
Operating Guide
Page 10
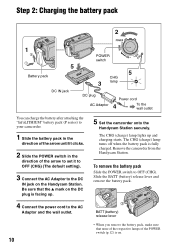
... of the arrow until it to OFF (CHG) (The default setting). 3 Connect the AC Adaptor to the DC IN jack on the Handycam Station. Remove the camcorder from the Handycam Station. Step 2: Charging the battery pack 2 1 5 Battery pack DC IN jack POWER switch 5 CHG 3 lamp DC plug AC Adaptor... battery after attaching the "InfoLITHIUM" battery pack (P series) to your camcorder. 1 Slide the battery pack in the direction of the POWER switch (p.12) is on. The CHG (charge) lamp lights up . 5 Set the camcorder onto the Handycam Station securely. Be sure that none of the respective lamps of the ...
... of the arrow until it to OFF (CHG) (The default setting). 3 Connect the AC Adaptor to the DC IN jack on the Handycam Station. Remove the camcorder from the Handycam Station. Step 2: Charging the battery pack 2 1 5 Battery pack DC IN jack POWER switch 5 CHG 3 lamp DC plug AC Adaptor... battery after attaching the "InfoLITHIUM" battery pack (P series) to your camcorder. 1 Slide the battery pack in the direction of the POWER switch (p.12) is on. The CHG (charge) lamp lights up . 5 Set the camcorder onto the Handycam Station securely. Be sure that none of the respective lamps of the ...
Operating Guide
Page 12
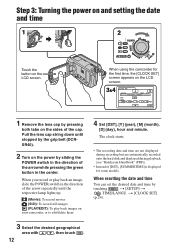
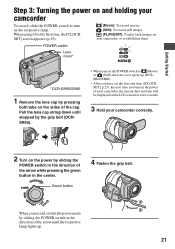
...and time are not displayed during recording but are automatically recorded onto the hard disk and displayed during playback (see "Handycam Handbook" (PDF)). • Instead of the cap. When resetting ...(month), [D] (day), hour and minute. Pull the lens cap string down until the respective lamp lights up. (Movie): To record movies (Still): To record still images (PLAY/EDIT): To play back... SET] (p.24). 3 Select the desired geographical area with / , then touch . 12 When using the camcorder for some models. Step 3: Turning the power on and setting the date and time 1 2 Touch the button...
...and time are not displayed during recording but are automatically recorded onto the hard disk and displayed during playback (see "Handycam Handbook" (PDF)). • Instead of the cap. When resetting ...(month), [D] (day), hour and minute. Pull the lens cap string down until the respective lamp lights up. (Movie): To record movies (Still): To record still images (PLAY/EDIT): To play back... SET] (p.24). 3 Select the desired geographical area with / , then touch . 12 When using the camcorder for some models. Step 3: Turning the power on and setting the date and time 1 2 Touch the button...
Operating Guide
Page 13
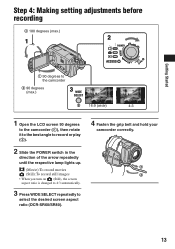
...:9 (wide) 4:3 1 Open the LCD screen 90 degrees to the camcorder (1), then rotate it to the best angle to record or play (2). 2 Slide the POWER switch in the direction of the arrow repeatedly until the respective lamp lights up. (Movie):To record movies (Still):To record still images •...; When you turn on (Still), the screen aspect ratio is changed to 4:3 automatically. 3 Press WIDE SELECT repeatedly to select the desired screen aspect ratio (DCR-SR60/SR80). 4 Fasten the grip belt and hold your camcorder correctly...
...:9 (wide) 4:3 1 Open the LCD screen 90 degrees to the camcorder (1), then rotate it to the best angle to record or play (2). 2 Slide the POWER switch in the direction of the arrow repeatedly until the respective lamp lights up. (Movie):To record movies (Still):To record still images •...; When you turn on (Still), the screen aspect ratio is changed to 4:3 automatically. 3 Press WIDE SELECT repeatedly to select the desired screen aspect ratio (DCR-SR60/SR80). 4 Fasten the grip belt and hold your camcorder correctly...
Operating Guide
Page 14
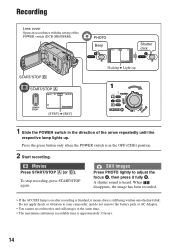
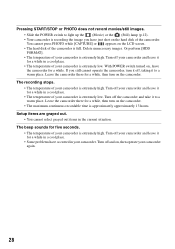
...written onto the hard disk. To stop recording, press START/STOP again. Movies Press START/STOP A (or B). When disappears, the image has been recorded. • If the ACCESS lamp is on after recording is in the direction of the POWER switch (DCR-SR60/SR80). Press ...the green button only when the POWER switch is finished, it fully B. START/STOP B START/STOP A 60min REC 00:01:00 START/ STOP P-MENU [STBY] b [REC] PHOTO Beep 60min 1.0M FINE 123 Shutter click P-MENU Flashing b Lights up . Still Images Press PHOTO lightly to your camcorder...
...written onto the hard disk. To stop recording, press START/STOP again. Movies Press START/STOP A (or B). When disappears, the image has been recorded. • If the ACCESS lamp is on after recording is in the direction of the POWER switch (DCR-SR60/SR80). Press ...the green button only when the POWER switch is finished, it fully B. START/STOP B START/STOP A 60min REC 00:01:00 START/ STOP P-MENU [STBY] b [REC] PHOTO Beep 60min 1.0M FINE 123 Shutter click P-MENU Flashing b Lights up . Still Images Press PHOTO lightly to your camcorder...
Operating Guide
Page 15
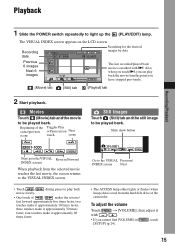
...it approximately 30 times faster, four touches make it with i. Movies Touch (Movie) tab and the movie to light up the (PLAY/EDIT) lamp. Beginning of the camcorder. Playback Recording/Playback 1 Slide the POWER switch repeatedly to be played back. Recording date 60min DEC 21 2006 ...DATE EDIT 12 : 34:01 Searching for the desired images by date Previous 6 images Next 6 images P-MENU The last recorded/played back movie is read from the hard disk...
...it approximately 30 times faster, four touches make it with i. Movies Touch (Movie) tab and the movie to light up the (PLAY/EDIT) lamp. Beginning of the camcorder. Playback Recording/Playback 1 Slide the POWER switch repeatedly to be played back. Recording date 60min DEC 21 2006 ...DATE EDIT 12 : 34:01 Searching for the desired images by date Previous 6 images Next 6 images P-MENU The last recorded/played back movie is read from the hard disk...
Operating Guide
Page 16
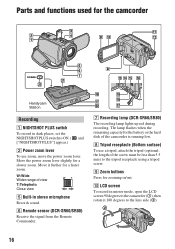
... side (2). 16 The lamp flashes when the remaining capacity for the battery or the hard disk of the camcorder is running low. 8 Tripod receptacle (Bottom surface) To use zoom, move the power... open the LCD screen 90 degrees to the camcorder (1), then rotate it further for a faster zoom. Parts and functions used for the camcorder Handycam Station Recording 1 NIGHTSHOT PLUS switch To record in...in stereo microphone Records sound. 6 Remote sensor (DCR-SR60/SR80) Receive the signal from the Remote Commander. 7 Recording lamp (DCR-SR60/SR80) The recording lamp lights up red during recording.
... side (2). 16 The lamp flashes when the remaining capacity for the battery or the hard disk of the camcorder is running low. 8 Tripod receptacle (Bottom surface) To use zoom, move the power... open the LCD screen 90 degrees to the camcorder (1), then rotate it further for a faster zoom. Parts and functions used for the camcorder Handycam Station Recording 1 NIGHTSHOT PLUS switch To record in...in stereo microphone Records sound. 6 Remote sensor (DCR-SR60/SR80) Receive the signal from the Remote Commander. 7 Recording lamp (DCR-SR60/SR80) The recording lamp lights up red during recording.

Operating Guide
Page 17
...the camcorder will be turned on EASY button in the center of the LCD screen. 4 Adjust the magnification with W (Wide angle)/T (Telephoto). qj DC IN jack Connect to the shoulder belt hook. ql REMOTE jack (DCR-SR60/SR80) Connect other devices qj qk ql ....... qd BACK LIGHT ...qs Shoulder belt hook To attach the shoulder belt, attach the shoulder belt (optional) with your camcorder. A frame appears on the camcorder. In this way, you want to display in "Recording". During Easy Handycam operation, you want to magnify. 2 Magnify the image with T (Telephoto). w; qa Speaker Sound...
...the camcorder will be turned on EASY button in the center of the LCD screen. 4 Adjust the magnification with W (Wide angle)/T (Telephoto). qj DC IN jack Connect to the shoulder belt hook. ql REMOTE jack (DCR-SR60/SR80) Connect other devices qj qk ql ....... qd BACK LIGHT ...qs Shoulder belt hook To attach the shoulder belt, attach the shoulder belt (optional) with your camcorder. A frame appears on the camcorder. In this way, you want to display in "Recording". During Easy Handycam operation, you want to magnify. 2 Magnify the image with T (Telephoto). w; qa Speaker Sound...
Operating Guide
Page 20
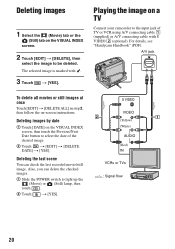
... the on-screen instructions. S VIDEO VIDEO (Yellow) (White) AUDIO (Red) IN VCRs or TVs : Signal flow 20 Playing the image on a TV Connect your camcorder to select the date of TV or VCR using A/V connecting cable 1 (supplied) or A/V connecting cable with . 3 Touch t [YES]. Deleting images by date 1... 1 Select the (Movie) tab or the (Still) tab on the VISUAL INDEX screen. 2 Touch [EDIT] t [DELETE], then select the image to light up the (Movie) or (Still) lamp, then touch . 2 Touch t [YES]. For details, see "Handycam Handbook" (PDF). The selected image is marked with S VIDEO 2 (optional).
... the on-screen instructions. S VIDEO VIDEO (Yellow) (White) AUDIO (Red) IN VCRs or TVs : Signal flow 20 Playing the image on a TV Connect your camcorder to select the date of TV or VCR using A/V connecting cable 1 (supplied) or A/V connecting cable with . 3 Touch t [YES]. Deleting images by date 1... 1 Select the (Movie) tab or the (Still) tab on the VISUAL INDEX screen. 2 Touch [EDIT] t [DELETE], then select the image to light up the (Movie) or (Still) lamp, then touch . 2 Touch t [YES]. For details, see "Handycam Handbook" (PDF). The selected image is marked with S VIDEO 2 (optional).
Operating Guide
Page 25
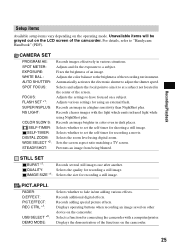
... fade in various situations. Automatically activates the electronic shutter to a subject. Adjusts the settings to "Handycam Handbook" (PDF). For details, refer to have focused on the camcorder. 25 Adjusts various settings for recording a still image. Records adding special picture effects. Records additional ... plus . Selects and adjusts the focal point to aim it to set the self-timer for connecting the camcorder with the light which emits infrared light while using digital zoom. Sets the screen aspect ratio matching a TV screen. Selects whether to at a ...
... fade in various situations. Automatically activates the electronic shutter to a subject. Adjusts the settings to "Handycam Handbook" (PDF). For details, refer to have focused on the camcorder. 25 Adjusts various settings for recording a still image. Records adding special picture effects. Records additional ... plus . Selects and adjusts the focal point to aim it to set the self-timer for connecting the camcorder with the light which emits infrared light while using digital zoom. Sets the screen aspect ratio matching a TV screen. Selects whether to at a ...
Operating Guide
Page 26
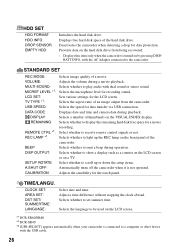
...when the camcorder is turned on the LCD screen. *1 DCR-SR60/SR80 *2 DCR-SR40 *3 [USB SELECT] appears automatically when your camcorder is not operated. Selects the aspect ratio of the camcorder. TIME/...hard disk drive from the camcorder. BEEP: Selects whether to display the remaining hard disk free space for the LCD screen. Displays free hard disk space of a movie. STANDARD SET REC MODE: Selects image quality of the hard disk...: Select whether to light up or down the setup items. A.SHUT OFF: Automatically turns off the camcorder when it is connected to the...
...when the camcorder is turned on the LCD screen. *1 DCR-SR60/SR80 *2 DCR-SR40 *3 [USB SELECT] appears automatically when your camcorder is not operated. Selects the aspect ratio of the camcorder. TIME/...hard disk drive from the camcorder. BEEP: Selects whether to display the remaining hard disk free space for the LCD screen. Displays free hard disk space of a movie. STANDARD SET REC MODE: Selects image quality of the hard disk...: Select whether to light up or down the setup items. A.SHUT OFF: Automatically turns off the camcorder when it is connected to the...
Operating Guide
Page 28
... a while in a cool place. • Some problems have just shot on the camcorder. Leave the camcorder there for a while, then turn on the hard disk of your camcorder is extremely low. Or perform [HDD FORMAT]. • The temperature of the camcorder. Turn off , taking it to light up the (Movie) or the (Still) lamp (p.12). • Your...
... a while in a cool place. • Some problems have just shot on the camcorder. Leave the camcorder there for a while, then turn on the hard disk of your camcorder is extremely low. Or perform [HDD FORMAT]. • The temperature of the camcorder. Turn off , taking it to light up the (Movie) or the (Still) lamp (p.12). • Your...

Operating Guide
Page 30
(Warning indicator pertaining to camera-shake warning)* • The amount of lights is unsteady, so camerashake easily occurs. Use the flash. • The camcorder is not sufficient, so camera-shake easily occurs. Hold the camcorder steady with both hands and record the image. However, note that the camerashake warning indicator does not disappear. * You hear a melody when the warning indicators appear on the screen. 30
(Warning indicator pertaining to camera-shake warning)* • The amount of lights is unsteady, so camerashake easily occurs. Use the flash. • The camcorder is not sufficient, so camera-shake easily occurs. Hold the camcorder steady with both hands and record the image. However, note that the camerashake warning indicator does not disappear. * You hear a melody when the warning indicators appear on the screen. 30
Operating Guide
Page 32
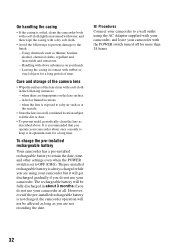
...casing in contact with a soft cloth in hot or humid locations - The rechargeable battery will get discharged gradually if you are fingerprints on your camcorder at the seaside. • Store the lens in optimum state for a long period of the lens clean with rubber or vinyl objects for...the date, time, and other settings even when the POWER switch is soiled, clean the camcorder body with a soft cloth lightly moistened with water, and then wipe the casing with your camcorder, and leave your camcorder about once a month to keep it will be affected as long as thinner, benzine, ...
...casing in contact with a soft cloth in hot or humid locations - The rechargeable battery will get discharged gradually if you are fingerprints on your camcorder at the seaside. • Store the lens in optimum state for a long period of the lens clean with rubber or vinyl objects for...the date, time, and other settings even when the POWER switch is soiled, clean the camcorder body with a soft cloth lightly moistened with water, and then wipe the casing with your camcorder, and leave your camcorder about once a month to keep it will be affected as long as thinner, benzine, ...

Handycam Handbook
Page 7
...points and/or bright points (white, red, blue, or green in Germany, and Sony Corporation, and produces superior images. You also cannot play back both movies and still ... not aim at dusk. Take images of light from what you need a NTSC system-based TV. • Television programs, films, video tapes, and other DCR-SR40/ SR60/SR80. On recording • Before starting...color) that appear constantly on a TV, you see. • Design and specifications of this camcorder and accessories are subject to malfunction. Compatibility of images • You cannot play back images recorded...
...points and/or bright points (white, red, blue, or green in Germany, and Sony Corporation, and produces superior images. You also cannot play back both movies and still ... not aim at dusk. Take images of light from what you need a NTSC system-based TV. • Television programs, films, video tapes, and other DCR-SR40/ SR60/SR80. On recording • Before starting...color) that appear constantly on a TV, you see. • Design and specifications of this camcorder and accessories are subject to malfunction. Compatibility of images • You cannot play back images recorded...
Handycam Handbook
Page 10
To adjust the exposure for backlit subjects (BACK LIGHT) To adjust the focus for an off center subject To fix...free hard disk space To turn off the operation confirmation beep To initialize the settings (Reset) Other part names and functions Checking/Deleting the last scene (Review/Review deleting 38 Indicators displayed during recording/playback 39 Remote Commander (DCR-SR60/SR80... 41 Playing the image on a TV 42 Saving images 44 Deleting images 45 Using the Setup items Using the Setup items 47 Setup items 49 CAMERA SET 51 Settings to adjust your camcorder to the...
To adjust the exposure for backlit subjects (BACK LIGHT) To adjust the focus for an off center subject To fix...free hard disk space To turn off the operation confirmation beep To initialize the settings (Reset) Other part names and functions Checking/Deleting the last scene (Review/Review deleting 38 Indicators displayed during recording/playback 39 Remote Commander (DCR-SR60/SR80... 41 Playing the image on a TV 42 Saving images 44 Deleting images 45 Using the Setup items Using the Setup items 47 Setup items 49 CAMERA SET 51 Settings to adjust your camcorder to the...

Handycam Handbook
Page 18
The CHG (charge) lamp turns off when the battery pack is on the camcorder. 5 Set the camcorder onto the Handycam Station securely. POWER switch DC IN jack CHG lamp The CHG (charge) lamp lights up to OFF (CHG), then connect the AC Adaptor directly to the DC IN jack on . 18 Slide the BATT (...battery) release lever and remove the battery pack. Be sure to set the camcorder to...
The CHG (charge) lamp turns off when the battery pack is on the camcorder. 5 Set the camcorder onto the Handycam Station securely. POWER switch DC IN jack CHG lamp The CHG (charge) lamp lights up to OFF (CHG), then connect the AC Adaptor directly to the DC IN jack on . 18 Slide the BATT (...battery) release lever and remove the battery pack. Be sure to set the camcorder to...

Handycam Handbook
Page 20
...176;C (50-86°F) is recommended.) • Available recording and playback time will be shorter when you use your camcorder or the Handycam Station, even when the power cord is removed from the wall outlet. • Do not use the AC Adaptor placed ...battery pack is damaged. - PRECAUTION • Even if your camcorder. DCR-SR40 Battery pack NP-FP50 (supplied) NP-FP60 NP-FP70 NP-FP71 NP-FP90 Playback time 140 210 295 350 525 DCR-SR60/SR80 Battery pack NP-FP50 (supplied) NP-FP60 NP-FP70...that you use an NP-FP70, NPFP71 or NP-FP90 battery pack when a video light (optional) is attached.
...176;C (50-86°F) is recommended.) • Available recording and playback time will be shorter when you use your camcorder or the Handycam Station, even when the power cord is removed from the wall outlet. • Do not use the AC Adaptor placed ...battery pack is damaged. - PRECAUTION • Even if your camcorder. DCR-SR40 Battery pack NP-FP50 (supplied) NP-FP60 NP-FP70 NP-FP71 NP-FP90 Playback time 140 210 295 350 525 DCR-SR60/SR80 Battery pack NP-FP50 (supplied) NP-FP60 NP-FP70...that you use an NP-FP70, NPFP71 or NP-FP90 battery pack when a video light (optional) is attached.
Handycam Handbook
Page 21
... record, slide the POWER switch to edit/delete them POWER switch Lens cover* * DCR-SR60/SR80 1 Remove the lens cap by pressing both tabs on the sides of your camcorder, the current date and time will be displayed on the LCD screen for the first time, the [CLOCK SET] screen appears (p.25).... (Still): To record still images (PLAY/EDIT): To play back images on your camcorder correctly. 2 Turn on the respective lamp. Green button 4 Fasten the grip belt. Pull the lens cap string down until the respective lamp lights up (DCRSR60/SR80). • After you turn on the power by sliding the ...
... record, slide the POWER switch to edit/delete them POWER switch Lens cover* * DCR-SR60/SR80 1 Remove the lens cap by pressing both tabs on the sides of your camcorder, the current date and time will be displayed on the LCD screen for the first time, the [CLOCK SET] screen appears (p.25).... (Still): To record still images (PLAY/EDIT): To play back images on your camcorder correctly. 2 Turn on the respective lamp. Green button 4 Fasten the grip belt. Pull the lens cap string down until the respective lamp lights up (DCRSR60/SR80). • After you turn on the power by sliding the ...

Handycam Handbook
Page 26
... 9,999. 26 POWER switch • You cannot change the aspect ratio in the 16:9 (wide) mode is recommended. To play back images after connecting your camcorder to a TV Set [TV TYPE] to [16:9] or [4:3] according to your TV (16:9/4:3) (p.42). • When viewing 16:9 (wide) images with [TV ...TYPE] set to [OLD MOVIE] (p.57) • Differences in the direction of the arrow to light up the (Still) lamp. Step 7: Selecting the aspect ratio (16:9 or 4:3) of the recording image (DCR-SR60/SR80) By recording in the 16:9 (wide) mode, you can enjoy wide-angle, high-resolution images. &#...
... 9,999. 26 POWER switch • You cannot change the aspect ratio in the 16:9 (wide) mode is recommended. To play back images after connecting your camcorder to a TV Set [TV TYPE] to [16:9] or [4:3] according to your TV (16:9/4:3) (p.42). • When viewing 16:9 (wide) images with [TV ...TYPE] set to [OLD MOVIE] (p.57) • Differences in the direction of the arrow to light up the (Still) lamp. Step 7: Selecting the aspect ratio (16:9 or 4:3) of the recording image (DCR-SR60/SR80) By recording in the 16:9 (wide) mode, you can enjoy wide-angle, high-resolution images. &#...

Handycam Handbook
Page 27
...LIGHT (p.35) • Press and hold DISP/BATT INFO (p.23) • Zoom lever/buttons (during Easy Handycam operation Touch [SETUP] to 26) before operation. 27 Invalid buttons during Easy Handycam operation. • To perform settings such as focusing manually and adding special effects, cancel Easy Handycam operation. If you set . using your camcorder... with just one press of your camcorder during playback) Now try recording page 28 Complete the ...
...LIGHT (p.35) • Press and hold DISP/BATT INFO (p.23) • Zoom lever/buttons (during Easy Handycam operation Touch [SETUP] to 26) before operation. 27 Invalid buttons during Easy Handycam operation. • To perform settings such as focusing manually and adding special effects, cancel Easy Handycam operation. If you set . using your camcorder... with just one press of your camcorder during playback) Now try recording page 28 Complete the ...


