
Operating Guide
Page 3
... set . When the power cord or plug is provided. - Servicing Do not attempt to restore the set exhibits a distinct change in safe operating condition. 3 Use a cloth lightly dampened with a cloth or other hazards. Use only a cart, stand, tripod, bracket, or table recommended by being dropped, or the cabinet has been damaged. - This will often require extensive work by a qualified technician to service the set...
... set . When the power cord or plug is provided. - Servicing Do not attempt to restore the set exhibits a distinct change in safe operating condition. 3 Use a cloth lightly dampened with a cloth or other hazards. Use only a cart, stand, tripod, bracket, or table recommended by being dropped, or the cabinet has been damaged. - This will often require extensive work by a qualified technician to service the set...
Operating Guide
Page 6
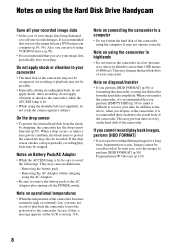
... the internal hard disk from the hard disk completely. Note on operational temperatures • When the temperature of the camcorder becomes extremely high or extremely low, you may appear different from what you save the image data on a DVD using the computer. Note on using a digital still camera, and thus may not record or playback the camcorder to provide protection to a malfunction of the POWER switch (p.12) or the ACCESS lamp...
... the internal hard disk from the hard disk completely. Note on operational temperatures • When the temperature of the camcorder becomes extremely high or extremely low, you may appear different from what you save the image data on a DVD using the computer. Note on using a digital still camera, and thus may not record or playback the camcorder to provide protection to a malfunction of the POWER switch (p.12) or the ACCESS lamp...
Operating Guide
Page 14
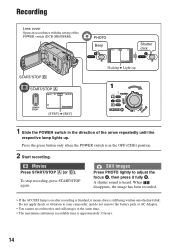
.../ STOP P-MENU [STBY] b [REC] PHOTO Beep 60min 1.0M FINE 123 Shutter click P-MENU Flashing b Lights up 1 1 Slide the POWER switch in accordance with the setting of the arrow repeatedly until the respective lamp lights up. Press the green button only when the POWER switch is still being written onto the hard disk. Still Images Press PHOTO lightly to your camcorder, and do not remove the battery pack or AC Adaptor. • You cannot record movies...
.../ STOP P-MENU [STBY] b [REC] PHOTO Beep 60min 1.0M FINE 123 Shutter click P-MENU Flashing b Lights up 1 1 Slide the POWER switch in accordance with the setting of the arrow repeatedly until the respective lamp lights up. Press the green button only when the POWER switch is still being written onto the hard disk. Still Images Press PHOTO lightly to your camcorder, and do not remove the battery pack or AC Adaptor. • You cannot record movies...

Operating Guide
Page 17
... camcorder. The accessory can use some of the buttons on the LCD screen. 3 Touch the portion you want to the shoulder belt hook. ql REMOTE jack (DCR-SR60/SR80) Connect other devices qj qk ql ....... qd BACK LIGHT button To adjust the exposure for the screen display settings or check the remaining battery power. qh EASY button By pressing the EASY button, most of the AC Adaptor. Playback 2 Power zoom lever 9 Zoom buttons You can change the settings...
... camcorder. The accessory can use some of the buttons on the LCD screen. 3 Touch the portion you want to the shoulder belt hook. ql REMOTE jack (DCR-SR60/SR80) Connect other devices qj qk ql ....... qd BACK LIGHT button To adjust the exposure for the screen display settings or check the remaining battery power. qh EASY button By pressing the EASY button, most of the AC Adaptor. Playback 2 Power zoom lever 9 Zoom buttons You can change the settings...
Operating Guide
Page 25
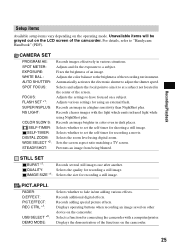
... the size for recording a still image. Displays operating buttons when recording an image saved on other device on a subject. STILL SET BURST *1: QUALITY: IMAGE SIZE *1: Records several still images one after another. PICT.APPLI. Recording/Playback Setup items Available setup items vary depending on the operating mode. Selects whether to a subject. Selects a function for shooting a still image. CAMERA SET PROGRAM AE: SPOT METER: EXPOSURE: WHITE BAL.: AUTO SHUTTER: SPOT FOCUS: FOCUS: FLASH SET *1: SUPER NSPLUS: NS LIGHT: COLOR SLOW S: SELF-TIMER: SELF-TIMER: DIGITAL ZOOM...
... the size for recording a still image. Displays operating buttons when recording an image saved on other device on a subject. STILL SET BURST *1: QUALITY: IMAGE SIZE *1: Records several still images one after another. PICT.APPLI. Recording/Playback Setup items Available setup items vary depending on the operating mode. Selects whether to a subject. Selects a function for shooting a still image. CAMERA SET PROGRAM AE: SPOT METER: EXPOSURE: WHITE BAL.: AUTO SHUTTER: SPOT FOCUS: FOCUS: FLASH SET *1: SUPER NSPLUS: NS LIGHT: COLOR SLOW S: SELF-TIMER: SELF-TIMER: DIGITAL ZOOM...
Operating Guide
Page 26
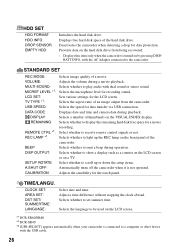
...cable. 26 USB SPEED: Selects the speed for the touch panel. TIME/LANGU. Prevents data on the LCD screen. *1 DCR-SR60/SR80 *2 DCR-SR40 *3 [USB SELECT] appears automatically when your camcorder is connected to set summer time. Displays this item only when the camcorder is not operated. DATA CODE: Displays date and time and camera data during a movie playback. REMOTE CTRL *1: Select whether to the camcorder. STANDARD SET REC MODE: Selects image quality of thumbnails on a TV. Selects the aspect ratio of the hard disk drive. VOLUME: Adjusts the volume...
...cable. 26 USB SPEED: Selects the speed for the touch panel. TIME/LANGU. Prevents data on the LCD screen. *1 DCR-SR60/SR80 *2 DCR-SR40 *3 [USB SELECT] appears automatically when your camcorder is connected to set summer time. Displays this item only when the camcorder is not operated. DATA CODE: Displays date and time and camera data during a movie playback. REMOTE CTRL *1: Select whether to the camcorder. STANDARD SET REC MODE: Selects image quality of thumbnails on a TV. Selects the aspect ratio of the hard disk drive. VOLUME: Adjusts the volume...
Handycam Handbook
Page 4
... following the operating instructions. Unauthorized substitutions may result in the operating instructions. Lightning For added protection for this indicates a need for long periods of any service or repairs to the set to normal operation. - When the power cord or plug is in safe operating condition. 4 Safety Check Upon completion of time, unplug it is left unattended and unused for service. If the set does not operate normally when...
... following the operating instructions. Unauthorized substitutions may result in the operating instructions. Lightning For added protection for this indicates a need for long periods of any service or repairs to the set to normal operation. - When the power cord or plug is in safe operating condition. 4 Safety Check Upon completion of time, unplug it is left unattended and unused for service. If the set does not operate normally when...

Handycam Handbook
Page 7
.... To view your camcorder. Notes on the Setup items, LCD screen and lens • A setup item that appear constantly on the LCD screen. Black point White, red, blue or green point • Exposing the LCD screen or the lens to change without any problems. • Compensation for Modulation Transfer Function. It adopts the MTF* measurement system for effective use. On this Handbook • The images of the LCD screen used on this Handbook are captured using extremely high...
.... To view your camcorder. Notes on the Setup items, LCD screen and lens • A setup item that appear constantly on the LCD screen. Black point White, red, blue or green point • Exposing the LCD screen or the lens to change without any problems. • Compensation for Modulation Transfer Function. It adopts the MTF* measurement system for effective use. On this Handbook • The images of the LCD screen used on this Handbook are captured using extremely high...
Handycam Handbook
Page 8
... save your image data periodically after turning off the POWER switch. Note on disposal/transfer • If you perform [HDD FORMAT] (p.58) or formatting the camcorder, you repeat recording/deleting images for a long time, fragmentation occurs. If you cannot record/play back may not be sure to perform [HDD FORMAT] (p.58). On the drop sensor • To protect the internal hard disk from the hard disk completely. Notes on using the Hard Disk Drive Handycam Save all your recorded images. When you save...
... save your image data periodically after turning off the POWER switch. Note on disposal/transfer • If you perform [HDD FORMAT] (p.58) or formatting the camcorder, you repeat recording/deleting images for a long time, fragmentation occurs. If you cannot record/play back may not be sure to perform [HDD FORMAT] (p.58). On the drop sensor • To protect the internal hard disk from the hard disk completely. Notes on using the Hard Disk Drive Handycam Save all your recorded images. When you save...
Handycam Handbook
Page 9
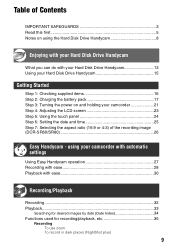
... on using your camcorder with automatic settings Using Easy Handycam operation 27 Recording with ease 28 Playback with your Hard Disk Drive Handycam 13 Using your Hard Disk Drive Handycam 15 Getting Started Step 1: Checking supplied items 16 Step 2: Charging the battery pack 17 Step 3: Turning the power on and holding your Hard Disk Drive Handycam What you can do with ease 30 Recording/Playback Recording 32 Playback 33 Searching for desired images by date (Date Index 34 Functions used for recording/playback, etc 35 Recording To use zoom To record...
... on using your camcorder with automatic settings Using Easy Handycam operation 27 Recording with ease 28 Playback with your Hard Disk Drive Handycam 13 Using your Hard Disk Drive Handycam 15 Getting Started Step 1: Checking supplied items 16 Step 2: Charging the battery pack 17 Step 3: Turning the power on and holding your Hard Disk Drive Handycam What you can do with ease 30 Recording/Playback Recording 32 Playback 33 Searching for desired images by date (Date Index 34 Functions used for recording/playback, etc 35 Recording To use zoom To record...
Handycam Handbook
Page 10
...) To use Playback zoom Recording/playback To check the remaining battery To check available free hard disk space To turn off the operation confirmation beep To initialize the settings (Reset) Other part names and functions Checking/Deleting the last scene (Review/Review deleting 38 Indicators displayed during recording/playback 39 Remote Commander (DCR-SR60/SR80 41 Playing the image on a TV 42 Saving images 44 Deleting images 45 Using the Setup items Using the Setup items 47 Setup items 49 CAMERA SET 51 Settings to adjust your camcorder to the recording conditions (EXPOSURE/WHITE BAL...
...) To use Playback zoom Recording/playback To check the remaining battery To check available free hard disk space To turn off the operation confirmation beep To initialize the settings (Reset) Other part names and functions Checking/Deleting the last scene (Review/Review deleting 38 Indicators displayed during recording/playback 39 Remote Commander (DCR-SR60/SR80 41 Playing the image on a TV 42 Saving images 44 Deleting images 45 Using the Setup items Using the Setup items 47 Setup items 49 CAMERA SET 51 Settings to adjust your camcorder to the recording conditions (EXPOSURE/WHITE BAL...
Handycam Handbook
Page 32
... to light up A shutter sound is created automatically. • For image quality of movies, see [REC MODE] (p.60), of still images, see [ IMAGE SIZE] (p.56). 32 PHOTO POWER switch START/STOP A ACCESS lamp * DCR-SR60/SR80 Press the green button only when the POWER switch is still being written onto the hard disk. Zoom lever START/STOP B 1 Slide the POWER switch in the direction of the POWER switch. Recording/Playback Recording Lens cover* Opens in accordance with the setting of the arrow repeatedly to your camcorder...
... to light up A shutter sound is created automatically. • For image quality of movies, see [REC MODE] (p.60), of still images, see [ IMAGE SIZE] (p.56). 32 PHOTO POWER switch START/STOP A ACCESS lamp * DCR-SR60/SR80 Press the green button only when the POWER switch is still being written onto the hard disk. Zoom lever START/STOP B 1 Slide the POWER switch in the direction of the POWER switch. Recording/Playback Recording Lens cover* Opens in accordance with the setting of the arrow repeatedly to your camcorder...
Handycam Handbook
Page 37
... the settings (Reset) ... qa Press RESET qa to operate your camcorder. 9 Recording lamp (DCR-SR60/SR80) The recording lamp lights up red during recording (p.62). Press the button while BATTERY INFO appears on page 63. BATTERY INFO BATTERY CHARGE LEVEL REC TIME AVAILABLE LCD SCREEN: 90 Remaining battery (approx.) Recording capacity (approx.) To check available free hard disk space 5 See [HDD INFO] (on the screen for the battery or the hard disk of still images are not initialized.) Other part names and functions 7 Built-in stereo microphone...
... the settings (Reset) ... qa Press RESET qa to operate your camcorder. 9 Recording lamp (DCR-SR60/SR80) The recording lamp lights up red during recording (p.62). Press the button while BATTERY INFO appears on page 63. BATTERY INFO BATTERY CHARGE LEVEL REC TIME AVAILABLE LCD SCREEN: 90 Remaining battery (approx.) Recording capacity (approx.) To check available free hard disk space 5 See [HDD INFO] (on the screen for the battery or the hard disk of still images are not initialized.) Other part names and functions 7 Built-in stereo microphone...
Handycam Handbook
Page 42
...:9/4:3) (DCR-SR60/ SR80) Change the setting according to [16:9 WIDE]. To set [TV TYPE] to the screen aspect ratio of the A/V connecting cable with an S VIDEO cable (optional), higher quality images can be connected. • To view the recorded images on . 1 Slide the POWER switch to light up the (PLAY/EDIT) lamp. 2 Touch t [SETUP] t STANDARD SET t [TV TYPE] t [16:9] or [4:3] t . • When you will not output audio. • You can display the counter on the VCR. Connect the white...
...:9/4:3) (DCR-SR60/ SR80) Change the setting according to [16:9 WIDE]. To set [TV TYPE] to the screen aspect ratio of the A/V connecting cable with an S VIDEO cable (optional), higher quality images can be connected. • To view the recorded images on . 1 Slide the POWER switch to light up the (PLAY/EDIT) lamp. 2 Touch t [SETUP] t STANDARD SET t [TV TYPE] t [16:9] or [4:3] t . • When you will not output audio. • You can display the counter on the VCR. Connect the white...
Handycam Handbook
Page 79
... camcorder onto the Handycam Station, then slide the POWER switch to turn on the [USB SELECT] screen. When you install the application, you insert the connector in this Handbook, the application for English version is used. If a screen asking whether to format the hard disk drive appears, select [NO]. 6 Operate your Macintosh to your Macintosh. On copyrights Music works, sound recording or other third party musical contents you copy image files to the hard disk drive...
... camcorder onto the Handycam Station, then slide the POWER switch to turn on the [USB SELECT] screen. When you install the application, you insert the connector in this Handbook, the application for English version is used. If a screen asking whether to format the hard disk drive appears, select [NO]. 6 Operate your Macintosh to your Macintosh. On copyrights Music works, sound recording or other third party musical contents you copy image files to the hard disk drive...
Handycam Handbook
Page 111
Remove the USB cable from the [Hide file extensions for known file types] under Advanced Settings. 3 Click [OK]. 111 Troubleshooting You cannot copy image data from your camcorder to a computer. • Set [USB SPEED] to [FULL SPEED] in the window folder t [Folder option...] t [View] tab. 2 Remove the check mark from the Handycam Station first (p.86), then touch [END] on your camcorder cannot be played back correctly. • When you connect your camcorder to a computer not compatible with...
Remove the USB cable from the [Hide file extensions for known file types] under Advanced Settings. 3 Click [OK]. 111 Troubleshooting You cannot copy image data from your camcorder to a computer. • Set [USB SPEED] to [FULL SPEED] in the window folder t [Folder option...] t [View] tab. 2 Remove the check mark from the Handycam Station first (p.86), then touch [END] on your camcorder cannot be played back correctly. • When you connect your camcorder to a computer not compatible with...
Handycam Handbook
Page 124
... created for connecting with a camcorder is a standard for direct printing from digital cameras to produce a clear image so the recording time is ".JPG". x Formatting The process of disc space is used to printers. Hard Disk Drive Handycam records movies in which enable you cannot see page 111. The higher the recording quality, the shorter the recording time. You can solve the condition by performing [HDD FORMAT] (p.58). x Thumbnail Reduced-size images which files are 3 modes: HQ...
... created for connecting with a camcorder is a standard for direct printing from digital cameras to produce a clear image so the recording time is ".JPG". x Formatting The process of disc space is used to printers. Hard Disk Drive Handycam records movies in which enable you cannot see page 111. The higher the recording quality, the shorter the recording time. You can solve the condition by performing [HDD FORMAT] (p.58). x Thumbnail Reduced-size images which files are 3 modes: HQ...
Handycam Handbook
Page 128
... 37, 62 Recording mode ...........60, 124 Recording time 19 REC CTRL 73 REC LAMP 62 REC MODE 60 REMAINING 62 Remaining battery 37 Remote Commander 41 REMOTE CTRL 62 REMOTE jack 76 Remote sensor 37 Removing the USB cable .....86 RESET 37 Review 38 Review deleting 38 S Saving images 15, 44 128 Searching for desired images by date 34 Self-diagnosis display ........ 113 SELF-TIMER 54, 109 SEPIA 57 Setup 47 CAMERA SET 51 HDD SET 58 Personal Menu ........ 47, 64...
... 37, 62 Recording mode ...........60, 124 Recording time 19 REC CTRL 73 REC LAMP 62 REC MODE 60 REMAINING 62 Remaining battery 37 Remote Commander 41 REMOTE CTRL 62 REMOTE jack 76 Remote sensor 37 Removing the USB cable .....86 RESET 37 Review 38 Review deleting 38 S Saving images 15, 44 128 Searching for desired images by date 34 Self-diagnosis display ........ 113 SELF-TIMER 54, 109 SEPIA 57 Setup 47 CAMERA SET 51 HDD SET 58 Personal Menu ........ 47, 64...
Marketing Specifications
Page 1
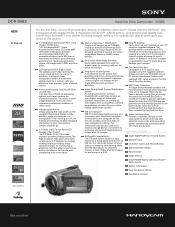
...'s hard drive for archiving purposes and viewing at a later time; Memory Stick Duo™ Media Slot6 Capture still images up to 1152x864 resolution directly onto Memory Stick Duo media for easy transfer to PCs for editing. Digital still images will be sharp and clear with the HDR-CX7. The VRD-VC30 allows for easy transfer of both Video and Still images for archiving on the supplied Handycam Station cradle provides quick connections to a compatible...
...'s hard drive for archiving purposes and viewing at a later time; Memory Stick Duo™ Media Slot6 Capture still images up to 1152x864 resolution directly onto Memory Stick Duo media for easy transfer to PCs for editing. Digital still images will be sharp and clear with the HDR-CX7. The VRD-VC30 allows for easy transfer of both Video and Still images for archiving on the supplied Handycam Station cradle provides quick connections to a compatible...
Marketing Specifications
Page 2
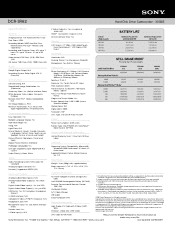
... 92127 •1.800.222.7669 •www.sony.com Last Updated: 03/06/2009 Available storage capacity of Carl Zeiss. Screen Images Simulated UPC Code: 027242712362 Please visit the Dealer Network for use with compatible Sony InfoLITHIUM® batteries. 2. DCR-SR62 Hard Disk Drive Camcorder - 30GB5 Specifications General Imaging Device: 1/6" Advanced HAD™ CCD Pixel Gross: 1070K Recording Media: 30GB5 Hard Disk Drive, Memory Stick PRO Duo™ Media (sold separately) Recording and Playback Times: HQ: up to 7 hours, SP: up...
... 92127 •1.800.222.7669 •www.sony.com Last Updated: 03/06/2009 Available storage capacity of Carl Zeiss. Screen Images Simulated UPC Code: 027242712362 Please visit the Dealer Network for use with compatible Sony InfoLITHIUM® batteries. 2. DCR-SR62 Hard Disk Drive Camcorder - 30GB5 Specifications General Imaging Device: 1/6" Advanced HAD™ CCD Pixel Gross: 1070K Recording Media: 30GB5 Hard Disk Drive, Memory Stick PRO Duo™ Media (sold separately) Recording and Playback Times: HQ: up to 7 hours, SP: up...


