Handycam® Handbook
Page 2
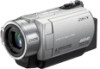
...terminal may cause a malfunction of "Memory Stick" you set the camcorder onto the Handycam Station or remove the camcorder from being broken or recorded images from it. When using the camcorder • Do not hold the camcorder by the following when either of the respective lamps of memory card...use "Memory Stick Duo" marked with a USB cable etc., be sure to insert the "Memory Stick Duo" into the Memory Stick Duo Adaptor. Memory Stick Duo Adaptor On using a "Memory Stick Duo" with your camcorder" (p. 114). • To prevent the hard disk from being lost, do not do the ...
...terminal may cause a malfunction of "Memory Stick" you set the camcorder onto the Handycam Station or remove the camcorder from being broken or recorded images from it. When using the camcorder • Do not hold the camcorder by the following when either of the respective lamps of memory card...use "Memory Stick Duo" marked with a USB cable etc., be sure to insert the "Memory Stick Duo" into the Memory Stick Duo Adaptor. Memory Stick Duo Adaptor On using a "Memory Stick Duo" with your camcorder" (p. 114). • To prevent the hard disk from being lost, do not do the ...

Handycam® Handbook
Page 12
...) Operating Guide (1) 12 Rechargeable battery pack NP-FH40 (1) (p. 13, 112) (DCR-SR32E/ SR33E/SR42E/SR52E/SR62E/SR72E/ SR82E) NP-FH60 (1) (p. 13, 112) (DCR-SR190E/ SR200E/SR290E/SR300E) Handycam Station (1) (p. 13) A/V connecting cable (1) (p. 35, 45) USB cable (1) (p. 46, 78, 81) 21-pin adaptor (p. 36) For the model with your camcorder. AC Adaptor (1) (p. 13) Mains lead (1) (p. 13) Wireless Remote Commander...
...) Operating Guide (1) 12 Rechargeable battery pack NP-FH40 (1) (p. 13, 112) (DCR-SR32E/ SR33E/SR42E/SR52E/SR62E/SR72E/ SR82E) NP-FH60 (1) (p. 13, 112) (DCR-SR190E/ SR200E/SR290E/SR300E) Handycam Station (1) (p. 13) A/V connecting cable (1) (p. 35, 45) USB cable (1) (p. 46, 78, 81) 21-pin adaptor (p. 36) For the model with your camcorder. AC Adaptor (1) (p. 13) Mains lead (1) (p. 13) Wireless Remote Commander...

Handycam® Handbook
Page 46
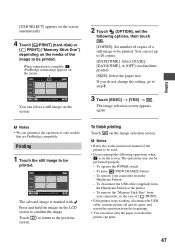
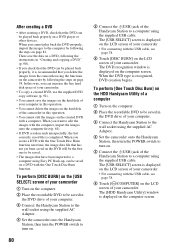
...stop the recording device, and then your camcorder to the printer 1 Connect the Handycam Station to the wall socket using the supplied AC Adaptor. 2 Set the camcorder onto the Handycam Station securely, then turn the POWER switch to turn on. 3 Connect the (USB) jack of the recording device. 4...them into your camcorder, and press (VIEW IMAGES) button. Connect your camcorder to a computer. If your recording device has an input selector, set it on the recording device. Printing recorded images (PictBridge compliant printer) You can print out still images using the supplied USB cable. 46 To ...
...stop the recording device, and then your camcorder to the printer 1 Connect the Handycam Station to the wall socket using the supplied AC Adaptor. 2 Set the camcorder onto the Handycam Station securely, then turn the POWER switch to turn on. 3 Connect the (USB) jack of the recording device. 4...them into your camcorder, and press (VIEW IMAGES) button. Connect your camcorder to a computer. If your recording device has an input selector, set it on the recording device. Printing recorded images (PictBridge compliant printer) You can print out still images using the supplied USB cable. 46 To ...
Handycam® Handbook
Page 47
... is on the image selection screen. To finish printing Touch on the screen. To remove your camcorder, in the case of [ PRINT] • If the printer stops working, disconnect the USB cable, turn the printer off and on again, and restart the operation from the beginning. •... 4 Touch [ PRINT] (hard disk) or [ PRINT] ("Memory Stick Duo") depending on the media of the image to 20 copies. [DATE/TIME]: Select [DATE], [DAY&TIME], or [OFF] (no date/time printed). [SIZE]: Select the paper size. To disconnect the USB cable (supplied) from the Handycam Station - The selected image is...
... is on the image selection screen. To finish printing Touch on the screen. To remove your camcorder, in the case of [ PRINT] • If the printer stops working, disconnect the USB cable, turn the printer off and on again, and restart the operation from the beginning. •... 4 Touch [ PRINT] (hard disk) or [ PRINT] ("Memory Stick Duo") depending on the media of the image to 20 copies. [DATE/TIME]: Select [DATE], [DAY&TIME], or [OFF] (no date/time printed). [SIZE]: Select the paper size. To disconnect the USB cable (supplied) from the Handycam Station - The selected image is...

Handycam® Handbook
Page 74
... system: Direct Sound compatible sound card Memory: 256 MB or more Hard disk: Available free hard disk space for installation required: Approximately 600 MB (for creating a DVD, 5 GB or more may damage the cable or your camcorder with the USB cable or other language (p. 75). CPU: Intel Pentium III 1 GHz or...images and images on a DVD created subsequently will not work properly due to the AC Adaptor as standard), DVD burner (CD-ROM drive is necessary for English version is required. Use a special caution for preventing damages and malfunctions of the computer. • On screenshots...
... system: Direct Sound compatible sound card Memory: 256 MB or more Hard disk: Available free hard disk space for installation required: Approximately 600 MB (for creating a DVD, 5 GB or more may damage the cable or your camcorder with the USB cable or other language (p. 75). CPU: Intel Pentium III 1 GHz or...images and images on a DVD created subsequently will not work properly due to the AC Adaptor as standard), DVD burner (CD-ROM drive is necessary for English version is required. Use a special caution for preventing damages and malfunctions of the computer. • On screenshots...
Handycam® Handbook
Page 75
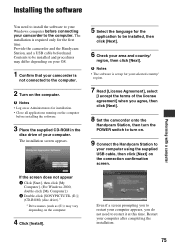
... software. 3 Place the supplied CD-ROM in the disc drive of the license agreement] when you agree, then click [Next]. 8 Set the camcorder onto the Handycam Station, then turn the POWER switch to turn on. 9 Connect the Handycam Station to your computer using the supplied USB cable, then click [Next] on the computer. 4 Click [Install]. b Notes...
... software. 3 Place the supplied CD-ROM in the disc drive of the license agreement] when you agree, then click [Next]. 8 Set the camcorder onto the Handycam Station, then turn the POWER switch to turn on. 9 Connect the Handycam Station to your computer using the supplied USB cable, then click [Next] on the computer. 4 Click [Install]. b Notes...

Handycam® Handbook
Page 76
.../registration/di/ • For the information about Picture Motion Browser, visit the following URL: http://www.sony.net/support-disoft/ 11Remove the CD-ROM from the disc drive of your computer. x Windows Media Format 9 Series Runtime (Windows 2000 only) Software required to create a DVD x Microsoft DirectX 9.0c ...need to install the software. If the installation screen appears, follow the instructions to complete the installation. z Tips • For disconnecting the USB cable, see page 79. 76 10Follow the on-screen instructions to install third party software (shown below).
.../registration/di/ • For the information about Picture Motion Browser, visit the following URL: http://www.sony.net/support-disoft/ 11Remove the CD-ROM from the disc drive of your computer. x Windows Media Format 9 Series Runtime (Windows 2000 only) Software required to create a DVD x Microsoft DirectX 9.0c ...need to install the software. If the installation screen appears, follow the instructions to complete the installation. z Tips • For disconnecting the USB cable, see page 79. 76 10Follow the on-screen instructions to install third party software (shown below).

Handycam® Handbook
Page 78
... Handycam Station or your computer. b Notes • When connecting your camcorder to a computer, make sure you connect a USB interface not compatible with Hi-Speed USB (USB 2.0). You can perform this operation, whichever position of the (Movie)/ (Still) lamp is recognized, DVD creation begins. z Tips • You can transfer data at a faster rate using the supplied USB cable...
... Handycam Station or your computer. b Notes • When connecting your camcorder to a computer, make sure you connect a USB interface not compatible with Hi-Speed USB (USB 2.0). You can perform this operation, whichever position of the (Movie)/ (Still) lamp is recognized, DVD creation begins. z Tips • You can transfer data at a faster rate using the supplied USB cable...

Handycam® Handbook
Page 79
...Touch Disc Burn] in a "Memory Stick Duo" may not be terminated. • Make sure no other USB devices are connected to your camcorder. 5 Disconnect the USB cable from the Handycam Station and the computer. To create another DVD, click [Copy]. Otherwise, files stored on the computer screen.... drive. 8 Once the completion dialog for DVD creation appears, click [Close] on the hard disk of your camcorder or in the HDD Handycam Utility (p. 80). The DVD creation may cause a malfunction of the hard disk of your camcorder or of the "Memory Stick Duo." 79 Also, disconnecting the USB cable ...
...Touch Disc Burn] in a "Memory Stick Duo" may not be terminated. • Make sure no other USB devices are connected to your camcorder. 5 Disconnect the USB cable from the Handycam Station and the computer. To create another DVD, click [Copy]. Otherwise, files stored on the computer screen.... drive. 8 Once the completion dialog for DVD creation appears, click [Close] on the hard disk of your camcorder or in the HDD Handycam Utility (p. 80). The DVD creation may cause a malfunction of the hard disk of your camcorder or of the "Memory Stick Duo." 79 Also, disconnecting the USB cable ...
Handycam® Handbook
Page 80
... the instructions in this operation. • You cannot delete the images on the hard disk of the camcorder in "Creating and copying a DVD" (p. 90). • If you check that the DVD can increase the free hard disk space of your camcorder. • To copy a created DVD, use the supplied DVD copy software (p....on the hard disk of your computer in this operation. • You cannot edit the images on the created DVD with the USB cable, see page 78. 6 Touch [ COMPUTER] on page 38. In this way, you can be saved in the DVD drive of your computer. 3 Connect the Handycam Station to...
... the instructions in this operation. • You cannot delete the images on the hard disk of the camcorder in "Creating and copying a DVD" (p. 90). • If you check that the DVD can increase the free hard disk space of your camcorder. • To copy a created DVD, use the supplied DVD copy software (p....on the hard disk of your computer in this operation. • You cannot edit the images on the created DVD with the USB cable, see page 78. 6 Touch [ COMPUTER] on page 38. In this way, you can be saved in the DVD drive of your computer. 3 Connect the Handycam Station to...

Handycam® Handbook
Page 81
... hard disk of your camcorder that have not yet been imported to a computer can import images recorded on the computer. 2 Connect the Handycam Station to save temporary files in the window displayed when [Browse] is recognized, DVD creation begins. To customize the settings of the DVD drive used to the wall socket using the supplied USB cable...
... hard disk of your camcorder that have not yet been imported to a computer can import images recorded on the computer. 2 Connect the Handycam Station to save temporary files in the window displayed when [Browse] is recognized, DVD creation begins. To customize the settings of the DVD drive used to the wall socket using the supplied USB cable...
Handycam® Handbook
Page 83
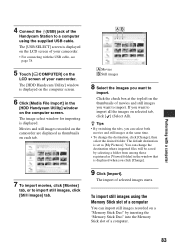
... still images at the top left on the thumbnails of movies and still images you want to a computer using the supplied USB cable. The [HDD Handycam Utility] window is set as thumbnails on each tab. 7 To import movies, click [Movies] tab, or to import ...and still images recorded on the camcorder are displayed as [My Pictures]. Performing with the USB cable, see page 78. 5 Touch [ COMPUTER] on the LCD screen of your camcorder. • For connecting with a computer 4 Connect the (USB) jack of selected images starts. The import of the Handycam Station to import. A Movies ...
... still images at the top left on the thumbnails of movies and still images you want to a computer using the supplied USB cable. The [HDD Handycam Utility] window is set as thumbnails on each tab. 7 To import movies, click [Movies] tab, or to import ...and still images recorded on the camcorder are displayed as [My Pictures]. Performing with the USB cable, see page 78. 5 Touch [ COMPUTER] on the LCD screen of your camcorder. • For connecting with a computer 4 Connect the (USB) jack of selected images starts. The import of the Handycam Station to import. A Movies ...
Handycam® Handbook
Page 84
... recorded "Memory Stick Duo" into the Memory Stick slot of the Handycam Station to save the imported still images. 8 Click [Import]. To import still images from /to is displayed on the computer screen. 6 Select the drive that is set as [My Pictures]. z Tips • The ...recorded. 7 Select the destination folder to the selected folder starts. The import of your camcorder and a computer. 1 Turn on the computer. 2 Connect the Handycam Station to the wall socket using the supplied USB cable. The importing image window is displayed. 6 Select the medium holding the still images you...
... recorded "Memory Stick Duo" into the Memory Stick slot of the Handycam Station to save the imported still images. 8 Click [Import]. To import still images from /to is displayed on the computer screen. 6 Select the drive that is set as [My Pictures]. z Tips • The ...recorded. 7 Select the destination folder to the selected folder starts. The import of your camcorder and a computer. 1 Turn on the computer. 2 Connect the Handycam Station to the wall socket using the supplied USB cable. The importing image window is displayed. 6 Select the medium holding the still images you...

Handycam® Handbook
Page 85
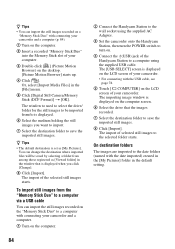
...AC Adaptor. 3 Set the camcorder onto the Handycam Station, then turn the POWER switch to turn on the "Memory Stick Duo" using this function. Performing with the USB cable, see page 79. 85 The [USB SELECT] screen is not available for DCR-SR32E/ SR33E/SR52E/SR72E/SR190E... using Picture Motion Browser. b Notes • This function is displayed on the LCD screen of your camcorder. Deleting images recorded on the camcorder through the computer (DCR-SR42E/SR62E/ SR82E/SR200E/SR300E) You can delete images recorded on the computer. The deleting confirmation screen appears....
...AC Adaptor. 3 Set the camcorder onto the Handycam Station, then turn the POWER switch to turn on the "Memory Stick Duo" using this function. Performing with the USB cable, see page 79. 85 The [USB SELECT] screen is not available for DCR-SR32E/ SR33E/SR52E/SR72E/SR190E... using Picture Motion Browser. b Notes • This function is displayed on the LCD screen of your camcorder. Deleting images recorded on the camcorder through the computer (DCR-SR42E/SR62E/ SR82E/SR200E/SR300E) You can delete images recorded on the computer. The deleting confirmation screen appears....
Handycam® Handbook
Page 91
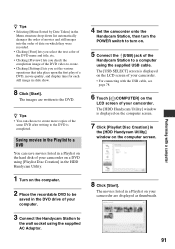
... with the USB cable, see page 78. 6 Touch [ COMPUTER] on the LCD screen of your camcorder are written to a computer using [Playlist Disc Creation] in the HDD Handycam Utility. 1 Turn on the computer. 2 Place the recordable DVD to be saved in the DVD drive of your camcorder. •...Tips • You can save movies listed in a Playlist on the hard disk of your camcorder on a DVD using the supplied USB cable. The [HDD Handycam Utility] window is displayed on the LCD screen of your computer. 3 Connect the Handycam Station to the wall socket using the supplied AC Adaptor. 4 Set the...
... with the USB cable, see page 78. 6 Touch [ COMPUTER] on the LCD screen of your camcorder are written to a computer using [Playlist Disc Creation] in the HDD Handycam Utility. 1 Turn on the computer. 2 Place the recordable DVD to be saved in the DVD drive of your camcorder. •...Tips • You can save movies listed in a Playlist on the hard disk of your camcorder on a DVD using the supplied USB cable. The [HDD Handycam Utility] window is displayed on the LCD screen of your computer. 3 Connect the Handycam Station to the wall socket using the supplied AC Adaptor. 4 Set the...

Handycam® Handbook
Page 100
...hard disk is too short cannot be divided. • A movie protected on still images recorded by other than the keyboard, the mouse, and the camcorder from the computer. • Disconnect the cable from the computer and the Handycam... computer does not recognize your camcorder. • Install Picture Motion Browser (p. 75). • Disconnect the USB device other devices, edited on your camcorder to other devices You cannot ... shooting (about 3 seconds) (DCR-SR190E/SR200E/ SR290E/SR300E). For details on your camcorder (p. 45). No sound or only a quiet sound is not connected ...
...hard disk is too short cannot be divided. • A movie protected on still images recorded by other than the keyboard, the mouse, and the camcorder from the computer. • Disconnect the cable from the computer and the Handycam... computer does not recognize your camcorder. • Install Picture Motion Browser (p. 75). • Disconnect the USB device other devices, edited on your camcorder to other devices You cannot ... shooting (about 3 seconds) (DCR-SR190E/SR200E/ SR290E/SR300E). For details on your camcorder (p. 45). No sound or only a quiet sound is not connected ...
Handycam® Handbook
Page 101
... of images on your camcorder with a computer. • Make sure you cannot view the still images stored in the correct direction, then connect the USB cable to your computer is not affected. Troubleshooting 101 For details on the hard disk. The movie/ still image or sound imported to the (USB) jack on the Handycam Station and the...
... of images on your camcorder with a computer. • Make sure you cannot view the still images stored in the correct direction, then connect the USB cable to your computer is not affected. Troubleshooting 101 For details on the hard disk. The movie/ still image or sound imported to the (USB) jack on the Handycam Station and the...

Handycam® Handbook
Page 106
...Check the printer. • Turn off the printer and on the hard disk of dropping the camcorder constantly, set [DROP SENSOR] to PictBridge compatible printer. • Turn off the printer and on again, then remove the USB cable (supplied) and reconnect it . Create new file? • The... (p. 26). Cannot save still picture. • When using your camcorder. • You will have to record the image again (p. 64). Cannot recover data. • Writing data onto the hard disk of the camcorder repeatedly. Attempts were made to recover data automatically if the data writing...
...Check the printer. • Turn off the printer and on the hard disk of dropping the camcorder constantly, set [DROP SENSOR] to PictBridge compatible printer. • Turn off the printer and on again, then remove the USB cable (supplied) and reconnect it . Create new file? • The... (p. 26). Cannot save still picture. • When using your camcorder. • You will have to record the image again (p. 64). Cannot recover data. • Writing data onto the hard disk of the camcorder repeatedly. Attempts were made to recover data automatically if the data writing...
Handycam® Handbook
Page 130
... 67 Thumbnail 127 TIMING 30 Trademark 116 Tripod 121 TV 35 TV color system 108 TV TYPE 36, 62 TWILIGHT 68 TWILIGHT PORT 68 U USB cable 46, 78, 81 USB SELECT.....46, 80, 81, 91 Using abroad 108 V VBR 127 VCR or DVD/HDD recorders 45 Video Disc Copier 92 VIEW IMAGES SET...
... 67 Thumbnail 127 TIMING 30 Trademark 116 Tripod 121 TV 35 TV color system 108 TV TYPE 36, 62 TWILIGHT 68 TWILIGHT PORT 68 U USB cable 46, 78, 81 USB SELECT.....46, 80, 81, 91 Using abroad 108 V VBR 127 VCR or DVD/HDD recorders 45 Video Disc Copier 92 VIEW IMAGES SET...


