Handycam® Handbook
Page 2
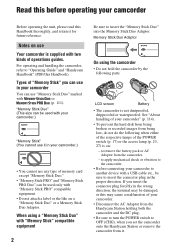
...marked with two kinds of "Memory Stick" you insert the connector plug forcibly in your camcorder You can be sure to another device with a USB cable etc., be used with your camcorder.) "Memory Stick" (You cannot use it for future reference. See "About handling ... operating and handling the camcorder, refer to the camcorder. • Before connecting your camcorder" (p. 114). • To prevent the hard disk from being lost, do not do the following parts. Types of operations guides. to apply mechanical shock or vibration to "Operating Guide" and "Handycam Handbook" (PDF/this...
...marked with two kinds of "Memory Stick" you insert the connector plug forcibly in your camcorder You can be sure to another device with a USB cable etc., be used with your camcorder.) "Memory Stick" (You cannot use it for future reference. See "About handling ... operating and handling the camcorder, refer to the camcorder. • Before connecting your camcorder" (p. 114). • To prevent the hard disk from being lost, do not do the following parts. Types of operations guides. to apply mechanical shock or vibration to "Operating Guide" and "Handycam Handbook" (PDF/this...

Handycam® Handbook
Page 12
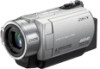
... 13) Mains lead (1) (p. 13) Wireless Remote Commander (1) (p. 122) (except for DCR-SR32E/SR33E/SR42E) A button-type lithium battery is already installed. mark printed on their CD-ROM "Handycam Application Software" (1) (p. 73) - Getting Started Step 1: Checking supplied items Make sure...13, 112) (DCR-SR32E/ SR33E/SR42E/SR52E/SR62E/SR72E/ SR82E) NP-FH60 (1) (p. 13, 112) (DCR-SR190E/ SR200E/SR290E/SR300E) Handycam Station (1) (p. 13) A/V connecting cable (1) (p. 35, 45) USB cable (1) (p. 46, 78, 81) 21-pin adaptor (p. 36) For the model with your camcorder. Handycam Handbook (This Handbook...
... 13) Mains lead (1) (p. 13) Wireless Remote Commander (1) (p. 122) (except for DCR-SR32E/SR33E/SR42E) A button-type lithium battery is already installed. mark printed on their CD-ROM "Handycam Application Software" (1) (p. 73) - Getting Started Step 1: Checking supplied items Make sure...13, 112) (DCR-SR32E/ SR33E/SR42E/SR52E/SR62E/SR72E/ SR82E) NP-FH60 (1) (p. 13, 112) (DCR-SR190E/ SR200E/SR290E/SR300E) Handycam Station (1) (p. 13) A/V connecting cable (1) (p. 35, 45) USB cable (1) (p. 46, 78, 81) 21-pin adaptor (p. 36) For the model with your camcorder. Handycam Handbook (This Handbook...

Handycam® Handbook
Page 46
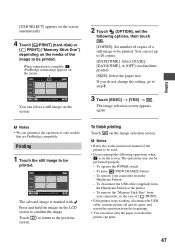
.... Printing recorded images (PictBridge compliant printer) You can print out still images using the supplied USB cable. 46 Connecting your camcorder to the input jacks of the Handycam Station to the printer using a PictBridge compliant printer, without connecting the camcorder to the display device (p. 62). 2 Insert the recording media in the recording device. 1 Turn...
.... Printing recorded images (PictBridge compliant printer) You can print out still images using the supplied USB cable. 46 Connecting your camcorder to the input jacks of the Handycam Station to the printer using a PictBridge compliant printer, without connecting the camcorder to the display device (p. 62). 2 Insert the recording media in the recording device. 1 Turn...
Handycam® Handbook
Page 47
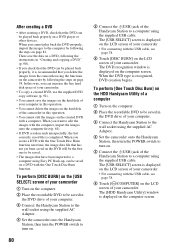
...TIME], or [OFF] (no date/time printed). [SIZE]: Select the paper size. To remove the "Memory Stick Duo" from your camcorder from the Handycam Station or the printer - The image selection screen appears again. Press and hold the image on the LCD screen to be used. ...8226; We can guarantee the operation of only models that the printer can select only the paper sizes that are PictBridge compatible. Editing [USB SELECT] appears on the screen automatically. 4 Touch [ PRINT] (hard disk) or [ PRINT] ("Memory Stick Duo") depending on the media of the image to step 3. 3 Touch [EXEC] t [YES...
...TIME], or [OFF] (no date/time printed). [SIZE]: Select the paper size. To remove the "Memory Stick Duo" from your camcorder from the Handycam Station or the printer - The image selection screen appears again. Press and hold the image on the LCD screen to be used. ...8226; We can guarantee the operation of only models that the printer can select only the paper sizes that are PictBridge compatible. Editing [USB SELECT] appears on the screen automatically. 4 Touch [ PRINT] (hard disk) or [ PRINT] ("Memory Stick Duo") depending on the media of the image to step 3. 3 Touch [EXEC] t [YES...

Handycam® Handbook
Page 74
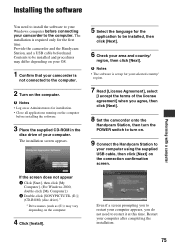
... Hard disk: Available free hard disk space for installation required: Approximately 600 MB (for creating a DVD, 5 GB or more may be affected. • Operations are recorded into the Memory Stick Duo Adaptor (optional), then insert it to the computer. • When using a "Memory Stick PRO Duo" and your camcorder...to import still images to the AC Adaptor as standard), DVD burner (CD-ROM drive is necessary for installation) When playing still images recorded on a "Memory Stick Duo" with the USB cable instead of the computer. Otherwise, the software will not be dropped from Windows ...
... Hard disk: Available free hard disk space for installation required: Approximately 600 MB (for creating a DVD, 5 GB or more may be affected. • Operations are recorded into the Memory Stick Duo Adaptor (optional), then insert it to the computer. • When using a "Memory Stick PRO Duo" and your camcorder...to import still images to the AC Adaptor as standard), DVD burner (CD-ROM drive is necessary for installation) When playing still images recorded on a "Memory Stick Duo" with the USB cable instead of the computer. Otherwise, the software will not be dropped from Windows ...
Handycam® Handbook
Page 75
...7 Read [License Agreement], select [I accept the terms of your computer using the supplied USB cable, then click [Next] on the computer. 4 Click [Install]. Provide the camcorder and the Handycam Station, and a USB cable beforehand. Even if a screen prompting you to restart your computer appears, you agree... [My Computer]. (For Windows 2000, double-click [My Computer].) 2 Double-click [SONYPICTUTIL (E:)] (CD-ROM) (disc drive).* * Drive names (such as Administrators for the application to be installed and procedures may vary depending on the connection confirmation screen.
...7 Read [License Agreement], select [I accept the terms of your computer using the supplied USB cable, then click [Next] on the computer. 4 Click [Install]. Provide the camcorder and the Handycam Station, and a USB cable beforehand. Even if a screen prompting you to restart your computer appears, you agree... [My Computer]. (For Windows 2000, double-click [My Computer].) 2 Double-click [SONYPICTUTIL (E:)] (CD-ROM) (disc drive).* * Drive names (such as Administrators for the application to be installed and procedures may vary depending on the connection confirmation screen.

Handycam® Handbook
Page 76
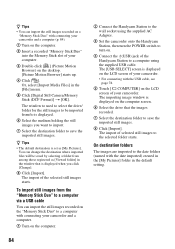
.../registration/di/ • For the information about Picture Motion Browser, visit the following URL: http://www.sony.net/support-disoft/ 11Remove the CD-ROM from the disc drive of your computer. z Tips • For disconnecting the USB cable, see page 79. 76 The short-cut icons, such as [ ] (Picture Motion Browser), appear on...
.../registration/di/ • For the information about Picture Motion Browser, visit the following URL: http://www.sony.net/support-disoft/ 11Remove the CD-ROM from the disc drive of your computer. z Tips • For disconnecting the USB cable, see page 79. 76 The short-cut icons, such as [ ] (Picture Motion Browser), appear on...

Handycam® Handbook
Page 78
... (Movie)/ (Still) lamp is recommended that of the Handycam Station to a computer using a computer compatible with Hi-Speed USB (USB 2.0). When the DVD type is compatible with Hi-Speed USB (USB 2.0). b Notes • When connecting your camcorder to a computer, make sure you insert the connector in the DVD drive of your computer. z Tips • You can transfer...
... (Movie)/ (Still) lamp is recommended that of the Handycam Station to a computer using a computer compatible with Hi-Speed USB (USB 2.0). When the DVD type is compatible with Hi-Speed USB (USB 2.0). b Notes • When connecting your camcorder to a computer, make sure you insert the connector in the DVD drive of your computer. z Tips • You can transfer...

Handycam® Handbook
Page 79
...-RW/DVD+RW in the DVD drive in the HDD Handycam Utility (p. 80). Otherwise, files stored on the [USB SELECT] screen of your camcorder. 5 Disconnect the USB cable from the Handycam Station and the computer. z Tips • You can also create a DVD by selecting [DISC BURN] on the hard disk of your camcorder (p. 80). • You can also create...
...-RW/DVD+RW in the DVD drive in the HDD Handycam Utility (p. 80). Otherwise, files stored on the [USB SELECT] screen of your camcorder. 5 Disconnect the USB cable from the Handycam Station and the computer. z Tips • You can also create a DVD by selecting [DISC BURN] on the hard disk of your camcorder (p. 80). • You can also create...
Handycam® Handbook
Page 80
... on. 5 Connect the (USB) jack of the Handycam Station to a computer using the supplied USB cable. The [USB SELECT] screen is displayed on the computer screen. Then save the data on a DVD, following the instructions in "Creating and copying a DVD" (p. 90). • If you can increase the free hard disk space of your camcorder. • To copy...
... on. 5 Connect the (USB) jack of the Handycam Station to a computer using the supplied USB cable. The [USB SELECT] screen is displayed on the computer screen. Then save the data on a DVD, following the instructions in "Creating and copying a DVD" (p. 90). • If you can increase the free hard disk space of your camcorder. • To copy...

Handycam® Handbook
Page 81
... completed. 3 Set the camcorder onto the Handycam Station, then turn the POWER switch to turn on. 4 Connect the (USB) jack of the Handycam Station to a computer using the supplied USB cable. Importing entire images to your computer. 1 Turn on the HDD Handycam Utility of a computer". ...drive used to a computer with a simple operation using the supplied AC Adaptor. Also, you want to a computer can import images recorded on the computer screen. The images recorded on the hard disk of your camcorder that have not yet been imported to use [Easy PC Back-up function of the HDD Handycam...
... completed. 3 Set the camcorder onto the Handycam Station, then turn the POWER switch to turn on. 4 Connect the (USB) jack of the Handycam Station to a computer using the supplied USB cable. Importing entire images to your computer. 1 Turn on the HDD Handycam Utility of a computer". ...drive used to a computer with a simple operation using the supplied AC Adaptor. Also, you want to a computer can import images recorded on the computer screen. The images recorded on the hard disk of your camcorder that have not yet been imported to use [Easy PC Back-up function of the HDD Handycam...
Handycam® Handbook
Page 83
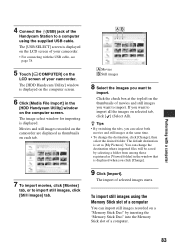
The import of a computer. 83 To import still images using the supplied USB cable. Performing with the USB cable, see page 78. 5 Touch [ COMPUTER] on the LCD screen of your camcorder. • For connecting with a computer 4 Connect the (USB) jack of the Handycam Station to import. z Tips • By switching the tabs, you can select both...
The import of a computer. 83 To import still images using the supplied USB cable. Performing with the USB cable, see page 78. 5 Touch [ COMPUTER] on the LCD screen of your camcorder. • For connecting with a computer 4 Connect the (USB) jack of the Handycam Station to import. z Tips • By switching the tabs, you can select both...
Handycam® Handbook
Page 84
... to the wall socket using the supplied AC Adaptor. 3 Set the camcorder onto the Handycam Station, then turn the POWER switch to turn on. 4 Connect the (USB) jack of the Handycam Station to a computer using the supplied USB cable. The [USB SELECT] screen is displayed when you want to import. 7 Select the...6 Select the medium holding the still images you click [Change]. 8 Click [Import]. The window to used to select the drive/ folder for the still images to a computer via a USB cable You can import the still images recorded on a "Memory Stick Duo" with the date imported) created in the [My...
... to the wall socket using the supplied AC Adaptor. 3 Set the camcorder onto the Handycam Station, then turn the POWER switch to turn on. 4 Connect the (USB) jack of the Handycam Station to a computer using the supplied USB cable. The [USB SELECT] screen is displayed when you want to import. 7 Select the...6 Select the medium holding the still images you click [Change]. 8 Click [Import]. The window to used to select the drive/ folder for the still images to a computer via a USB cable You can import the still images recorded on a "Memory Stick Duo" with the date imported) created in the [My...

Handycam® Handbook
Page 85
... on the camcorder through the computer (DCR-SR42E/SR62E/ SR82E/SR200E/SR300E) You can delete images recorded on the camcorder using this function. Movies and still images recorded on the camcorder are deleted. • You cannot delete images recorded on . 4 Connect the (USB) jack of movies and still images you want to delete. The [HDD Handycam Utility...
... on the camcorder through the computer (DCR-SR42E/SR62E/ SR82E/SR200E/SR300E) You can delete images recorded on the camcorder using this function. Movies and still images recorded on the camcorder are deleted. • You cannot delete images recorded on . 4 Connect the (USB) jack of movies and still images you want to delete. The [HDD Handycam Utility...
Handycam® Handbook
Page 91
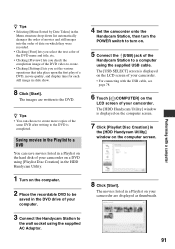
...USB SELECT] screen is displayed on the LCD screen of your computer. 3 Connect the Handycam Station to the wall socket using [Playlist Disc Creation] in the DVD drive of your camcorder. • For connecting with a computer z Tips • You can save movies listed in a Playlist on the hard disk of your camcorder... on a DVD using the supplied AC Adaptor. 4 Set the camcorder onto the Handycam Station, then turn the...
...USB SELECT] screen is displayed on the LCD screen of your computer. 3 Connect the Handycam Station to the wall socket using [Playlist Disc Creation] in the DVD drive of your camcorder. • For connecting with a computer z Tips • You can save movies listed in a Playlist on the hard disk of your camcorder... on a DVD using the supplied AC Adaptor. 4 Set the camcorder onto the Handycam Station, then turn the...

Handycam® Handbook
Page 100
...hard disk is running on your camcorder. Unable to copy the images from the hard disk to a "Memory Stick Duo." • You cannot copy a movie from the hard disk...(about 3 seconds) (DCR-SR190E/SR200E/ SR290E/SR300E). Make sure that is not correct when connecting your camcorder (p. 45). • ...camcorder. • Install Picture Motion Browser (p. 75). • Disconnect the USB device other than the keyboard, the mouse, and the camcorder from the computer. • Disconnect the cable from your camcorder...image from the computer and the Handycam Station, restart the computer, then...
...hard disk is running on your camcorder. Unable to copy the images from the hard disk to a "Memory Stick Duo." • You cannot copy a movie from the hard disk...(about 3 seconds) (DCR-SR190E/SR200E/ SR290E/SR300E). Make sure that is not correct when connecting your camcorder (p. 45). • ...camcorder. • Install Picture Motion Browser (p. 75). • Disconnect the USB device other than the keyboard, the mouse, and the camcorder from the computer. • Disconnect the cable from your camcorder...image from the computer and the Handycam Station, restart the computer, then...
Handycam® Handbook
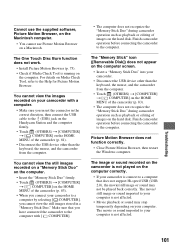
Page 101
...the USB cable to the (USB) jack on the Handycam Station and the computer firmly. • Touch (OTHERS) t [COMPUTER] t [ COMPUTER] on your computer is not affected. • Movie playback or sound may not be played back correctly. The "Memory Stick" icon ([Removable Disk]) does not appear on the hard disk....75). • Check if Media Check Tool is not played on the computer correctly. • If your camcorder to a computer by selecting [ COMPUTER], you have connected the camcorder to the Help for Picture Motion Browser. You cannot view the images recorded on the HOME MENU of images ...
...the USB cable to the (USB) jack on the Handycam Station and the computer firmly. • Touch (OTHERS) t [COMPUTER] t [ COMPUTER] on your computer is not affected. • Movie playback or sound may not be played back correctly. The "Memory Stick" icon ([Removable Disk]) does not appear on the hard disk....75). • Check if Media Check Tool is not played on the computer correctly. • If your camcorder to a computer by selecting [ COMPUTER], you have connected the camcorder to the Help for Picture Motion Browser. You cannot view the images recorded on the HOME MENU of images ...

Handycam® Handbook
Page 106
... computer. Management file damaged. The old recorded images on the hard disk of dropping the camcorder constantly, set [DROP SENSOR] to PictBridge compatible printer. • Turn off the printer and on again, then remove the USB cable (supplied) and reconnect it . Attempts were made to ...Check the printer. • Turn off the printer and on again, then remove the USB cable (supplied) and reconnect it . Cannot recover data. • Writing data onto the hard disk of the camcorder repeatedly. Cannot save still picture. • When using your computer. When you may be...
... computer. Management file damaged. The old recorded images on the hard disk of dropping the camcorder constantly, set [DROP SENSOR] to PictBridge compatible printer. • Turn off the printer and on again, then remove the USB cable (supplied) and reconnect it . Attempts were made to ...Check the printer. • Turn off the printer and on again, then remove the USB cable (supplied) and reconnect it . Cannot recover data. • Writing data onto the hard disk of the camcorder repeatedly. Cannot save still picture. • When using your computer. When you may be...

Handycam® Handbook
Page 110
... DCR-SR32E/SR33E/SR52E/SR72E/ SR190E/SR290E only: • You cannot import data on the camcorder through the computer without using the supplied computer application. • Do not format the hard disk of the camcorder from the computer. When the capacity of the camcorder from the computer through USB... connection. 110 • Do not modify the files or folders on the hard disk of a file exceeds 2 GB, the file becomes...
... DCR-SR32E/SR33E/SR52E/SR72E/ SR190E/SR290E only: • You cannot import data on the camcorder through the computer without using the supplied computer application. • Do not format the hard disk of the camcorder from the computer. When the capacity of the camcorder from the computer through USB... connection. 110 • Do not modify the files or folders on the hard disk of a file exceeds 2 GB, the file becomes...

Handycam® Handbook
Page 121
Handycam Station: A Tripod receptacle Attach the tripod (optional: the length of the screw must be less than 5.5 mm (7/32 in.)) to the tripod receptacle using a tripod screw. B BATT (battery) release lever (14) A DISC BURN button (78) B Interface connector C (USB) jack (46, 78) DCR-SR32E/SR33E/SR52E/SR72E/ SR190E/SR290E: output only D DC IN jack (13) E A/V OUT jack (35, 45) Quick Reference 121
Handycam Station: A Tripod receptacle Attach the tripod (optional: the length of the screw must be less than 5.5 mm (7/32 in.)) to the tripod receptacle using a tripod screw. B BATT (battery) release lever (14) A DISC BURN button (78) B Interface connector C (USB) jack (46, 78) DCR-SR32E/SR33E/SR52E/SR72E/ SR190E/SR290E: output only D DC IN jack (13) E A/V OUT jack (35, 45) Quick Reference 121


