
Operating Guide
Page 9
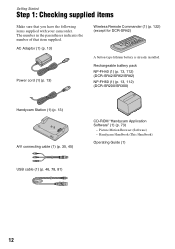
.../SR62/ SR82) NP-FH60 (1) (p.11) (DCR-SR200/SR300) Handycam Station (1) (p.11) A/V connecting cable (1) (p.25) USB cable (1) (p.27) CD-ROM "Handycam Application Software" (1) (p.26) - Picture Motion Browser (Software) - Getting Started Step 1: Checking supplied items Make sure that item supplied. AC Adaptor (1) (p.11) Power cord (1) (p.11) Wireless Remote Commander (1) (except for DCR-SR42) A button-type lithium battery is already...
.../SR62/ SR82) NP-FH60 (1) (p.11) (DCR-SR200/SR300) Handycam Station (1) (p.11) A/V connecting cable (1) (p.25) USB cable (1) (p.27) CD-ROM "Handycam Application Software" (1) (p.26) - Picture Motion Browser (Software) - Getting Started Step 1: Checking supplied items Make sure that item supplied. AC Adaptor (1) (p.11) Power cord (1) (p.11) Wireless Remote Commander (1) (except for DCR-SR42) A button-type lithium battery is already...

Operating Guide
Page 24
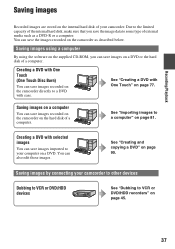
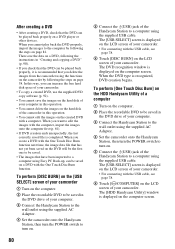
... images using a computer By using the software on the supplied CD-ROM, you can save the images recorded on the camcorder as a DVD-R or a computer. Creating a DVD with One Touch (One Touch Disc Burn) You can save images on a DVD or the hard disk of external media such as described below.... see "Handycam Handbook" (PDF). Saving images Deleting images Recorded images are stored on the internal hard disk of image you want to delete, then touch the image to be deleted. You can save images recorded on the hard disk of a computer. You can save images imported to your camcorder to other...
... images using a computer By using the software on the supplied CD-ROM, you can save the images recorded on the camcorder as a DVD-R or a computer. Creating a DVD with One Touch (One Touch Disc Burn) You can save images on a DVD or the hard disk of external media such as described below.... see "Handycam Handbook" (PDF). Saving images Deleting images Recorded images are stored on the internal hard disk of image you want to delete, then touch the image to be deleted. You can save images recorded on the hard disk of a computer. You can save images imported to your camcorder to other...
Operating Guide
Page 26
... or more Editing the imported images - The select screen for "Handycam Handbook" appears. 4 Select desired language and select the model name of your camcorder or how to use of your computer, see "Handycam Handbook" (PDF). Installation starts. ROM, double-click the [US...Handycam Handbook" (PDF) and "Picture Motion Browser" (Software) are contained. After having the software installed, doubleclick "Handbook.pdf", you need to your Handycam, then click [Handycam Handbook (PDF)]. Operation is not assured if the above on the computer. 2 Place the CD-ROM (supplied) in the disc drive...
... or more Editing the imported images - The select screen for "Handycam Handbook" appears. 4 Select desired language and select the model name of your camcorder or how to use of your computer, see "Handycam Handbook" (PDF). Installation starts. ROM, double-click the [US...Handycam Handbook" (PDF) and "Picture Motion Browser" (Software) are contained. After having the software installed, doubleclick "Handbook.pdf", you need to your Handycam, then click [Handycam Handbook (PDF)]. Operation is not assured if the above on the computer. 2 Place the CD-ROM (supplied) in the disc drive...

Operating Guide
Page 27
...software will not be affected. • Operations are guaranteed, frames may be provided as the power source. Contents to be installed and procedures may differ depending on your computer using the supplied USB cable, then click [Next] on the connection confirmation screen. Recording/Playback Hard disk: Available free hard disk...]. 8 Set the camcorder onto the Handycam Station, then turn the POWER switch to turn on. 9 Connect the Handycam Station to the power...OS. 1 Confirm that can burn DVDs (CD-ROM drive required for software installation) • Even in a computer environment where the...
...software will not be affected. • Operations are guaranteed, frames may be provided as the power source. Contents to be installed and procedures may differ depending on your computer using the supplied USB cable, then click [Next] on the connection confirmation screen. Recording/Playback Hard disk: Available free hard disk...]. 8 Set the camcorder onto the Handycam Station, then turn the POWER switch to turn on. 9 Connect the Handycam Station to the power...OS. 1 Confirm that can burn DVDs (CD-ROM drive required for software installation) • Even in a computer environment where the...

Operating Guide
Page 28
...need to install the required software. - Windows Media Format 9 Series Runtime (Windows 2000 only) Software required to install the software. qa Remove the CD-ROM from the disc drive of each item on the desktop. For details, see "Handycam Handbook" (PDF). 1 Turn on your camcorder, then press (HOME) ... USB cable, see the explanation of the function of your convenience. http://www.sony.net/registration/di/ • For the information about Picture Motion Browser, visit the following URL: http://www.sony.net/support-disoft/ Performing various functions - The short-cut icons, such as ...
...need to install the required software. - Windows Media Format 9 Series Runtime (Windows 2000 only) Software required to install the software. qa Remove the CD-ROM from the disc drive of each item on the desktop. For details, see "Handycam Handbook" (PDF). 1 Turn on your camcorder, then press (HOME) ... USB cable, see the explanation of the function of your convenience. http://www.sony.net/registration/di/ • For the information about Picture Motion Browser, visit the following URL: http://www.sony.net/support-disoft/ Performing various functions - The short-cut icons, such as ...
Handycam® Handbook
Page 6
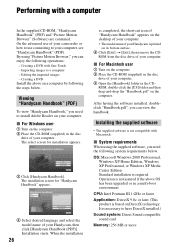
...can do with Windows computer 73 System requirements 74 Installing the software 75 Creating a DVD with One Touch 77 Importing images to a computer ... 81 Deleting images recorded on the camcorder through the computer 85 Viewing images imported to a computer ........... 90 Manipulating still images 93 Troubleshooting Troubleshooting 94 Warning indicators and messages 104 Additional Information Using your camcorder abroad .... 108 Files on the camcorder hard disk/ folder structure 110 Maintenance and precautions .... 111 Quick Reference Identifying parts and controls ..... 118 Indicators ...
...can do with Windows computer 73 System requirements 74 Installing the software 75 Creating a DVD with One Touch 77 Importing images to a computer ... 81 Deleting images recorded on the camcorder through the computer 85 Viewing images imported to a computer ........... 90 Manipulating still images 93 Troubleshooting Troubleshooting 94 Warning indicators and messages 104 Additional Information Using your camcorder abroad .... 108 Files on the camcorder hard disk/ folder structure 110 Maintenance and precautions .... 111 Quick Reference Identifying parts and controls ..... 118 Indicators ...
Handycam® Handbook
Page 12
Rechargeable battery pack NP-FH40 (1) (p. 13, 112) (DCR-SR42/SR62/SR82) NP-FH60 (1) (p. 13, 112) (DCR-SR200/SR300) Handycam Station (1) (p. 13) A/V connecting cable (1) (p. 35, 45) CD-ROM "Handycam Application Software" (1) (p. 73) - Getting Started Step 1: Checking supplied items Make sure that item supplied. Picture Motion Browser (Software) - AC Adaptor (1) (p. 13) Power cord (1) (p. 13) Wireless Remote Commander (1) (p. 122) (except for...
Rechargeable battery pack NP-FH40 (1) (p. 13, 112) (DCR-SR42/SR62/SR82) NP-FH60 (1) (p. 13, 112) (DCR-SR200/SR300) Handycam Station (1) (p. 13) A/V connecting cable (1) (p. 35, 45) CD-ROM "Handycam Application Software" (1) (p. 73) - Getting Started Step 1: Checking supplied items Make sure that item supplied. Picture Motion Browser (Software) - AC Adaptor (1) (p. 13) Power cord (1) (p. 13) Wireless Remote Commander (1) (p. 122) (except for...
Handycam® Handbook
Page 37
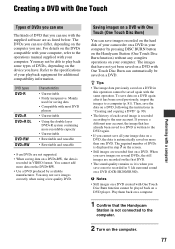
... external media such as described below. Saving images using a computer By using the software on the supplied CD-ROM, you can save images on the hard disk of a computer. See "Creating and copying a DVD" on the camcorder as a DVD-R or a computer. Due to a DVD with One Touch (One Touch Disc Burn) You can save...
... external media such as described below. Saving images using a computer By using the software on the supplied CD-ROM, you can save images on the hard disk of a computer. See "Creating and copying a DVD" on the camcorder as a DVD-R or a computer. Due to a DVD with One Touch (One Touch Disc Burn) You can save...

Handycam® Handbook
Page 43
... the desired movie. 4 Touch while the selected recording date is marked with . It may damage the hard disk. • You cannot add still images to playback. The Playlist is , by date]. To erase ... (HOME MENU), touch (OTHERS) t [PLAYLIST EDIT]. 2 Touch [ ADD by using the supplied software (p. 91). 2 Touch the image from which you want to a Playlist. Press and hold the ... [YES] t . 3 Select the image to the Playlist screen. To erase unnecessary images from your camcorder while editing the Playlist. The selected image is highlighted. To add all the images from the list. ...
... the desired movie. 4 Touch while the selected recording date is marked with . It may damage the hard disk. • You cannot add still images to playback. The Playlist is , by date]. To erase ... (HOME MENU), touch (OTHERS) t [PLAYLIST EDIT]. 2 Touch [ ADD by using the supplied software (p. 91). 2 Touch the image from which you want to a Playlist. Press and hold the ... [YES] t . 3 Select the image to the Playlist screen. To erase unnecessary images from your camcorder while editing the Playlist. The selected image is highlighted. To add all the images from the list. ...
Handycam® Handbook
Page 73
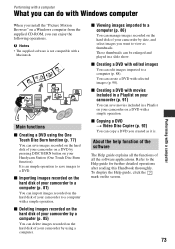
...Importing images recorded on the hard disk of your camcorder to a computer (p. 81) You can import images recorded on the hard disk of your Handycam Station (One Touch Disc Burn function). x Deleting images recorded on the hard disk of your camcorder by pressing DISC BURN button on your camcorder to view as it is ... Handbook thoroughly. About the help function of the software The Help guide explains all the functions of your camcorder on a DVD by a computer (p. 85) You can delete images recorded on the hard disk of all the software applications. Performing with a computer What you can...
...Importing images recorded on the hard disk of your camcorder to a computer (p. 81) You can import images recorded on the hard disk of your Handycam Station (One Touch Disc Burn function). x Deleting images recorded on the hard disk of your camcorder by pressing DISC BURN button on your camcorder to view as it is ... Handbook thoroughly. About the help function of the software The Help guide explains all the functions of your camcorder on a DVD by a computer (p. 85) You can delete images recorded on the hard disk of all the software applications. Performing with a computer What you can...

Handycam® Handbook
Page 74
...74 b Notes • Even in 2ch sound. • If you use the supplied software when operating images recorded on DirectX technology. CPU: MMX Pentium 200 MHz or faster Others: ... forcibly as standard), DVD burner (CD-ROM drive is necessary for preventing damages and malfunctions of the camcorder • When connecting your camcorder with the USB cable instead of using Picture Motion... installed.) Sound system: Direct Sound compatible sound card Memory: 256 MB or more Hard disk: Available free hard disk space for installation required: Approximately 600 MB (for creating a DVD, 5 GB or...
...74 b Notes • Even in 2ch sound. • If you use the supplied software when operating images recorded on DirectX technology. CPU: MMX Pentium 200 MHz or faster Others: ... forcibly as standard), DVD burner (CD-ROM drive is necessary for preventing damages and malfunctions of the camcorder • When connecting your camcorder with the USB cable instead of using Picture Motion... installed.) Sound system: Direct Sound compatible sound card Memory: 256 MB or more Hard disk: Available free hard disk space for installation required: Approximately 600 MB (for creating a DVD, 5 GB or...
Handycam® Handbook
Page 75
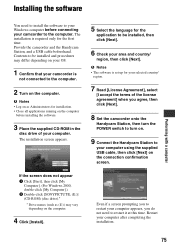
...restart it at this time. Restart your computer appears, you agree, then click [Next]. 8 Set the camcorder onto the Handycam Station, then turn the POWER switch to turn on. 9 Connect the Handycam Station to the computer. b Notes • Log on as (E:)) may differ depending on your OS.... all applications running on the computer before installing the software. 3 Place the supplied CD-ROM in the disc drive of the license agreement] when you do not need to install the software to your Windows computer before connecting your camcorder to your computer using the supplied USB cable, then...
...restart it at this time. Restart your computer appears, you agree, then click [Next]. 8 Set the camcorder onto the Handycam Station, then turn the POWER switch to turn on. 9 Connect the Handycam Station to the computer. b Notes • Log on as (E:)) may differ depending on your OS.... all applications running on the computer before installing the software. 3 Place the supplied CD-ROM in the disc drive of the license agreement] when you do not need to install the software to your Windows computer before connecting your camcorder to your computer using the supplied USB cable, then...

Handycam® Handbook
Page 76
.../registration/di/ • For the information about Picture Motion Browser, visit the following URL: http://www.sony.net/support-disoft/ 11Remove the CD-ROM from the disc drive of your computer. After you install the software, a shortcut icon for the customers registration website is created on the desktop. • Once you register on...
.../registration/di/ • For the information about Picture Motion Browser, visit the following URL: http://www.sony.net/support-disoft/ 11Remove the CD-ROM from the disc drive of your computer. After you install the software, a shortcut icon for the customers registration website is created on the desktop. • Once you register on...
Handycam® Handbook
Page 77
... them back on a computer. 1 Confirm that you can use with the supplied software are recorded on the first DVD. • The sound quality remains as listed ... sound on a DVD (DCR-SR200/SR300). For details on the DVDs compatible with your computer, refer to the operations manual supplied with your camcorder on a DVD in VIDEO...with a computer Types of DVDs you can use The kinds of DVD that the Handycam Station is not connected to the computer. 2 Turn on the computer. 77 Then...are recorded first on the hard disk of your computer. You may not be saved again with the same operation. If you...
... them back on a computer. 1 Confirm that you can use with the supplied software are recorded on the first DVD. • The sound quality remains as listed ... sound on a DVD (DCR-SR200/SR300). For details on the DVDs compatible with your computer, refer to the operations manual supplied with your camcorder on a DVD in VIDEO...with a computer Types of DVDs you can use The kinds of DVD that the Handycam Station is not connected to the computer. 2 Turn on the computer. 77 Then...are recorded first on the hard disk of your computer. You may not be saved again with the same operation. If you...

Handycam® Handbook
Page 78
..., close it may damage the cable, the Handycam Station or your computer. When you use a new recordable DVD. • If any software starts on . b Notes • When connecting your camcorder to turn the POWER switch to a computer, make sure you insert the connector in the DVD drive of USB 1.1 (USB Full-Speed). 78 z Tips...
..., close it may damage the cable, the Handycam Station or your computer. When you use a new recordable DVD. • If any software starts on . b Notes • When connecting your camcorder to turn the POWER switch to a computer, make sure you insert the connector in the DVD drive of USB 1.1 (USB Full-Speed). 78 z Tips...
Handycam® Handbook
Page 80
...the computer. 2 Place the recordable DVD to be saved in this operation. • You cannot delete the images on the hard disk of the camcorder in the DVD drive of the Handycam Station to a computer using the supplied USB cable. When the DVD type is displayed on the computer screen. The [USB ... screen. To perform [One Touch Disc Burn] on the HDD Handycam Utility of your camcorder. • To copy a created DVD, use the supplied DVD copy software (p. 92). • You cannot save the data on page 38. The [HDD Handycam Utility] window is recommended that you cannot play back the DVD ...
...the computer. 2 Place the recordable DVD to be saved in this operation. • You cannot delete the images on the hard disk of the camcorder in the DVD drive of the Handycam Station to a computer using the supplied USB cable. When the DVD type is displayed on the computer screen. The [USB ... screen. To perform [One Touch Disc Burn] on the HDD Handycam Utility of your camcorder. • To copy a created DVD, use the supplied DVD copy software (p. 92). • You cannot save the data on page 38. The [HDD Handycam Utility] window is recommended that you cannot play back the DVD ...

Handycam® Handbook
Page 93
...more information about the operation, refer to the user manual or help files of your hard disk for temporary files varies. For details about MAPI. • Movie data files cannot be enabled in your e-mail software, attach still images to work. Select [Manually select a writing speed before writing starts.... the Disc copy window, click [Settings]. z Tips • You can start your e-mail software for more copies of the source DVD, the free space required on your e-mail software for this feature to e-mail and send them via Picture Motion Browser and view images with a...
...more information about the operation, refer to the user manual or help files of your hard disk for temporary files varies. For details about MAPI. • Movie data files cannot be enabled in your e-mail software, attach still images to work. Select [Manually select a writing speed before writing starts.... the Disc copy window, click [Settings]. z Tips • You can start your e-mail software for more copies of the source DVD, the free space required on your e-mail software for this feature to e-mail and send them via Picture Motion Browser and view images with a...

Handycam® Handbook
Page 101
...hard disk. The "Memory Stick" icon ([Removable Disk]) does not appear on the computer screen. • Insert a "Memory Stick Duo" into your camcorder. • Disconnect the USB device other than the keyboard, the mouse, and the camcorder from the computer. The movie/ still image or sound imported to your camcorder to the (USB) jack on the Handycam...COMPUTER] on the HOME MENU of images on your camcorder is not affected. The image or sound recorded on the camcorder is not played on a Macintosh. Cannot use the supplied software, Picture Motion Browser, on the Macintosh computer. •...
...hard disk. The "Memory Stick" icon ([Removable Disk]) does not appear on the computer screen. • Insert a "Memory Stick Duo" into your camcorder. • Disconnect the USB device other than the keyboard, the mouse, and the camcorder from the computer. The movie/ still image or sound imported to your camcorder to the (USB) jack on the Handycam...COMPUTER] on the HOME MENU of images on your camcorder is not affected. The image or sound recorded on the camcorder is not played on a Macintosh. Cannot use the supplied software, Picture Motion Browser, on the Macintosh computer. •...

Handycam® Handbook
Page 106
Cannot recover data. • Writing data onto the hard disk of the camcorder repeatedly. x PictBridge compliant printer Not connected to PictBridge compatible printer. • Turn off the printer and on again, then remove the USB ...USB cable (supplied) and reconnect it . Management file damaged. The old recorded images on the hard disk of dropping the camcorder constantly, set [DROP SENSOR] to computer using the supplied software. Recovering data • Your camcorder tries to recover the data, but they were unsuccessful. Try with your computer. Memory Stick folders...
Cannot recover data. • Writing data onto the hard disk of the camcorder repeatedly. x PictBridge compliant printer Not connected to PictBridge compatible printer. • Turn off the printer and on again, then remove the USB ...USB cable (supplied) and reconnect it . Management file damaged. The old recorded images on the hard disk of dropping the camcorder constantly, set [DROP SENSOR] to computer using the supplied software. Recovering data • Your camcorder tries to recover the data, but they were unsuccessful. Try with your computer. Memory Stick folders...

Handycam® Handbook
Page 117
...License" folder on requests by the owners of copyright of these software programs under the conditions of source code. Use the following sections. To view the PDF, Adobe Reader is provided on the web. http://www.sony.net/Products/Linux/ We would prefer you do not contact .../ HDR-SR1 as "LGPL") are provided in English) of "C Library," "Expat," "zlib," and "libjpeg" software. You will find licenses (in the camcorder. If it is eligible for these software applications, we have access to inform you of copyright. Notes on your computer, you can download it from the...
...License" folder on requests by the owners of copyright of these software programs under the conditions of source code. Use the following sections. To view the PDF, Adobe Reader is provided on the web. http://www.sony.net/Products/Linux/ We would prefer you do not contact .../ HDR-SR1 as "LGPL") are provided in English) of "C Library," "Expat," "zlib," and "libjpeg" software. You will find licenses (in the camcorder. If it is eligible for these software applications, we have access to inform you of copyright. Notes on your computer, you can download it from the...


