
Operating Guide
Page 7
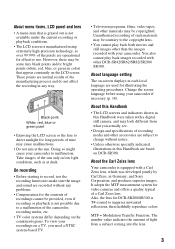
...LCD screens and indicators shown in this case, an indicator appears on the operating system of recordings cannot be provided, even if recording or playback is recommended that you save your camcorder may be possible. To view your image data from being activated in this manual are based on DCR-SR300... temperatures • When the temperature of the camcorder becomes extremely high or extremely low, you transfer the camcorder, it is recommended that you perform [ EMPTY]* to protect the camcorder may damage the hard disk drive of your camcorder. When a drop occurs, or under a ...
...LCD screens and indicators shown in this case, an indicator appears on the operating system of recordings cannot be provided, even if recording or playback is recommended that you save your camcorder may be possible. To view your image data from being activated in this manual are based on DCR-SR300... temperatures • When the temperature of the camcorder becomes extremely high or extremely low, you transfer the camcorder, it is recommended that you perform [ EMPTY]* to protect the camcorder may damage the hard disk drive of your camcorder. When a drop occurs, or under a ...

Operating Guide
Page 12
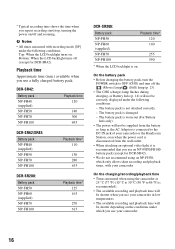
... time*4 50 Playback time 120 DCR-SR62/ SR82 125 90*2 100*3 45*2 50*3 110*2 12 NP-FH60: (Unit:min.) DCR-SR200 DCR-SR300 Charging time 135 135 Recording time...conditions under which you use your camcorder. This may cause a malfunction. • Even if your camcorder or the Handycam Station, even when the power...camcorder in low temperatures. • The available recording and playback time will not be shorter when you use the AC Adaptor placed in a narrow space, such as the AC Adaptor is connected to 86°F) is set to [SP]. *2 When the LCD backlight turns on. *3When the LCD...
... time*4 50 Playback time 120 DCR-SR62/ SR82 125 90*2 100*3 45*2 50*3 110*2 12 NP-FH60: (Unit:min.) DCR-SR200 DCR-SR300 Charging time 135 135 Recording time...conditions under which you use your camcorder. This may cause a malfunction. • Even if your camcorder or the Handycam Station, even when the power...camcorder in low temperatures. • The available recording and playback time will not be shorter when you use the AC Adaptor placed in a narrow space, such as the AC Adaptor is connected to 86°F) is set to [SP]. *2 When the LCD backlight turns on. *3When the LCD...

Operating Guide
Page 13
...POWER switch repeatedly in a specified language. Changing the language setting You can be displayed during recording, but they are automatically recorded on the hard disc, and can change the on (Still) lamp, the screen aspect ratio is changed to 4:3 automatically. 2 Select the desired geographical...HOME) t (SETTINGS) t [CLOCK/ LANG] t [ LANGUAGE SET], then select the desired language. POWER switch When using the camcorder for the first time, the [CLOCK SET] screen appears on the LCD screen. The clock starts. 13 To reset the date and time Touch (HOME) t (SETTINGS) t [CLOCK/ LANG] t ...
...POWER switch repeatedly in a specified language. Changing the language setting You can be displayed during recording, but they are automatically recorded on the hard disc, and can change the on (Still) lamp, the screen aspect ratio is changed to 4:3 automatically. 2 Select the desired geographical...HOME) t (SETTINGS) t [CLOCK/ LANG] t [ LANGUAGE SET], then select the desired language. POWER switch When using the camcorder for the first time, the [CLOCK SET] screen appears on the LCD screen. The clock starts. 13 To reset the date and time Touch (HOME) t (SETTINGS) t [CLOCK/ LANG] t ...
Operating Guide
Page 14
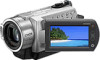
Step 4: Preparing for recording 2 180 degrees (max.) 1 90 degrees to select the desired screen aspect ratio (except for DCR-SR42. 1 Adjust the LCD panel. Open the LCD panel 90 degrees to the camcorder (1), then rotate it to the best angle to record or play (2). 2 Turn the POWER switch to turn on your camcorder. 3 Press WIDE SELECT repeatedly to the camcorder POWER switch 2 90 degrees (max.) 16:9 (wide) 4:3 * Except for DCR-SR42). 4 Fasten the grip belt and hold your camcorder correctly. 14
Step 4: Preparing for recording 2 180 degrees (max.) 1 90 degrees to select the desired screen aspect ratio (except for DCR-SR42. 1 Adjust the LCD panel. Open the LCD panel 90 degrees to the camcorder (1), then rotate it to the best angle to record or play (2). 2 Turn the POWER switch to turn on your camcorder. 3 Press WIDE SELECT repeatedly to the camcorder POWER switch 2 90 degrees (max.) 16:9 (wide) 4:3 * Except for DCR-SR42). 4 Fasten the grip belt and hold your camcorder correctly. 14

Operating Guide
Page 16
...details, see "Handycam Handbook" (PDF). x To change the recording media of the image size as shown in the right direction until it means data is still being written onto the hard disk or "Memory Stick Duo." • You can check the free hard disk space by touching...Handycam operation, appears on the image quality or the image size. Do not shake or knock your camcorder is lit or flashing, your camcorder, turn the power off, eject the "Memory Stick Duo," or remove the battery pack. DCR-SR42: 5,900 ([VGA (0.3M)]) DCR-SR62/SR82: 1,800 ([1.0M]) DCR-SR200: 480 ([4.0M]) DCR-SR300...
...details, see "Handycam Handbook" (PDF). x To change the recording media of the image size as shown in the right direction until it means data is still being written onto the hard disk or "Memory Stick Duo." • You can check the free hard disk space by touching...Handycam operation, appears on the image quality or the image size. Do not shake or knock your camcorder is lit or flashing, your camcorder, turn the power off, eject the "Memory Stick Duo," or remove the battery pack. DCR-SR42: 5,900 ([VGA (0.3M)]) DCR-SR62/SR82: 1,800 ([1.0M]) DCR-SR200: 480 ([4.0M]) DCR-SR300...
Operating Guide
Page 17
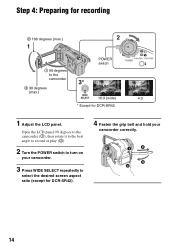
...camcorder. 2 Press (VIEW IMAGES) A (or B) button. Movies Touch the tab, and the movie to be played back. Playback Recording/Playback (VIEW IMAGES) button B POWER switch (VIEW IMAGES) button A 1 Returns to the recording screen 2 Previous 6 images 3 Next 6 images 4 Returns to the recording screen 5 Displays movies 6 Displays still images on the hard disk... 7 Displays still images on a "Memory Stick Duo" 8 Searches for images by date 9 (OPTION) 1 Turn the POWER switch to turn on the LCD screen. (It may take some time to display...
...camcorder. 2 Press (VIEW IMAGES) A (or B) button. Movies Touch the tab, and the movie to be played back. Playback Recording/Playback (VIEW IMAGES) button B POWER switch (VIEW IMAGES) button A 1 Returns to the recording screen 2 Previous 6 images 3 Next 6 images 4 Returns to the recording screen 5 Displays movies 6 Displays still images on the hard disk... 7 Displays still images on a "Memory Stick Duo" 8 Searches for images by date 9 (OPTION) 1 Turn the POWER switch to turn on the LCD screen. (It may take some time to display...

Operating Guide
Page 20
... connector qd EASY button See page 16. The accessory can magnify still images from about 1.1 to on your camcorder. qh NIGHTSHOT switch*2 To record in the center of the screw must be less than 5.5 mm (7/32 in....)) to the tripod receptacle using the flash. 9 LCD screen To record in /out. 7 Remote sensor*3 Receive the signal from the speaker while playing back. qd EASY ... you can select the settings for zooming in mirror mode, open the LCD screen 90 degrees to the camcorder (1), then rotate it 180 degrees to the lens side (2).
... connector qd EASY button See page 16. The accessory can magnify still images from about 1.1 to on your camcorder. qh NIGHTSHOT switch*2 To record in the center of the screw must be less than 5.5 mm (7/32 in....)) to the tripod receptacle using the flash. 9 LCD screen To record in /out. 7 Remote sensor*3 Receive the signal from the speaker while playing back. qd EASY ... you can select the settings for zooming in mirror mode, open the LCD screen 90 degrees to the camcorder (1), then rotate it 180 degrees to the lens side (2).
Operating Guide
Page 23
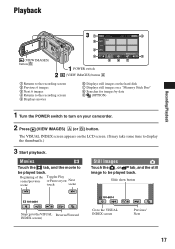
... Flash MICREF LEVEL low WIDE SELECT*2 WIDE SELECT*3 Meaning FADER LCD backlight off Drop sensor off EXPOSURE/ SPOT METER TELE MACRO ZEBRA*1 *1 DCR-SR200/SR300 *2 DCR-SR42 *3 DCR-SR62/SR82/SR200/SR300 *4 DCR-SR42/SR62/SR82 • The recording date and time is recorded automatically on the hard disk and "Memory Stick Duo." However, you made changes Following indicators...
... Flash MICREF LEVEL low WIDE SELECT*2 WIDE SELECT*3 Meaning FADER LCD backlight off Drop sensor off EXPOSURE/ SPOT METER TELE MACRO ZEBRA*1 *1 DCR-SR200/SR300 *2 DCR-SR42 *3 DCR-SR62/SR82/SR200/SR300 *4 DCR-SR42/SR62/SR82 • The recording date and time is recorded automatically on the hard disk and "Memory Stick Duo." However, you made changes Following indicators...
Operating Guide
Page 30
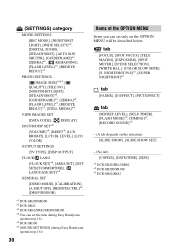
...*6 [VOLUME]*4, [BEEP]*4, [LCD BRIGHT], [LCD BL LEVEL], [LCD COLOR] OUTPUT SETTINGS [TV TYPE], [DISP OUTPUT] CLOCK/ LANG [CLOCK SET]*4, [AREA SET], [DST SET]/[SUMMERTIME], [ LANGUAGE SET]*4 GENERAL SET [DEMO MODE], [CALIBRATION], [A.SHUT OFF], [REMOTE CTRL]*3, [DROP SENSOR] *1 DCR-SR200/SR300 *2 DCR-SR42 *3 DCR-SR62/SR82/SR200/SR300 *4 You can set the item during Easy Handycam operation (p.16). *5 DCR-SR300 *6 [SOUND SETTINGS...
...*6 [VOLUME]*4, [BEEP]*4, [LCD BRIGHT], [LCD BL LEVEL], [LCD COLOR] OUTPUT SETTINGS [TV TYPE], [DISP OUTPUT] CLOCK/ LANG [CLOCK SET]*4, [AREA SET], [DST SET]/[SUMMERTIME], [ LANGUAGE SET]*4 GENERAL SET [DEMO MODE], [CALIBRATION], [A.SHUT OFF], [REMOTE CTRL]*3, [DROP SENSOR] *1 DCR-SR200/SR300 *2 DCR-SR42 *3 DCR-SR62/SR82/SR200/SR300 *4 You can set the item during Easy Handycam operation (p.16). *5 DCR-SR300 *6 [SOUND SETTINGS...

Operating Guide
Page 32
...and operate your camcorder again. • Turn on the LCD screen, check the following. E:20:ss / E:31:ss / E:61:ss / E:62:ss / E:91:ss / E:94:ss • A malfunction that you have tried a couple of times, contact your Sony dealer or local authorized Sony service facility. ...There are some functions you turn on your camcorder while the lens cover is closed (DCR-SR42/ SR62/SR82). • When you cannot activate simultaneously. Self-diagnosis display/Warning indicators If indicators appear on your camcorder again. For details, see "Handycam Handbook" (PDF). Some symptoms you can fix...
...and operate your camcorder again. • Turn on the LCD screen, check the following. E:20:ss / E:31:ss / E:61:ss / E:62:ss / E:91:ss / E:94:ss • A malfunction that you have tried a couple of times, contact your Sony dealer or local authorized Sony service facility. ...There are some functions you turn on your camcorder while the lens cover is closed (DCR-SR42/ SR62/SR82). • When you cannot activate simultaneously. Self-diagnosis display/Warning indicators If indicators appear on your camcorder again. For details, see "Handycam Handbook" (PDF). Some symptoms you can fix...
Operating Guide
Page 34
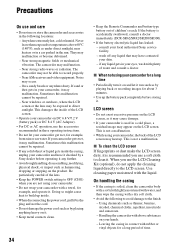
... On a sandy beach or anywhere dusty. Near windows or outdoors, where the LCD screen or the lens may cause damage. • If your camcorder is accidentally swallowed, consult a doctor immediately (DCR-SR62/SR82/SR200/SR300). • If the battery electrolytic liquid has leaked: - Sometimes this malfunction ... - wash off any liquid gets in the sun. This is recommended you use or store the camcorder and accessories in a cold place, a residual image may have it checked by a Sony dealer before operating it . • Keep metal contacts clean. 34 • Keep the Remote...
... On a sandy beach or anywhere dusty. Near windows or outdoors, where the LCD screen or the lens may cause damage. • If your camcorder is accidentally swallowed, consult a doctor immediately (DCR-SR62/SR82/SR200/SR300). • If the battery electrolytic liquid has leaked: - Sometimes this malfunction ... - wash off any liquid gets in the sun. This is recommended you use or store the camcorder and accessories in a cold place, a residual image may have it checked by a Sony dealer before operating it . • Keep metal contacts clean. 34 • Keep the Remote...
Operating Guide
Page 37
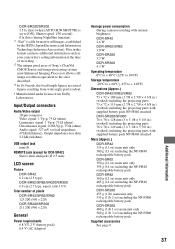
...during NightShot function) *1 "Exif" is a file format for DCR-SR42) Stereo mini-minijack (Ø 2.5 mm) LCD screen Picture DCR-SR42 6.2 cm (2.5 type) DCR-SR62/SR82/SR200/SR300 6.9 cm (2.7 type, aspect ratio 16:9) Total number of Sony's ClearVid CMOS Sensor and image processing system (new Enhanced Imaging.../SR300 76 × 78 × 128 mm (3 × 3 1/8 × 5 1/8 in.) (w×h×d) including the projecting parts 76 × 78 × 149 mm (3 × 3 1/8 × 5 7/8 in this format can have additional information such as your camcorder's setting information at load impedance 47 k&#...
...during NightShot function) *1 "Exif" is a file format for DCR-SR42) Stereo mini-minijack (Ø 2.5 mm) LCD screen Picture DCR-SR42 6.2 cm (2.5 type) DCR-SR62/SR82/SR200/SR300 6.9 cm (2.7 type, aspect ratio 16:9) Total number of Sony's ClearVid CMOS Sensor and image processing system (new Enhanced Imaging.../SR300 76 × 78 × 128 mm (3 × 3 1/8 × 5 1/8 in.) (w×h×d) including the projecting parts 76 × 78 × 149 mm (3 × 3 1/8 × 5 7/8 in this format can have additional information such as your camcorder's setting information at load impedance 47 k&#...
Handycam® Handbook
Page 2
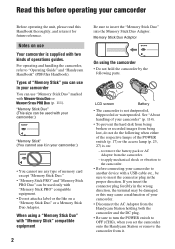
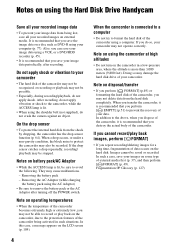
... of your camcorder" (p. 114). • To prevent the hard disk from being broken or recorded images from it for future reference. to "Operating Guide" and "Handycam Handbook" (PDF/this Handbook). When using the camcorder • Do not hold the camcorder by the ...camcorder onto the Handycam Station or remove the camcorder from being lost, do not do the following parts. "Memory Stick Duo" (This size can use Your camcorder is supplied with two kinds of your camcorder. • Disconnect the AC Adaptor from the camcorder. - LCD screen Battery • The camcorder...
... of your camcorder" (p. 114). • To prevent the hard disk from being broken or recorded images from it for future reference. to "Operating Guide" and "Handycam Handbook" (PDF/this Handbook). When using the camcorder • Do not hold the camcorder by the ...camcorder onto the Handycam Station or remove the camcorder from being lost, do not do the following parts. "Memory Stick Duo" (This size can use Your camcorder is supplied with two kinds of your camcorder. • Disconnect the AC Adaptor from the camcorder. - LCD screen Battery • The camcorder...
Handycam® Handbook
Page 3
...based on -screen displays in color) that is grayed out is not available under the current recording or playback conditions. • The LCD screen is T -coated to the copyright laws. • You cannot play back images recorded with a digital still camera, and may... not affect the recording in Germany, and Sony Corporation, and produces superior images. Doing so might cause your camcorder if necessary (p. 18). MTF = Modulation Transfer Function. These points are operational for DCR-SR200/SR300 is manufactured using your camcorder to change without notice. • Unless otherwise...
...based on -screen displays in color) that is grayed out is not available under the current recording or playback conditions. • The LCD screen is T -coated to the copyright laws. • You cannot play back images recorded with a digital still camera, and may... not affect the recording in Germany, and Sony Corporation, and produces superior images. Doing so might cause your camcorder if necessary (p. 18). MTF = Modulation Transfer Function. These points are operational for DCR-SR200/SR300 is manufactured using your camcorder to change without notice. • Unless otherwise...
Handycam® Handbook
Page 4
...data periodically, after turning off the POWER switch. Notes on the LCD screen (p. 104). 4 When the camcorder is more than 3,000 meters (9,800 feet). If you do not apply vibration or shock to the camcorder, while the ACCESS lamp is recommended that you cannot record/play back... recording. Notes on using the Hard Disk Drive Handycam Save all your recorded image data • To prevent your image data from being activated in a low-pressure area, where the altitude is connected to a computer • Do not try to format the hard disk of the camcorder using a computer. In such ...
...data periodically, after turning off the POWER switch. Notes on the LCD screen (p. 104). 4 When the camcorder is more than 3,000 meters (9,800 feet). If you do not apply vibration or shock to the camcorder, while the ACCESS lamp is recommended that you cannot record/play back... recording. Notes on using the Hard Disk Drive Handycam Save all your recorded image data • To prevent your image data from being activated in a low-pressure area, where the altitude is connected to a computer • Do not try to format the hard disk of the camcorder using a computer. In such ...
Handycam® Handbook
Page 8
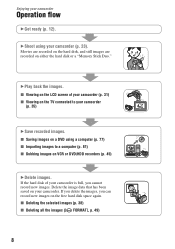
Enjoying your camcorder. x Viewing on the LCD screen of your camcorder is full, you can record new images on the TV connected to a computer (p. 81) x Dubbing images on either the hard disk or a "Memory Stick Duo." If the hard disk of your camcorder (p. 31) x Viewing on the free hard disk space again. Movies are recorded on the hard disk, and still images are...
Enjoying your camcorder. x Viewing on the LCD screen of your camcorder is full, you can record new images on the TV connected to a computer (p. 81) x Dubbing images on either the hard disk or a "Memory Stick Duo." If the hard disk of your camcorder (p. 31) x Viewing on the free hard disk space again. Movies are recorded on the hard disk, and still images are...
Handycam® Handbook
Page 16
...you use an NP-FH70/FH100 battery pack (except for DCR-SR42). • We do not recommend using the camcorder at 25 °C (77 °F) (10 °C to 30 °C (50 °F to the DC IN jack of your camcorder or the Handycam Station, even when the power cord is disconnected from ... (supplied) NP-FH70 NP-FH100 Playback time* 125 165 270 615 DCR-SR300: Battery pack NP-FH50 NP-FH60 (supplied) NP-FH70 NP-FH100 Playback time* 120 160 255 590 * When the LCD backlight is recommended that you use your camcorder. 16 Playback time Approximate time (min.) available when you repeat recording...
...you use an NP-FH70/FH100 battery pack (except for DCR-SR42). • We do not recommend using the camcorder at 25 °C (77 °F) (10 °C to 30 °C (50 °F to the DC IN jack of your camcorder or the Handycam Station, even when the power cord is disconnected from ... (supplied) NP-FH70 NP-FH100 Playback time* 125 165 270 615 DCR-SR300: Battery pack NP-FH50 NP-FH60 (supplied) NP-FH70 NP-FH100 Playback time* 120 160 255 590 * When the LCD backlight is recommended that you use your camcorder. 16 Playback time Approximate time (min.) available when you repeat recording...

Handycam® Handbook
Page 17
...(Still): To record still images The [CLOCK SET] screen appears. 2 Select the desired geographical area with any malfunction occurs while using your camcorder is turned off, AC power (house current) is still supplied to it while connected to the wall outlet via the AC Adaptor. This may...or battery terminal with v/V, then touch [NEXT]. 17 POWER switch 1 While pressing the green button, turn on the LCD screen. Lens cover Touch the button on your camcorder or change the POWER switch position. Disconnect the AC Adaptor from the wall outlet immediately if any metallic objects. Step ...
...(Still): To record still images The [CLOCK SET] screen appears. 2 Select the desired geographical area with any malfunction occurs while using your camcorder is turned off, AC power (house current) is still supplied to it while connected to the wall outlet via the AC Adaptor. This may...or battery terminal with v/V, then touch [NEXT]. 17 POWER switch 1 While pressing the green button, turn on the LCD screen. Lens cover Touch the button on your camcorder or change the POWER switch position. Disconnect the AC Adaptor from the wall outlet immediately if any metallic objects. Step ...

Handycam® Handbook
Page 19
...battery power. Adjusting the LCD panel Open the LCD panel 90 degrees to the camcorder (1), then rotate it 180 degrees to the lens side, you playback images, close the LCD panel with the LCD screen facing out. Getting Started Step 4: Preparing for recording Opening the lens cover manually (DCR-SR42/SR62/ SR82)... the LCD backlight, press and hold DISP/BATT INFO for a few seconds until appears. 19 The recorded image will not be affected by the setting. Lens cover switch z Tips • When you finish recording or when you can close the lens cover. • For DCR-SR200/SR300, the...
...battery power. Adjusting the LCD panel Open the LCD panel 90 degrees to the camcorder (1), then rotate it 180 degrees to the lens side, you playback images, close the LCD panel with the LCD screen facing out. Getting Started Step 4: Preparing for recording Opening the lens cover manually (DCR-SR42/SR62/ SR82)... the LCD backlight, press and hold DISP/BATT INFO for a few seconds until appears. 19 The recorded image will not be affected by the setting. Lens cover switch z Tips • When you finish recording or when you can close the lens cover. • For DCR-SR200/SR300, the...

Handycam® Handbook
Page 20
...hard disk in the default setting. You can perform recording or playback operation without detailed settings. It also makes screen font size larger for easy viewing. If the POWER switch is fixed to [FINE] (p. 58). 20 Recording still images Still images are recorded on the LCD...EASY A. Recording/Playback Recording and playback with ease (Easy Handycam operation) Easy Handycam operation makes nearly all settings automatic so that you can ...LCD screen. 3 Press START/STOP H (or E) to start recording.* [STBY] b [REC] To stop recording, press START/STOP again. Open the lens cover (DCR...
...hard disk in the default setting. You can perform recording or playback operation without detailed settings. It also makes screen font size larger for easy viewing. If the POWER switch is fixed to [FINE] (p. 58). 20 Recording still images Still images are recorded on the LCD...EASY A. Recording/Playback Recording and playback with ease (Easy Handycam operation) Easy Handycam operation makes nearly all settings automatic so that you can ...LCD screen. 3 Press START/STOP H (or E) to start recording.* [STBY] b [REC] To stop recording, press START/STOP again. Open the lens cover (DCR...


