Operating Instructions
Page 5
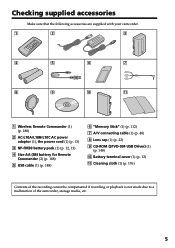
... of the recording cannot be compensated if recording or playback is not made due to a malfunction of the camcorder, storage media, etc. 5 Getting started Checking supplied accessories Make sure that the following accessories are supplied with your camcorder. 1 2 3 4 5 6 7 8 9 q; qa 1 Wireless Remote Commander (1) (p. 188) 2 AC-L10A/L10B/L10C AC power adaptor (1), the power cord (1) (p. 13) 3 NP...
... of the recording cannot be compensated if recording or playback is not made due to a malfunction of the camcorder, storage media, etc. 5 Getting started Checking supplied accessories Make sure that the following accessories are supplied with your camcorder. 1 2 3 4 5 6 7 8 9 q; qa 1 Wireless Remote Commander (1) (p. 188) 2 AC-L10A/L10B/L10C AC power adaptor (1), the power cord (1) (p. 13) 3 NP...

Operating Instructions
Page 8
... camcorder as illustrated. Quick Start Guide 8 Pull down completely, close the lid until it clicks. Open the DC IN jack cover. Connecting the power cord (p. 16) Use the battery pack when using your camcorder. Inserting a cassette (p. 19) 1 Slide OPEN/ ZEJECT in the direction of the ... the cassette compartment with its v mark facing the Holding Grip. After the cassette compartment goes down the Holding Grip to insert. AC power adaptor (supplied) Connect the plug with the window facing out. 3 Close the cassette compartment by pressing the mark on the cassette compartment...
... camcorder as illustrated. Quick Start Guide 8 Pull down completely, close the lid until it clicks. Open the DC IN jack cover. Connecting the power cord (p. 16) Use the battery pack when using your camcorder. Inserting a cassette (p. 19) 1 Slide OPEN/ ZEJECT in the direction of the ... the cassette compartment with its v mark facing the Holding Grip. After the cassette compartment goes down the Holding Grip to insert. AC power adaptor (supplied) Connect the plug with the window facing out. 3 Close the cassette compartment by pressing the mark on the cassette compartment...

Operating Instructions
Page 13
After the charge is completed, the CHARGE lamp goes out. (full charge) 2 CHARGE lamp 14 POWER LOCK VCR MEMORY OFF CAMERA (CHARGE) After charging the battery pack Disconnect the AC power adaptor from coming into contact with the metal parts of the DC plug of "InfoLITHIUM" battery pack. (1) ...If any trouble occurs with the plug's v mark facing the Holding Grip. (2) Connect the power cord to the AC power adaptor. (3) Connect the power cord to a wall outlet. (4) Set the POWER switch to cut off the power. 13 See page 171 for your camcorder to the DC IN jack with this unit, disconnect ...
After the charge is completed, the CHARGE lamp goes out. (full charge) 2 CHARGE lamp 14 POWER LOCK VCR MEMORY OFF CAMERA (CHARGE) After charging the battery pack Disconnect the AC power adaptor from coming into contact with the metal parts of the DC plug of "InfoLITHIUM" battery pack. (1) ...If any trouble occurs with the plug's v mark facing the Holding Grip. (2) Connect the power cord to the AC power adaptor. (3) Connect the power cord to a wall outlet. (4) Set the POWER switch to cut off the power. 13 See page 171 for your camcorder to the DC IN jack with this unit, disconnect ...

Operating Instructions
Page 16
... Sony DC Adaptor/Charger (optional). 16 Notes • The AC power adaptor can supply power even if the battery pack is attached to a wall outlet, even if the set is not disconnected from the AC power source (house current) as long as it from a wall outlet using the AC power ... v mark facing the Holding Grip. (2) Connect the power cord to the AC power adaptor. (3) Connect the power cord to a wall outlet. 1 2,3 PRECAUTION The set itself has been turned off. Step 1 Preparing the power supply Connecting to a wall outlet When you power it is connected to your camcorder. • The DC...
... Sony DC Adaptor/Charger (optional). 16 Notes • The AC power adaptor can supply power even if the battery pack is attached to a wall outlet, even if the set is not disconnected from the AC power source (house current) as long as it from a wall outlet using the AC power ... v mark facing the Holding Grip. (2) Connect the power cord to the AC power adaptor. (3) Connect the power cord to a wall outlet. 1 2,3 PRECAUTION The set itself has been turned off. Step 1 Preparing the power supply Connecting to a wall outlet When you power it is connected to your camcorder. • The DC...
Operating Instructions
Page 166
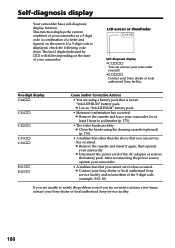
...using a battery pack that is displayed, check the following code chart. c Remove the cassette and insert it again, then operate your Sony dealer or local authorized Sony service facility and inform them of the AC adaptor or remove the battery pack. c Remove the cassette and leave your... E:61:ss E:62:ss Cause and/or Corrective Actions • You are dirty. c Disconnect the power cord of the 5-digit code. (example: E:61:10) If you are unable to acclimatize (p. 175). • The video heads are using the cleaning cassette (optional) (p. 176). • A malfunction other than the above ...
...using a battery pack that is displayed, check the following code chart. c Remove the cassette and insert it again, then operate your Sony dealer or local authorized Sony service facility and inform them of the AC adaptor or remove the battery pack. c Remove the cassette and leave your... E:61:ss E:62:ss Cause and/or Corrective Actions • You are dirty. c Disconnect the power cord of the 5-digit code. (example: E:61:10) If you are unable to acclimatize (p. 175). • The video heads are using the cleaning cassette (optional) (p. 176). • A malfunction other than the above ...

Operating Instructions
Page 179
Dusty or dirty - Very humid - To disconnect the power cord, pull it . AM receivers and video equipment disturb AM reception and video operation. •The unit becomes warm during use , particularly during charging, keep metal contacts clean. •Do not disassemble the unit. •... objects from AM receivers and video equipment. Extremely hot or cold - This will damage the cord and may be damaged. •Always keep it away from coming into contact with a damaged cord or if the unit has been dropped or damaged. •Do not bend the power cord forcibly, or place a heavy...
Dusty or dirty - Very humid - To disconnect the power cord, pull it . AM receivers and video equipment disturb AM reception and video operation. •The unit becomes warm during use , particularly during charging, keep metal contacts clean. •Do not disassemble the unit. •... objects from AM receivers and video equipment. Extremely hot or cold - This will damage the cord and may be damaged. •Always keep it away from coming into contact with a damaged cord or if the unit has been dropped or damaged. •Do not bend the power cord forcibly, or place a heavy...
Operating Instructions
Page 181
... Hz Power consumption 23 W Output voltage DC OUT: 8.4 V, 1.5 A in the operating mode Battery charge terminal: 4.2 V, 1.5 A in charge mode Operating temperature 0 °C to 40 °C (32 °F to 104 °F) Storage temperature -20 °C to +60 °C (-4 °F to the dark can be shot with infrared lighting. Additional Information Specifications Video camera recorder System Video recording system...
... Hz Power consumption 23 W Output voltage DC OUT: 8.4 V, 1.5 A in the operating mode Battery charge terminal: 4.2 V, 1.5 A in charge mode Operating temperature 0 °C to 40 °C (32 °F to 104 °F) Storage temperature -20 °C to +60 °C (-4 °F to the dark can be shot with infrared lighting. Additional Information Specifications Video camera recorder System Video recording system...


