
Operating Guide
Page 35
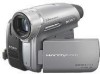
...displayed. To use special effects 4 See (PICT.APPLI.) menu on Personal Menu are not initialized.) 35 K Internal stereo microphone For DCR-HC96: An Active Interface Shoe compatible microphone will take precedence when connected (p. 78). Recording/Playback To cancel, touch [END]. • You cannot change the ...the volume, see page 31. O Speaker Playback sound come out from the speaker. • For how to operate your camcorder. J Recording lamp (DCR-HC96) The recording lamp lights up to OFF (CHG), then press DISP/BATT INFO qd. Recording/playback To check the remaining battery...
...displayed. To use special effects 4 See (PICT.APPLI.) menu on Personal Menu are not initialized.) 35 K Internal stereo microphone For DCR-HC96: An Active Interface Shoe compatible microphone will take precedence when connected (p. 78). Recording/Playback To cancel, touch [END]. • You cannot change the ...the volume, see page 31. O Speaker Playback sound come out from the speaker. • For how to operate your camcorder. J Recording lamp (DCR-HC96) The recording lamp lights up to OFF (CHG), then press DISP/BATT INFO qd. Recording/playback To check the remaining battery...
Operating Guide
Page 78
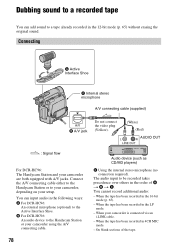
... You can input audio in the LP mode. - Connecting A Active Interface Shoe C Internal stereo microphone A/V connecting cable (supplied) A/V B A/V jack Do not connect the video plug (Yellow). (White) (Red) AUDIO OUT : Signal flow For DCR-HC96: The Handycam Station and your camcorder is connected via an i.LINK cable. - When the tape has been recorded in the...
... You can input audio in the LP mode. - Connecting A Active Interface Shoe C Internal stereo microphone A/V connecting cable (supplied) A/V B A/V jack Do not connect the video plug (Yellow). (White) (Red) AUDIO OUT : Signal flow For DCR-HC96: The Handycam Station and your camcorder is connected via an i.LINK cable. - When the tape has been recorded in the...

Operating Guide
Page 79
...the same time. Check the sound using a TV or other than that of your camcorder beforehand. 1 Slide the POWER switch repeatedly to turn on the Handycam Station. Recording sound Insert a recorded cassette into your camcorder (p. 122). - Continued , 79 Dubbing/Editing - When the tape has been ... of the tape. 5 Touch (Stop) when you want to a TV or other device using the A/V jack (DCR-HC96) or the internal stereo microphone, the picture will not be output from your camcorder. On sections recorded in stereo 2 (ST2) during playback. X appears. 6 0 min AUD DUB CTRL 0:00:...
...the same time. Check the sound using a TV or other than that of your camcorder beforehand. 1 Slide the POWER switch repeatedly to turn on the Handycam Station. Recording sound Insert a recorded cassette into your camcorder (p. 122). - Continued , 79 Dubbing/Editing - When the tape has been ... of the tape. 5 Touch (Stop) when you want to a TV or other device using the A/V jack (DCR-HC96) or the internal stereo microphone, the picture will not be output from your camcorder. On sections recorded in stereo 2 (ST2) during playback. X appears. 6 0 min AUD DUB CTRL 0:00:...
Operating Guide
Page 84
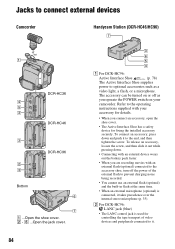
...) and the built-in flash at the same time. • When an external microphone (optional) is connected, it . 84 Jacks to connect external devices Camcorder Handycam Station (DCR-HC46/HC96) 7 1 DCR-HC36 4 5 3 DCR-HC46 3 DCR-HC96 2 3 Bottom 6 7 1 ...Open the shoe cover. 2 - 6 ...Open the jack cover. 3 6 5 4 A For DCR-HC96: Active Interface Shoe (p. 78) The Active Interface Shoe supplies power to optional accessories...
...) and the built-in flash at the same time. • When an external microphone (optional) is connected, it . 84 Jacks to connect external devices Camcorder Handycam Station (DCR-HC46/HC96) 7 1 DCR-HC36 4 5 3 DCR-HC46 3 DCR-HC96 2 3 Bottom 6 7 1 ...Open the shoe cover. 2 - 6 ...Open the jack cover. 3 6 5 4 A For DCR-HC96: Active Interface Shoe (p. 78) The Active Interface Shoe supplies power to optional accessories...

Operating Guide
Page 107
...optional) (p. 129). This is not a malfunction (p. 125). Troubleshooting Continued , 107 This is not a malfunction (p. 122). Fine patterns flicker, diagonal lines look jagged (DCR-HC96). • Adjust [SHARPNESS] to [STEREO] (p. 65). • Turn up the volume (p. 31). • Adjust [AUDIO MIX] from the [ST2] (... blank section on the tape is not compatible with a scratch or noise cannot be read. Your camcorder is being played. • The data code on a tape with 4ch microphone recording. The displayed pictures are not clear or do not appear. • Clean the head using...
...optional) (p. 129). This is not a malfunction (p. 125). Troubleshooting Continued , 107 This is not a malfunction (p. 122). Fine patterns flicker, diagonal lines look jagged (DCR-HC96). • Adjust [SHARPNESS] to [STEREO] (p. 65). • Turn up the volume (p. 31). • Adjust [AUDIO MIX] from the [ST2] (... blank section on the tape is not compatible with a scratch or noise cannot be read. Your camcorder is being played. • The data code on a tape with 4ch microphone recording. The displayed pictures are not clear or do not appear. • Clean the head using...
Operating Guide
Page 138
... 58, 124 FRAME REC (Frame recording 62 Frame-by-frame Playback ....64 G Getting Started 12 Grip belt 18 GUIDEFRAME 67 H Handycam Station ..........13, 84 Help 87 Holding the camcorder .........18 I i.LINK 127 i.LINK cable .......72, 75, 94, 97 Icon .......See Display indicators ID-1/ID-2 43, 54 Image... battery pack 126 Initialize (Reset 35 Install 89 Insulation sheet 40 INT.REC-STL (Interval photo recording).... 63 Interface connector 85 Internal stereo microphone 35 J Jack 84 JPEG 124 L Label 123 LANC jack 84 LANDSCAPE 49 LANGUAGE 69 LCD backlight 20, 101 LCD BL LEVEL (LCD...
... 58, 124 FRAME REC (Frame recording 62 Frame-by-frame Playback ....64 G Getting Started 12 Grip belt 18 GUIDEFRAME 67 H Handycam Station ..........13, 84 Help 87 Holding the camcorder .........18 I i.LINK 127 i.LINK cable .......72, 75, 94, 97 Icon .......See Display indicators ID-1/ID-2 43, 54 Image... battery pack 126 Initialize (Reset 35 Install 89 Insulation sheet 40 INT.REC-STL (Interval photo recording).... 63 Interface connector 85 Internal stereo microphone 35 J Jack 84 JPEG 124 L Label 123 LANC jack 84 LANDSCAPE 49 LANGUAGE 69 LCD backlight 20, 101 LCD BL LEVEL (LCD...


