Operating Guide
Page 4
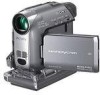
"Operating Guide" (This manual) - If you insert the connector plug forcibly in your camcorder • A mini DV cassette marked with (mini DV cassettes with Cassette Memory are incompatible) (p. 106). • "Memory Stick Duo" marked with , (p. 107). On the menu ... points are operational for long periods of such materials may cause malfunctions. • Do not aim at dusk. Read this may cause a malfunction of your camcorder. On using extremely highprecision technology, so over 99.99% of the pixels are normal results of the manufacturing process and do not affect the recording...
"Operating Guide" (This manual) - If you insert the connector plug forcibly in your camcorder • A mini DV cassette marked with (mini DV cassettes with Cassette Memory are incompatible) (p. 106). • "Memory Stick Duo" marked with , (p. 107). On the menu ... points are operational for long periods of such materials may cause malfunctions. • Do not aim at dusk. Read this may cause a malfunction of your camcorder. On using extremely highprecision technology, so over 99.99% of the pixels are normal results of the manufacturing process and do not affect the recording...
Operating Guide
Page 5
..., and therefore may appear different. • The on-screen displays in each local language are based on this manual for illustration purposes are captured using your camcorder if necessary (p. 16). • The illustrations used for Modulation Transfer Function. The number value indicates the amount ... camcorder is equipped with a Carl Zeiss lens, which was developed jointly by Carl Zeiss, in Germany, and Sony Corporation, and produces superior images. On this manual • The images of the LCD screen and the viewfinder used in this manual are used on the model DCR-HC42....
..., and therefore may appear different. • The on-screen displays in each local language are based on this manual for illustration purposes are captured using your camcorder if necessary (p. 16). • The illustrations used for Modulation Transfer Function. The number value indicates the amount ... camcorder is equipped with a Carl Zeiss lens, which was developed jointly by Carl Zeiss, in Germany, and Sony Corporation, and produces superior images. On this manual • The images of the LCD screen and the viewfinder used in this manual are used on the model DCR-HC42....

Operating Guide
Page 7
...USB, etc.) TIME/LANGU. Searching for the starting point 31 Searching for the last scene of the most recent recording (END SEARCH 31 Searching manually (EDIT SEARCH 31 Reviewing the most recently recorded scenes (Rec review 31 Remote Commander 32 Searching quickly for a desired scene (Zero set memory ... Playing the picture on a TV 34 Using the Menu Using the menu items 36 Menu items 38 CAMERA SET menu 40 Settings to adjust your camcorder to a recorded tape 63 Continued 7 menu 48 Special effects on pictures or additional functions on a tape or other recording devices 60 ...
...USB, etc.) TIME/LANGU. Searching for the starting point 31 Searching for the last scene of the most recent recording (END SEARCH 31 Searching manually (EDIT SEARCH 31 Reviewing the most recently recorded scenes (Rec review 31 Remote Commander 32 Searching quickly for a desired scene (Zero set memory ... Playing the picture on a TV 34 Using the Menu Using the menu items 36 Menu items 38 CAMERA SET menu 40 Settings to adjust your camcorder to a recorded tape 63 Continued 7 menu 48 Special effects on pictures or additional functions on a tape or other recording devices 60 ...
Operating Guide
Page 9
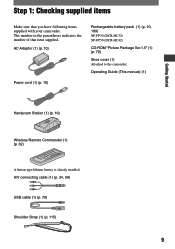
...manual) (1) Getting Started Handycam Station (1) (p. 10) Wireless Remote Commander (1) (p. 32) A button-type lithium battery is already installed. Step 1: Checking supplied items Make sure that item supplied. The number in the parentheses indicates the number of that you have following items supplied with your camcorder.... A/V connecting cable (1) (p. 34, 59) USB cable (1) (p. 70) Shoulder Strap (1) (p. 115) 9 AC Adaptor (1) (p. 10) Power cord (1) (p. 10) Rechargeable battery pack (1) (p. 10, 109) NP-FP30 (DCR-HC32) NP-FP50 (DCR-HC42) CD-ROM "Picture ...
...manual) (1) Getting Started Handycam Station (1) (p. 10) Wireless Remote Commander (1) (p. 32) A button-type lithium battery is already installed. Step 1: Checking supplied items Make sure that item supplied. The number in the parentheses indicates the number of that you have following items supplied with your camcorder.... A/V connecting cable (1) (p. 34, 59) USB cable (1) (p. 70) Shoulder Strap (1) (p. 115) 9 AC Adaptor (1) (p. 10) Power cord (1) (p. 10) Rechargeable battery pack (1) (p. 10, 109) NP-FP30 (DCR-HC32) NP-FP50 (DCR-HC42) CD-ROM "Picture ...
Operating Guide
Page 24
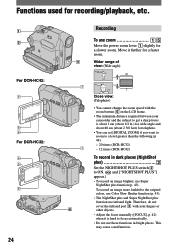
...; with the zoom buttons on the LCD frame. • The minimum distance required between your fingers or other objects. • Adjust the focus manually ([FOCUS], p. 42) when it further for a faster zoom. 3 Wider range of view: (Wide angle) 7 7 8 Close view: (Telephoto) • You...with your camcorder and the subject to get a sharp focus is hard to focus automatically. • Do not use these functions in dark places (NightShot plus Set the NIGHTSHOT PLUS switch to a level greater than the following (p 44): - 20 times (DCR-HC32) - 12 times (DCR-HC42) To ...
...; with the zoom buttons on the LCD frame. • The minimum distance required between your fingers or other objects. • Adjust the focus manually ([FOCUS], p. 42) when it further for a faster zoom. 3 Wider range of view: (Wide angle) 7 7 8 Close view: (Telephoto) • You...with your camcorder and the subject to get a sharp focus is hard to focus automatically. • Do not use these functions in dark places (NightShot plus Set the NIGHTSHOT PLUS switch to a level greater than the following (p 44): - 20 times (DCR-HC32) - 12 times (DCR-HC42) To ...
Operating Guide
Page 31
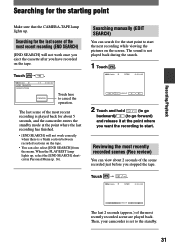
...that the CAMERA-TAPE lamp lights up , select the [END SEARCH] shortcut in Personal Menu (p. 36). Searching manually (EDIT SEARCH) You can view about 5 seconds, and the camcorder enters the standby mode at the point where you want the recording to go backward)/ (to start the next ...recording while viewing the pictures on the screen. Then, your camcorder is a blank section between recorded sections on the tape. Touch . 6 0 min END SEARCH EXECUTING 1 0:00:00 CANCEL Touch here ...
...that the CAMERA-TAPE lamp lights up , select the [END SEARCH] shortcut in Personal Menu (p. 36). Searching manually (EDIT SEARCH) You can view about 5 seconds, and the camcorder enters the standby mode at the point where you want the recording to go backward)/ (to start the next ...recording while viewing the pictures on the screen. Then, your camcorder is a blank section between recorded sections on the tape. Touch . 6 0 min END SEARCH EXECUTING 1 0:00:00 CANCEL Touch here ...

Operating Guide
Page 34
... [16:9]. When your TV is not necessary. Set the input selector on the VCR. For DCR-HC42: To set [TV TYPE] to the playback picture. The TV automatically switches the aspect ratio ... and 4:3, the image may jitter. 34 In this operation (p. 10). Refer also to the manual supplied with your TV. • When you set the aspect ratio according to the connected TV...(STANDARD SET) [TV TYPE] [16:9] or [4:3] . • When you connect your camcorder to a TV compatible with the ID-1/ID-2 system, or via the S VIDEO jack, by using the supplied AC Adaptor for...
... [16:9]. When your TV is not necessary. Set the input selector on the VCR. For DCR-HC42: To set [TV TYPE] to the playback picture. The TV automatically switches the aspect ratio ... and 4:3, the image may jitter. 34 In this operation (p. 10). Refer also to the manual supplied with your TV. • When you set the aspect ratio according to the connected TV...(STANDARD SET) [TV TYPE] [16:9] or [4:3] . • When you connect your camcorder to a TV compatible with the ID-1/ID-2 system, or via the S VIDEO jack, by using the supplied AC Adaptor for...
Operating Guide
Page 40
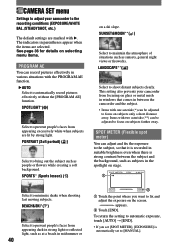
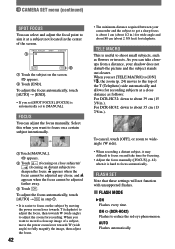
... focusing on glass or metal mesh in windows that it is recorded in suitable brightness even when there is automatically set to [MANUAL]. SPORTS* (Sports lesson) ( ) on subjects only a short distance away. BEACH&SKI*( ) Select to prevent people's faces from ... to automatically record pictures effectively without the [PROGRAM AE] function. The indicators in various situations with . This setting also prevents your camcorder to the recording conditions (EXPOSURE/WHITE BAL./STEADYSHOT, etc.) The default settings are marked with the PROGRAM AE function. AUTO Select...
... focusing on glass or metal mesh in windows that it is recorded in suitable brightness even when there is automatically set to [MANUAL]. SPORTS* (Sports lesson) ( ) on subjects only a short distance away. BEACH&SKI*( ) Select to prevent people's faces from ... to automatically record pictures effectively without the [PROGRAM AE] function. The indicators in various situations with . This setting also prevents your camcorder to the recording conditions (EXPOSURE/WHITE BAL./STEADYSHOT, etc.) The default settings are marked with the PROGRAM AE function. AUTO Select...
Operating Guide
Page 41
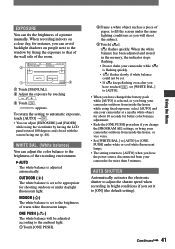
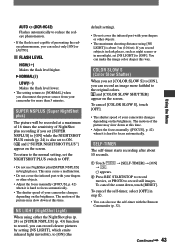
...180 degrees and closed with the screen facing out (p. 48). WHITE BAL. (White balance) You can fix the brightness of a picture manually. EXPOSURE You can adjust the color balance to the brightness of the recording environment. AUTO The white balance is selected, or you bring... the electronic shutter to adjust the shutter speed when recording in the memory, the indicator stops flashing. • Do not shake your camcorder while is flashing quickly. • flashes slowly if white balance could not be adjusted according to the ambient light. ...
...180 degrees and closed with the screen facing out (p. 48). WHITE BAL. (White balance) You can fix the brightness of a picture manually. EXPOSURE You can adjust the color balance to the brightness of the recording environment. AUTO The white balance is selected, or you bring... the electronic shutter to adjust the shutter speed when recording in the memory, the indicator stops flashing. • Do not shake your camcorder while is flashing quickly. • flashes slowly if white balance could not be adjusted according to the ambient light. ...
Operating Guide
Page 42
... Adjust the focus manually ([FOCUS], p. 42... hard to reduce the red-eye phenomenon. For DCR-HC42: down to [MANUAL]. FLASH SET Note that these settings will not function... the screen. appears. Touch [END]. ON (DCR-HC42) Flashes to focus automatically. AUTO Flashes automatically. When you set [SPOT...is useful to shoot small subjects, such as follows: For DCR-HC32: down to get a sharp focus is automatically set ...If you want to focus on a certain subject intentionally. Touch [MANUAL]. appears. Touch (focusing on close subjects)/ (focusing ...
... Adjust the focus manually ([FOCUS], p. 42... hard to reduce the red-eye phenomenon. For DCR-HC42: down to [MANUAL]. FLASH SET Note that these settings will not function... the screen. appears. Touch [END]. ON (DCR-HC42) Flashes to focus automatically. AUTO Flashes automatically. When you set [SPOT...is useful to shoot small subjects, such as follows: For DCR-HC32: down to get a sharp focus is automatically set ...If you want to focus on a certain subject intentionally. Touch [MANUAL]. appears. Touch (focusing on close subjects)/ (focusing ...
Operating Guide
Page 43
...REC START/STOP to record movies, or PHOTO to ON. Continued 43 Using the Menu AUTO (DCR-HC42) Flashes automatically to reduce the redeye phenomenon. • If the flash is not capable of preventing ...automatically. The motion of the picture may slow down at this time. • Adjust the focus manually ([FOCUS], p. 42) when it is hard to focus automatically. • The shutter speed of... moonlight, set [COLOR SLOW S] to [ON], you disconnect the power source from your camcorder changes depending on the brightness. To cancel the self-timer, select [OFF] in bright ...
...REC START/STOP to record movies, or PHOTO to ON. Continued 43 Using the Menu AUTO (DCR-HC42) Flashes automatically to reduce the redeye phenomenon. • If the flash is not capable of preventing ...automatically. The motion of the picture may slow down at this time. • Adjust the focus manually ([FOCUS], p. 42) when it is hard to focus automatically. • The shutter speed of... moonlight, set [COLOR SLOW S] to [ON], you disconnect the power source from your camcorder changes depending on the brightness. To cancel the self-timer, select [OFF] in bright ...
Operating Guide
Page 44
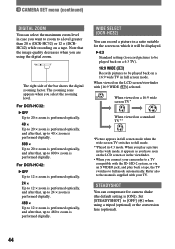
...connect your TV. For DCR-HC42: OFF Up to 12 × zoom is performed optically. 24 × Up to 12 × zoom is performed optically, and after that the image quality decreases when you have seen on a tape. Refer also to the manuals supplied with your camcorder to a TV compatible... with [16:9 WIDE ( )] selected. When you want to zoom to 800 × zoom is performed digitally. Note that , up to a level greater than 20 × (DCR-HC32) or 12 × (DCRHC42) while recording...
...connect your TV. For DCR-HC42: OFF Up to 12 × zoom is performed optically. 24 × Up to 12 × zoom is performed optically, and after that the image quality decreases when you have seen on a tape. Refer also to the manuals supplied with your camcorder to a TV compatible... with [16:9 WIDE ( )] selected. When you want to zoom to 800 × zoom is performed digitally. Note that , up to a level greater than 20 × (DCR-HC32) or 12 × (DCRHC42) while recording...
Operating Guide
Page 50
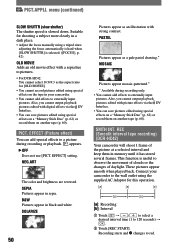
... is useful to red. EFFECT] setting. B&W Pictures appear in sepia. REC (Smooth interval tape recording) (DCR-HC42) Your camcorder will shoot 1 frame of daylight. Suitable for shooting a subject more clearly in a dark place. • Adjust the focus manually using special effects on the tape in memory until it has stored several frames. EFFECT (Picture...
... is useful to red. EFFECT] setting. B&W Pictures appear in sepia. REC (Smooth interval tape recording) (DCR-HC42) Your camcorder will shoot 1 frame of daylight. Suitable for shooting a subject more clearly in a dark place. • Adjust the focus manually using special effects on the tape in memory until it has stored several frames. EFFECT (Picture...
Operating Guide
Page 51
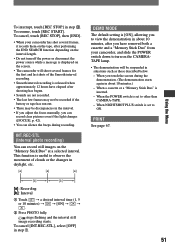
...clouds or the changes in the interval. • If you adjust the focus manually, you can record clear pictures even if the light changes ([FOCUS], p. 42). • You can record still images on the screen. • The camcorder will be discrepancies in daylight, etc. PRINT See page 67. To cancel ... while a message is displayed on the "Memory Stick Duo" at a selected interval. To cancel, touch [REC STOP], then [END]. • When your camcorder, and slide the POWER switch down to ON. To interrupt, touch [REC STOP] in step . 51 When the POWER switch is set to view...
...clouds or the changes in the interval. • If you adjust the focus manually, you can record clear pictures even if the light changes ([FOCUS], p. 42). • You can record still images on the screen. • The camcorder will be discrepancies in daylight, etc. PRINT See page 67. To cancel ... while a message is displayed on the "Memory Stick Duo" at a selected interval. To cancel, touch [REC STOP], then [END]. • When your camcorder, and slide the POWER switch down to ON. To interrupt, touch [REC STOP] in step . 51 When the POWER switch is set to view...
Operating Guide
Page 59
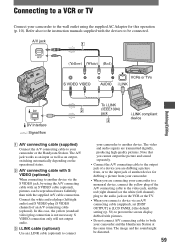
...optional), pictures can be reproduced more faithfully than with the supplied A/V cable connection. The video and audio signals are connecting your camcorder and the Handycam Station at the same time. Connect the white and red plugs (left channel) plug to the audio jack on the operational ...connecting cable with S VIDEO (optional) When connecting to be distorted. 59 Refer also to the instruction manuals supplied with pictures. • Do not connect A/V connecting cables to both your camcorder to a monaural device, connect the yellow plug of the A/V connecting cable to the video jack, ...
...optional), pictures can be reproduced more faithfully than with the supplied A/V cable connection. The video and audio signals are connecting your camcorder and the Handycam Station at the same time. Connect the white and red plugs (left channel) plug to the audio jack on the operational ...connecting cable with S VIDEO (optional) When connecting to be distorted. 59 Refer also to the instruction manuals supplied with pictures. • Do not connect A/V connecting cables to both your camcorder to a monaural device, connect the yellow plug of the A/V connecting cable to the video jack, ...
Operating Guide
Page 71
About "First Step Guide" "First Step Guide" is an instruction manual you use the software stored on the CDROM (supplied). To display the Help guide, click the [?] mark on a computer OS: Microsoft Windows 98, Windows 98SE, ... an i.LINK cable), disc drive (You need a CD-R drive to play back movies.) Continued 71 Using a Computer Refer to on the size of your camcorder and computer and making settings, to general operation the first time you can refer to the Help guide for installation: 500 MB or more...
About "First Step Guide" "First Step Guide" is an instruction manual you use the software stored on the CDROM (supplied). To display the Help guide, click the [?] mark on a computer OS: Microsoft Windows 98, Windows 98SE, ... an i.LINK cable), disc drive (You need a CD-R drive to play back movies.) Continued 71 Using a Computer Refer to on the size of your camcorder and computer and making settings, to general operation the first time you can refer to the Help guide for installation: 500 MB or more...


