Operating Guide
Page 14
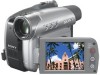
... lamp lights up and charging starts. • When inserting the camcorder into the Handycam Station securely, all the way to a power source such as a wall outlet as shown in this case. Step2: Charging the battery pack (Continued) For DCR-HC36: With the v mark facing to the LCD screen DC IN jack...in the illustration. For DCR-HC46/HC96: To charge the battery pack using only the AC Adaptor Turn off when the battery is fully charged. For DCR-HC36: Connect the power cord to the AC Adaptor and the wall outlet. Insert the camcorder into the Handycam Station, close the DC IN jack ...
... lamp lights up and charging starts. • When inserting the camcorder into the Handycam Station securely, all the way to a power source such as a wall outlet as shown in this case. Step2: Charging the battery pack (Continued) For DCR-HC36: With the v mark facing to the LCD screen DC IN jack...in the illustration. For DCR-HC46/HC96: To charge the battery pack using only the AC Adaptor Turn off when the battery is fully charged. For DCR-HC36: Connect the power cord to the AC Adaptor and the wall outlet. Insert the camcorder into the Handycam Station, close the DC IN jack ...

Operating Guide
Page 16
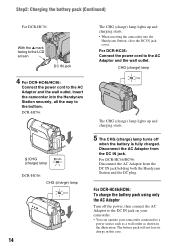
...turns off . Bottom: Recording with LCD screen. DCR-HC36 Battery pack LCD panel opened NP-FP30 (supplied) 90 NP-FP50 125 NP-FP70 265 NP-FP71 315 NP-FP90 475 LCD panel closed 110 160 330 395 580 DCR-HC46 Battery pack Continuous recording time Typical recording ...conditions: Top: Recording with viewfinder while the LCD panel closed. * Typical recording time shows the time when you repeat recording start /stop, turning the power on/off and zooming. Step2: Charging the battery pack (Continued) DCR-HC36 Battery pack Continuous recording time Typical recording time* NP-...
...turns off . Bottom: Recording with LCD screen. DCR-HC36 Battery pack LCD panel opened NP-FP30 (supplied) 90 NP-FP50 125 NP-FP70 265 NP-FP71 315 NP-FP90 475 LCD panel closed 110 160 330 395 580 DCR-HC46 Battery pack Continuous recording time Typical recording ...conditions: Top: Recording with viewfinder while the LCD panel closed. * Typical recording time shows the time when you repeat recording start /stop, turning the power on/off and zooming. Step2: Charging the battery pack (Continued) DCR-HC36 Battery pack Continuous recording time Typical recording time* NP-...
Operating Guide
Page 17
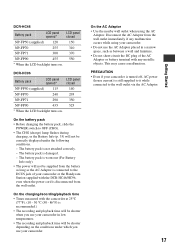
... AC Adaptor is disconnected from the wall outlet immediately if any metallic objects. Disconnect the AC Adaptor from the wall outlet. DCR-HC96 Battery pack LCD panel opened * LCD panel closed NP-FP50 (supplied) 115 140 NP-FP70 240 295 NP-FP71 290 350 NP-FP90 435 525 * When the LCD ... be supplied from the battery as long as between a wall and furniture. • Do not short-circuit the DC plug of your camcorder or the Handycam Station supplied with the DCR-HC46/HC96, even when the power cord is connected to the DC IN jack of the AC Adaptor or battery terminal with...
... AC Adaptor is disconnected from the wall outlet immediately if any metallic objects. Disconnect the AC Adaptor from the wall outlet. DCR-HC96 Battery pack LCD panel opened * LCD panel closed NP-FP50 (supplied) 115 140 NP-FP70 240 295 NP-FP71 290 350 NP-FP90 435 525 * When the LCD ... be supplied from the battery as long as between a wall and furniture. • Do not short-circuit the DC plug of your camcorder or the Handycam Station supplied with the DCR-HC46/HC96, even when the power cord is connected to the DC IN jack of the AC Adaptor or battery terminal with...
Operating Guide
Page 20
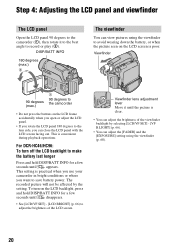
... view pictures using the viewfinder (p. 60). 20 Step 4: Adjusting the LCD panel and viewfinder The LCD panel Open the LCD panel 90 degrees to the camcorder (1), then rotate it until the picture is clear. • You can adjust the brightness of the LCD screen. Viewfinder 90 degrees (max.) 1 90 degrees...[LCD/VF SET] - [LCD BRIGHT] (p. 66) to record or play (2). DISP/BATT INFO 180 degrees (max.) 2 The viewfinder You can close the LCD panel with the LCD screen facing out. For DCR-HC46/HC96: To turn on the LCD screen is poor. Viewfinder lens adjustment lever Move it to the best angle...
... view pictures using the viewfinder (p. 60). 20 Step 4: Adjusting the LCD panel and viewfinder The LCD panel Open the LCD panel 90 degrees to the camcorder (1), then rotate it until the picture is clear. • You can adjust the brightness of the LCD screen. Viewfinder 90 degrees (max.) 1 90 degrees...[LCD/VF SET] - [LCD BRIGHT] (p. 66) to record or play (2). DISP/BATT INFO 180 degrees (max.) 2 The viewfinder You can close the LCD panel with the LCD screen facing out. For DCR-HC46/HC96: To turn on the LCD screen is poor. Viewfinder lens adjustment lever Move it to the best angle...
Operating Guide
Page 24
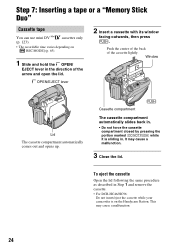
...in. • Do not force the cassette compartment closed by pressing the portion marked {DO NOT PUSH} while it is sliding in Step 1 and remove the cassette. • For DCR-HC46/HC96: Do not insert/eject the cassette while your camcorder is on [ REC MODE] (p. 65). 1 ... compartment automatically comes out and opens up. This may cause a malfunction. 3 Close the lid. Step 7: Inserting a tape or a "Memory Stick Duo" Cassette tape You can use mini DV cassettes only (p. 123). • The recordable time varies depending on the Handycam Station. It may cause a malfunction. 24
...in. • Do not force the cassette compartment closed by pressing the portion marked {DO NOT PUSH} while it is sliding in Step 1 and remove the cassette. • For DCR-HC46/HC96: Do not insert/eject the cassette while your camcorder is on [ REC MODE] (p. 65). 1 ... compartment automatically comes out and opens up. This may cause a malfunction. 3 Close the lid. Step 7: Inserting a tape or a "Memory Stick Duo" Cassette tape You can use mini DV cassettes only (p. 123). • The recordable time varies depending on the Handycam Station. It may cause a malfunction. 24
Operating Guide
Page 32
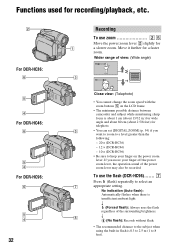
...DCR-HC36) - 12 × (DCR-HC46) - 10 × (DCR-HC96) • Be sure to keep your finger on the LCD frame. • The minimum possible distance between camcorder... and subject while maintaining sharp focus is about 1 cm (about 13/32 in.) for wide angle and about 80 cm (about 2 5/8 feet) for telephoto. 3 • You can set [DIGITAL... range of view: (Wide angle) 3 Close view: (Telephoto) • You cannot change the zoom speed with the zoom ...
...DCR-HC36) - 12 × (DCR-HC46) - 10 × (DCR-HC96) • Be sure to keep your finger on the LCD frame. • The minimum possible distance between camcorder... and subject while maintaining sharp focus is about 1 cm (about 13/32 in.) for wide angle and about 80 cm (about 2 5/8 feet) for telephoto. 3 • You can set [DIGITAL... range of view: (Wide angle) 3 Close view: (Telephoto) • You cannot change the zoom speed with the zoom ...
Operating Guide
Page 45
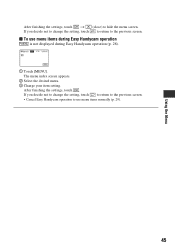
... decide not to change the setting, touch to return to the previous screen. • Cancel Easy Handycam operation to hide the menu screen. Using the Menu After finishing the settings, touch t (close) to use menu items during Easy Handycam operation is not displayed during Easy Handycam operation (p. 28). 60min EASY STBY MENU 1 Touch [MENU].
... decide not to change the setting, touch to return to the previous screen. • Cancel Easy Handycam operation to hide the menu screen. Using the Menu After finishing the settings, touch t (close) to use menu items during Easy Handycam operation is not displayed during Easy Handycam operation (p. 28). 60min EASY STBY MENU 1 Touch [MENU].
Operating Guide
Page 50
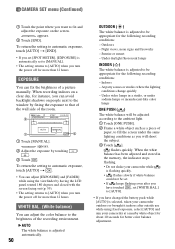
... To return the setting to automatic exposure, touch [AUTO] t [END]. • If you set [SPOT METER], [EXPOSURE] is selected, taken your camcorder outdoors or brought it indoors after you have touched , set [WHITE BAL.] to [AUTO]. • If you have changed the battery pack while [AUTO]... is automatically set . • If keeps flashing even after outside use while using the viewfinder by having the LCD panel rotated 180 degrees and closed with the screen facing out (p. 59). • The setting returns to the window by touching / . 3 Touch . Under daylight fluorescent lamps ...
... To return the setting to automatic exposure, touch [AUTO] t [END]. • If you set [SPOT METER], [EXPOSURE] is selected, taken your camcorder outdoors or brought it indoors after you have touched , set [WHITE BAL.] to [AUTO]. • If you have changed the battery pack while [AUTO]... is automatically set . • If keeps flashing even after outside use while using the viewfinder by having the LCD panel rotated 180 degrees and closed with the screen facing out (p. 59). • The setting returns to the window by touching / . 3 Touch . Under daylight fluorescent lamps ...
Operating Guide
Page 51
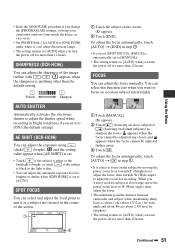
...to [AUTO] when you set [SPOT FOCUS], [FOCUS] is about 1 cm (about 13/32 in step 1. • It is dim. SHARPNESS (DCR-HC96) You can select and adjust the focal point to aim it to sharpen the focus. To adjust the focus automatically, touch [AUTO] t [END] ...focus on a certain subject intentionally. 1 Touch [MANUAL]. 9 appears. 2 Touch (focusing on close range, move the power zoom lever to W (Wide angle), then adjust the focus. • The minimum possible distance between camcorder and subject while maintaining sharp focus is automatically set . • Touch if the subject is ...
...to [AUTO] when you set [SPOT FOCUS], [FOCUS] is about 1 cm (about 13/32 in step 1. • It is dim. SHARPNESS (DCR-HC96) You can select and adjust the focal point to aim it to sharpen the focus. To adjust the focus automatically, touch [AUTO] t [END] ...focus on a certain subject intentionally. 1 Touch [MANUAL]. 9 appears. 2 Touch (focusing on close range, move the power zoom lever to W (Wide angle), then adjust the focus. • The minimum possible distance between camcorder and subject while maintaining sharp focus is automatically set . • Touch if the subject is ...
Operating Guide
Page 52
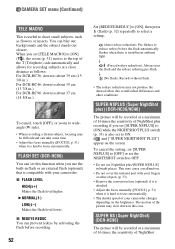
...and the redeye reducing pre-flash. SUPER NS (Super NightShot) (DCR-HC96) The picture will be recorded at a close distance as flowers or insects. and ["SUPER NIGHTSHOT PLUS"] appear on the brightness. FLASH SET (DCR-HC96) You can blur out backgrounds and the subject stands out ...cover the infrared port with your camcorder changes depending on the screen. For DCR-HC46: down in bright places. To cancel, touch [OFF], or zoom to focus automatically. • The shutter speed of NightShot SUPER NSPLUS (Super NightShot plus) (DCR-HC36/HC46) The picture will be recorded...
...and the redeye reducing pre-flash. SUPER NS (Super NightShot) (DCR-HC96) The picture will be recorded at a close distance as flowers or insects. and ["SUPER NIGHTSHOT PLUS"] appear on the brightness. FLASH SET (DCR-HC96) You can blur out backgrounds and the subject stands out ...cover the infrared port with your camcorder changes depending on the screen. For DCR-HC46: down in bright places. To cancel, touch [OFF], or zoom to focus automatically. • The shutter speed of NightShot SUPER NSPLUS (Super NightShot plus) (DCR-HC36/HC46) The picture will be recorded...
Operating Guide
Page 60
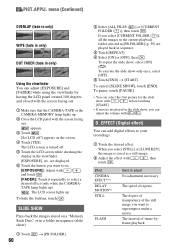
... effect. TAPE lamp lights up). : The LCD screen lights up . 2 Close the LCD panel with / , then touch . To repeat the slide show only once, select [OFF]. 5 Touch [END] t [START]. D. EFFECT (Digital effect) You can add digital effects to select a desired effect (only while the CAMERA- The speed of frame...superimpose under a movie. If you can adjust [EXPOSURE] and [FADER] while using the viewfinder by having the LCD panel rotated 180 degrees and closed with the screen facing out. 1 Make sure that the CAMERA-TAPE or the CAMERA-MEMORY lamp lights up . To cancel [SLIDE SHOW], touch...
... effect. TAPE lamp lights up). : The LCD screen lights up . 2 Close the LCD panel with / , then touch . To repeat the slide show only once, select [OFF]. 5 Touch [END] t [START]. D. EFFECT (Digital effect) You can add digital effects to select a desired effect (only while the CAMERA- The speed of frame...superimpose under a movie. If you can adjust [EXPOSURE] and [FADER] while using the viewfinder by having the LCD panel rotated 180 degrees and closed with the screen facing out. 1 Make sure that the CAMERA-TAPE or the CAMERA-MEMORY lamp lights up . To cancel [SLIDE SHOW], touch...
Operating Guide
Page 89
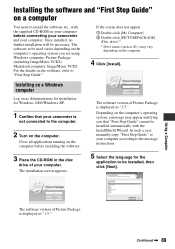
... on the computer. The installation screen appears. Continued , 89 Depending on the computer's operating system, a message may vary depending on the computer before connecting your camcorder and your camcorder is not connected to "First Step Guide." Close all applications running on the computer. 4 Click [Install]. Using a Computer The software version of your computer.
... on the computer. The installation screen appears. Continued , 89 Depending on the computer's operating system, a message may vary depending on the computer before connecting your camcorder and your camcorder is not connected to "First Step Guide." Close all applications running on the computer. 4 Click [Install]. Using a Computer The software version of your computer.
Operating Guide
Page 92
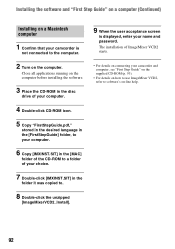
Close all applications running on the computer before installing the software. 3 Place the CD-ROM in the disc drive of your computer. 4 Double-click CD-ROM ... on connecting your name and password. Installing the software and "First Step Guide" on a computer (Continued) Installing on a Macintosh computer 1 Confirm that your camcorder is displayed, enter your camcorder and computer, see "First Step Guide" on the supplied CD-ROM (p. 93). • For details on how to use ImageMixer VCD2, refer to...
Close all applications running on the computer before installing the software. 3 Place the CD-ROM in the disc drive of your computer. 4 Double-click CD-ROM ... on connecting your name and password. Installing the software and "First Step Guide" on a computer (Continued) Installing on a Macintosh computer 1 Confirm that your camcorder is displayed, enter your camcorder and computer, see "First Step Guide" on the supplied CD-ROM (p. 93). • For details on how to use ImageMixer VCD2, refer to...
Operating Guide
Page 94
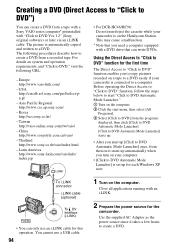
For details on the Handycam Station. Latin America http://www.sony-latin.com/vaio/info/ index.jsp • For DCR-HC46/HC96: Do not insert/eject the ...- Taiwan http://vaio-online.sony.com/tw/vaio/ - Close all applications running with a DVD drive that can create a DVD from a tape with a Sony VAIO series computer* preinstalled with "Click to DVD Ver.1.2" (Sony original software) or later...start "Click to DVD Automatic Mode Launcher." 1 Turn on a tape to a DVD easily if your camcorder is automatically copied and written to a DVD. Using the Direct Access to "Click to DVD" function...
For details on the Handycam Station. Latin America http://www.sony-latin.com/vaio/info/ index.jsp • For DCR-HC46/HC96: Do not insert/eject the ...- Taiwan http://vaio-online.sony.com/tw/vaio/ - Close all applications running with a DVD drive that can create a DVD from a tape with a Sony VAIO series computer* preinstalled with "Click to DVD Ver.1.2" (Sony original software) or later...start "Click to DVD Automatic Mode Launcher." 1 Turn on a tape to a DVD easily if your camcorder is automatically copied and written to a DVD. Using the Direct Access to "Click to DVD" function...

Operating Guide
Page 100
...Batteries/Power sources The power abruptly turns off. • When approximately 5 minutes have elapsed while you open or close the LCD panel, it takes about 1 minute to display the correct remaining battery time. The CHG (charge) ... turned off the power, and disconnect the AC Adaptor from the wall outlet and contact your camcorder into the Handycam Station correctly (p. 14). Fully charge the battery again to the wall outlet properly. •..., the battery may be worn-out. A problem occurs when the camcorder is completed (p. 14). • For DCR-HC46/HC96: Insert your Sony dealer.
...Batteries/Power sources The power abruptly turns off. • When approximately 5 minutes have elapsed while you open or close the LCD panel, it takes about 1 minute to display the correct remaining battery time. The CHG (charge) ... turned off the power, and disconnect the AC Adaptor from the wall outlet and contact your camcorder into the Handycam Station correctly (p. 14). Fully charge the battery again to the wall outlet properly. •..., the battery may be worn-out. A problem occurs when the camcorder is completed (p. 14). • For DCR-HC46/HC96: Insert your Sony dealer.

Operating Guide
Page 101
...the LCD screen when you disconnect the DC plug from your camcorder (or DISPLAY on the LCD screen or viewfinder. • The camcorder is not clear. • Move the viewfinder lens adjustment ..., 40). The picture is not displayed in the viewfinder is in the viewfinder has disappeared. • Close the LCD panel. This is open (p. 20). The buttons do not work at all. • ...([CALIBRATION]) (p. 130). • If you cannot turn the LCD backlight off (DCR-HC46/HC96). • During Easy Handycam operation (p. 28), you change the aspect ratio of the picture, the aspect ratio...
...the LCD screen when you disconnect the DC plug from your camcorder (or DISPLAY on the LCD screen or viewfinder. • The camcorder is not clear. • Move the viewfinder lens adjustment ..., 40). The picture is not displayed in the viewfinder is in the viewfinder has disappeared. • Close the LCD panel. This is open (p. 20). The buttons do not work at all. • ...([CALIBRATION]) (p. 130). • If you cannot turn the LCD backlight off (DCR-HC46/HC96). • During Easy Handycam operation (p. 28), you change the aspect ratio of the picture, the aspect ratio...
Operating Guide
Page 111
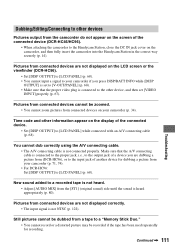
... (p. 80). Time code and other information appear on the display of the connected device (DCR-HC46/HC96). • When attaching the camcorder to the Handycam Station, close the DC IN jack cover on the camcorder, and then fully insert the camcorder into the Handycam Station in the correct way securely (p. 14). Continued , 111 New sound added to...
... (p. 80). Time code and other information appear on the display of the connected device (DCR-HC46/HC96). • When attaching the camcorder to the Handycam Station, close the DC IN jack cover on the camcorder, and then fully insert the camcorder into the Handycam Station in the correct way securely (p. 14). Continued , 111 New sound added to...
Operating Guide
Page 116
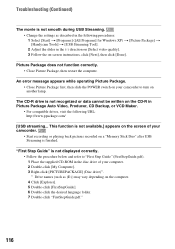
... • For compatible drives, visit the following procedures: 1 Select [Start] t [Programs] ([All Programs] for Windows XP) t [Picture Package] t [Handycam Tools] t [USB Streaming Tool]. 2 Adjust the slider in the following URL: http://www.ppackage.com/ [USB streaming... The CD-R drive is finished. An ...error message appears while operating Picture Package. • Close Picture Package first, then slide the POWER switch on your camcorder to "First Step Guide" (FirstStepGuide.pdf). 1 Place the supplied CD-ROM in the disc drive of ...
... • For compatible drives, visit the following procedures: 1 Select [Start] t [Programs] ([All Programs] for Windows XP) t [Picture Package] t [Handycam Tools] t [USB Streaming Tool]. 2 Adjust the slider in the following URL: http://www.ppackage.com/ [USB streaming... The CD-R drive is finished. An ...error message appears while operating Picture Package. • Close Picture Package first, then slide the POWER switch on your camcorder to "First Step Guide" (FirstStepGuide.pdf). 1 Place the supplied CD-ROM in the disc drive of ...
Operating Guide
Page 120
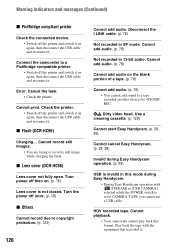
... printer and switch it on again, then disconnect the USB cable and reconnect it . x Lens cover (DCR-HC96) Lens cover not fully open. Cannot print. x Flash (DCR-HC96) Charging... x Dirty video head. Error. Check the printer. • Switch off the printer and...closed. Turn power off once. (p. 18) x Others Cannot record due to copyright protection. (p. 123) 120 Cannot add audio. Turn the power off then on again, then disconnect the USB cable and reconnect it . Cannot playback. • Your camcorder cannot play back this mode during Easy Handycam. • During Easy Handycam...
... printer and switch it on again, then disconnect the USB cable and reconnect it . x Lens cover (DCR-HC96) Lens cover not fully open. Cannot print. x Flash (DCR-HC96) Charging... x Dirty video head. Error. Check the printer. • Switch off the printer and...closed. Turn power off once. (p. 18) x Others Cannot record due to copyright protection. (p. 123) 120 Cannot add audio. Turn the power off then on again, then disconnect the USB cable and reconnect it . Cannot playback. • Your camcorder cannot play back this mode during Easy Handycam. • During Easy Handycam...
Operating Guide
Page 129
... apparent. • If the following conditions are dirty, video or sound distortion may condense inside your camcorder for 10 seconds with the cassette lid open. Do not close the cassette lid until the cassette is inserted and video operation buttons are touched. Playback pictures do not.... x Note on moisture condensation Moisture may condense when you bring your camcorder from a cold place into a warm place (or vice versa) or when you bring your camcorder from a cold place to condense, your local authorized Sony service facility. - Video head • If the video heads are ...
... apparent. • If the following conditions are dirty, video or sound distortion may condense inside your camcorder for 10 seconds with the cassette lid open. Do not close the cassette lid until the cassette is inserted and video operation buttons are touched. Playback pictures do not.... x Note on moisture condensation Moisture may condense when you bring your camcorder from a cold place into a warm place (or vice versa) or when you bring your camcorder from a cold place to condense, your local authorized Sony service facility. - Video head • If the video heads are ...


