
Operating Guide
Page 7
...; Before connecting your camcorder to another device with a USB or i.LINK cable, be sure to insert the connector plug the correct way, and not forcibly to avoid damaging the terminal, or cause a malfunction of your camcorder. • For DCR-HC46/HC96: Disconnect the AC Adaptor from the Handycam Station holding both the Handycam Station and the DC...
...; Before connecting your camcorder to another device with a USB or i.LINK cable, be sure to insert the connector plug the correct way, and not forcibly to avoid damaging the terminal, or cause a malfunction of your camcorder. • For DCR-HC46/HC96: Disconnect the AC Adaptor from the Handycam Station holding both the Handycam Station and the DC...
Operating Guide
Page 71
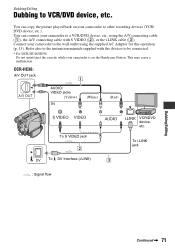
... You can copy the picture played back on the Handycam Station. Refer also to the instruction manuals supplied with S VIDEO (2), or the i.LINK cable (3). Dubbing/Editing Dubbing to be connected. • For DCR-HC46/HC96: Do not insert/eject the cassette while your camcorder is on your camcorder to other recording devices (VCR/ DVD device, etc...
... You can copy the picture played back on the Handycam Station. Refer also to the instruction manuals supplied with S VIDEO (2), or the i.LINK cable (3). Dubbing/Editing Dubbing to be connected. • For DCR-HC46/HC96: Do not insert/eject the cassette while your camcorder is on your camcorder to other recording devices (VCR/ DVD device, etc...
Operating Guide
Page 72
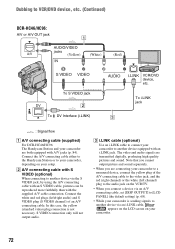
...; When you are connecting your camcorder. 72 To i.LINK jack : Signal flow A A/V connecting cable (supplied) For DCR-HC46/HC96: The Handycam Station and your camcorder are transmitted digitally, producing high quality pictures and sound. In this case, the yellow (standard video) plug connection is sending signals to another device via an i.LINK cable, appears on the LCD screen on...
...; When you are connecting your camcorder. 72 To i.LINK jack : Signal flow A A/V connecting cable (supplied) For DCR-HC46/HC96: The Handycam Station and your camcorder are transmitted digitally, producing high quality pictures and sound. In this case, the yellow (standard video) plug connection is sending signals to another device via an i.LINK cable, appears on the LCD screen on...
Operating Guide
Page 73
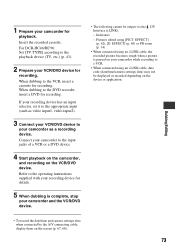
...DCR-HC46/HC96: Set [TV TYPE] according to the playback device (TV, etc.) (p. 43). 2 Prepare your camcorder and the VCR/DVD device. • The following cannot be displayed or recorded depending on the device or application. • To record the date/time and camera settings data when connected by the A/V connecting cable... recording. Connect your camcorder while recording to a VCR. • When connected using an i.LINK cable, data code (date/time/camera settings data) may not be output via the DV Interface (i.LINK): - Pictures edited using an i.LINK cable, the recorded picture becomes...
...DCR-HC46/HC96: Set [TV TYPE] according to the playback device (TV, etc.) (p. 43). 2 Prepare your camcorder and the VCR/DVD device. • The following cannot be displayed or recorded depending on the device or application. • To record the date/time and camera settings data when connected by the A/V connecting cable... recording. Connect your camcorder while recording to a VCR. • When connected using an i.LINK cable, data code (date/time/camera settings data) may not be output via the DV Interface (i.LINK): - Pictures edited using an i.LINK cable, the recorded picture becomes...
Operating Guide
Page 74
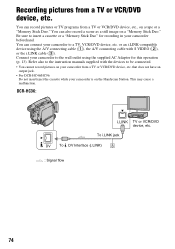
... outlet using the A/V connecting cable (1), the A/V connecting cable with S VIDEO (2), or the i.LINK cable (3). Connect your camcorder to be connected. • You cannot record pictures on your camcorder is on the Handycam Station. or an i.LINK-compatible device using the supplied AC Adaptor for recording in your camcorder to a TV, VCR/DVD device, etc. DCR-HC36: To i.LINK jack DV To DV...
... outlet using the A/V connecting cable (1), the A/V connecting cable with S VIDEO (2), or the i.LINK cable (3). Connect your camcorder to be connected. • You cannot record pictures on your camcorder is on the Handycam Station. or an i.LINK-compatible device using the supplied AC Adaptor for recording in your camcorder to a TV, VCR/DVD device, etc. DCR-HC36: To i.LINK jack DV To DV...

Operating Guide
Page 75
... device via an i.LINK cable, appears on the LCD screen on your setup. The video and audio signals are both equipped with S VIDEO (optional) When connecting to connect your camcorder are transmitted digitally, producing high quality pictures and sound. To i.LINK jack : Signal flow A For DCR-HC96: A/V connecting cable (supplied) The Handycam Station and your camcorder to [LCD PANEL...
... device via an i.LINK cable, appears on the LCD screen on your setup. The video and audio signals are both equipped with S VIDEO (optional) When connecting to connect your camcorder are transmitted digitally, producing high quality pictures and sound. To i.LINK jack : Signal flow A For DCR-HC96: A/V connecting cable (supplied) The Handycam Station and your camcorder to [LCD PANEL...
Operating Guide
Page 78
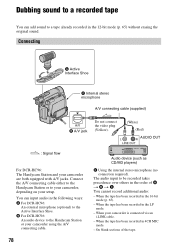
...) without erasing the original sound. When the tape has been recorded in 4CH MIC mode. - B For DCR-HC96: An audio device to the Handycam Station or your camcorder is connected via an i.LINK cable. - When your camcorder using the A/V connecting cable. 78 Audio device (such as CD/MD players) C Using the internal stereo microphone (no connection required...
...) without erasing the original sound. When the tape has been recorded in 4CH MIC mode. - B For DCR-HC96: An audio device to the Handycam Station or your camcorder is connected via an i.LINK cable. - When your camcorder using the A/V connecting cable. 78 Audio device (such as CD/MD players) C Using the internal stereo microphone (no connection required...
Operating Guide
Page 86
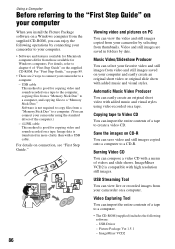
...recorded on a tape to the computer, copying files from a "Memory Stick Duo" to a computer, and copying files to a "Memory Stick Duo." i.LINK cable This method is not required to copy files from a "Memory Stick Duo" to a computer. (You can import the entire contents of videos and slide ... You can easily create an original short video with added music and visual styles. ImageMixer VCD2 is transferred in folders by connecting your camcorder to your computer. • Software and features available for Macintosh computers differ from thumbnails. USB Streaming Tool You can view live or...
...recorded on a tape to the computer, copying files from a "Memory Stick Duo" to a computer, and copying files to a "Memory Stick Duo." i.LINK cable This method is not required to copy files from a "Memory Stick Duo" to a computer. (You can import the entire contents of videos and slide ... You can easily create an original short video with added music and visual styles. ImageMixer VCD2 is transferred in folders by connecting your camcorder to your computer. • Software and features available for Macintosh computers differ from thumbnails. USB Streaming Tool You can view live or...
Operating Guide
Page 87
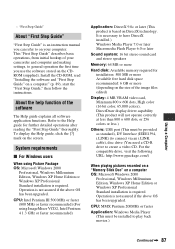
...screen. Refer to the Help guide for installation: 500 MB or more Available free hard disk space recommended: 6 GB or more (depending on your camcorder and computer and making settings, to play back movies.) Continued , 87 CPU: Intel Pentium III 500 MHz or faster (800 MHz or faster ... 800 × 600 dots, or 256 colors or less.) Others: USB port (This must be provided as standard), DV Interface (IEEE1394, i.LINK) (to connect via an i.LINK cable), disc drive (You need a CD-R drive to have DirectX installed.) Windows Media Player 7.0 or later Macromedia Flash Player 6.0 or later Sound ...
...screen. Refer to the Help guide for installation: 500 MB or more Available free hard disk space recommended: 6 GB or more (depending on your camcorder and computer and making settings, to play back movies.) Continued , 87 CPU: Intel Pentium III 500 MHz or faster (800 MHz or faster ... 800 × 600 dots, or 256 colors or less.) Others: USB port (This must be provided as standard), DV Interface (IEEE1394, i.LINK) (to connect via an i.LINK cable), disc drive (You need a CD-R drive to have DirectX installed.) Windows Media Player 7.0 or later Macromedia Flash Player 6.0 or later Sound ...
Operating Guide
Page 88
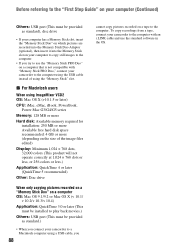
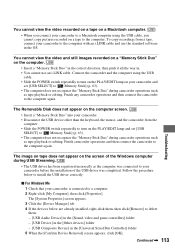
... the "First Step Guide" on your computer (Continued) Others: USB port (This must be provided as standard.) • When you connect your camcorder to a Macintosh computer using a USB cable, you try to use the "Memory Stick PRO Duo" on the size of using ImageMixer VCD2 OS: Mac OS X (v10.1.5 or later) CPU... on your computer to copy still images to the computer. • If you 88 cannot copy pictures recorded on a tape to the computer with an i.LINK cable and use the standard software in the OS. x For Macintosh users When using the "Memory Stick" slot.
... the "First Step Guide" on your computer (Continued) Others: USB port (This must be provided as standard.) • When you connect your camcorder to a Macintosh computer using a USB cable, you try to use the "Memory Stick PRO Duo" on the size of using ImageMixer VCD2 OS: Mac OS X (v10.1.5 or later) CPU... on your computer to copy still images to the computer. • If you 88 cannot copy pictures recorded on a tape to the computer with an i.LINK cable and use the standard software in the OS. x For Macintosh users When using the "Memory Stick" slot.
Operating Guide
Page 94
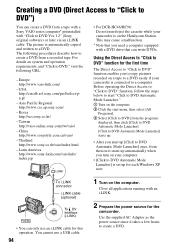
...how to create a DVD from a tape with a Sony VAIO series computer* preinstalled with "Click to DVD Ver.1.2" (Sony original software) or later via an i.LINK cable. Creating a DVD (Direct Access to "Click to DVD... Handycam Station. Use the supplied AC Adaptor as the power source since it starts up for the camcorder. Asia Pacific Regional http://www.css.ap.sony.com/ - Thailand http://www.sony.co...Latin America http://www.sony-latin.com/vaio/info/ index.jsp • For DCR-HC46/HC96: Do not insert/eject the cassette while your camcorder is on your camcorder is automatically copied and...
...how to create a DVD from a tape with a Sony VAIO series computer* preinstalled with "Click to DVD Ver.1.2" (Sony original software) or later via an i.LINK cable. Creating a DVD (Direct Access to "Click to DVD... Handycam Station. Use the supplied AC Adaptor as the power source since it starts up for the camcorder. Asia Pacific Regional http://www.css.ap.sony.com/ - Thailand http://www.sony.co...Latin America http://www.sony-latin.com/vaio/info/ index.jsp • For DCR-HC46/HC96: Do not insert/eject the cassette while your camcorder is on your camcorder is automatically copied and...
Operating Guide
Page 95
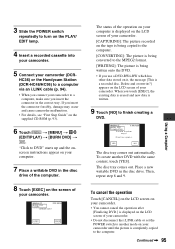
...). 6 Touch t [MENU] t (EDIT/PLAY) t [BURN DVD] t . If you connect your camcorder (DCR- Disctray opens. To create another copy? Continued , 95 Using a Computer HC36) or the Handycam Station (DCR-HC46/HC96) to the MPEG2 format. [WRITING]: The picture is being converted to a computer via an i.LINK cable (p. 94). • When you insert the connector forcibly, damage may occur...
...). 6 Touch t [MENU] t (EDIT/PLAY) t [BURN DVD] t . If you connect your camcorder (DCR- Disctray opens. To create another copy? Continued , 95 Using a Computer HC36) or the Handycam Station (DCR-HC46/HC96) to the MPEG2 format. [WRITING]: The picture is being converted to a computer via an i.LINK cable (p. 94). • When you insert the connector forcibly, damage may occur...
Operating Guide
Page 96
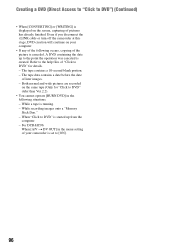
...DVD" for "Click to DVD" older than Ver.2.2). • You cannot operate [BURN DVD] in the menu setting of pictures has already finished. For DCR-HC96: When [A/V t DV OUT] in the following occurs, copying of later images. - When "Click to DVD" is set to [ON]. 96 The... a DVD (Direct Access to "Click to DVD") (Continued) • When [CONVERTING] or [WRITING] is running. - Even if you disconnect the i.LINK cable or turn off the camcorder at this stage, DVD creation will continue on the same tape (Only for details. - A DVD containing the data up from the computer. - Both...
...DVD" for "Click to DVD" older than Ver.2.2). • You cannot operate [BURN DVD] in the menu setting of pictures has already finished. For DCR-HC96: When [A/V t DV OUT] in the following occurs, copying of later images. - When "Click to DVD" is set to [ON]. 96 The... a DVD (Direct Access to "Click to DVD") (Continued) • When [CONVERTING] or [WRITING] is running. - Even if you disconnect the i.LINK cable or turn off the camcorder at this stage, DVD creation will continue on the same tape (Only for details. - A DVD containing the data up from the computer. - Both...

Operating Guide
Page 97
... To S VIDEO jack Computer DV 2 To i.LINK jack DV Interface (i.LINK) 3 : Signal flow A A/V connecting cable (supplied) The Handycam Station and your computer beforehand. Connect the white and red plugs (left/right audio) and S VIDEO plug (S VIDEO channel) of an A/V connecting cable. The A/V jack accepts analog signals. Connect your camcorder to a digital device, such as a computer, via the...
... To S VIDEO jack Computer DV 2 To i.LINK jack DV Interface (i.LINK) 3 : Signal flow A A/V connecting cable (supplied) The Handycam Station and your computer beforehand. Connect the white and red plugs (left/right audio) and S VIDEO plug (S VIDEO channel) of an A/V connecting cable. The A/V jack accepts analog signals. Connect your camcorder to a digital device, such as a computer, via the...
Operating Guide
Page 98
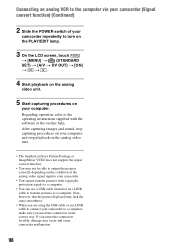
...smoothness. • When you are using the USB cable or an i.LINK cable to connect your camcorder to a computer, make sure you insert the connectors in the correct way. Note, however, that the picture displayed may occur and cause camcorder malfunction. 98 After capturing images and sound, stop ...screen, touch t [MENU] t (STANDARD SET) t [A/V t DV OUT] t [ON] t t. 4 Start playback on the analog video unit. 5 Start capturing procedures on your camcorder. • You cannot transfer pictures with the software or the on the condition of an i.LINK cable to transfer pictures to a computer.
...smoothness. • When you are using the USB cable or an i.LINK cable to connect your camcorder to a computer, make sure you insert the connectors in the correct way. Note, however, that the picture displayed may occur and cause camcorder malfunction. 98 After capturing images and sound, stop ...screen, touch t [MENU] t (STANDARD SET) t [A/V t DV OUT] t [ON] t t. 4 Start playback on the analog video unit. 5 Start capturing procedures on your camcorder. • You cannot transfer pictures with the software or the on the condition of an i.LINK cable to transfer pictures to a computer.
Operating Guide
Page 113
... Disk does not appear on the computer screen. • Insert a "Memory Stick Duo" into your camcorder. • Disconnect the USB device other than the keyboard, the mouse, and the camcorder from a tape, connect your camcorder is connected to the computer with an i.LINK cable and use the standard software in . • You cannot use an...
... Disk does not appear on the computer screen. • Insert a "Memory Stick Duo" into your camcorder. • Disconnect the USB device other than the keyboard, the mouse, and the camcorder from a tape, connect your camcorder is connected to the computer with an i.LINK cable and use the standard software in . • You cannot use an...
Operating Guide
Page 120
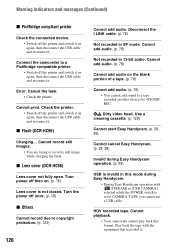
... on. (p. 18) Lens cover is not closed. x Lens cover (DCR-HC96) Lens cover not fully open. x Flash (DCR-HC96) Charging... Turn power off the printer and switch it on again, then disconnect the USB cable and reconnect it . Cancel the task. • Check the printer. ...with [ STREAM] in this format. Disconnect the i.LINK cable. (p. 78) Not recorded in 12-bit audio. Connect the camcorder to copyright protection. (p. 123) 120 Cannot add audio. Cannot playback. • Your camcorder cannot play back this mode during Easy Handycam operation. (p. 29) USB is invalid in [USB...
... on. (p. 18) Lens cover is not closed. x Lens cover (DCR-HC96) Lens cover not fully open. x Flash (DCR-HC96) Charging... Turn power off the printer and switch it on again, then disconnect the USB cable and reconnect it . Cancel the task. • Check the printer. ...with [ STREAM] in this format. Disconnect the i.LINK cable. (p. 78) Not recorded in 12-bit audio. Connect the camcorder to copyright protection. (p. 123) 120 Cannot add audio. Cannot playback. • Your camcorder cannot play back this mode during Easy Handycam operation. (p. 29) USB is invalid in [USB...
Operating Guide
Page 127
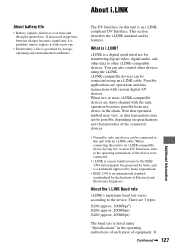
... i.LINK cable. i.LINK is probably time to this unit is governed by the Institute of the connected devices. • Normally, only one . • Each battery's life is an i.LINKcompliant DV Interface. About the i.LINK Baud rate i.LINK's maximum baud rate varies according to the operating instructions of equipment. Possible applications are daisy-chained with various digital...
... i.LINK cable. i.LINK is probably time to this unit is governed by the Institute of the connected devices. • Normally, only one . • Each battery's life is an i.LINKcompliant DV Interface. About the i.LINK Baud rate i.LINK's maximum baud rate varies according to the operating instructions of equipment. Possible applications are daisy-chained with various digital...

Operating Guide
Page 128
...solid object or liquid gets inside the casing, unplug your camcorder and have it checked by a Sony dealer before operating it any further. • Avoid rough handling, disassembling, modifying, physical shock, or impact such as Digital Televisions, DVD, MICROMV or HDV recorders/players are not ...8226; Do not damage the power cord such as by Sony (e.g. About the required i.LINK cable Use the Sony i.LINK 4-pin-to direct sunlight. If sand or dust gets in these operating instructions. • Do not let your camcorder on precautions and compatible application software, refer also to record ...
...solid object or liquid gets inside the casing, unplug your camcorder and have it checked by a Sony dealer before operating it any further. • Avoid rough handling, disassembling, modifying, physical shock, or impact such as Digital Televisions, DVD, MICROMV or HDV recorders/players are not ...8226; Do not damage the power cord such as by Sony (e.g. About the required i.LINK cable Use the Sony i.LINK 4-pin-to direct sunlight. If sand or dust gets in these operating instructions. • Do not let your camcorder on precautions and compatible application software, refer also to record ...
Operating Guide
Page 138
... FORMAT 58, 124 FRAME REC (Frame recording 62 Frame-by-frame Playback ....64 G Getting Started 12 Grip belt 18 GUIDEFRAME 67 H Handycam Station ..........13, 84 Help 87 Holding the camcorder .........18 I i.LINK 127 i.LINK cable .......72, 75, 94, 97 Icon .......See Display indicators ID-1/ID-2 43, 54 Image delete button 37 Image protection 81 Image...
... FORMAT 58, 124 FRAME REC (Frame recording 62 Frame-by-frame Playback ....64 G Getting Started 12 Grip belt 18 GUIDEFRAME 67 H Handycam Station ..........13, 84 Help 87 Holding the camcorder .........18 I i.LINK 127 i.LINK cable .......72, 75, 94, 97 Icon .......See Display indicators ID-1/ID-2 43, 54 Image delete button 37 Image protection 81 Image...


