Operating Guide
Page 2
.... You can help preserve our environment by returning your used rechargeable batteries to discontinue midway (fail), restart the application or disconnect and connect the communication cable (USB, etc.) again. Battery pack This device complies with Canadian ICES-003. 2 This symbol is intended to alert the user to the presence of uninsulated "dangerous...
.... You can help preserve our environment by returning your used rechargeable batteries to discontinue midway (fail), restart the application or disconnect and connect the communication cable (USB, etc.) again. Battery pack This device complies with Canadian ICES-003. 2 This symbol is intended to alert the user to the presence of uninsulated "dangerous...
Operating Guide
Page 4
... or playback conditions. • The LCD screen and the viewfinder are incompatible) (p. 106). • "Memory Stick Duo" marked with a USB or i.LINK cable, be sure to a malfunction of the camcorder, storage media, etc. • TV color systems differ depending on the LCD screen and the viewfinder. "Operating Guide" (This...
... or playback conditions. • The LCD screen and the viewfinder are incompatible) (p. 106). • "Memory Stick Duo" marked with a USB or i.LINK cable, be sure to a malfunction of the camcorder, storage media, etc. • TV color systems differ depending on the LCD screen and the viewfinder. "Operating Guide" (This...
Operating Guide
Page 9
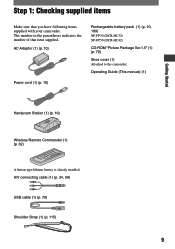
... (1) (p. 10) Power cord (1) (p. 10) Rechargeable battery pack (1) (p. 10, 109) NP-FP30 (DCR-HC32) NP-FP50 (DCR-HC42) CD-ROM "Picture Package Ver.1.5" (1) (p. 70) Shoe cover (1) Attached to the camcorder. A/V connecting cable (1) (p. 34, 59) USB cable (1) (p. 70) Shoulder Strap (1) (p. 115) 9 Operating Guide (This manual) (1) Getting Started Handycam Station (1) (p. 10) Wireless Remote Commander (1) (p. 32) A button-type lithium battery is already...
... (1) (p. 10) Power cord (1) (p. 10) Rechargeable battery pack (1) (p. 10, 109) NP-FP30 (DCR-HC32) NP-FP50 (DCR-HC42) CD-ROM "Picture Package Ver.1.5" (1) (p. 70) Shoe cover (1) Attached to the camcorder. A/V connecting cable (1) (p. 34, 59) USB cable (1) (p. 70) Shoulder Strap (1) (p. 115) 9 Operating Guide (This manual) (1) Getting Started Handycam Station (1) (p. 10) Wireless Remote Commander (1) (p. 32) A button-type lithium battery is already...
Operating Guide
Page 54
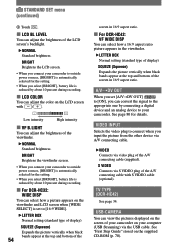
...camcorder. See page 80 for the setting. • When you input the picture from the other device via A/V connecting cable. VIDEO Connects via video plug of the A/V connecting cable (supplied). A/VDV OUT When you set to the appropriate one by about 10 percent during recording. For DCR-HC32...You can view the pictures displayed on the screen of your camcorder on your computer (USB Streaming) via the USB cable. BRIGHT Brightens the viewfinder screen. • When you connect your camcorder to outside power sources, [BRIGHT] is set [A/VDV ...
...camcorder. See page 80 for the setting. • When you input the picture from the other device via A/V connecting cable. VIDEO Connects via video plug of the A/V connecting cable (supplied). A/VDV OUT When you set to the appropriate one by about 10 percent during recording. For DCR-HC32...You can view the pictures displayed on the screen of your camcorder on your computer (USB Streaming) via the USB cable. BRIGHT Brightens the viewfinder screen. • When you connect your camcorder to outside power sources, [BRIGHT] is set [A/VDV ...
Operating Guide
Page 55
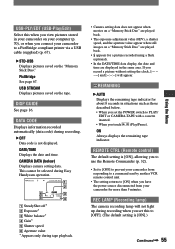
...; When you set the POWER switch to [OFF]. (The default setting is [ON].) Continued 55 Using the Menu This cannot be selected during Easy Handycam operation. 6 0 min 1 0 : 0 0 : 0 0 : 0 0 2 6 5 AUTO 100 AWB F1. 8 9 dB 3 4 SteadyShot off* Exposure* White balance* &#...to use the Remote Commander (p. 32). • Set to [OFF] to prevent your camcorder from your camcorder to a PictBridge compliant printer via a USB cable (supplied) (p. 67). STD-USB Displays pictures saved on the tape. REC LAMP (Recording lamp) The camera recording lamp will ...
...; When you set the POWER switch to [OFF]. (The default setting is [ON].) Continued 55 Using the Menu This cannot be selected during Easy Handycam operation. 6 0 min 1 0 : 0 0 : 0 0 : 0 0 2 6 5 AUTO 100 AWB F1. 8 9 dB 3 4 SteadyShot off* Exposure* White balance* &#...to use the Remote Commander (p. 32). • Set to [OFF] to prevent your camcorder from your camcorder to a PictBridge compliant printer via a USB cable (supplied) (p. 67). STD-USB Displays pictures saved on the tape. REC LAMP (Recording lamp) The camera recording lamp will ...
Operating Guide
Page 67
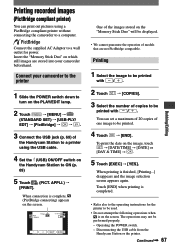
...not be performed properly. - Insert the "Memory Stick Duo" on which still images are not PictBridge compatible. Connect your camcorder beforehand. Disconnecting the USB cable from the Handycam Station or the printer. Touch [END] when printing is complete, (PictBridge connecting) appears on the screen. 1152 PRINT 101... recorded images (PictBridge compliant printer) You can set a maximum of 20 copies of copies to be printed with / . You can print out pictures using the USB cable. 4 Set the (USB) ON/OFF switch on the Handycam Station to ON (p. 69) 5 Touch (PICT. When printing is...
...not be performed properly. - Insert the "Memory Stick Duo" on which still images are not PictBridge compatible. Connect your camcorder beforehand. Disconnecting the USB cable from the Handycam Station or the printer. Touch [END] when printing is complete, (PictBridge connecting) appears on the screen. 1152 PRINT 101... recorded images (PictBridge compliant printer) You can set a maximum of 20 copies of copies to be printed with / . You can print out pictures using the USB cable. 4 Set the (USB) ON/OFF switch on the Handycam Station to ON (p. 69) 5 Touch (PICT. When printing is...
Operating Guide
Page 68
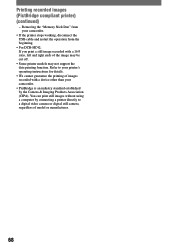
... instructions for details. • We cannot guarantee the printing of images recorded with a device other than your camcorder. • If the printer stops working, disconnect the USB cable and restart the operation from the beginning. • For DCR-HC42: If you print a still image recorded with a 16:9 ratio, left and right ends of model...
... instructions for details. • We cannot guarantee the printing of images recorded with a device other than your camcorder. • If the printer stops working, disconnect the USB cable and restart the operation from the beginning. • For DCR-HC42: If you print a still image recorded with a 16:9 ratio, left and right ends of model...

Operating Guide
Page 70
...you can enjoy the following software. - Save the images on a tape to a computer. - USB Streaming Tool You can import the contents of videos and slide shows. ImageMixer VCD2 - USB cable This method is good for copying video and sound recorded on CD-R You can select your computer ...and easily create a short original video or slide show with a USB cable. still images from thumbnails. Copying tape to Video CD You can view the picture your camcorder to the computer, copying files from those available for copying video and sound recorded ...
...you can enjoy the following software. - Save the images on a tape to a computer. - USB Streaming Tool You can import the contents of videos and slide shows. ImageMixer VCD2 - USB cable This method is good for copying video and sound recorded on CD-R You can select your computer ...and easily create a short original video or slide show with a USB cable. still images from thumbnails. Copying tape to Video CD You can view the picture your camcorder to the computer, copying files from those available for copying video and sound recorded ...
Operating Guide
Page 71
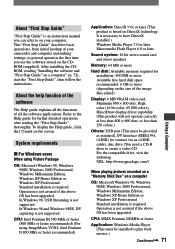
..."First Step Guide" describes basic operations, from initial hookup of your camcorder and computer and making settings, to general operation the first... faster recommended) Application: DirectX 9.0c or later (This product is based on the screen. In Windows 98, USB Streaming is required. CPU: Intel Pentium III 500 MHz or faster (800 MHz or faster recommended) (For using...800 × 600 dots, or less than 256 colors.) Others: USB port (This must be provided as standard), DV Interface (IEEE1394, i.LINK) (to connect via an i.LINK cable), disc drive (You need a CD-R drive to create a video...
..."First Step Guide" describes basic operations, from initial hookup of your camcorder and computer and making settings, to general operation the first... faster recommended) Application: DirectX 9.0c or later (This product is based on the screen. In Windows 98, USB Streaming is required. CPU: Intel Pentium III 500 MHz or faster (800 MHz or faster recommended) (For using...800 × 600 dots, or less than 256 colors.) Others: USB port (This must be provided as standard), DV Interface (IEEE1394, i.LINK) (to connect via an i.LINK cable), disc drive (You need a CD-R drive to create a video...
Operating Guide
Page 72
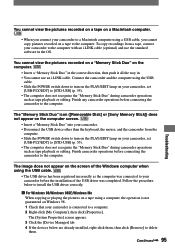
... appear Double-click [My Computer]. Double-click [PICTUREPACKAGE] 72 The software to be provided as standard) • When you connect your camcorder to a Macintosh computer using a USB cable, you are using. Close all applications running on the software, refer to "First Step Guide". Windows computer: Picture Package (including ImageMixer VCD2) Macintosh...
... appear Double-click [My Computer]. Double-click [PICTUREPACKAGE] 72 The software to be provided as standard) • When you connect your camcorder to a Macintosh computer using a USB cable, you are using. Close all applications running on the software, refer to "First Step Guide". Windows computer: Picture Package (including ImageMixer VCD2) Macintosh...
Operating Guide
Page 77
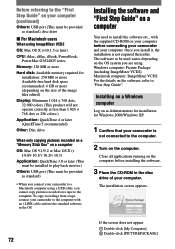
... start up for this operation. Latin America http://vaio-online.sony.com/ i.LINK cable (optional) to i.LINK (IEEE1394) connector to DV Interface • You can only use a USB cable. * Note that supports "Click to DVD" via an i.LINK cable (optional). For system and operation requirements, visit the following procedures...is set up [Click to DVD Automatic Mode Launcher] once, from a picture recorded on a tape to a DVD easily if your camcorder to a Sony VAIO series computer* that you need the computer with a DVD drive that can be used to write DVDs. Using the Direct Access to...
... start up for this operation. Latin America http://vaio-online.sony.com/ i.LINK cable (optional) to i.LINK (IEEE1394) connector to DV Interface • You can only use a USB cable. * Note that supports "Click to DVD" via an i.LINK cable (optional). For system and operation requirements, visit the following procedures...is set up [Click to DVD Automatic Mode Launcher] once, from a picture recorded on a tape to a DVD easily if your camcorder to a Sony VAIO series computer* that you need the computer with a DVD drive that can be used to write DVDs. Using the Direct Access to...

Operating Guide
Page 81
.... • When you insert the connectors forcibly, they may not be damaged, and cause a malfunction of an i.LINK cable (optional) to transfer pictures to a computer. • You can use a USB cable instead of your camcorder. • You cannot transfer pictures with the software or the on the condition of the analog video signal input...
.... • When you insert the connectors forcibly, they may not be damaged, and cause a malfunction of an i.LINK cable (optional) to transfer pictures to a computer. • You can use a USB cable instead of your camcorder. • You cannot transfer pictures with the software or the on the condition of the analog video signal input...
Operating Guide
Page 82
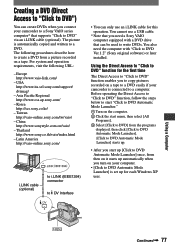
... not work. • During Easy Handycam operation, the available buttons are not displayed on . • Disconnect the AC Adaptor from your camcorder, use the following table to a wall outlet (p. 10). • Insert your Sony dealer. The camcorder does not operate even when the power... that are limited (p. 20). Troubleshooting If you run into the Handycam Station correctly (p. 10). You cannot turn Easy Handycam operation on or off. • During recording or communicating with another device via USB cable, you cannot turn on for a long time. The camcorder gets warm. •...
... not work. • During Easy Handycam operation, the available buttons are not displayed on . • Disconnect the AC Adaptor from your camcorder, use the following table to a wall outlet (p. 10). • Insert your Sony dealer. The camcorder does not operate even when the power... that are limited (p. 20). Troubleshooting If you run into the Handycam Station correctly (p. 10). You cannot turn Easy Handycam operation on or off. • During recording or communicating with another device via USB cable, you cannot turn on for a long time. The camcorder gets warm. •...

Operating Guide
Page 94
... computer. • Slide the POWER switch down to turn on the Handycam Station to ON. • Connect the Handycam Station to the camcorder securely. • Disconnect USB devices other than the keyboard, the mouse, and the camcorder from the computer. • Disconnect the cable from the computer, then connect it again. The picture appears distorted or...
... computer. • Slide the POWER switch down to turn on the Handycam Station to ON. • Connect the Handycam Station to the camcorder securely. • Disconnect USB devices other than the keyboard, the mouse, and the camcorder from the computer. • Disconnect the cable from the computer, then connect it again. The picture appears distorted or...
Operating Guide
Page 95
.../EDIT lamp on the screen of the Windows computer when using the USB cable. • The USB driver has been registered incorrectly as the computer was connected to your camcorder before the installation of the USB driver was completed. You cannot view the pictures recorded on a "...[Sony Memory Stick]) does not appear on the computer screen. • Insert a "Memory Stick Duo" into your camcorder. • Disconnect the USB device other than the keyboard, the mouse, and the camcorder from a tape, connect your camcorder to the computer with an i.LINK cable (optional) and use an i.LINK cable....
.../EDIT lamp on the screen of the Windows computer when using the USB cable. • The USB driver has been registered incorrectly as the computer was connected to your camcorder before the installation of the USB driver was completed. You cannot view the pictures recorded on a "...[Sony Memory Stick]) does not appear on the computer screen. • Insert a "Memory Stick Duo" into your camcorder. • Disconnect the USB device other than the keyboard, the mouse, and the camcorder from a tape, connect your camcorder to the computer with an i.LINK cable (optional) and use an i.LINK cable....
Operating Guide
Page 96
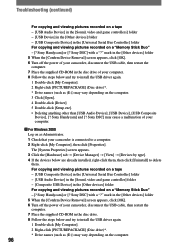
..., click [OK]. 6 Turn off the power of your camcorder, disconnect the USB cable, then restart the computer. 7 Place the supplied CD-ROM in the disc drive of your computer. For Windows 2000 Log on as (E:)) may cause a malfunction of your camcorder is connected to delete them. Sony Handycam] or [? Troubleshooting (continued) For copying and viewing...
..., click [OK]. 6 Turn off the power of your camcorder, disconnect the USB cable, then restart the computer. 7 Place the supplied CD-ROM in the disc drive of your computer. For Windows 2000 Log on as (E:)) may cause a malfunction of your camcorder is connected to delete them. Sony Handycam] or [? Troubleshooting (continued) For copying and viewing...
Operating Guide
Page 97
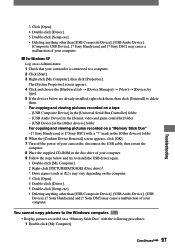
...folder 6 When the [Confirm Device Removal] screen appears, click [OK]. 7 Turn off the power of your camcorder, disconnect the USB cable, then restart the computer. 8 Place the supplied CD-ROM in the [Other devices] folder For copying and viewing pictures ...]. 4 Double-click [Driver]. 5 Double-click [Setup.exe]. • Deleting anything other than [USB Composite Device], [USB Audio Device], [Composite USB Device], [? Sony Handycam] and [? Continued 97 Sony Handycam] or [? You cannot copy pictures to delete them. For copying and viewing pictures recorded on a ...
...folder 6 When the [Confirm Device Removal] screen appears, click [OK]. 7 Turn off the power of your camcorder, disconnect the USB cable, then restart the computer. 8 Place the supplied CD-ROM in the [Other devices] folder For copying and viewing pictures ...]. 4 Double-click [Driver]. 5 Double-click [Setup.exe]. • Deleting anything other than [USB Composite Device], [USB Audio Device], [Composite USB Device], [? Sony Handycam] and [? Continued 97 Sony Handycam] or [? You cannot copy pictures to delete them. For copying and viewing pictures recorded on a ...

Operating Guide
Page 98
...environment as described in the following URL: http://www.ppackage.com/ 98 Disconnect the USB cable from your camcorder. • You cannot start Easy Handycam with USB connected] or [Cannot cancel Easy Handycam with USB connected] appears on another device on the [Select audio device] screen. 3 Follow...] [USB Streaming Tool]. 2 Select another lamp. Troubleshooting (continued) 2 Double-click the icon for the newly recognized drive [Removable Disk (F:)] (For Windows XP, [Sony Memory Stick]). The CD-R drive is not supported on the CD-R in the (-) direction on [Select video...
...environment as described in the following URL: http://www.ppackage.com/ 98 Disconnect the USB cable from your camcorder. • You cannot start Easy Handycam with USB connected] or [Cannot cancel Easy Handycam with USB connected] appears on another device on the [Select audio device] screen. 3 Follow...] [USB Streaming Tool]. 2 Select another lamp. Troubleshooting (continued) 2 Double-click the icon for the newly recognized drive [Removable Disk (F:)] (For Windows XP, [Sony Memory Stick]). The CD-R drive is not supported on the CD-R in the (-) direction on [Select video...

Operating Guide
Page 103
... switch it on again, then disconnect the USB cable and reconnect it. Flash Charging... Cannot print. Cannot add audio (p. 63). Cannot start Easy Handycam Cannot cancel Easy Handycam (p. 20). Cannot add audio. • Your camcorder does not allow you to PLAY/EDIT during Easy Handycam • You can select [STD-USB] when you touch .) HDV recorded tape...
... switch it on again, then disconnect the USB cable and reconnect it. Flash Charging... Cannot print. Cannot add audio (p. 63). Cannot start Easy Handycam Cannot cancel Easy Handycam (p. 20). Cannot add audio. • Your camcorder does not allow you to PLAY/EDIT during Easy Handycam • You can select [STD-USB] when you touch .) HDV recorded tape...
Operating Guide
Page 121
...42, 92 SPOT METER (Flexible spot meter 40, 91 STANDARD 45 STANDARD SET menu ...... 53 STD-USB 55 STEADYSHOT 44, 88 STILL 49 Still image Image size 45 Quality 45 Still image format ....... ...Sub sound 53 SUNSET&MOON 40 SUPER NSPLUS (Super Nightshot plus 43, 92 System requirement 71 S VIDEO cable 34, 59 S VIDEO jack 34, 59 Continued 121 Additional Information EFFECT (Picture effect 50 ... OUTDOOR 41 OVERLAP 48 P PAL 90, 105 PASTEL 50 PB FOLDER (Playback folder 47 PB zoom 25 Personal Menu 36, 57 Add 57 Arrange the order.......... 58 Customize 57 Delete 57 Reset ...
...42, 92 SPOT METER (Flexible spot meter 40, 91 STANDARD 45 STANDARD SET menu ...... 53 STD-USB 55 STEADYSHOT 44, 88 STILL 49 Still image Image size 45 Quality 45 Still image format ....... ...Sub sound 53 SUNSET&MOON 40 SUPER NSPLUS (Super Nightshot plus 43, 92 System requirement 71 S VIDEO cable 34, 59 S VIDEO jack 34, 59 Continued 121 Additional Information EFFECT (Picture effect 50 ... OUTDOOR 41 OVERLAP 48 P PAL 90, 105 PASTEL 50 PB FOLDER (Playback folder 47 PB zoom 25 Personal Menu 36, 57 Add 57 Arrange the order.......... 58 Customize 57 Delete 57 Reset ...


