
User Manual
Page 4
... captured using your camcorder. • Design and specifications of recording media and accessories are subject to change without any problems. • Compensation for the contents of the camcorder, storage media, etc. • TV color systems differ depending on the model DCR-HC28E. To view your recordings on a TV, you need a PAL system-based TV. • Television programs, films, video tapes, and other materials may be provided, even if recording or playback...
... captured using your camcorder. • Design and specifications of recording media and accessories are subject to change without any problems. • Compensation for the contents of the camcorder, storage media, etc. • TV color systems differ depending on the model DCR-HC28E. To view your recordings on a TV, you need a PAL system-based TV. • Television programs, films, video tapes, and other materials may be provided, even if recording or playback...

User Manual
Page 5
... adjust the focus for an off center subject (SPOT FOCUS) To fix the exposure for the selected subject (Flexible spot meter) To record in mirror mode To use a tripod To use a Shoulder Belt Playback To play back the images with added special effects (Picture effect) Recording/playback To check the remaining battery (Battery Info) To turn off the operation confirmation beep (BEEP) To initialize the settings (RESET) Other part names and functions Indicators displayed...
... adjust the focus for an off center subject (SPOT FOCUS) To fix the exposure for the selected subject (Flexible spot meter) To record in mirror mode To use a tripod To use a Shoulder Belt Playback To play back the images with added special effects (Picture effect) Recording/playback To check the remaining battery (Battery Info) To turn off the operation confirmation beep (BEEP) To initialize the settings (RESET) Other part names and functions Indicators displayed...

User Manual
Page 6
... TAPE SET menu 42 - OTHERS menu 44 - Dubbing/Editing Dubbing to VCR/DVD device, etc 45 Recording pictures from a VCR, etc. (DCR-HC28E 47 Dubbing sound to a recorded tape 48 Jacks to connect external devices 50 Troubleshooting Troubleshooting 51 Warning indicators and messages 58 6 PROGRAM AE/P EFFECT, etc. AUDIO MIX LCD/VF SET menu 41 - CLOCK SET/LANGUAGE, etc. D ZOOM/WIDE SEL/STEADYSHOT, etc. Playing the picture on a TV 28 Using the Menu Using the menu items 30 Operation button items 32 Menu items 37 MANUAL SET menu 38 - REC MODE/AUDIO MODE/REMAIN SETUP MENU menu...
... TAPE SET menu 42 - OTHERS menu 44 - Dubbing/Editing Dubbing to VCR/DVD device, etc 45 Recording pictures from a VCR, etc. (DCR-HC28E 47 Dubbing sound to a recorded tape 48 Jacks to connect external devices 50 Troubleshooting Troubleshooting 51 Warning indicators and messages 58 6 PROGRAM AE/P EFFECT, etc. AUDIO MIX LCD/VF SET menu 41 - CLOCK SET/LANGUAGE, etc. D ZOOM/WIDE SEL/STEADYSHOT, etc. Playing the picture on a TV 28 Using the Menu Using the menu items 30 Operation button items 32 Menu items 37 MANUAL SET menu 38 - REC MODE/AUDIO MODE/REMAIN SETUP MENU menu...

User Manual
Page 11
.... • Do not short-circuit the DC plug of your camcorder is turned off and zooming. Bottom: Recording with LCD screen. Playing time Approximate time (min.) available when you use a fully charged battery pack. The battery pack is still supplied to it while connected to OFF(CHG). • The CHG (charge) lamp flashes during charging, or the Battery Info (p. 23) will be correctly displayed under the following conditions. - On the...
.... • Do not short-circuit the DC plug of your camcorder is turned off and zooming. Bottom: Recording with LCD screen. Playing time Approximate time (min.) available when you use a fully charged battery pack. The battery pack is still supplied to it while connected to OFF(CHG). • The CHG (charge) lamp flashes during charging, or the Battery Info (p. 23) will be correctly displayed under the following conditions. - On the...

User Manual
Page 16
...]. SETUP MENU CLOCK SET LANGUAGE DEMO MODE --:--:-- • The date and time are not displayed while recording, but they are automatically recorded on your camcorder for about 3 months, the built-in rechargeable battery gets discharged and the date and time settings may be displayed during playback (see page 35 for the first time. In that case, charge the rechargeable battery and then set the date and time, the [CLOCK SET] screen appears every time you turn on the tape...
...]. SETUP MENU CLOCK SET LANGUAGE DEMO MODE --:--:-- • The date and time are not displayed while recording, but they are automatically recorded on your camcorder for about 3 months, the built-in rechargeable battery gets discharged and the date and time settings may be displayed during playback (see page 35 for the first time. In that case, charge the rechargeable battery and then set the date and time, the [CLOCK SET] screen appears every time you turn on the tape...
User Manual
Page 22
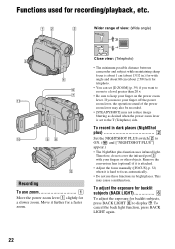
... telephoto. • You can set [D ZOOM] (p. 39) if you move your finger off the power zoom lever, the operation sound of view: (Wide angle) 5 qa 4 6 7 q; 98 qs Recording To use these functions in bright places. Therefore, do not cover the infrared port 3 with your finger on the power zoom lever. Remove the conversion lens (optional) if it is attached. • Adjust the focus manually ([FOCUS], p. 32) when it...
... telephoto. • You can set [D ZOOM] (p. 39) if you move your finger off the power zoom lever, the operation sound of view: (Wide angle) 5 qa 4 6 7 q; 98 qs Recording To use these functions in bright places. Therefore, do not cover the infrared port 3 with your finger on the power zoom lever. Remove the conversion lens (optional) if it is attached. • Adjust the focus manually ([FOCUS], p. 32) when it...

User Manual
Page 23
... displayed. Remaining battery (approx.) BATTERY INFO BATTERY CHARGE LEVEL 0% 50% 100% REC TIME AVAILABLE LCD SCREEN : 86 min VIEWFINDER : 99 min Recording capacity (approx.) To turn off center subject (SPOT FOCUS q; Recording/Playback To adjust the focus for about 7 seconds. See [P EFFECT] on page 32. You can view the battery information for the selected subject (Flexible spot meter)...... To use a tripod qs Attach the tripod (optional: the length of the date...
... displayed. Remaining battery (approx.) BATTERY INFO BATTERY CHARGE LEVEL 0% 50% 100% REC TIME AVAILABLE LCD SCREEN : 86 min VIEWFINDER : 99 min Recording capacity (approx.) To turn off center subject (SPOT FOCUS q; Recording/Playback To adjust the focus for about 7 seconds. See [P EFFECT] on page 32. You can view the battery information for the selected subject (Flexible spot meter)...... To use a tripod qs Attach the tripod (optional: the length of the date...

User Manual
Page 28
... camcorder to the input jack of a TV or a VCR using the A/V connecting cable with an S VIDEO cable, pictures can display the time code on the VCR. This adaptor is designed for viewing recorded images. TV/VCR Playing the picture on the VCR to LINE (VIDEO 1, VIDEO 2, etc.), if the VCR has an input selector. 28 When your TV is monaural (Only one audio input jack) Connect the yellow plug of the A/V connecting cable to the video input jack and connect the white (left /right audio...
... camcorder to the input jack of a TV or a VCR using the A/V connecting cable with an S VIDEO cable, pictures can display the time code on the VCR. This adaptor is designed for viewing recorded images. TV/VCR Playing the picture on the VCR to LINE (VIDEO 1, VIDEO 2, etc.), if the VCR has an input selector. 28 When your TV is monaural (Only one audio input jack) Connect the yellow plug of the A/V connecting cable to the video input jack and connect the white (left /right audio...

User Manual
Page 34
... use with the screen facing out (p. 33). • The setting returns to [ AUTO] when you turn the power off for more than 12 hours. [PAGE2] WHT BAL (White balance) You can fix the brightness of a picture manually. Under video lamps in the memory, the indicator stops flashing. •Do not shake your camcorder at a nearby white object for about 10 seconds for the following recording conditions: - flashes quickly. OUTDOOR ( ) The white balance...
... use with the screen facing out (p. 33). • The setting returns to [ AUTO] when you turn the power off for more than 12 hours. [PAGE2] WHT BAL (White balance) You can fix the brightness of a picture manually. Under video lamps in the memory, the indicator stops flashing. •Do not shake your camcorder at a nearby white object for about 10 seconds for the following recording conditions: - flashes quickly. OUTDOOR ( ) The white balance...
User Manual
Page 36
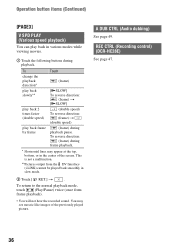
... slow mode. 2 Touch [ RET.] t . This is not a malfunction. **Pictures output from frame playback). • You will not hear the recorded sound. REC CTRL (Recording control) (DCR-HC28E) See page 47. 36 Operation button items (Continued) [PAGE3] V SPD PLAY (Various speed playback) You can play back frame by frame (frame) during playback. You may appear at the top, bottom, or in various modes while viewing movies. 1 Touch the following buttons during playback pause. To Touch change the playback direction* play...
... slow mode. 2 Touch [ RET.] t . This is not a malfunction. **Pictures output from frame playback). • You will not hear the recorded sound. REC CTRL (Recording control) (DCR-HC28E) See page 47. 36 Operation button items (Continued) [PAGE3] V SPD PLAY (Various speed playback) You can play back frame by frame (frame) during playback. You may appear at the top, bottom, or in various modes while viewing movies. 1 Touch the following buttons during playback pause. To Touch change the playback direction* play...
User Manual
Page 37
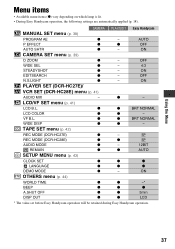
... Handycam operation. 37 OFF N.S.LIGHT z - z z BRT NORMAL WIDE DISP z z - LCD/VF SET menu (p. 41) LCD B.L. VF B.L. ON CAMERA SET menu (p. 39) D ZOOM z - z - z z BRT NORMAL LCD COLOR z z - TAPE SET menu (p. 42) REC MODE (DCR-HC27E) REC MODE (DCR-HC28E) z - AUTO P EFFECT z z OFF AUTO SHTR z - OFF WIDE SEL z - 4:3 STEADYSHOT z - ON EDITSEARCH z - SP z z SP AUDIO MODE z - 12BIT REMAIN z z AUTO SETUP MENU menu (p. 43) CLOCK SET z z z LANGUAGE z z z DEMO MODE z - CAMERA PLAY/EDIT Easy Handycam MANUAL SET...
... Handycam operation. 37 OFF N.S.LIGHT z - z z BRT NORMAL WIDE DISP z z - LCD/VF SET menu (p. 41) LCD B.L. VF B.L. ON CAMERA SET menu (p. 39) D ZOOM z - z - z z BRT NORMAL LCD COLOR z z - TAPE SET menu (p. 42) REC MODE (DCR-HC27E) REC MODE (DCR-HC28E) z - AUTO P EFFECT z z OFF AUTO SHTR z - OFF WIDE SEL z - 4:3 STEADYSHOT z - ON EDITSEARCH z - SP z z SP AUDIO MODE z - 12BIT REMAIN z z AUTO SETUP MENU menu (p. 43) CLOCK SET z z z LANGUAGE z z z DEMO MODE z - CAMERA PLAY/EDIT Easy Handycam MANUAL SET...
User Manual
Page 39
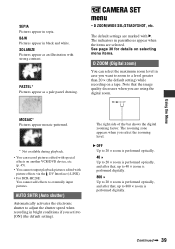
... selecting menu items. D ZOOM (Digital zoom) You can record pictures edited with special effects on a tape. AUTO SHTR (Auto shutter) Automatically activates the electronic shutter to a level greater than 20 × (the default setting) while recording on another VCR/DVD device, etc. (p. 45). • You cannot output playback pictures edited with picture effects via the DV Interface (i.LINK). • For DCR-HC28E: You cannot add effects to externally input pictures. B OFF Up to 20 × zoom is...
... selecting menu items. D ZOOM (Digital zoom) You can record pictures edited with special effects on a tape. AUTO SHTR (Auto shutter) Automatically activates the electronic shutter to a level greater than 20 × (the default setting) while recording on another VCR/DVD device, etc. (p. 45). • You cannot output playback pictures edited with picture effects via the DV Interface (i.LINK). • For DCR-HC28E: You cannot add effects to externally input pictures. B OFF Up to 20 × zoom is...

User Manual
Page 45
... flow A A/V connecting cable (supplied) B A/V connecting cable with S VIDEO (optional) When connecting to other recording devices (VCR/ DVD device, etc.). S VIDEO connection only will not output audio. Note that you cannot output picture and sound separately. • When you connect a device via the S VIDEO jack, by using the A/V connecting cable with an S VIDEO cable, pictures can connect your camcorder to the video jack, and the red (right channel) or the white (left /right audio) and S VIDEO plug (S VIDEO channel) of an A/V connecting cable. Connect the white and red plugs (left...
... flow A A/V connecting cable (supplied) B A/V connecting cable with S VIDEO (optional) When connecting to other recording devices (VCR/ DVD device, etc.). S VIDEO connection only will not output audio. Note that you cannot output picture and sound separately. • When you connect a device via the S VIDEO jack, by using the A/V connecting cable with an S VIDEO cable, pictures can connect your camcorder to the video jack, and the red (right channel) or the white (left /right audio) and S VIDEO plug (S VIDEO channel) of an A/V connecting cable. Connect the white and red plugs (left...

User Manual
Page 48
Internal stereo microphone You can add sound to start recording. 7 Stop recording. Touch (Stop) or [REC PAUSE]. 8 Touch [ RET.] t . When the tape has been recorded in the 16-bit mode (p. 42). - Check the picture on the VCR. The picture played on the connected device appears on the LCD screen of the cassette is connected via an i.LINK cable. - When your camcorder (p. 61). - When the tape has been recorded in 4CH MIC mode. - When the write-protect tab of your camcorder. 6 Touch...
Internal stereo microphone You can add sound to start recording. 7 Stop recording. Touch (Stop) or [REC PAUSE]. 8 Touch [ RET.] t . When the tape has been recorded in the 16-bit mode (p. 42). - Check the picture on the VCR. The picture played on the connected device appears on the LCD screen of the cassette is connected via an i.LINK cable. - When your camcorder (p. 61). - When the tape has been recorded in 4CH MIC mode. - When the write-protect tab of your camcorder. 6 Touch...

User Manual
Page 51
... AC Adaptor from your Sony dealer. Settings change during Easy Handycam operation. • During Easy Handycam operation, the settings of [A.SHUT OFF] (p. 44), or turn on the screen return to their defaults. The camcorder gets warm. • The camcorder may get warmer while you press the RESET button, all buttons are not displayed on . • Attach a charged battery pack to the camcorder (p. 9). • Use the AC Adaptor to connect to troubleshoot the problem.
... AC Adaptor from your Sony dealer. Settings change during Easy Handycam operation. • During Easy Handycam operation, the settings of [A.SHUT OFF] (p. 44), or turn on the screen return to their defaults. The camcorder gets warm. • The camcorder may get warmer while you press the RESET button, all buttons are not displayed on . • Attach a charged battery pack to the camcorder (p. 9). • Use the AC Adaptor to connect to troubleshoot the problem.

User Manual
Page 55
... when recording a bright subject. • This phenomenon is not a malfunction. The screen picture is not correctly displayed. • Deactivate the NightShot plus function (p. 22), or cancel the BACK LIGHT function (p. 22). Playback You cannot play back tape. • Slide the POWER switch repeatedly to reduce the anomaly (p. 38). Continued , 55 The displayed pictures are not clear or do not appear. • Clean the head using an S VIDEO plug, make...
... when recording a bright subject. • This phenomenon is not a malfunction. The screen picture is not correctly displayed. • Deactivate the NightShot plus function (p. 22), or cancel the BACK LIGHT function (p. 22). Playback You cannot play back tape. • Slide the POWER switch repeatedly to reduce the anomaly (p. 38). Continued , 55 The displayed pictures are not clear or do not appear. • Clean the head using an S VIDEO plug, make...
User Manual
Page 61
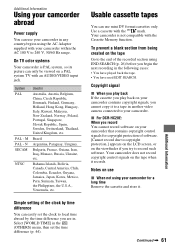
... can use your camcorder in another video camera connected to your camcorder. On TV color systems Your camcorder is not compatible with your camcorder within the AC 100 V to copyright protection.] appears on the LCD screen, or on use mini DV format cassettes only. Simple setting of the clock by the time difference you play back on your camcorder that contains copyright control signals for a long time Remove the cassette and store it records. Notes...
... can use your camcorder in another video camera connected to your camcorder. On TV color systems Your camcorder is not compatible with your camcorder within the AC 100 V to copyright protection.] appears on the LCD screen, or on use mini DV format cassettes only. Simple setting of the clock by the time difference you play back on your camcorder that contains copyright control signals for a long time Remove the cassette and store it records. Notes...

User Manual
Page 66
... device. • When you bring your camcorder in blue. - If you cannot obtain a clear image even after long use a soft cloth to the LCD screen. This is opened. Maintenance and precautions (Continued) • The warning message does not appear when the power is turned on. • Neither % or Z flash when a cassette is inserted and video operation buttons are dirty, video or sound distortion may be because the video heads...
... device. • When you bring your camcorder in blue. - If you cannot obtain a clear image even after long use a soft cloth to the LCD screen. This is opened. Maintenance and precautions (Continued) • The warning message does not appear when the power is turned on. • Neither % or Z flash when a cassette is inserted and video operation buttons are dirty, video or sound distortion may be because the video heads...

User Manual
Page 71
... 10 Battery Battery info 23 Battery pack 9 Charging time 10 Playing time 11 Recording time 11 Remaining battery .........24 BEACH&SKI 38 BEEP 44 BLACK 33 B&W 39 C CALIBRATION 67 CAM DATA 35 CAMERA SET menu........... 39 Cassette 17, 61 Insert/Eject 17 Write-protect tab 62 Cassette compartment .......... 17 Charging the battery 9 Battery pack 9 Pre-installed rechargeable battery 68 Charging time 10 CHG (charge) lamp 10 CLOCK SET 16 Connect TV 28, 47 VCR 28, 45, 47 D D ZOOM (Digital zoom) ..... 39 DATA CODE 24, 35 DATE/TIME...
... 10 Battery Battery info 23 Battery pack 9 Charging time 10 Playing time 11 Recording time 11 Remaining battery .........24 BEACH&SKI 38 BEEP 44 BLACK 33 B&W 39 C CALIBRATION 67 CAM DATA 35 CAMERA SET menu........... 39 Cassette 17, 61 Insert/Eject 17 Write-protect tab 62 Cassette compartment .......... 17 Charging the battery 9 Battery pack 9 Pre-installed rechargeable battery 68 Charging time 10 CHG (charge) lamp 10 CLOCK SET 16 Connect TV 28, 47 VCR 28, 45, 47 D D ZOOM (Digital zoom) ..... 39 DATA CODE 24, 35 DATE/TIME...
User Manual
Page 72
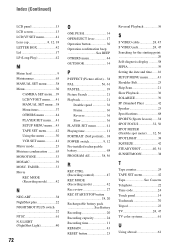
... PASTEL 39 Picture Search 21 Playback 21 Double speed 36 Frame 36 Reverse 36 Slow 36 PLAYER SET menu 41 Playing time 11 PORTRAIT (Soft portrait)... 38 POWER switch 9, 12 Pre-installed rechargeable battery 68 PROGRAM AE 38, 56 R REC CTRL (Recording control 47 REC MODE (Recording mode 42 Rec review 27 REC START/STOP button 18, 20 Rechargeable battery pack See Battery Recording 20 Recording capacity 24 Recording time 11 REMAIN 43 RESET button 23 Reversal Playback 36 S S VIDEO cable 28, 45 S VIDEO jack 28...
... PASTEL 39 Picture Search 21 Playback 21 Double speed 36 Frame 36 Reverse 36 Slow 36 PLAYER SET menu 41 Playing time 11 PORTRAIT (Soft portrait)... 38 POWER switch 9, 12 Pre-installed rechargeable battery 68 PROGRAM AE 38, 56 R REC CTRL (Recording control 47 REC MODE (Recording mode 42 Rec review 27 REC START/STOP button 18, 20 Rechargeable battery pack See Battery Recording 20 Recording capacity 24 Recording time 11 REMAIN 43 RESET button 23 Reversal Playback 36 S S VIDEO cable 28, 45 S VIDEO jack 28...


