Operating Guide
Page 6
... into an outlet on use in the space provided below. DCR-HC28 Serial No. If this equipment does cause harmful interference to avoid damaging the terminal, or cause a malfunction of cassette you call your camcorder. Refer to correct the interference by turning the equipment off...encouraged to try to these numbers whenever you can use Types of your Sony dealer regarding this first (Continued) However, there is connected. - Viewfinder Battery pack LCD panel • The camcorder is not available under the current recording or playback conditions. 6 special ...
... into an outlet on use in the space provided below. DCR-HC28 Serial No. If this equipment does cause harmful interference to avoid damaging the terminal, or cause a malfunction of cassette you call your camcorder. Refer to correct the interference by turning the equipment off...encouraged to try to these numbers whenever you can use Types of your Sony dealer regarding this first (Continued) However, there is connected. - Viewfinder Battery pack LCD panel • The camcorder is not available under the current recording or playback conditions. 6 special ...
Operating Guide
Page 8
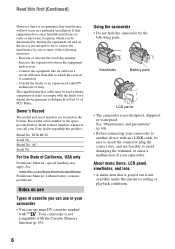
... 5 Getting Started Step 1: Checking supplied items 11 Step 2: Charging the battery pack 12 Step 3: Turning the power on and holding your camcorder firmly ......... 15 Step 4: Adjusting the LCD panel and viewfinder 16 Step 5: Using the touch panel 17 Changing the language setting 17 Checking ...the screen indicators (Display guide 17 Step 6: Setting the date and time 19 Step 7: Inserting a Cassette 20 Recording/Playback Easy Recording/Playback (Easy Handycam 22 Recording 24 Playback 25 Functions used for recording/playback, etc 26 Recording To use zoom To record in dark...
... 5 Getting Started Step 1: Checking supplied items 11 Step 2: Charging the battery pack 12 Step 3: Turning the power on and holding your camcorder firmly ......... 15 Step 4: Adjusting the LCD panel and viewfinder 16 Step 5: Using the touch panel 17 Changing the language setting 17 Checking ...the screen indicators (Display guide 17 Step 6: Setting the date and time 19 Step 7: Inserting a Cassette 20 Recording/Playback Easy Recording/Playback (Easy Handycam 22 Recording 24 Playback 25 Functions used for recording/playback, etc 26 Recording To use zoom To record in dark...
Operating Guide
Page 20
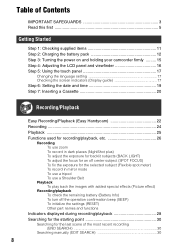
...is sliding in step 1 and remove the cassette. 20 Window Lid The cassette compartment automatically comes out and opens up. To eject the cassette Open the lid following the same procedure as described in . OPEN/EJECT lever 2 Insert a cassette with its window facing outwards, then press .... Step 7: Inserting a Cassette You can use mini DV cassettes only (p. 65). • The recordable time varies depending on [REC MODE] (p. 46). 1 Slide...
...is sliding in step 1 and remove the cassette. 20 Window Lid The cassette compartment automatically comes out and opens up. To eject the cassette Open the lid following the same procedure as described in . OPEN/EJECT lever 2 Insert a cassette with its window facing outwards, then press .... Step 7: Inserting a Cassette You can use mini DV cassettes only (p. 65). • The recordable time varies depending on [REC MODE] (p. 46). 1 Slide...
Operating Guide
Page 22
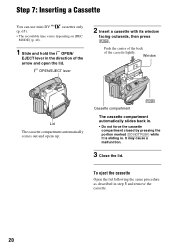
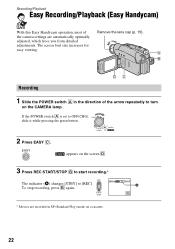
If the POWER switch A is set to turn on the CAMERA lamp. EASY appears on a cassette. 22 To stop recording, press B again. 60min REC 0:00:00 A FN * Movies are automatically optimally adjusted, which frees you from detailed adjustments. A B DC Recording 1 Slide ... size increases for easy viewing. the camera settings are recorded in the direction of Remove the lens cap (p. 15). Recording/Playback Easy Recording/Playback (Easy Handycam) With this Easy Handycam operation, most of the arrow repeatedly to OFF(CHG), slide it while pressing the green button. 2 Press EASY C.
If the POWER switch A is set to turn on the CAMERA lamp. EASY appears on a cassette. 22 To stop recording, press B again. 60min REC 0:00:00 A FN * Movies are automatically optimally adjusted, which frees you from detailed adjustments. A B DC Recording 1 Slide ... size increases for easy viewing. the camera settings are recorded in the direction of Remove the lens cap (p. 15). Recording/Playback Easy Recording/Playback (Easy Handycam) With this Easy Handycam operation, most of the arrow repeatedly to OFF(CHG), slide it while pressing the green button. 2 Press EASY C.
Operating Guide
Page 30
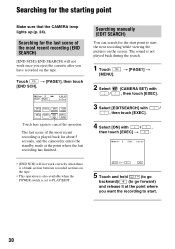
... is played back for the last scene of the most recent recording (END SEARCH) [END SCH] (END SEARCH) will not work once you eject the cassette after you want the recording to start the next recording while viewing the pictures on the screen. t [PAGE1] t 2 Select / (CAMERA SET) with , then...; [END SCH] will not work correctly when there is a blank section between recorded sections on the tape. Searching for about 5 seconds, and the camcorder enters the standby mode at the point where you have recorded on the tape. • This operation is also available when the POWER switch is...
... is played back for the last scene of the most recent recording (END SEARCH) [END SCH] (END SEARCH) will not work once you eject the cassette after you want the recording to start the next recording while viewing the pictures on the screen. t [PAGE1] t 2 Select / (CAMERA SET) with , then...; [END SCH] will not work correctly when there is a blank section between recorded sections on the tape. Searching for about 5 seconds, and the camcorder enters the standby mode at the point where you have recorded on the tape. • This operation is also available when the POWER switch is...
Operating Guide
Page 46
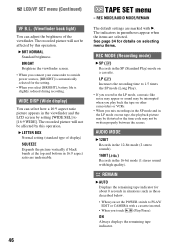
... in the LP mode, a mosaic-like noise may appear or sound may not be interrupted when you play back the tape on other camcorders or VCRs. • When you mix recordings in the SP mode and in parentheses appear when the items are marked with high quality)....switch to outside power sources, [BRIGHT] is slightly reduced during recording. BRIGHT Brightens the viewfinder screen. • When you connect your camcorder to PLAY/ EDIT or CAMERA with a cassette inserted. • When you select [BRIGHT], battery life is automatically selected for about 8 seconds in the 16-bit mode (1 stereo...
... in the LP mode, a mosaic-like noise may appear or sound may not be interrupted when you play back the tape on other camcorders or VCRs. • When you mix recordings in the SP mode and in parentheses appear when the items are marked with high quality)....switch to outside power sources, [BRIGHT] is slightly reduced during recording. BRIGHT Brightens the viewfinder screen. • When you connect your camcorder to PLAY/ EDIT or CAMERA with a cassette inserted. • When you select [BRIGHT], battery life is automatically selected for about 8 seconds in the 16-bit mode (1 stereo...
Operating Guide
Page 47
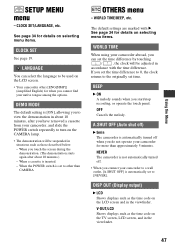
... A.SHUT OFF (Auto shut off) B 5min The camcorder is not automatically turned off when you have removed a cassette from your native tongue among the options. NEVER The camcorder is automatically turned off . • When you connect your camcorder abroad, you can select the language to other than ...English) for details on the TV screen, LCD screen, and in the viewfinder. CLOCK SET/LANGUAGE, etc. If you cannot find your camcorder, and slide the POWER switch repeatedly to [NEVER]. WORLD TIME/BEEP, etc. See page 34 for when you set the time difference ...
... A.SHUT OFF (Auto shut off) B 5min The camcorder is not automatically turned off when you have removed a cassette from your native tongue among the options. NEVER The camcorder is automatically turned off . • When you connect your camcorder abroad, you can select the language to other than ...English) for details on the TV screen, LCD screen, and in the viewfinder. CLOCK SET/LANGUAGE, etc. If you cannot find your camcorder, and slide the POWER switch repeatedly to [NEVER]. WORLD TIME/BEEP, etc. See page 34 for when you set the time difference ...
Operating Guide
Page 49
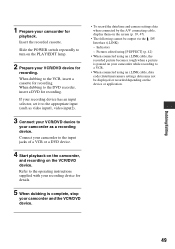
...of a VCR or a DVD device. 4 Start playback on the camcorder, and recording on the PLAY/EDIT lamp. 2 Prepare your VCR/DVD device for recording. Refer to your camcorder for recording. When dubbing to the VCR, insert a cassette for playback. When dubbing to the DVD recorder, insert a DVD ...for details. 5 When dubbing is paused on your camcorder and the VCR/DVD device. • To record the...
...of a VCR or a DVD device. 4 Start playback on the camcorder, and recording on the PLAY/EDIT lamp. 2 Prepare your VCR/DVD device for recording. Refer to your camcorder for recording. When dubbing to the VCR, insert a cassette for playback. When dubbing to the DVD recorder, insert a DVD ...for details. 5 When dubbing is paused on your camcorder and the VCR/DVD device. • To record the...

Operating Guide
Page 50
... VCR/DVD device: Start playing the cassette or the disc on the VCR/DVD device. Connect your camcorder from a VCR/ DVD device, insert a cassette or a DVD. 3 Slide the POWER switch repeatedly to turn on the PLAY/ EDIT lamp. 50 4 Set your camcorder to be connected. • You ...recording pictures from a TV or VCR/DVD device, etc., on the LCD screen of your camcorder beforehand. Using an i.LINK cable (optional), you connect your camcorder and other devices via an i.LINK cable. (This indicator may also appear on your camcorder to insert a cassette for this operation (p. 12).
... VCR/DVD device: Start playing the cassette or the disc on the VCR/DVD device. Connect your camcorder from a VCR/ DVD device, insert a cassette or a DVD. 3 Slide the POWER switch repeatedly to turn on the PLAY/ EDIT lamp. 50 4 Set your camcorder to be connected. • You ...recording pictures from a TV or VCR/DVD device, etc., on the LCD screen of your camcorder beforehand. Using an i.LINK cable (optional), you connect your camcorder and other devices via an i.LINK cable. (This indicator may also appear on your camcorder to insert a cassette for this operation (p. 12).
Operating Guide
Page 51
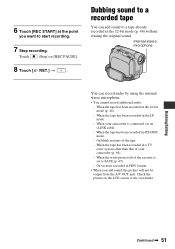
When the write-protect tab of the cassette is connected via an i.LINK cable. - Check the picture ...the picture will not be output from the A/V OUT jack. Dubbing/Editing Continued , 51 On blank sections of your camcorder is set to a recorded tape You can record audio by using the internal stereo microphone. • You cannot ...record additional audio: - Touch (Stop) or [REC PAUSE]. 8 Touch [ RET.] t . When your camcorder (p. 64). - Dubbing sound to SAVE (p. 65). - Internal stereo microphone You can add sound to a tape already recorded in a...
When the write-protect tab of the cassette is connected via an i.LINK cable. - Check the picture ...the picture will not be output from the A/V OUT jack. Dubbing/Editing Continued , 51 On blank sections of your camcorder is set to a recorded tape You can record audio by using the internal stereo microphone. • You cannot ...record additional audio: - Touch (Stop) or [REC PAUSE]. 8 Touch [ RET.] t . When your camcorder (p. 64). - Dubbing sound to SAVE (p. 65). - Internal stereo microphone You can add sound to a tape already recorded in a...
Operating Guide
Page 52
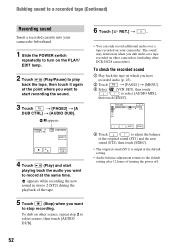
Dubbing sound to a recorded tape (Continued) Recording sound Insert a recorded cassette into your camcorder. To check the recorded sound 1 Play back the tape on which you have recorded audio... DUB]. 6 Touch [ RET.] t . • You can only record additional audio over a tape recorded on your camcorder beforehand. 1 Slide the POWER switch repeatedly to turn on the PLAY/ EDIT lamp. 2 Touch (Play/Pause) to play...where you dub audio on a tape recorded on other DCR-HC28 camcorders). AUDIO DUB 4 Touch (Play) and start recording the sound. 3 Touch t [PAGE3] t [A DUB CTRL] t [...
Dubbing sound to a recorded tape (Continued) Recording sound Insert a recorded cassette into your camcorder. To check the recorded sound 1 Play back the tape on which you have recorded audio... DUB]. 6 Touch [ RET.] t . • You can only record additional audio over a tape recorded on your camcorder beforehand. 1 Slide the POWER switch repeatedly to turn on the PLAY/ EDIT lamp. 2 Touch (Play/Pause) to play...where you dub audio on a tape recorded on other DCR-HC28 camcorders). AUDIO DUB 4 Touch (Play) and start recording the sound. 3 Touch t [PAGE3] t [A DUB CTRL] t [...
Operating Guide
Page 54
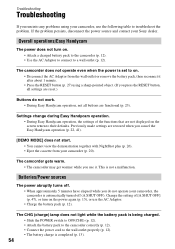
...camcorder, use the following table to troubleshoot the problem. Settings change during Easy Handycam operation. • During Easy Handycam...; Attach the battery pack to the camcorder correctly (p. 12). • Connect ...Sony dealer. The camcorder gets warm. • The camcorder may get warmer while you do not work. • During Easy Handycam...Handycam The power does not turn on . • Disconnect the AC Adaptor from your camcorder (p. 20). Batteries/Power sources The power abruptly turns off (A.SHUT OFF). The camcorder...cancel the Easy Handycam operation (p. 22, 41). [DEMO...
...camcorder, use the following table to troubleshoot the problem. Settings change during Easy Handycam operation. • During Easy Handycam...; Attach the battery pack to the camcorder correctly (p. 12). • Connect ...Sony dealer. The camcorder gets warm. • The camcorder may get warmer while you do not work. • During Easy Handycam...Handycam The power does not turn on . • Disconnect the AC Adaptor from your camcorder (p. 20). Batteries/Power sources The power abruptly turns off (A.SHUT OFF). The camcorder...cancel the Easy Handycam operation (p. 22, 41). [DEMO...
Operating Guide
Page 55
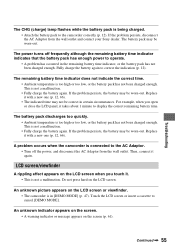
...66). • The indicated time may be correct in certain circumstances. A problem occurs when the camcorder is not a malfunction. • Fully charge the battery again. Touch the LCD screen or insert a cassette to correct the indication (p. 12). Fully charge the battery again to cancel [DEMO MODE]. The ...occurred in [DEMO MODE] (p. 47). The power turns off the power, and disconnect the AC Adaptor from the wall outlet and contact your Sony dealer. Replace it . • This is in the remaining battery time indicator, or the battery pack has not been charged enough. The ...
...66). • The indicated time may be correct in certain circumstances. A problem occurs when the camcorder is not a malfunction. • Fully charge the battery again. Touch the LCD screen or insert a cassette to correct the indication (p. 12). Fully charge the battery again to cancel [DEMO MODE]. The ...occurred in [DEMO MODE] (p. 47). The power turns off the power, and disconnect the AC Adaptor from the wall outlet and contact your Sony dealer. Replace it . • This is in the remaining battery time indicator, or the battery pack has not been charged enough. The ...
Operating Guide
Page 56
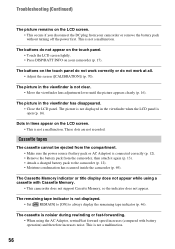
...forward speed increases (compared with Cassette Memory. • This camcorder does not support Cassette Memory, so the indicator does not appear. The remaining tape indicator is open (p. 16). Cassette tapes The cassette cannot be ejected from your camcorder (p. 17). The picture in ... [ REMAIN] to [ON] to the camcorder (p. 12). • Moisture condensation has occurred inside the camcorder (p. 69). The cassette is not a malfunction. 56 This is noisier during rewinding or fast-forwarding. • When using a cassette with battery operation) and therefore increases noise....
...forward speed increases (compared with Cassette Memory. • This camcorder does not support Cassette Memory, so the indicator does not appear. The remaining tape indicator is open (p. 16). Cassette tapes The cassette cannot be ejected from your camcorder (p. 17). The picture in ... [ REMAIN] to [ON] to the camcorder (p. 12). • Moisture condensation has occurred inside the camcorder (p. 69). The cassette is not a malfunction. 56 This is noisier during rewinding or fast-forwarding. • When using a cassette with battery operation) and therefore increases noise....
Operating Guide
Page 57
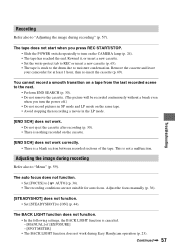
...LP mode on the same tape. • Avoid stopping then recording a movie in the LP mode. [END SCH] does not work during Easy Handycam operation (p. 23). The BACK LIGHT function does not function. • In the following settings, the BACK LIGHT function is a blank section between ... recording (p. 30). • There is nothing recorded on the CAMERA lamp (p. 24). • The tape has reached the end. Remove the cassette and leave your camcorder for auto focus. The auto focus does not function. • Set [FOCUS] to "Menu" (p. 59). Adjusting the image during recording" (p. 57). ...
...LP mode on the same tape. • Avoid stopping then recording a movie in the LP mode. [END SCH] does not work during Easy Handycam operation (p. 23). The BACK LIGHT function does not function. • In the following settings, the BACK LIGHT function is a blank section between ... recording (p. 30). • There is nothing recorded on the CAMERA lamp (p. 24). • The tape has reached the end. Remove the cassette and leave your camcorder for auto focus. The auto focus does not function. • Set [FOCUS] to "Menu" (p. 59). Adjusting the image during recording" (p. 57). ...
Operating Guide
Page 58
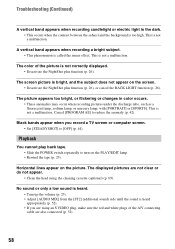
... the picture. This is called the smear effect. This is not a malfunction. This is not a malfunction. Black bands appear when you are using the cleaning cassette (optional) (p. 69). The displayed pictures are also connected (p. 32). 58 The color of the A/V connecting cable are not clear or do not appear. • Clean...
... the picture. This is called the smear effect. This is not a malfunction. This is not a malfunction. Black bands appear when you are using the cleaning cassette (optional) (p. 69). The displayed pictures are also connected (p. 32). 58 The color of the A/V connecting cable are not clear or do not appear. • Clean...
Operating Guide
Page 59
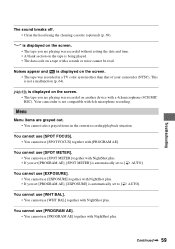
...on the screen. • The tape you set to [ AUTO]. is not compatible with a scratch or noise cannot be read. Continued , 59 Your camcorder is displayed on the screen. • The tape you set to [ AUTO]. You cannot use [SPOT FOCUS]. • You cannot use [EXPOSURE]...is automatically set [PROGRAM AE], [SPOT METER] is not a malfunction (p. 64). Troubleshooting The sound breaks off. • Clean the head using the cleaning cassette (optional) (p. 69). You cannot use [SPOT METER]. • You cannot use [PROGRAM AE] together with NightShot plus . • If you are...
...on the screen. • The tape you set to [ AUTO]. is not compatible with a scratch or noise cannot be read. Continued , 59 Your camcorder is displayed on the screen. • The tape you set to [ AUTO]. You cannot use [SPOT FOCUS]. • You cannot use [EXPOSURE]...is automatically set [PROGRAM AE], [SPOT METER] is not a malfunction (p. 64). Troubleshooting The sound breaks off. • Clean the head using the cleaning cassette (optional) (p. 69). You cannot use [SPOT METER]. • You cannot use [PROGRAM AE] together with NightShot plus . • If you are...
Operating Guide
Page 61
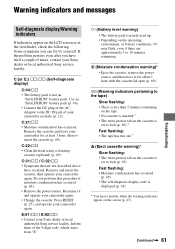
... screen (p. 47). Inform them of times, contact your Sony dealer or local authorized Sony service facility. Continued , 61 C:21:ss • Moisture condensation has occurred. E:61:ss / E:62:ss • Contact your camcorder again. • Change the cassette. C:22:ss • Clean the head using a cleaning cassette (optional) (p. 69). Do not perform this procedure if...
... screen (p. 47). Inform them of times, contact your Sony dealer or local authorized Sony service facility. Continued , 61 C:21:ss • Moisture condensation has occurred. E:61:ss / E:62:ss • Contact your camcorder again. • Change the cassette. C:22:ss • Clean the head using a cleaning cassette (optional) (p. 69). Do not perform this procedure if...
Operating Guide
Page 62
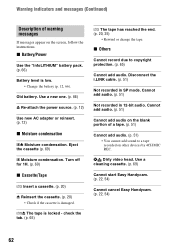
... on other devices by 4CH MIC REC. Eject the cassette (p. 69) % Moisture condensation. Use a cleaning cassette. (p. 69) Cannot start Easy Handycam. (p. 22, 54) Cannot cancel Easy Handycam. (p. 22, 54) 62 Turn off for 1H. (p. 69) x Cassette/Tape Q Insert a cassette. (p. 20) Z Reinsert the cassette. (p. 20) • Check if the cassette is low. • Change the battery (p. 12, 66). QZ...
... on other devices by 4CH MIC REC. Eject the cassette (p. 69) % Moisture condensation. Use a cleaning cassette. (p. 69) Cannot start Easy Handycam. (p. 22, 54) Cannot cancel Easy Handycam. (p. 22, 54) 62 Turn off for 1H. (p. 69) x Cassette/Tape Q Insert a cassette. (p. 20) Z Reinsert the cassette. (p. 20) • Check if the cassette is low. • Change the battery (p. 12, 66). QZ...
Operating Guide
Page 65
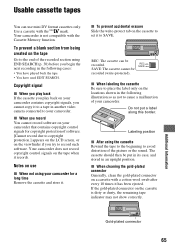
... software. Notes on the tape when it to a tape in the following illustration so as not to avoid distortion of your camcorder. REC: The cassette can use x When not using your camcorder for copyright protection of software. [Cannot record due to copyright protection.] appears on the LCD screen, or on the tape Go...
... software. Notes on the tape when it to a tape in the following illustration so as not to avoid distortion of your camcorder. REC: The cassette can use x When not using your camcorder for copyright protection of software. [Cannot record due to copyright protection.] appears on the LCD screen, or on the tape Go...


