Operating Guide
Page 8
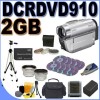
... Using your camcorder 4 Table of Contents 8 Subject examples and solutions ... 10 Enjoying with more presence (5.1ch surround recording 36 Starting to VCR or DVD/HDD recorders 57 Printing still images (PictBridge compliant printer 59 Utilizing Media (MANAGE MEDIA) category 61 Making ... disc or a "Memory Stick PRO Duo 27 Recording/Playback Recording and playing back with ease (Easy Handycam operation) ....... 31 Recording 34 Zooming 36 Recording sound with Your Camcorder Media for backlit subjects 38 Recording in mirror mode 38 Recording the fast action in slow- Taking advantage ...
... Using your camcorder 4 Table of Contents 8 Subject examples and solutions ... 10 Enjoying with more presence (5.1ch surround recording 36 Starting to VCR or DVD/HDD recorders 57 Printing still images (PictBridge compliant printer 59 Utilizing Media (MANAGE MEDIA) category 61 Making ... disc or a "Memory Stick PRO Duo 27 Recording/Playback Recording and playing back with ease (Easy Handycam operation) ....... 31 Recording 34 Zooming 36 Recording sound with Your Camcorder Media for backlit subjects 38 Recording in mirror mode 38 Recording the fast action in slow- Taking advantage ...
Operating Guide
Page 28
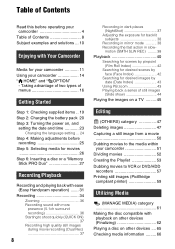
...118). z Tips • When you use it again to obstruct the operation with the disc set , the recording format is fixed to your camcorder since your camcorder to malfunction. • Do not disconnect the power sources while formatting a disc. • Do not apply shock or vibration to VIDEO mode...; You can start . • To delete all of the previously recorded images from a DVD-RW/DVD+RW, then to use a DVD-RW while the Easy Handycam operation (p. 31) is set incorrectly, it may cause your camcorder is displayed on the LCD screen • It may take some time to remove the disc...
...118). z Tips • When you use it again to obstruct the operation with the disc set , the recording format is fixed to your camcorder since your camcorder to malfunction. • Do not disconnect the power sources while formatting a disc. • Do not apply shock or vibration to VIDEO mode...; You can start . • To delete all of the previously recorded images from a DVD-RW/DVD+RW, then to use a DVD-RW while the Easy Handycam operation (p. 31) is set incorrectly, it may cause your camcorder is displayed on the LCD screen • It may take some time to remove the disc...
Operating Guide
Page 47
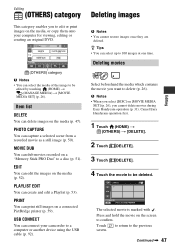
... the media which contains the movie you to edit or print images on [MOVIE MEDIA SET] (p. 26), you cannot delete movies during Easy Handycam operation (p. 31). Cancel Easy Handycam operation first. 1 Touch (HOME) t (OTHERS) t [DELETE]. 2 Touch [ DELETE]. 3 Touch [ DELETE]. 4 Touch the movie to be edited by touching ... original DVD. (OTHERS) category b Notes • You can select the media of the image to be deleted. Editing (OTHERS) category This category enables you want to delete (p. 26). b Notes • When you select [DISC] on the media, or copy them onto your camcorder to ...
... the media which contains the movie you to edit or print images on [MOVIE MEDIA SET] (p. 26), you cannot delete movies during Easy Handycam operation (p. 31). Cancel Easy Handycam operation first. 1 Touch (HOME) t (OTHERS) t [DELETE]. 2 Touch [ DELETE]. 3 Touch [ DELETE]. 4 Touch the movie to be edited by touching ... original DVD. (OTHERS) category b Notes • You can select the media of the image to be deleted. Editing (OTHERS) category This category enables you want to delete (p. 26). b Notes • When you select [DISC] on the media, or copy them onto your camcorder to ...
Operating Guide
Page 64
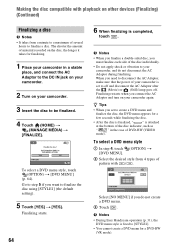
..." in a stable place, and connect the AC Adaptor to the DC IN jack on your camcorder. 2 Turn on your camcorder, and do not create a DVD menu. 3 Touch . Making the disc compatible with playback on other devices (Finalizing) (Continued)... Finalizing a disc b Notes • It takes from 4 types of pattern with / . b Notes • During Easy Handycam operation (p. 31), the DVD menu style is completed, touch . Go to step 5 if you set to create a DVD...
..." in a stable place, and connect the AC Adaptor to the DC IN jack on your camcorder. 2 Turn on your camcorder, and do not create a DVD menu. 3 Touch . Making the disc compatible with playback on other devices (Finalizing) (Continued)... Finalizing a disc b Notes • It takes from 4 types of pattern with / . b Notes • During Easy Handycam operation (p. 31), the DVD menu style is completed, touch . Go to step 5 if you set to create a DVD...

Operating Guide
Page 67
... the recording format, [VIDEO] or [VR] (p. 11), then touch . x DVD+RW Select the aspect ratio of DVD+RW, you format a DVD-RW during formatting. • Even the images protected with the original device, and then format it. Cancel the protection with another ... STICK]. 5 Touch [YES] t [YES]. 6 When [Completed.] appears, touch . b Notes • Do not apply shock or vibration to your camcorder, and do not disconnect the AC Adaptor during Easy Handycam operation (p. 31), the recording format is required on other devices. Format the disc again to VIDEO mode. z Tips • When you...
... the recording format, [VIDEO] or [VR] (p. 11), then touch . x DVD+RW Select the aspect ratio of DVD+RW, you format a DVD-RW during formatting. • Even the images protected with the original device, and then format it. Cancel the protection with another ... STICK]. 5 Touch [YES] t [YES]. 6 When [Completed.] appears, touch . b Notes • Do not apply shock or vibration to your camcorder, and do not disconnect the AC Adaptor during Easy Handycam operation (p. 31), the recording format is required on other devices. Format the disc again to VIDEO mode. z Tips • When you...
Operating Guide
Page 96
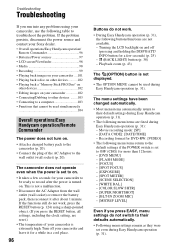
... pack to the camcorder (p. 20). • Connect the plug of your camcorder is set even during Easy Handycam operation (p. 31). Turning the LCD backlight on . If the problem persists, disconnect the power source and contact your Sony dealer. • Overall operations/Easy Handycam operation/ Remote Commander... extremely high. Recording format for more than 12 hours: - [DVD MENU] - [FLASH MODE] - [FOCUS] - [SPOT FOCUS] - [EXPOSURE] - [SPOT METER] - [SCENE SELECTION] - [WHITE BAL.] - [COLOR SLOW SHTR] - [SUPER NIGHTSHOT] - [BLT-IN ZOOM MIC] - [MICREF LEVEL] Even if you press the RESET ...
... pack to the camcorder (p. 20). • Connect the plug of your camcorder is set even during Easy Handycam operation (p. 31). Turning the LCD backlight on . If the problem persists, disconnect the power source and contact your Sony dealer. • Overall operations/Easy Handycam operation/ Remote Commander... extremely high. Recording format for more than 12 hours: - [DVD MENU] - [FLASH MODE] - [FOCUS] - [SPOT FOCUS] - [EXPOSURE] - [SPOT METER] - [SCENE SELECTION] - [WHITE BAL.] - [COLOR SLOW SHTR] - [SUPER NIGHTSHOT] - [BLT-IN ZOOM MIC] - [MICREF LEVEL] Even if you press the RESET ...

Operating Guide
Page 103
... during Easy Handycam operation (p. 31). • Images protected on a "Memory Stick PRO Duo" (p. 53). Connecting to a computer You cannot install "Picture Motion Browser." • Check the computer environment required to capture a still image from your camcorder using other devices. In the case of the A/V connecting cable with S VIDEO (optional) (p. 57). DVD+RW - The...
... during Easy Handycam operation (p. 31). • Images protected on a "Memory Stick PRO Duo" (p. 53). Connecting to a computer You cannot install "Picture Motion Browser." • Check the computer environment required to capture a still image from your camcorder using other devices. In the case of the A/V connecting cable with S VIDEO (optional) (p. 57). DVD+RW - The...


