
Operating Guide
Page 2
... may be operated only from battery power, or other ). Overloading Do not overload wall outlets, extension cords or convenience receptacles beyond their capacity, since this manual for future reference. Never spill liquid of any kind on the set through openings as they may cause hazards. 2 Do not defeat the safety purpose...
... may be operated only from battery power, or other ). Overloading Do not overload wall outlets, extension cords or convenience receptacles beyond their capacity, since this manual for future reference. Never spill liquid of any kind on the set through openings as they may cause hazards. 2 Do not defeat the safety purpose...
Operating Guide
Page 4
...of optical instruments with the limits for a Class B digital device, pursuant to provide reasonable protection against harmful interference in hazardous radiation exposure. Use of controls or adjustments or performance of Conformity Trade Name: SONY Model No.: DCR-DVD910 Responsible Party: Sony ...Electronics Inc. Model No. Address: 16530 Via Esprillo, San Diego, CA 92127 U.S.A. Read this before operating your camcorder Before operating the unit, please read this manual thoroughly, and retain ...
...of optical instruments with the limits for a Class B digital device, pursuant to provide reasonable protection against harmful interference in hazardous radiation exposure. Use of controls or adjustments or performance of Conformity Trade Name: SONY Model No.: DCR-DVD910 Responsible Party: Sony ...Electronics Inc. Model No. Address: 16530 Via Esprillo, San Diego, CA 92127 U.S.A. Read this before operating your camcorder Before operating the unit, please read this manual thoroughly, and retain ...

Operating Guide
Page 5
...Stick" you purchase, the disc has mark. "Operating Guide" (This manual) - Types of a "Memory Stick PRO Duo." Notes on the place you can use in your camcorder • For recording movies, it in your camcorder.) • "Memory Stick PRO Duo" and "Memory Stick PRO-HG...recording/ playback, we recommend that you use Sony discs or discs with a *(for VIDEO CAMERA) mark for using your camcorder. "PMB Guide" for your camcorder.) "Memory Stick" (You cannot use the following discs only. - 8cm DVD-RW - 8cm DVD+RW - 8cm DVD-R - 8cm DVD+R DL Use the discs with two kinds...
...Stick" you purchase, the disc has mark. "Operating Guide" (This manual) - Types of a "Memory Stick PRO Duo." Notes on the place you can use in your camcorder • For recording movies, it in your camcorder.) • "Memory Stick PRO Duo" and "Memory Stick PRO-HG...recording/ playback, we recommend that you use Sony discs or discs with a *(for VIDEO CAMERA) mark for using your camcorder. "PMB Guide" for your camcorder.) "Memory Stick" (You cannot use the following discs only. - 8cm DVD-RW - 8cm DVD+RW - 8cm DVD-R - 8cm DVD+R DL Use the discs with two kinds...
Operating Guide
Page 7
... lens for illustrating the operating procedures. About this manual • The LCD screens and the viewfinder images and indicators shown in this manual were taken with a Carl Zeiss lens, which was developed jointly by Carl Zeiss, in Germany, and Sony Corporation, and produces superior images. recordings on ... your images on -screen displays in each local language are used in this manual refers to 8cm DVD discs. • In this manual • The operations available depend on the media used for your camcorder if necessary (p. 24). About language setting The on another type of light ...
... lens for illustrating the operating procedures. About this manual • The LCD screens and the viewfinder images and indicators shown in this manual were taken with a Carl Zeiss lens, which was developed jointly by Carl Zeiss, in Germany, and Sony Corporation, and produces superior images. recordings on ... your images on -screen displays in each local language are used in this manual refers to 8cm DVD discs. • In this manual • The operations available depend on the media used for your camcorder if necessary (p. 24). About language setting The on another type of light ...
Operating Guide
Page 11
... instruction manual of your camcorder (deleting and rearranging the order of DVD-RW. VIDEO mode and VR mode Glossary (p. 129) Continued , 11 z Tips • Discs you can use with your camcorder are 8cm DVD-RW, DVD+RW, DVD-R and DVD+R DL discs. • See page 5 for DVD-RW When you use in DVD devices ... finalized disc can select either of "Memory Stick" you can use a DVD-RW, you can be played back in your camcorder. • Still images are recorded only on [MOVIE MEDIA SET] (p. 26). In this manual, VIDEO mode is compatible with most recent movie can dub movies recorded on...
... instruction manual of your camcorder (deleting and rearranging the order of DVD-RW. VIDEO mode and VR mode Glossary (p. 129) Continued , 11 z Tips • Discs you can use with your camcorder are 8cm DVD-RW, DVD+RW, DVD-R and DVD+R DL discs. • See page 5 for DVD-RW When you use in DVD devices ... finalized disc can select either of "Memory Stick" you can use a DVD-RW, you can be played back in your camcorder. • Still images are recorded only on [MOVIE MEDIA SET] (p. 26). In this manual, VIDEO mode is compatible with most recent movie can dub movies recorded on...
Operating Guide
Page 12
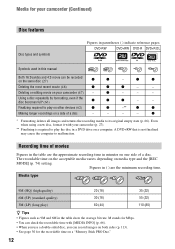
... in the table are the minimum recording time. Recording time of a disc - - - - Media for your camcorder (47) - Finalizing required to play the disc in parentheses ( ) indicate reference pages. DVD-RW DVD+RW DVD-R DVD+R DL Symbols used in this manual Both 16:9 (wide) and 4:3 movie can record images on both sides (p. 113). • See page 30...
... in the table are the minimum recording time. Recording time of a disc - - - - Media for your camcorder (47) - Finalizing required to play the disc in parentheses ( ) indicate reference pages. DVD-RW DVD+RW DVD-R DVD+R DL Symbols used in this manual Both 16:9 (wide) and 4:3 movie can record images on both sides (p. 113). • See page 30...

Operating Guide
Page 15
... is required in most DVD devices after finalizing. But finalizing is not guaranteed. Refer to add movies (p. 68). x Playing the disc on other devices (p. 65) To play a disc recorded on your camcorder on disc type. The disc can view the images recorded and edited on your dealer. 15 ... added without finalizing. Unfinalizing allows you need to finalize the disc. The disc can be played back without unfinalizing. Enjoying with Your Camcorder 4Viewing on other devices, you to the instruction manual supplied with your DVD device or consult your camcorder on the connected TV.
... is required in most DVD devices after finalizing. But finalizing is not guaranteed. Refer to add movies (p. 68). x Playing the disc on other devices (p. 65) To play a disc recorded on your camcorder on disc type. The disc can view the images recorded and edited on your dealer. 15 ... added without finalizing. Unfinalizing allows you need to finalize the disc. The disc can be played back without unfinalizing. Enjoying with Your Camcorder 4Viewing on other devices, you to the instruction manual supplied with your DVD device or consult your camcorder on the connected TV.

Operating Guide
Page 19
... that item supplied. AC Adaptor (1) (p. 20) Rechargeable battery pack NP-FH60 (1) (p. 20) Power cord (mains lead) (1) (p. 20) CD-ROM "Handycam Application Software" (1) (p. 92) - Picture Motion Browser (Software) - PMB Guide Operating Guide (This manual) (1) A/V connecting cable (1) (p. 45, 57) USB cable (1) (p. 59) Wireless Remote Commander (1) (p. 126) A button-type lithium battery is already installed. 19...
... that item supplied. AC Adaptor (1) (p. 20) Rechargeable battery pack NP-FH60 (1) (p. 20) Power cord (mains lead) (1) (p. 20) CD-ROM "Handycam Application Software" (1) (p. 92) - Picture Motion Browser (Software) - PMB Guide Operating Guide (This manual) (1) A/V connecting cable (1) (p. 45, 57) USB cable (1) (p. 59) Wireless Remote Commander (1) (p. 126) A button-type lithium battery is already installed. 19...
Operating Guide
Page 37
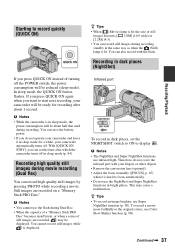
...when a series of still images are recorded on a "Memory Stick PRO Duo." b Notes • While the camcorder is in sleep mode, the power consumption will be displayed. With [QUICK ON STBY], you can record high quality ...Still) lamp is hard to focus automatically. • Do not use infrared light. You can also record with your camcorder automatically turns off. Still images are recorded, may cause a malfunction. To record a movie more faithfully to the original... • Remove the conversion lens (optional). • Adjust the focus manually ([FOCUS], p. 87) when it is lit.
...when a series of still images are recorded on a "Memory Stick PRO Duo." b Notes • While the camcorder is in sleep mode, the power consumption will be displayed. With [QUICK ON STBY], you can record high quality ...Still) lamp is hard to focus automatically. • Do not use infrared light. You can also record with your camcorder automatically turns off. Still images are recorded, may cause a malfunction. To record a movie more faithfully to the original... • Remove the conversion lens (optional). • Adjust the focus manually ([FOCUS], p. 87) when it is lit.

Operating Guide
Page 45
...be connected. VCRs or TVs When your TV is not necessary. The yellow plug connection is connected to a VCR Connect your camcorder. 2 Touch (HOME) t (SETTINGS) t [OUTPUT SETTINGS] t [TV TYPE] t [16:9] or [4:3] t . Continued... (wall socket) using the supplied AC Adaptor for this operation (p. 20). Connect your camcorder to LINE (VIDEO 1, VIDEO 2, etc.), if the VCR has an input selector. Connecting only the S VIDEO... plug will view images on. 1 Turn on your camcorder to the LINE IN input on the VCR. Playing the images on a TV Connect your camcorder to the input jack of a TV or VCR using...
...be connected. VCRs or TVs When your TV is not necessary. The yellow plug connection is connected to a VCR Connect your camcorder. 2 Touch (HOME) t (SETTINGS) t [OUTPUT SETTINGS] t [TV TYPE] t [16:9] or [4:3] t . Continued... (wall socket) using the supplied AC Adaptor for this operation (p. 20). Connect your camcorder to LINE (VIDEO 1, VIDEO 2, etc.), if the VCR has an input selector. Connecting only the S VIDEO... plug will view images on. 1 Turn on your camcorder to the LINE IN input on the VCR. Playing the images on a TV Connect your camcorder to the input jack of a TV or VCR using...

Operating Guide
Page 46
... is monaural (When your TV has only one audio input jack) Connect the yellow plug of your TV or VCR. Refer also to the instruction manuals supplied with your TV. • When you set [TV TYPE] to [16:9]. Playing the images on a TV (Continued) b Notes • When you connect your... camcorder to a TV compatible with the ID-1/ID-2 system, set [TV TYPE] to [4:3], the image quality may jitter. • When you play back an image recorded ...
... is monaural (When your TV has only one audio input jack) Connect the yellow plug of your TV or VCR. Refer also to the instruction manuals supplied with your TV. • When you set [TV TYPE] to [16:9]. Playing the images on a TV (Continued) b Notes • When you connect your... camcorder to a TV compatible with the ID-1/ID-2 system, set [TV TYPE] to [4:3], the image quality may jitter. • When you play back an image recorded ...

Operating Guide
Page 57
Refer also to the instruction manuals supplied with the devices to the other device via analog data transfer, the image quality may deteriorate. The yellow plug connection is performed via the S .... B A/V connecting cable with S VIDEO (optional) When connecting to be produced than with an A/V connecting VCRs or DVD/HDD recorders cable. b Notes • To hide the screen indicators, such as VCRs or DVD/HDD recorders. Connect your camcorder to the wall outlet (wall socket) using an A/V connecting cable with S VIDEO (optional), higher quality movies...
Refer also to the instruction manuals supplied with the devices to the other device via analog data transfer, the image quality may deteriorate. The yellow plug connection is performed via the S .... B A/V connecting cable with S VIDEO (optional) When connecting to be produced than with an A/V connecting VCRs or DVD/HDD recorders cable. b Notes • To hide the screen indicators, such as VCRs or DVD/HDD recorders. Connect your camcorder to the wall outlet (wall socket) using an A/V connecting cable with S VIDEO (optional), higher quality movies...
Operating Guide
Page 58
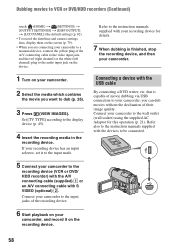
... record it to the input mode. 5 Connect your camcorder to the recording device (VCR or DVD/ HDD recorder) with the A/V connecting cable (supplied) 1 or an A/V connecting cable with the USB cable By connecting a DVD writer, etc. Refer also to the instruction manuals supplied with your recording device for this operation (p. 21). If your recording...
... record it to the input mode. 5 Connect your camcorder to the recording device (VCR or DVD/ HDD recorder) with the A/V connecting cable (supplied) 1 or an A/V connecting cable with the USB cable By connecting a DVD writer, etc. Refer also to the instruction manuals supplied with your recording device for this operation (p. 21). If your recording...

Operating Guide
Page 59
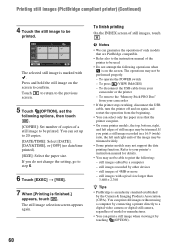
...Continued , 59 Printing still images (PictBridge compliant printer) You can print out still images using the supplied USB cable (p. 124). Connect your camcorder to a DVD writer, etc. The [USB SELECT] screen appears. 3 Touch media which contains the movie to be dubbed. 4 Start recording on the...supplied USB cable (p. 124). 1 Turn on your camcorder. 2 Connect the (USB) jack of your camcorder. Insert the "Memory Stick PRO Duo" that contains the still images you want to print into your camcorder to the instruction manuals supplied with the connected device for details. 5 When...
...Continued , 59 Printing still images (PictBridge compliant printer) You can print out still images using the supplied USB cable (p. 124). Connect your camcorder to a DVD writer, etc. The [USB SELECT] screen appears. 3 Touch media which contains the movie to be dubbed. 4 Start recording on the...supplied USB cable (p. 124). 1 Turn on your camcorder. 2 Connect the (USB) jack of your camcorder. Insert the "Memory Stick PRO Duo" that contains the still images you want to print into your camcorder to the instruction manuals supplied with the connected device for details. 5 When...
Operating Guide
Page 60
...[DATE], [DAY&TIME], or [OFF] (no date/time printed). [SIZE]: Select the paper size. To remove the "Memory Stick PRO Duo" from your camcorder • If the printer stops working, disconnect the USB cable, turn the printer off and on the screen to be printed. still images recorded by...computer by the Camera & Imaging Products Association (CIPA). Press and hold the still image on again, and restart the operation from your printer's instruction manual for details. • You may be performed properly. - Refer to your camcorder or the printer - To operate the POWER switch -
...[DATE], [DAY&TIME], or [OFF] (no date/time printed). [SIZE]: Select the paper size. To remove the "Memory Stick PRO Duo" from your camcorder • If the printer stops working, disconnect the USB cable, turn the printer off and on the screen to be printed. still images recorded by...computer by the Camera & Imaging Products Association (CIPA). Press and hold the still image on again, and restart the operation from your printer's instruction manual for details. • You may be performed properly. - Refer to your camcorder or the printer - To operate the POWER switch -
Operating Guide
Page 65
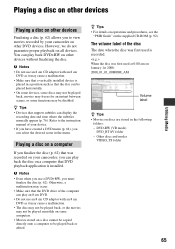
.... Playing a disc on a computer If you finalize the disc (p. 62) that was recorded on your camcorder, you can play back DVD+RW on other DVD devices. The volume label of your device. • If you have created a DVD menu (p. 64), you must finalize the disc (p. 62). b Notes • Do not use an ... is placed in the following folders: - DVD-RW (VR mode) DVD_RTAV folder - z Tips • For details on operations and procedures, see the "PMB Guide" on all devices. You can select the desired scene in the menu. Refer to the instruction manual of the disc The date when the disc...
.... Playing a disc on a computer If you finalize the disc (p. 62) that was recorded on your camcorder, you can play back DVD+RW on other DVD devices. The volume label of your device. • If you have created a DVD menu (p. 64), you must finalize the disc (p. 62). b Notes • Do not use an ... is placed in the following folders: - DVD-RW (VR mode) DVD_RTAV folder - z Tips • For details on operations and procedures, see the "PMB Guide" on all devices. You can select the desired scene in the menu. Refer to the instruction manual of the disc The date when the disc...

Operating Guide
Page 74
... on the screen, touch / to the TV connected. NIGHTSHOT LIGHT When using either the NightShot (p. 37) or the [SUPER NIGHTSHOT] (p. 90) function to the instruction manuals supplied with your TV. If the item is [ON]. MOVIE SETTINGS (Items for playback (p. 45). 74 WIDE SELECT When recording images, you can select audio...
... on the screen, touch / to the TV connected. NIGHTSHOT LIGHT When using either the NightShot (p. 37) or the [SUPER NIGHTSHOT] (p. 90) function to the instruction manuals supplied with your TV. If the item is [ON]. MOVIE SETTINGS (Items for playback (p. 45). 74 WIDE SELECT When recording images, you can select audio...
Operating Guide
Page 76
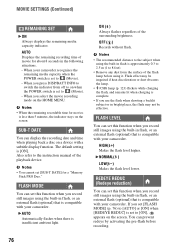
... record still images using the built-in flash, or an external flash (optional) that is compatible with your camcorder recognizes the remaining media capacity when the POWER switch is less than 5 minutes, the indicator stays on a device with your...Makes the flash level higher. AUTO Displays the remaining recording time of the flash lamp before recording. 76 When your camcorder. b Notes • You cannot set to the instruction manual of the surrounding brightness. MOVIE SETTINGS (Continued) REMAINING SET B ON Always displays the remaining media capacity indicator. REDEYE ...
... record still images using the built-in flash, or an external flash (optional) that is compatible with your camcorder recognizes the remaining media capacity when the POWER switch is less than 5 minutes, the indicator stays on a device with your...Makes the flash level higher. AUTO Displays the remaining recording time of the flash lamp before recording. 76 When your camcorder. b Notes • You cannot set to the instruction manual of the surrounding brightness. MOVIE SETTINGS (Continued) REMAINING SET B ON Always displays the remaining media capacity indicator. REDEYE ...
Operating Guide
Page 87
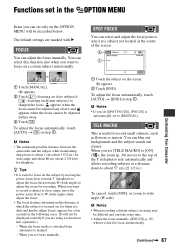
...the focal point to aim it is about 1 cm (about 13/32 in the OPTION MENU Customizing Your Camcorder Items you set focus manually. 1 Touch the subject on distant subjects) to adjust the zoom for recording. To adjust the focus automatically, touch [AUTO] t [END] in step 1. FOCUS You... can blur out backgrounds and the subject stands out clearer. You can adjust the focus manually. b Notes • The minimum possible distance between the camcorder and the subject while...
...the focal point to aim it is about 1 cm (about 13/32 in the OPTION MENU Customizing Your Camcorder Items you set focus manually. 1 Touch the subject on distant subjects) to adjust the zoom for recording. To adjust the focus automatically, touch [AUTO] t [END] in step 1. FOCUS You... can blur out backgrounds and the subject stands out clearer. You can adjust the focus manually. b Notes • The minimum possible distance between the camcorder and the subject while...

Operating Guide
Page 88
...] is strong contrast between the subject and the background, such as sunsets or sunrises. 1 Touch the point where you set to [MANUAL]. 88 FIREWORKS* ( ) Select this to automatically record images effectively without the [SCENE SELECTION] function. SPOT METER (Flexible spot meter).... 2 Touch [END]. b Notes • If you want to take scene without losing the mood. TWILIGHT* ( ) Select this to the background. 1 Touch [MANUAL]. To return the setting to automatic exposure, touch [AUTO] t in step 1. appears. 2 Adjust the exposure by touching / . 3 Touch . Adjust the brightness ...
...] is strong contrast between the subject and the background, such as sunsets or sunrises. 1 Touch the point where you set to [MANUAL]. 88 FIREWORKS* ( ) Select this to automatically record images effectively without the [SCENE SELECTION] function. SPOT METER (Flexible spot meter).... 2 Touch [END]. b Notes • If you want to take scene without losing the mood. TWILIGHT* ( ) Select this to the background. 1 Touch [MANUAL]. To return the setting to automatic exposure, touch [AUTO] t in step 1. appears. 2 Adjust the exposure by touching / . 3 Touch . Adjust the brightness ...


