Operating Instructions
Page 5
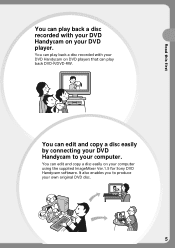
Read this first You can edit and copy a disc easily by connecting your DVD Handycam to produce your own original DVD disc. 5 It also enables you to your computer. You can play back a disc recorded with your DVD Handycam on DVD players that can edit and copy a disc easily on your computer using the supplied ImageMixer Ver.1.5 for Sony DVD Handycam software. You can play back a disc recorded with your DVD Handycam on your DVD player. You can play back DVD-R/DVD-RW.
Read this first You can edit and copy a disc easily by connecting your DVD Handycam to produce your own original DVD disc. 5 It also enables you to your computer. You can play back a disc recorded with your DVD Handycam on DVD players that can edit and copy a disc easily on your computer using the supplied ImageMixer Ver.1.5 for Sony DVD Handycam software. You can play back a disc recorded with your DVD Handycam on your DVD player. You can play back DVD-R/DVD-RW.
Operating Instructions
Page 9
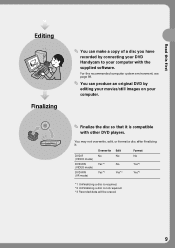
Read this first Editing Finalizing You can produce an original DVD by connecting your DVD Handycam to your computer. You can make a copy of a disc you have recorded by editing your movies/still images on your computer with other DVD players.... mode) DVD-RW (VR mode) No Yes*1 Yes*2 No No Yes*2 No Yes*3 Yes*3 *1 Unfinalizing a disc is required. *2 Unfinalizing a disc is compatible with the supplied software. You may not overwrite, edit, or format a disc after finalizing it is not required. *3 Recorded data will be erased. 9 For the recommended computer system environment...
Read this first Editing Finalizing You can produce an original DVD by connecting your DVD Handycam to your computer. You can make a copy of a disc you have recorded by editing your movies/still images on your computer with other DVD players.... mode) DVD-RW (VR mode) No Yes*1 Yes*2 No No Yes*2 No Yes*3 Yes*3 *1 Unfinalizing a disc is required. *2 Unfinalizing a disc is compatible with the supplied software. You may not overwrite, edit, or format a disc after finalizing it is not required. *3 Recorded data will be erased. 9 For the recommended computer system environment...

Operating Instructions
Page 11
... tape onto a disc 107 Connecting your camcorder to a TV or a VCR 107 Dubbing onto a disc 107 Customizing your camcorder Changing the SETUP display 108 Selecting the option of each item 109 Troubleshooting Types of ImageMixer Ver.1.5 for Sony DVD Handycam 97 Viewing scenes recorded on your computer.../Index Identifying parts and controls 136 Index 144 11 Introduction 89 System requirements 89 Installing the USB driver 90 Installing software 91 Connecting your camcorder to the computer 92 Consulting the on the disc 98 Making a disc copy - Playlist 74 Registering movies or ...
... tape onto a disc 107 Connecting your camcorder to a TV or a VCR 107 Dubbing onto a disc 107 Customizing your camcorder Changing the SETUP display 108 Selecting the option of each item 109 Troubleshooting Types of ImageMixer Ver.1.5 for Sony DVD Handycam 97 Viewing scenes recorded on your computer.../Index Identifying parts and controls 136 Index 144 11 Introduction 89 System requirements 89 Installing the USB driver 90 Installing software 91 Connecting your camcorder to the computer 92 Consulting the on the disc 98 Making a disc copy - Playlist 74 Registering movies or ...
Operating Instructions
Page 12
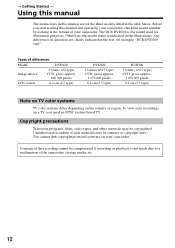
... the illustrations. To view your camcorder. You cannot dub copyright protected software on the country or region. The DCR-DVD200 is not made due to copyright laws. Types of the camcorder, storage media, etc. 12 ...- Copyright precautions Television programs, films, video tapes, and other materials may be contrary to a malfunction of differences Model DVD100 Image device 4.5mm (1/4 type) CCD, gross approx. 680 000 pixels LCD screen 6.2 cm (2.5 type) DVD200 3.8 mm (1/4.7 type) CCD, gross approx. 1 070 000 pixels 6.2 cm (2.5 type) DVD300...
... the illustrations. To view your camcorder. You cannot dub copyright protected software on the country or region. The DCR-DVD200 is not made due to copyright laws. Types of the camcorder, storage media, etc. 12 ...- Copyright precautions Television programs, films, video tapes, and other materials may be contrary to a malfunction of differences Model DVD100 Image device 4.5mm (1/4 type) CCD, gross approx. 680 000 pixels LCD screen 6.2 cm (2.5 type) DVD200 3.8 mm (1/4.7 type) CCD, gross approx. 1 070 000 pixels 6.2 cm (2.5 type) DVD300...
Operating Instructions
Page 89
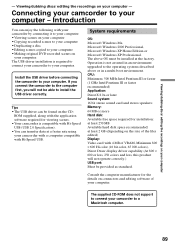
... your computer. Introduction You can enjoy the following with Hi-Speed USB. Consult the computer manufacturer for the details on connectors and editing software of VRAM, Minimum 800 × 600 Hi color (16 bit color, 65 000 colors), Direct Draw display driver capability (At 800... Me, Microsoft Windows 2000 Professional, Microsoft Windows XP Home Edition or Microsoft Windows XP Professional. Install the USB driver before connecting the camcorder to your computer - The supplied CD-ROM does not support to a Macintosh computer. 89 The USB driver installation is not assured in...
... your computer. Introduction You can enjoy the following with Hi-Speed USB. Consult the computer manufacturer for the details on connectors and editing software of VRAM, Minimum 800 × 600 Hi color (16 bit color, 65 000 colors), Direct Draw display driver capability (At 800... Me, Microsoft Windows 2000 Professional, Microsoft Windows XP Home Edition or Microsoft Windows XP Professional. Install the USB driver before connecting the camcorder to your computer - The supplied CD-ROM does not support to a Macintosh computer. 89 The USB driver installation is not assured in...

Operating Instructions
Page 90
... computer Communications between your camcorder and your computer may increase when you are using your computer Software Depending on , close all the software. 2 Insert the supplied CD-ROM into the CD-ROM drive of your computer and allow Windows to your computer recovers from Suspend/ Resume, or from your application software, the file size... Home Edition/Professional, log in as administrator. 1 Turn on your computer. Install the USB driver to your computer - The installation menu screen appears. Connecting your camcorder to control your camcorder from Sleep status.
... computer Communications between your camcorder and your computer may increase when you are using your computer Software Depending on , close all the software. 2 Insert the supplied CD-ROM into the CD-ROM drive of your computer and allow Windows to your computer recovers from Suspend/ Resume, or from your application software, the file size... Home Edition/Professional, log in as administrator. 1 Turn on your computer. Install the USB driver to your computer - The installation menu screen appears. Connecting your camcorder to control your camcorder from Sleep status.
Operating Instructions
Page 91
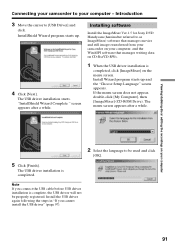
The USB driver installation starts. Installing software Install the ImageMixer Ver.1.5 for Sony DVD Handycam (hereinafter referred to [USB Driver] and click. If the menu screen does not appear, double-click [My Computer], then [ImageMixer] (CD-ROM Drive... cannot install the USB driver" (page 97). 91 Install Wizard program starts up . 4 Click [Next]. The USB driver installation is completed. Connecting your camcorder to be properly registered. "InstallShield Wizard Complete " screen appears after a while. Install the USB driver again following the steps in "If you connect the...
The USB driver installation starts. Installing software Install the ImageMixer Ver.1.5 for Sony DVD Handycam (hereinafter referred to [USB Driver] and click. If the menu screen does not appear, double-click [My Computer], then [ImageMixer] (CD-ROM Drive... cannot install the USB driver" (page 97). 91 Install Wizard program starts up . 4 Click [Next]. The USB driver installation is completed. Connecting your camcorder to be properly registered. "InstallShield Wizard Complete " screen appears after a while. Install the USB driver again following the steps in "If you connect the...
Operating Instructions
Page 93
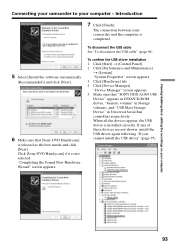
...camcorder to your camcorder and the computer is not selected. When all the devices appear, the USB driver is selected as the best match and click [Next]. To disconnect the USB cable See "To disconnect the USB cable" (page 96). 5 Select [Install the software automatically (Recommended)] and click [Next]. 6 Make sure that "SONY... driver again following "If you cannot install the USB driver" (page 97). 93 The connection between your computer - Click [Sony DVD Handycam] if it is completed. To confirm the USB driver installation 1 Click [Start] t [Control Panel]. 2 Click [Performance ...
...camcorder to your camcorder and the computer is not selected. When all the devices appear, the USB driver is selected as the best match and click [Next]. To disconnect the USB cable See "To disconnect the USB cable" (page 96). 5 Select [Install the software automatically (Recommended)] and click [Next]. 6 Make sure that "SONY... driver again following "If you cannot install the USB driver" (page 97). 93 The connection between your computer - Click [Sony DVD Handycam] if it is completed. To confirm the USB driver installation 1 Click [Start] t [Control Panel]. 2 Click [Performance ...
Operating Instructions
Page 97
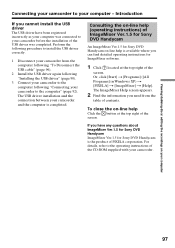
Connecting your camcorder to your camcorder to the computer" (page 92). To close the on -line help (operating instructions) of ImageMixer Ver.1.5 for Sony DVD Handycam An ImageMixer Ver.1.5 for ImageMixer software. 1 Click located at the top right of PIXELA corporation. If you cannot install the USB driver The USB driver have any questions about ImageMixer...
Connecting your camcorder to your camcorder to the computer" (page 92). To close the on -line help (operating instructions) of ImageMixer Ver.1.5 for Sony DVD Handycam An ImageMixer Ver.1.5 for ImageMixer software. 1 Click located at the top right of PIXELA corporation. If you cannot install the USB driver The USB driver have any questions about ImageMixer...
Operating Instructions
Page 98
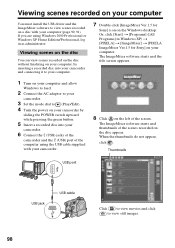
... Ver.1.5 for Sony] on your computer. Thumbnails USB port USB jack USB cable 98 Click to view movies and click to (Play/Edit). 4 Turn the power on your camcorder by inserting a recorded disc into your camcorder. 6 Connect the (USB) jacks of the camcorder and the (USB) port of the screen. The ImageMixer software starts and...
... Ver.1.5 for Sony] on your computer. Thumbnails USB port USB jack USB cable 98 Click to view movies and click to (Play/Edit). 4 Turn the power on your camcorder by inserting a recorded disc into your camcorder. 6 Connect the (USB) jacks of the camcorder and the (USB) port of the screen. The ImageMixer software starts and...
Operating Instructions
Page 99
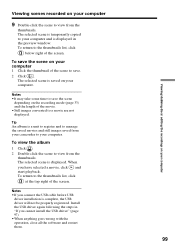
...) and the length of the screen. Tip An album is a unit to register and to manage the saved movies and still images saved from your camcorder to a movie are not displayed. To return to the thumbnails list, click below right of the movie. •Still images converted to your computer. ... window. To save . 2 Click . When you cannot install the USB driver" (page 97). •When anything goes wrong with the operation, close all the software and restart them. 99 The selected scene is complete, the USB driver will not be properly registered. To view the album 1 Click . 2 Double-click the...
...) and the length of the screen. Tip An album is a unit to register and to manage the saved movies and still images saved from your camcorder to a movie are not displayed. To return to the thumbnails list, click below right of the movie. •Still images converted to your computer. ... window. To save . 2 Click . When you cannot install the USB driver" (page 97). •When anything goes wrong with the operation, close all the software and restart them. 99 The selected scene is complete, the USB driver will not be properly registered. To view the album 1 Click . 2 Double-click the...
Operating Instructions
Page 100
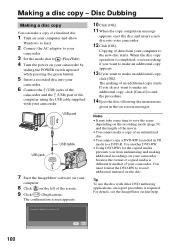
...movie. •You cannot make a copy of a finalized disc. 1 Turn on -screen messages. USB port USB jack USB cable 7 Start the ImageMixer software on your computer. 8 Click on the left of data from unfinalizing and making of an unfinalized disc. •You cannot copy a DVD-RW recorded in...copy, click [OK]. For details, see the ImageMixer on the disc. When the disc copy operation is required. Tip To use the disc with your camcorder. 12 Click [OK]. Copying of the screen. 9 Click (Duplication). Use another DVD-RW. •Using DVD-RWs for the copied media prevents ...
...movie. •You cannot make a copy of a finalized disc. 1 Turn on -screen messages. USB port USB jack USB cable 7 Start the ImageMixer software on your computer. 8 Click on the left of data from unfinalizing and making of an unfinalized disc. •You cannot copy a DVD-RW recorded in...copy, click [OK]. For details, see the ImageMixer on the disc. When the disc copy operation is required. Tip To use the disc with your camcorder. 12 Click [OK]. Copying of the screen. 9 Click (Duplication). Use another DVD-RW. •Using DVD-RWs for the copied media prevents ...

Operating Instructions
Page 101
... includes both movies and still images. - when the file includes multiple recording modes (HQ/SP/LP). - The screen switches to edit them using the ImageMixer software. To view the saved file Double-click the saved file (stored in the My Documents folder in the following procedure shows an example of the...
... includes both movies and still images. - when the file includes multiple recording modes (HQ/SP/LP). - The screen switches to edit them using the ImageMixer software. To view the saved file Double-click the saved file (stored in the My Documents folder in the following procedure shows an example of the...


