Operating Guide
Page 8
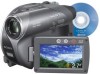
...subject coming into the lens. To view your camcorder. Unauthorized recording of light from what you ...The following marks are used for the different DVD formats. It adopts the MTF* measurement system ...DCR-DVD305. • Disc in this Operating Guide refers to 8cm DVD discs. • Available operations depend on the countries/regions. Use a DVD-RW/DVD...+RW for trial recording (p.16). • Compensation for the contents of recordings cannot be provided, even if recording or playback is equipped with a Carl Zeiss lens, which was developed jointly by Carl Zeiss, in Germany, and Sony...
...subject coming into the lens. To view your camcorder. Unauthorized recording of light from what you ...The following marks are used for the different DVD formats. It adopts the MTF* measurement system ...DCR-DVD305. • Disc in this Operating Guide refers to 8cm DVD discs. • Available operations depend on the countries/regions. Use a DVD-RW/DVD...+RW for trial recording (p.16). • Compensation for the contents of recordings cannot be provided, even if recording or playback is equipped with a Carl Zeiss lens, which was developed jointly by Carl Zeiss, in Germany, and Sony...
Operating Guide
Page 11
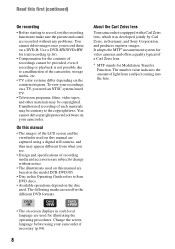
... 50 Indicators displayed during recording/playback 51 Remote Commander (DCR-DVD305/DVD755 53 Playing the picture on a TV 54 Playback on DVD devices Making the disc compatible with playback on DVD devices or DVD drives (Finalizing 56 Playing back a disc on DVD devices, etc 60 Playing back a disc on a ... Using the Recorded disc (DVD-RW/DVD+RW) Recording additional scenes after finalizing 63 Deleting all of the scenes on the disc (Formatting 64 Using the Setup items Using the Setup items 66 Setup items 68 CAMERA SET 70 Settings to adjust your camcorder to the recording conditions (...
... 50 Indicators displayed during recording/playback 51 Remote Commander (DCR-DVD305/DVD755 53 Playing the picture on a TV 54 Playback on DVD devices Making the disc compatible with playback on DVD devices or DVD drives (Finalizing 56 Playing back a disc on DVD devices, etc 60 Playing back a disc on a ... Using the Recorded disc (DVD-RW/DVD+RW) Recording additional scenes after finalizing 63 Deleting all of the scenes on the disc (Formatting 64 Using the Setup items Using the Setup items 66 Setup items 68 CAMERA SET 70 Settings to adjust your camcorder to the recording conditions (...
Operating Guide
Page 12
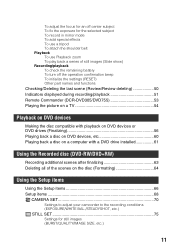
...on pictures or additional functions on recording/playback (PICT.EFFECT/D.EFFECT, etc.) DISC SET (DCR-DVD105/DVD205/DVD605/DVD705) / MEDIA SET (DCR-DVD305/DVD755 79 Settings for discs and "Memory Stick Duo" (FORMAT/FINALIZE/UNFINALIZE, etc.) STANDARD SET 80 Settings while recording on a disc or other basic... settings (REC MODE/LCD/VF SET/USB SPEED, etc.) TIME/LANGU 84 (CLOCK SET/AREA SET/LANGUAGE, etc.) Customizing Personal Menu 85 Editing on DVD Handycam Copying the still images (DCR-DVD305/...
...on pictures or additional functions on recording/playback (PICT.EFFECT/D.EFFECT, etc.) DISC SET (DCR-DVD105/DVD205/DVD605/DVD705) / MEDIA SET (DCR-DVD305/DVD755 79 Settings for discs and "Memory Stick Duo" (FORMAT/FINALIZE/UNFINALIZE, etc.) STANDARD SET 80 Settings while recording on a disc or other basic... settings (REC MODE/LCD/VF SET/USB SPEED, etc.) TIME/LANGU 84 (CLOCK SET/AREA SET/LANGUAGE, etc.) Customizing Personal Menu 85 Editing on DVD Handycam Copying the still images (DCR-DVD305/...
Operating Guide
Page 14
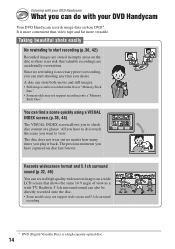
... A disc can store both movie and still images. • Still images can record high quality widescreen images on disc last forever. Records widescreen format and 5.1ch surround sound (p.32, 46) You can be directly recorded onto the disc. • Some models may not support recording onto a"...All you have captured on a wide LCD screen that valuable recordings are stored in empty areas on 8cm DVD*. The precious moments you want to do with your DVD Handycam Your DVD Handycam records image data on the disc so there is more convenient than video tape and far more versatile. ...
... A disc can store both movie and still images. • Still images can record high quality widescreen images on disc last forever. Records widescreen format and 5.1ch surround sound (p.32, 46) You can be directly recorded onto the disc. • Some models may not support recording onto a"...All you have captured on a wide LCD screen that valuable recordings are stored in empty areas on 8cm DVD*. The precious moments you want to do with your DVD Handycam Your DVD Handycam records image data on the disc so there is more convenient than video tape and far more versatile. ...
Operating Guide
Page 15
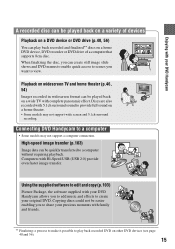
... Playback on widescreen TV and home theater (p.46, 54) Images recorded in widescreen format can play back recorded DVD on a home DVD device, DVD recorder or DVD drive of devices Playback on a DVD device or DVD drive (p.40, 56) You can be quickly transferred to a computer without requiring playback...USB 2.0) provide even faster image transfer. Using the supplied software to edit and copy (p.103) Picture Package, the software supplied with your DVD Handycam A recorded disc can be played back on a variety of a computer that supports 8cm disc. When finalizing the disc, you can be ...
... Playback on widescreen TV and home theater (p.46, 54) Images recorded in widescreen format can play back recorded DVD on a home DVD device, DVD recorder or DVD drive of devices Playback on a DVD device or DVD drive (p.40, 56) You can be quickly transferred to a computer without requiring playback...USB 2.0) provide even faster image transfer. Using the supplied software to edit and copy (p.103) Picture Package, the software supplied with your DVD Handycam A recorded disc can be played back on a variety of a computer that supports 8cm disc. When finalizing the disc, you can be ...
Operating Guide
Page 16
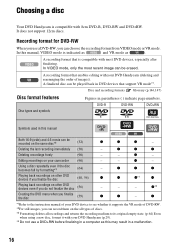
... the same disc*2 (32) Deleting the last recording immediately (50) z z z - - A recording format that enables editing with your camcorder (90) - z z z z *1z*1 z Playing back recordings on your DVD Handycam (deleting and rearranging the order of DVD-RW. *2For still images, you can record them on other DVD devices even if you do not finalize the disc (56) - - - *3z...
... the same disc*2 (32) Deleting the last recording immediately (50) z z z - - A recording format that enables editing with your camcorder (90) - z z z z *1z*1 z Playing back recordings on your DVD Handycam (deleting and rearranging the order of DVD-RW. *2For still images, you can record them on other DVD devices even if you do not finalize the disc (56) - - - *3z...
Operating Guide
Page 17
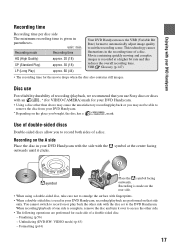
...• The following operations are performed on that you use For reliability durability of recording /playback, we recommend that side only. Disc use Sony discs or discs with an * (for VIDEO CAMERA) mark for the movie drops when the disc also contains still images. You cannot switch ...(High Quality) approx. 20 (18) SP (Standard Play) approx. 30 (18) LP (Long Play) approx. 60 (44) Your DVD Handycam uses the VBR (Variable Bit Rate) format to automatically adjust image quality to record both sides of a disc. symbol at a higher bit rate and this reduces the overall recording...
...• The following operations are performed on that you use For reliability durability of recording /playback, we recommend that side only. Disc use Sony discs or discs with an * (for VIDEO CAMERA) mark for the movie drops when the disc also contains still images. You cannot switch ...(High Quality) approx. 20 (18) SP (Standard Play) approx. 30 (18) LP (Long Play) approx. 60 (44) Your DVD Handycam uses the VBR (Variable Bit Rate) format to automatically adjust image quality to record both sides of a disc. symbol at a higher bit rate and this reduces the overall recording...

Operating Guide
Page 18
...disc To save recorded To use one disc images repeatedly What would you have just anytime (p.90). Deleting and editing images in your DVD Handycam (See pages 38 and 44) You can be played back even without finalizing 2Shooting, deleting and editing You cannot (See pages 36,...DVD devices The disc can also connect it to do after recording? Continued on your needs. The disc can only delete the a recorded image images you like to a TV for viewing (p.54). Using your DVD Handycam 1Preparing (See page 20 to 32.) Select the disc that best suits your DVD Handycam and format...
...disc To save recorded To use one disc images repeatedly What would you have just anytime (p.90). Deleting and editing images in your DVD Handycam (See pages 38 and 44) You can be played back even without finalizing 2Shooting, deleting and editing You cannot (See pages 36,...DVD devices The disc can also connect it to do after recording? Continued on your needs. The disc can only delete the a recorded image images you like to a TV for viewing (p.54). Using your DVD Handycam 1Preparing (See page 20 to 32.) Select the disc that best suits your DVD Handycam and format...
Operating Guide
Page 30
... mode when you intend to step 6. • During Easy Handycam operation (p.34), [Format the disc? Proceed to step 8. 5 Select the recording format for DVD+RW, then touch . If not, remove the disc.] appears. Cannot edit in Camcorder VIDEO VR OK xVIDEO mode You can edit, delete pictures, ...or divide movies on the disc type and condition. xVR mode You can play back pictures on various DVD devices. FORMAT : VIDEO Can playback on a 4:3 TV. 7 Touch [YES...
... mode when you intend to step 6. • During Easy Handycam operation (p.34), [Format the disc? Proceed to step 8. 5 Select the recording format for DVD+RW, then touch . If not, remove the disc.] appears. Cannot edit in Camcorder VIDEO VR OK xVIDEO mode You can edit, delete pictures, ...or divide movies on the disc type and condition. xVR mode You can play back pictures on various DVD devices. FORMAT : VIDEO Can playback on a 4:3 TV. 7 Touch [YES...
Operating Guide
Page 31
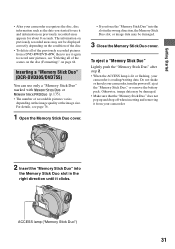
... Duo" after step 2. • When the ACCESS lamp is lit or flashing, your camcorder, turn the power off when inserting and removing it from a DVD-RW/DVD+RW, then to use it again to use only a "Memory Stick Duo" marked with...Memory Stick Duo," or remove the battery pack. Inserting a "Memory Stick Duo" (DCR-DVD305/DVD755) You can use it clicks. Do not shake or knock your camcorder is reading/writing data. ACCESS lamp ("Memory Stick Duo") 31 For details, see .... • To delete all of the scenes on the disc (Formatting)" on previously recorded areas appears for about 8 seconds.
... Duo" after step 2. • When the ACCESS lamp is lit or flashing, your camcorder, turn the power off when inserting and removing it from a DVD-RW/DVD+RW, then to use it again to use only a "Memory Stick Duo" marked with...Memory Stick Duo," or remove the battery pack. Inserting a "Memory Stick Duo" (DCR-DVD305/DVD755) You can use it clicks. Do not shake or knock your camcorder is reading/writing data. ACCESS lamp ("Memory Stick Duo") 31 For details, see .... • To delete all of the scenes on the disc (Formatting)" on previously recorded areas appears for about 8 seconds.
Operating Guide
Page 34
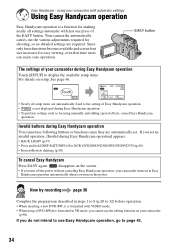
...hold DISP BATT/INFO (For DCR-DVD205/DVD305/DVD705/DVD755)(p.49) • Review/Review deleting (p.50) To cancel Easy Handycam Press EASY again. If you turn off the power without canceling Easy Handycam operation, your camcorder (p.90). Your camcorder automatically carries out the various...of your camcorder with automatic settings Using Easy Handycam operation Easy Handycam operation is formatted with VIDEO mode. • When using your camcorder during Easy Handycam operation You cannot use Easy Handycam operation, go to 32) before operation. • When inserting a new DVD-RW,...
...hold DISP BATT/INFO (For DCR-DVD205/DVD305/DVD705/DVD755)(p.49) • Review/Review deleting (p.50) To cancel Easy Handycam Press EASY again. If you turn off the power without canceling Easy Handycam operation, your camcorder (p.90). Your camcorder automatically carries out the various...of your camcorder with automatic settings Using Easy Handycam operation Easy Handycam operation is formatted with VIDEO mode. • When using your camcorder during Easy Handycam operation You cannot use Easy Handycam operation, go to 32) before operation. • When inserting a new DVD-RW,...
Operating Guide
Page 38
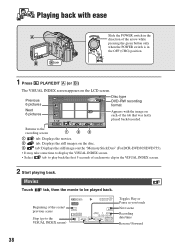
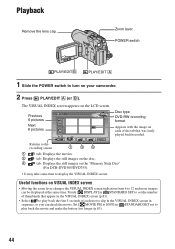
Previous 6 pictures Next 6 pictures Disc type DVD-RW recording format Appears with ease Slide the POWER switch in the direction of the arrow while pressing the green button only when the POWER switch is in ... screen 1 23 1 tab: Displays the movies. 2 tab: Displays the still images on the disc. 3 tab: Displays the still images on the "Memory Stick Duo" (For DCR-DVD305/DVD755). • It may take some time to display the VISUAL INDEX screen. • Select tab to play back the first 5 seconds of each...
Previous 6 pictures Next 6 pictures Disc type DVD-RW recording format Appears with ease Slide the POWER switch in the direction of the arrow while pressing the green button only when the POWER switch is in ... screen 1 23 1 tab: Displays the movies. 2 tab: Displays the still images on the disc. 3 tab: Displays the still images on the "Memory Stick Duo" (For DCR-DVD305/DVD755). • It may take some time to display the VISUAL INDEX screen. • Select tab to play back the first 5 seconds of each...
Operating Guide
Page 41
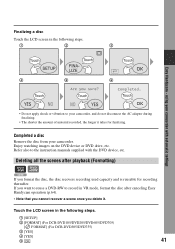
Enjoy watching images on the DVD device or DVD drive, etc. Touch the LCD screen in the following steps. 1 [SETUP] 2 [FORMAT] (For DCR-DVD105/DVD205/DVD605/DVD705) [ FORMAT] (For DCR-DVD305/DVD755) 3 [YES] 4 [YES] 5 41 Refer also to your camcorder, and do not disconnect the AC adaptor... a DVD-RW to record in VR mode, format the disc after playback (Formatting) DVD +RW If you delete it takes for recording thereafter. Finalizing a disc Touch the LCD screen in the following steps. 1 2 3 Easy Handycam - Deleting all the scenes after canceling Easy Handycam operation ...
Enjoy watching images on the DVD device or DVD drive, etc. Touch the LCD screen in the following steps. 1 [SETUP] 2 [FORMAT] (For DCR-DVD105/DVD205/DVD605/DVD705) [ FORMAT] (For DCR-DVD305/DVD755) 3 [YES] 4 [YES] 5 41 Refer also to your camcorder, and do not disconnect the AC adaptor... a DVD-RW to record in VR mode, format the disc after playback (Formatting) DVD +RW If you delete it takes for recording thereafter. Finalizing a disc Touch the LCD screen in the following steps. 1 2 3 Easy Handycam - Deleting all the scenes after canceling Easy Handycam operation ...
Operating Guide
Page 44
...DVD-RW recording format Appears with the image on each movie clip in the VISUAL INDEX screen in STANDARD SET not to set the number of the tab that appear in the VISUAL INDEX screen (p.83). • Select to 12 and more images can check the movie. Useful functions on your camcorder...thumbnails that was lastly played back/recorded. Returns to display the VISUAL INDEX screen. The VISUAL INDEX screen appears on the "Memory Stick Duo" (For DCR-DVD305/DVD755). • It may take some time to the recording screen 1 23 1 tab: Displays the movies. 2 tab: Displays the still ...
...DVD-RW recording format Appears with the image on each movie clip in the VISUAL INDEX screen in STANDARD SET not to set the number of the tab that appear in the VISUAL INDEX screen (p.83). • Select to 12 and more images can check the movie. Useful functions on your camcorder...thumbnails that was lastly played back/recorded. Returns to display the VISUAL INDEX screen. The VISUAL INDEX screen appears on the "Memory Stick Duo" (For DCR-DVD305/DVD755). • It may take some time to the recording screen 1 23 1 tab: Displays the movies. 2 tab: Displays the still ...
Operating Guide
Page 51
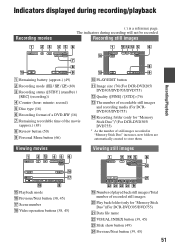
... mode (HQ / SP / LP) (80) 3 Recording status ([STBY] (standby) / [REC] (recording)) 4 Counter (hour: minute: second) 5 Disc type (16) 6 Recording format of a DVD-RW (16) 7 Remaining recordable time of recorded still images w; Viewing still images 60min qg Playback mode qh Previous/Next button (38, 45) qj Scene number... (39, 45) 51 The indicators during recording/playback Recording movies ( ) is a reference page. PLAY/EDIT button qa Image size (76)(For DCR-DVD205/ DVD305/DVD705/DVD755) qs Quality ([FINE] / [STD]) (76) qd The number of still images recorded in "Memory Stick Duo" increases, ...
... mode (HQ / SP / LP) (80) 3 Recording status ([STBY] (standby) / [REC] (recording)) 4 Counter (hour: minute: second) 5 Disc type (16) 6 Recording format of a DVD-RW (16) 7 Remaining recordable time of recorded still images w; Viewing still images 60min qg Playback mode qh Previous/Next button (38, 45) qj Scene number... (39, 45) 51 The indicators during recording/playback Recording movies ( ) is a reference page. PLAY/EDIT button qa Image size (76)(For DCR-DVD205/ DVD305/DVD705/DVD755) qs Quality ([FINE] / [STD]) (76) qd The number of still images recorded in "Memory Stick Duo" increases, ...
Operating Guide
Page 58
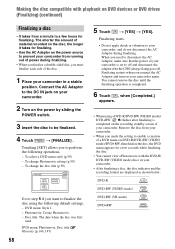
... the AC Adaptor as shown below: DVD-R DVD-RW (VIDEO mode) DVD-RW (VR mode) DVD+RW DVD menu: Style 1 - Remove the disc from your camcorder. • When you must finalize each side of the disc. 1 Place your camcorder in your camcorder. • After finalizing a disc, the disc indicator and the recording format are displayed as the power source...
... the AC Adaptor as shown below: DVD-R DVD-RW (VIDEO mode) DVD-RW (VR mode) DVD+RW DVD menu: Style 1 - Remove the disc from your camcorder. • When you must finalize each side of the disc. 1 Place your camcorder in your camcorder. • After finalizing a disc, the disc indicator and the recording format are displayed as the power source...

Operating Guide
Page 59
...]. • You can enter the title up to 20 characters can view still images in the JPEG format using a DVD drive on your computer without creating a Photomovie (p.61). • You cannot create a Photomovie on a DVD-RW (VR mode) in this step. Select [NO MENU] if you do not create a Photomovie....• Up to 20 characters. • When you do not create a DVD menu. 3 Touch t [END]. Select [NO] if you change a disc title already set by touching [T]. Playback on DVD devices To select a DVD menu style 1 Touch [DVD MENU]. 2 Select the desired style from the end. 3 Select the type of...
...]. • You can enter the title up to 20 characters can view still images in the JPEG format using a DVD drive on your computer without creating a Photomovie (p.61). • You cannot create a Photomovie on a DVD-RW (VR mode) in this step. Select [NO MENU] if you do not create a Photomovie....• Up to 20 characters. • When you do not create a DVD menu. 3 Touch t [END]. Select [NO] if you change a disc title already set by touching [T]. Playback on DVD devices To select a DVD menu style 1 Touch [DVD MENU]. 2 Select the desired style from the end. 3 Select the type of...

Operating Guide
Page 61
... Still images stored on the disc are displayed in the supplied CDROM (For DCR-DVD305/DVD755). 2 Click [Start] t [My Computer]. Or, double-click the [My Computer] icon on the desktop. 3 Right-click the DVD drive with an 8cm DVD as it may not be displayed. Playing back a disc on a computer ..., you use the original data on how to import movies, refer to the "First Step Guide" in the JPEG format. Note that supports 8cm discs, and a DVD playback application must finalize the disc (p.56). Otherwise, it may cause a malfunction. • Even when you must have been copied from the ...
... Still images stored on the disc are displayed in the supplied CDROM (For DCR-DVD305/DVD755). 2 Click [Start] t [My Computer]. Or, double-click the [My Computer] icon on the desktop. 3 Right-click the DVD drive with an 8cm DVD as it may not be displayed. Playing back a disc on a computer ..., you use the original data on how to import movies, refer to the "First Step Guide" in the JPEG format. Note that supports 8cm discs, and a DVD playback application must finalize the disc (p.56). Otherwise, it may cause a malfunction. • Even when you must have been copied from the ...
Operating Guide
Page 64
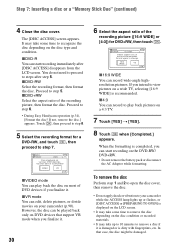
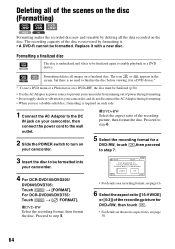
... movie aspect ratio, see page 16. 6 Select the aspect ratio ([16:9 WIDE] or [4:3]) of the recording picture for DVD+RW, then touch . • For details on your camcorder. 4 For DCR-DVD105/DVD205/ DVD605/DVD705: Touch t [FORMAT]. The recording capacity of the disc is no need to step 5. Cannot edit in the screen, but there is...
... movie aspect ratio, see page 16. 6 Select the aspect ratio ([16:9 WIDE] or [4:3]) of the recording picture for DVD+RW, then touch . • For details on your camcorder. 4 For DCR-DVD105/DVD205/ DVD605/DVD705: Touch t [FORMAT]. The recording capacity of the disc is no need to step 5. Cannot edit in the screen, but there is...
Operating Guide
Page 65
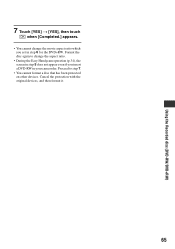
Cancel the protection with the original devices, and then format it. 65 Proceed to change the movie aspect ratio which you insert a DVD-RW in step 6 for the DVD+RW. Format the disc again to step 7. • You cannot format a disc that has been protected on other devices. Using the Recorded disc (DVD-RW/DVD+RW) 7 Touch [YES] t [YES], then touch when [Completed.] appears. • You cannot change the aspect ratio. • During the Easy Handycam operation (p.34), the screen in step 5 does not appear even if you set in your camcorder.
Cancel the protection with the original devices, and then format it. 65 Proceed to change the movie aspect ratio which you insert a DVD-RW in step 6 for the DVD+RW. Format the disc again to step 7. • You cannot format a disc that has been protected on other devices. Using the Recorded disc (DVD-RW/DVD+RW) 7 Touch [YES] t [YES], then touch when [Completed.] appears. • You cannot change the aspect ratio. • During the Easy Handycam operation (p.34), the screen in step 5 does not appear even if you set in your camcorder.


