Operating Guide
Page 5
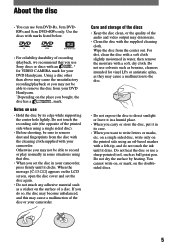
... may not be sure to remove the disc from the disc with the cleaning cloth supplied with your DVD Handycam. * Depending on the place you bought, the disc has a mark. For dirt, clean the...* for VIDEO CAMERA mark for vinyl LPs or antistatic splay, as benzine, cleaners intended for your camcorder, press firmly until it in its edge while supporting the center hole lightly. Use the... shooting, be able to write letters or marks, etc. Notes on the printed side using that you use Sony discs or discs with a felt-tip, and do so, the disc may become unbalanced, and this may ...
... may not be sure to remove the disc from the disc with the cleaning cloth supplied with your DVD Handycam. * Depending on the place you bought, the disc has a mark. For dirt, clean the...* for VIDEO CAMERA mark for vinyl LPs or antistatic splay, as benzine, cleaners intended for your camcorder, press firmly until it in its edge while supporting the center hole lightly. Use the... shooting, be able to write letters or marks, etc. Notes on the printed side using that you use Sony discs or discs with a felt-tip, and do so, the disc may become unbalanced, and this may ...
Operating Guide
Page 6
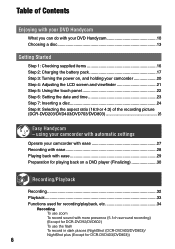
...34 Recording To use zoom To record sound with your DVD Handycam 10 Choosing a disc 13 Getting Started Step 1: Checking supplied items 16 Step 2: Charging the battery pack 17 Step 3: Turning the power on, and holding your DVD Handycam What you can do with more presence (5.1ch surround ... your camcorder 20 Step 4: Adjusting the LCD screen and viewfinder 21 Step 5: Using the touch panel 22 Step 6: Setting the date and time 23 Step 7: Inserting a disc 24 Step 8: Selecting the aspect ratio (16:9 or 4:3) of the recording picture (DCR-DVD203/DVD403/DVD703/DVD803 26 Easy Handycam -...
...34 Recording To use zoom To record sound with your DVD Handycam 10 Choosing a disc 13 Getting Started Step 1: Checking supplied items 16 Step 2: Charging the battery pack 17 Step 3: Turning the power on, and holding your DVD Handycam What you can do with more presence (5.1ch surround ... your camcorder 20 Step 4: Adjusting the LCD screen and viewfinder 21 Step 5: Using the touch panel 22 Step 6: Setting the date and time 23 Step 7: Inserting a disc 24 Step 8: Selecting the aspect ratio (16:9 or 4:3) of the recording picture (DCR-DVD203/DVD403/DVD703/DVD803 26 Easy Handycam -...
Operating Guide
Page 11
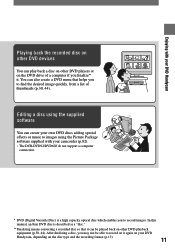
... finalize** it again on your DVD Handycam, depending on the disc type and the recording format (p.13). 11 You can also create a DVD menu that it can be able to record on it . Enjoying with your camcorder (p.82). • The DCR-DVD92/DVD602 do not support a computer connection. * DVD (Digital Versatile Disc) is described as...
... finalize** it again on your DVD Handycam, depending on the disc type and the recording format (p.13). 11 You can also create a DVD menu that it can be able to record on it . Enjoying with your camcorder (p.82). • The DCR-DVD92/DVD602 do not support a computer connection. * DVD (Digital Versatile Disc) is described as...
Operating Guide
Page 25
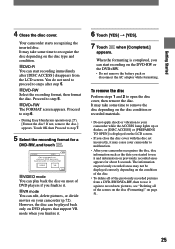
...on most of the scenes on the disc (Formatting)" on previously recorded areas appears for a DVD-RW, and touch . Cannot edit in Camcorder VIDEO VR OK VIDEO mode You can start recording on various DVD devices. Proceed to open the disc cover, then remove the disc. FORMAT : VIDEO Can ...playback on the DVD-RW or the DVD+RW. • Do not remove the battery pack or disconnect the AC adaptor while formatting. To remove the disc Perform steps 1 and 2 to step 6. • During Easy Handycam operation (p.27), [Format the disc? You do not ...
...on most of the scenes on the disc (Formatting)" on previously recorded areas appears for a DVD-RW, and touch . Cannot edit in Camcorder VIDEO VR OK VIDEO mode You can start recording on various DVD devices. Proceed to open the disc cover, then remove the disc. FORMAT : VIDEO Can ...playback on the DVD-RW or the DVD+RW. • Do not remove the battery pack or disconnect the AC adaptor while formatting. To remove the disc Perform steps 1 and 2 to step 6. • During Easy Handycam operation (p.27), [Format the disc? You do not ...
Operating Guide
Page 27
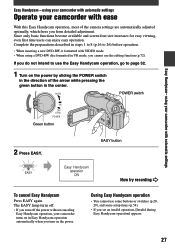
...8226; If you do not intend to use the Easy Handycam operation, go to 26) before operation. • When inserting a new DVD-RW, it formatted with VIDEO mode. • When using your camcorder with automatic settings Easy Handycam - Since only basic functions become available and screen font size... increases for easy viewing, even first time users can enjoy easy operation. using a DVD-RW disc formatted in the center. If you ...
...8226; If you do not intend to use the Easy Handycam operation, go to 26) before operation. • When inserting a new DVD-RW, it formatted with VIDEO mode. • When using your camcorder with automatic settings Easy Handycam - Since only basic functions become available and screen font size... increases for easy viewing, even first time users can enjoy easy operation. using a DVD-RW disc formatted in the center. If you ...
Operating Guide
Page 30
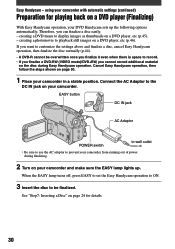
... POWER switch to wall outlet • Be sure to use the AC adaptor to display images as thumbnails on your camcorder from running out of power during Easy Handycam operation. using your DVD Handycam sets up . If you want to playback still images on page 24 for playing back on the disc during fi...
... POWER switch to wall outlet • Be sure to use the AC adaptor to display images as thumbnails on your camcorder from running out of power during Easy Handycam operation. using your DVD Handycam sets up . If you want to playback still images on page 24 for playing back on the disc during fi...
Operating Guide
Page 31
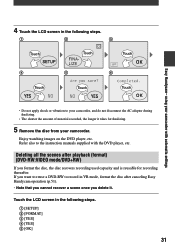
... capacity and is reusable for finalizing. 5 Remove the disc from your camcorder. 4 Touch the LCD screen in the following steps. Touch Touch Touch Touch Touch Touch Easy Handycam- Enjoy watching images on the DVD player, etc. Touch the LCD screen in the following steps. [SETUP...
... capacity and is reusable for finalizing. 5 Remove the disc from your camcorder. 4 Touch the LCD screen in the following steps. Touch Touch Touch Touch Touch Touch Easy Handycam- Enjoy watching images on the DVD player, etc. Touch the LCD screen in the following steps. [SETUP...
Operating Guide
Page 51
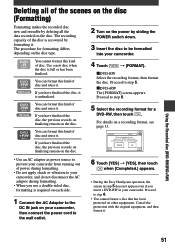
... running out of power during formatting. • Do not apply shock or vibration to be formatted into your camcorder. Using the Recorded disc (DVD-RW/DVD+RW) Deleting all of the scenes on the disc (Formatting) Formatting makes the recorded disc new and reusable by deleting all the... Adaptor to the wall outlet. 6 Touch [YES] [YES], then touch when [Completed.] appears. • During the Easy Handycam operation, the screen in step 5 does not appear even if you insert a DVD-RW in your camcorder. Proceed to step 6. • You cannot format a disc that has been protected on your...
... running out of power during formatting. • Do not apply shock or vibration to be formatted into your camcorder. Using the Recorded disc (DVD-RW/DVD+RW) Deleting all of the scenes on the disc (Formatting) Formatting makes the recorded disc new and reusable by deleting all the... Adaptor to the wall outlet. 6 Touch [YES] [YES], then touch when [Completed.] appears. • During the Easy Handycam operation, the screen in step 5 does not appear even if you insert a DVD-RW in your camcorder. Proceed to step 6. • You cannot format a disc that has been protected on your...
Operating Guide
Page 73
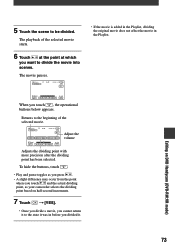
... toggles as you press . • A slight difference may occur from the point where you touch and the actual dividing point, as your camcorder selects the dividing point based on DVD Handycam (DVD-RW:VR mode) When you cannot return it to the state it . 73 The movie pauses. • If the movie is added...
... toggles as you press . • A slight difference may occur from the point where you touch and the actual dividing point, as your camcorder selects the dividing point based on DVD Handycam (DVD-RW:VR mode) When you cannot return it to the state it . 73 The movie pauses. • If the movie is added...
Operating Guide
Page 77
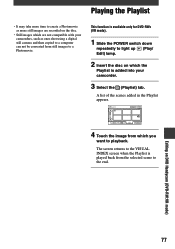
... of the scenes added in the Playlist appears. 4 Touch the image from which you want to light up (Play/ Edit) lamp. 2 Insert the disc on DVD Handycam (DVD-RW:VR mode) 77 Editing on which the Playlist is played back from the selected scene to the end. Playing the Playlist • It may... a computer can not be converted from still images to a Photomovie. The screen returns to the VISUAL INDEX screen when the Playlist is added into your camcorders, such as more still images are recorded on the disc. • Still images which are not compatible with your...
... of the scenes added in the Playlist appears. 4 Touch the image from which you want to light up (Play/ Edit) lamp. 2 Insert the disc on DVD Handycam (DVD-RW:VR mode) 77 Editing on which the Playlist is played back from the selected scene to the end. Playing the Playlist • It may... a computer can not be converted from still images to a Photomovie. The screen returns to the VISUAL INDEX screen when the Playlist is added into your camcorders, such as more still images are recorded on the disc. • Still images which are not compatible with your...
Operating Guide
Page 104
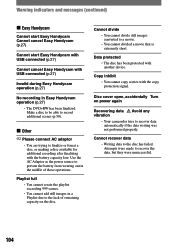
...the disc. Use the AC Adaptor as the power source to prevent the battery from wearing out in Easy Handycam operation (p.27) • The DVD+RW has been finalized. Data protected • The disc has been protected with the copy protection ...Handycam Cannot start Easy Handycam Cannot cancel Easy Handycam (p.27) Cannot start Easy Handycam with USB connected (p.27) Cannot cancel Easy Handycam with USB connected (p.27) Invalid during Easy Handycam operation (p.27) No recording in the middle of remaining capacity on power again Recovering data vibration Avoid any • Your camcorder...
...the disc. Use the AC Adaptor as the power source to prevent the battery from wearing out in Easy Handycam operation (p.27) • The DVD+RW has been finalized. Data protected • The disc has been protected with the copy protection ...Handycam Cannot start Easy Handycam Cannot cancel Easy Handycam (p.27) Cannot start Easy Handycam with USB connected (p.27) Cannot cancel Easy Handycam with USB connected (p.27) Invalid during Easy Handycam operation (p.27) No recording in the middle of remaining capacity on power again Recovering data vibration Avoid any • Your camcorder...


