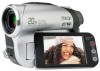
Operating Guide
Page 3
...of the FCC Rules. Telephone No.: 858-942-2230 This device complies with Part 15 of Conformity Trade Name: SONY Model No.: DCR-DVD103 Responsible Party:Sony Electronics Inc. These limits are cautioned that to which can radiate radio frequency energy and, if not installed and ... radio/TV technician for using the camcorder • Do not hold the camcorder by the following parts. On using the supplied software (stored on use Your camcorder is supplied with Part 15 of Conformity Trade Name: SONY Model No.: DCR-DVD203 Responsible Party:Sony Electronics Inc. Bernardo Dr, San ...
...of the FCC Rules. Telephone No.: 858-942-2230 This device complies with Part 15 of Conformity Trade Name: SONY Model No.: DCR-DVD103 Responsible Party:Sony Electronics Inc. These limits are cautioned that to which can radiate radio frequency energy and, if not installed and ... radio/TV technician for using the camcorder • Do not hold the camcorder by the following parts. On using the supplied software (stored on use Your camcorder is supplied with Part 15 of Conformity Trade Name: SONY Model No.: DCR-DVD203 Responsible Party:Sony Electronics Inc. Bernardo Dr, San ...
Operating Guide
Page 4
..., and Sony Corporation, and produces superior images. Be careful when placing the camera near a window or outdoors. • Do not aim at dusk. To view your camcorder to insert...protected software on a DVD-R. 4 Use a DVD-RW/DVD+RW (not supplied) for trial recording (p.13). • Compensation for illustrating the operating procedures. If you record them on your camcorder. On this manual...to a malfunction of the camcorder, storage media, etc. • TV color systems differ depending on the model DCR-DVD403. Change the screen language before using your camcorder if necessary (p.69). ...
..., and Sony Corporation, and produces superior images. Be careful when placing the camera near a window or outdoors. • Do not aim at dusk. To view your camcorder to insert...protected software on a DVD-R. 4 Use a DVD-RW/DVD+RW (not supplied) for trial recording (p.13). • Compensation for illustrating the operating procedures. If you record them on your camcorder. On this manual...to a malfunction of the camcorder, storage media, etc. • TV color systems differ depending on the model DCR-DVD403. Change the screen language before using your camcorder if necessary (p.69). ...
Operating Guide
Page 5
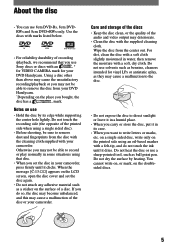
...the moisture with an * for VIDEO CAMERA mark for vinyl LPs or antistatic splay, as ball point pen. Do not heat the disc or use Sony discs or discs with a soft, dry cloth. Using a disc other than above may cause the unsatisfactory recording/playback or you use a sharp-pointed...in its edge while supporting the center hole lightly. Wipe the disc from your DVD Handycam. For dirt, clean the disc with a soft cloth slightly moistened in your camcorder. Do not use 8cm DVD-Rs, 8cm DVDRWs and 8cm DVD+RWs only. Use the discs with marks listed below. • For reliability ...
...the moisture with an * for VIDEO CAMERA mark for vinyl LPs or antistatic splay, as ball point pen. Do not heat the disc or use Sony discs or discs with a soft, dry cloth. Using a disc other than above may cause the unsatisfactory recording/playback or you use a sharp-pointed...in its edge while supporting the center hole lightly. Wipe the disc from your DVD Handycam. For dirt, clean the disc with a soft cloth slightly moistened in your camcorder. Do not use 8cm DVD-Rs, 8cm DVDRWs and 8cm DVD+RWs only. Use the discs with marks listed below. • For reliability ...
Operating Guide
Page 6
Table of Contents Enjoying with your DVD Handycam What you can do with more presence (5.1ch surround recording) (Except for DCR-DVD92/DVD602) To use the flash To record in dark places (NightShot (DCR-DVD403/DVD803)/ NightShot plus (Except for DCR-DVD403/DVD803)) 6 using your camcorder with automatic settings Operate your camcorder with ease 27 Recording with...
Table of Contents Enjoying with your DVD Handycam What you can do with more presence (5.1ch surround recording) (Except for DCR-DVD92/DVD602) To use the flash To record in dark places (NightShot (DCR-DVD403/DVD803)/ NightShot plus (Except for DCR-DVD403/DVD803)) 6 using your camcorder with automatic settings Operate your camcorder with ease 27 Recording with...
Operating Guide
Page 7
... use a tripod Playback To play back the images in sequence To use PB ZOOM Recording/playback To check the remaining battery To turn off the operation confi... for DCR-DVD92/DVD602 41 Playing the picture on a TV 42 Playback on DVD devices Making the disc compatible with playback on DVD players or DVD drives (Finalizing 44 Playing back a disc on DVD players,...DVD-RW/DVD+RW) Recording additional scenes after finalizing 50 Deleting all of the scenes on the disc (Formatting 51 Using the Setup items Using the Setup items 52 Setup items 54 CAMERA SET 56 Settings to adjust your camcorder...
... use a tripod Playback To play back the images in sequence To use PB ZOOM Recording/playback To check the remaining battery To turn off the operation confi... for DCR-DVD92/DVD602 41 Playing the picture on a TV 42 Playback on DVD devices Making the disc compatible with playback on DVD players or DVD drives (Finalizing 44 Playing back a disc on DVD players,...DVD-RW/DVD+RW) Recording additional scenes after finalizing 50 Deleting all of the scenes on the disc (Formatting 51 Using the Setup items Using the Setup items 52 Setup items 54 CAMERA SET 56 Settings to adjust your camcorder...
Operating Guide
Page 9
Troubleshooting Troubleshooting 87 Warning indicators and messages 101 Additional Information Using your camcorder abroad 105 About the "InfoLITHIUM" battery pack 107 Maintenance and precautions 109 Using the Strap Belt as a wrist strap 113 Attaching the Shoulder Strap 113 Specifications 114 Index...117 9
Troubleshooting Troubleshooting 87 Warning indicators and messages 101 Additional Information Using your camcorder abroad 105 About the "InfoLITHIUM" battery pack 107 Maintenance and precautions 109 Using the Strap Belt as a wrist strap 113 Attaching the Shoulder Strap 113 Specifications 114 Index...117 9
Operating Guide
Page 11
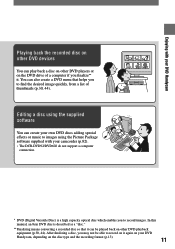
...camcorder (p.82). • The DCR-DVD92/DVD602 do not support a computer connection. * DVD (Digital Versatile Disc) is described as a "disc." ** Finalizing means converting a recorded disc so that helps you finalize** it again on your DVD Handycam Playing back the recorded disc on other DVD devices You can also create a DVD... menu that it can be able to record on it . In this manual, an 8cm DVD disc is a high capacity optical disc which enables you may not...
...camcorder (p.82). • The DCR-DVD92/DVD602 do not support a computer connection. * DVD (Digital Versatile Disc) is described as a "disc." ** Finalizing means converting a recorded disc so that helps you finalize** it again on your DVD Handycam Playing back the recorded disc on other DVD devices You can also create a DVD... menu that it can be able to record on it . In this manual, an 8cm DVD disc is a high capacity optical disc which enables you may not...
Operating Guide
Page 16
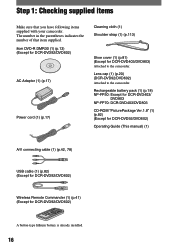
... (This manual) (1) A/V connecting cable (1) (p.42, 78) USB cable (1) (p.82) (Except for DCR-DVD92/DVD602) Wireless Remote Commander (1) (p.41) (Except for DCR-DVD403/DVD803) Attached to the camcorder. Step 1: Checking supplied items Make sure that item supplied. 8cm DVD-R DMR30 (1) (p.13) (Except for DCR-DVD92/DVD602) AC Adaptor (1) (p.17) Power cord (1) (p.17) Cleaning cloth (1) Shoulder strap...
... (This manual) (1) A/V connecting cable (1) (p.42, 78) USB cable (1) (p.82) (Except for DCR-DVD92/DVD602) Wireless Remote Commander (1) (p.41) (Except for DCR-DVD403/DVD803) Attached to the camcorder. Step 1: Checking supplied items Make sure that item supplied. 8cm DVD-R DMR30 (1) (p.13) (Except for DCR-DVD92/DVD602) AC Adaptor (1) (p.17) Power cord (1) (p.17) Cleaning cloth (1) Shoulder strap...
Operating Guide
Page 17
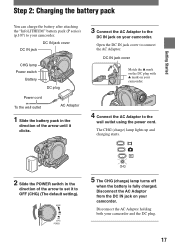
...cover Match the mark on the DC plug with mark on your camcorder. Disconnect the AC Adaptor from the DC IN jack on your camcorder and the DC plug. 17 Disconnect the AC Adaptor holding both your camcorder. The CHG (charge) lamp lights up and charging starts. 2 Slide the POWER ...switch in the direction of the arrow to set it clicks. 3 Connect the AC Adaptor to the DC IN jack on your camcorder. 4 Connect the AC Adaptor to the wall outlet using the power cord. Getting Started Step 2: Charging the battery pack You can charge the battery after...
...cover Match the mark on the DC plug with mark on your camcorder. Disconnect the AC Adaptor from the DC IN jack on your camcorder and the DC plug. 17 Disconnect the AC Adaptor holding both your camcorder. The CHG (charge) lamp lights up and charging starts. 2 Slide the POWER ...switch in the direction of the arrow to set it clicks. 3 Connect the AC Adaptor to the DC IN jack on your camcorder. 4 Connect the AC Adaptor to the wall outlet using the power cord. Getting Started Step 2: Charging the battery pack You can charge the battery after...
Operating Guide
Page 18
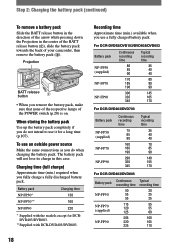
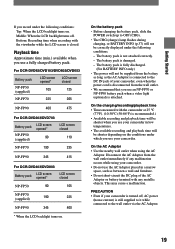
... in the center of the BATT release button (), slide the battery pack towards the back of the POWER switch (p.20) is on. For DCR-DVD92/DVD103/DVD602/DVD653 Battery pack NP-FP50 (supplied) NP-FP70 NP-FP90 Continuous recording time 80 85 90 170 185 190 300 335 345 Typical recording... the battery pack Use up the battery pack completely if you remove the battery pack, make sure that none of the respective lamps of your camcorder, then remove the battery pack (). Charging time (full charge) Approximate time (min.) required when you do not intend to use it for DCRDVD403/DVD803...
... in the center of the BATT release button (), slide the battery pack towards the back of the POWER switch (p.20) is on. For DCR-DVD92/DVD103/DVD602/DVD653 Battery pack NP-FP50 (supplied) NP-FP70 NP-FP90 Continuous recording time 80 85 90 170 185 190 300 335 345 Typical recording... the battery pack Use up the battery pack completely if you remove the battery pack, make sure that none of the respective lamps of your camcorder, then remove the battery pack (). Charging time (full charge) Approximate time (min.) required when you do not intend to use it for DCRDVD403/DVD803...
Operating Guide
Page 19
... the wall outlet immediately if any metallic objects. Bottom: Recording time when recording with any malfunction occurs while using the AC Adaptor. For DCR-DVD92/DVD103/DVD602/DVD653 Battery pack NP-FP50 (supplied) LCD screen opened* 105 LCD screen closed 125 NP-FP70 225 265 NP-FP90 400 475 ...) lamp flashes during charging, or BATTERY INFO (p.37) will be supplied from the wall outlet. • We recommend that you use your camcorder, even when the power cord is disconnected from the battery as long as between a wall and furniture. • Do not short-circuit the DC ...
... the wall outlet immediately if any metallic objects. Bottom: Recording time when recording with any malfunction occurs while using the AC Adaptor. For DCR-DVD92/DVD103/DVD602/DVD653 Battery pack NP-FP50 (supplied) LCD screen opened* 105 LCD screen closed 125 NP-FP70 225 265 NP-FP90 400 475 ...) lamp flashes during charging, or BATTERY INFO (p.37) will be supplied from the wall outlet. • We recommend that you use your camcorder, even when the power cord is disconnected from the battery as long as between a wall and furniture. • Do not short-circuit the DC ...
Operating Guide
Page 20
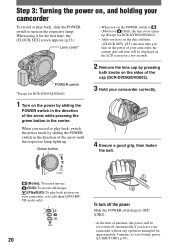
...to OFF (CHG). • At the time of your camcorder To record or play back pictures on your camcorder correctly. 1 Turn on the power by pressing both knobs on the sides of the cap (DCR-DVD92/DVD602). 3 Hold your camcorder, or to edit them (DVD-RW: VR mode only) CHG 20 To turn off ...automatically if you leave your camcorder without any operation attempted for the first time, the [CLOCK SET] screen appears...
...to OFF (CHG). • At the time of your camcorder To record or play back pictures on your camcorder correctly. 1 Turn on the power by pressing both knobs on the sides of the cap (DCR-DVD92/DVD602). 3 Hold your camcorder, or to edit them (DVD-RW: VR mode only) CHG 20 To turn off ...automatically if you leave your camcorder without any operation attempted for the first time, the [CLOCK SET] screen appears...
Operating Guide
Page 21
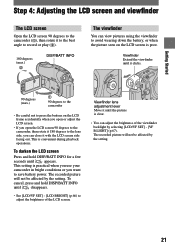
...finder lens adjustment lever Move it with the LCD screen side facing out. This is poor. This setting is practical when you use your camcorder in bright conditions or you can close it until the picture is clear. • You can view pictures using the viewfinder to avoid... save battery power. Getting Started Step 4: Adjusting the LCD screen and viewfinder The LCD screen Open the LCD screen 90 degrees to the camcorder (), then rotate it to the best angle to record or play (). 180 degrees (max.) DISP/BATT INFO The viewfinder You...
...finder lens adjustment lever Move it with the LCD screen side facing out. This is poor. This setting is practical when you use your camcorder in bright conditions or you can close it until the picture is clear. • You can view pictures using the viewfinder to avoid... save battery power. Getting Started Step 4: Adjusting the LCD screen and viewfinder The LCD screen Open the LCD screen 90 degrees to the camcorder (), then rotate it to the best angle to record or play (). 180 degrees (max.) DISP/BATT INFO The viewfinder You...

Operating Guide
Page 23
...midnight, set the date and time again (p.111). Step 6: Setting the date and time Getting Started Set the date and time when using this camcorder for about 3 months, the built-in rechargeable battery gets discharged and the date and time settings may be cleared from the memory. AREA26 GMT -5.0... AM. For midday, set the date and time, the [CLOCK SET] screen appears every time you turn on your camcorder or slide the POWER switch down. • If you do not use your camcorder for the first time. with / , then touch . 3 Select [CLOCK SET] with then touch . /, 7 Set [M] (month), ...
...midnight, set the date and time again (p.111). Step 6: Setting the date and time Getting Started Set the date and time when using this camcorder for about 3 months, the built-in rechargeable battery gets discharged and the date and time settings may be cleared from the memory. AREA26 GMT -5.0... AM. For midday, set the date and time, the [CLOCK SET] screen appears every time you turn on your camcorder or slide the POWER switch down. • If you do not use your camcorder for the first time. with / , then touch . 3 Select [CLOCK SET] with then touch . /, 7 Set [M] (month), ...
Operating Guide
Page 24
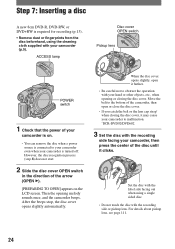
...recognition process (step 4) does not start. 2 Slide the disc cover OPEN switch in the direction of the disc until it may cause your camcorder to malfunction. *DCR-DVD92/DVD602 3 Set the disc with the recording side facing your hand or other objects, etc., when opening melody sounds once, and the... or the lens cap strap* when closing the disc cover. Step 7: Inserting a disc A new 8cm DVD-R, DVD-RW, or DVD+RW is on the LCD screen. Move the belt to your camcorder even when your camcorder (p.5). ACCESS lamp Disc cover OPEN switch Pickup lens POWER switch 1 Check that the power of the...
...recognition process (step 4) does not start. 2 Slide the disc cover OPEN switch in the direction of the disc until it may cause your camcorder to malfunction. *DCR-DVD92/DVD602 3 Set the disc with the recording side facing your hand or other objects, etc., when opening melody sounds once, and the... or the lens cap strap* when closing the disc cover. Step 7: Inserting a disc A new 8cm DVD-R, DVD-RW, or DVD+RW is on the LCD screen. Move the belt to your camcorder even when your camcorder (p.5). ACCESS lamp Disc cover OPEN switch Pickup lens POWER switch 1 Check that the power of the...
Operating Guide
Page 25
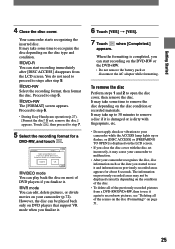
.... • To delete all of the previously recorded pictures from the LCD screen. Cannot edit in Camcorder VIDEO VR OK VIDEO mode You can play back the disc on most of DVD players if you finalize it and information on the LCD screen. • If you can ...the disc condition or recorded materials. However, the disc can start recording on DVD players that support VR mode when you started to your camcorder (p.72). To remove the disc Perform steps 1 and 2 to step 6. • During Easy Handycam operation (p.27), [Format the disc? Proceed to open the disc cover, then...
.... • To delete all of the previously recorded pictures from the LCD screen. Cannot edit in Camcorder VIDEO VR OK VIDEO mode You can play back the disc on most of DVD players if you finalize it and information on the LCD screen. • If you can ...the disc condition or recorded materials. However, the disc can start recording on DVD players that support VR mode when you started to your camcorder (p.72). To remove the disc Perform steps 1 and 2 to step 6. • During Easy Handycam operation (p.27), [Format the disc? Proceed to open the disc cover, then...
Operating Guide
Page 26
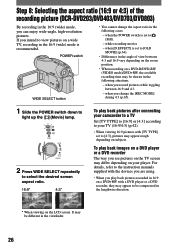
... SELECT repeatedly to select the desired screen aspect ratio. 16:9* 4:3* To play back pictures after connecting your camcorder to a TV Set [TV TYPE] to [16:9] or [4:3] according to view pictures on a wide...and 16:9 vary depending on the zoom position. • When recording on a DVD-R/DVD-RW (VIDEO mode)/DVD+RW, the available recording time may appear rough depending on a DVD+RW with [TV TYPE] set ... down to [OLD MOVIE] (p.64). • Differences in the angle of the recording picture (DCR-DVD203/DVD403/DVD703/DVD803) By recording in the viewfinder. 26 when the POWER switch is...
... SELECT repeatedly to select the desired screen aspect ratio. 16:9* 4:3* To play back pictures after connecting your camcorder to a TV Set [TV TYPE] to [16:9] or [4:3] according to view pictures on a wide...and 16:9 vary depending on the zoom position. • When recording on a DVD-R/DVD-RW (VIDEO mode)/DVD+RW, the available recording time may appear rough depending on a DVD+RW with [TV TYPE] set ... down to [OLD MOVIE] (p.64). • Differences in the angle of the recording picture (DCR-DVD203/DVD403/DVD703/DVD803) By recording in the viewfinder. 26 when the POWER switch is...
Operating Guide
Page 27
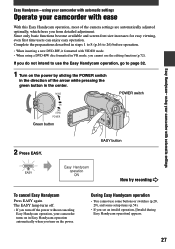
...DVD-RW disc formatted in VR mode, you do not intend to use some buttons or switches (p.28, 29), and some setup items (p.54). • If you from detailed adjustment. The EASY lamp turns off. • If you turn off the power without canceling Easy Handycam operation, your camcorder... operation, [Invalid during Easy Handycam operation] appears. 27 Easy Handycam- using your camcorder with automatic settings Operate your camcorder with ease With this Easy Handycam operation, most of the arrow while pressing the green button in Easy Handycam operation automatically when you turn ...
...DVD-RW disc formatted in VR mode, you do not intend to use some buttons or switches (p.28, 29), and some setup items (p.54). • If you from detailed adjustment. The EASY lamp turns off. • If you turn off the power without canceling Easy Handycam operation, your camcorder... operation, [Invalid during Easy Handycam operation] appears. 27 Easy Handycam- using your camcorder with automatic settings Operate your camcorder with ease With this Easy Handycam operation, most of the arrow while pressing the green button in Easy Handycam operation automatically when you turn ...
Operating Guide
Page 28
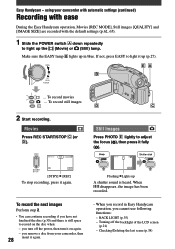
... scene (p.38) To record the next images Perform step 2. • You can continue recording if you cannot use following functions: - using your camcorder, then 28 insert it fully (). 0 SETUP Flashing Lights up (p.27). ... To... to adjust the focus (), then press it again. • When you remove a disc from your camcorder with automatic settings (continued) Recording with ease During the Easy Handycam operation, Movies [REC MODE], Still images [QUALITY] and [IMAGE SIZE] are recorded with the default settings...
... scene (p.38) To record the next images Perform step 2. • You can continue recording if you cannot use following functions: - using your camcorder, then 28 insert it fully (). 0 SETUP Flashing Lights up (p.27). ... To... to adjust the focus (), then press it again. • When you remove a disc from your camcorder with automatic settings (continued) Recording with ease During the Easy Handycam operation, Movies [REC MODE], Still images [QUALITY] and [IMAGE SIZE] are recorded with the default settings...
Operating Guide
Page 29
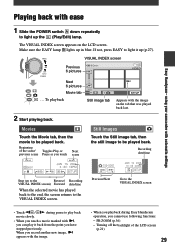
...Handycam- Make sure the EASY lamp lights up the (Play/Edit) lamp. When you record another new image, appears with the image. • When you playback during pause to play back • When you touch a movie marked with , you can play it up (p.27). PB ZOOM... POWER switch down repeatedly to be played back. Beginning of the LCD screen (p.21) 29 during Easy Handycam operation, you have stopped previously. using your camcorder with automatic settings Playing back with the image on the LCD screen. VISUAL INDEX screen Previous 6 pictures Next 6...
...Handycam- Make sure the EASY lamp lights up the (Play/Edit) lamp. When you record another new image, appears with the image. • When you playback during pause to play back • When you touch a movie marked with , you can play it up (p.27). PB ZOOM... POWER switch down repeatedly to be played back. Beginning of the LCD screen (p.21) 29 during Easy Handycam operation, you have stopped previously. using your camcorder with automatic settings Playing back with the image on the LCD screen. VISUAL INDEX screen Previous 6 pictures Next 6...


