Operating Instructions
Page 2
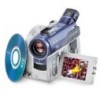
... causes data transfer to the presence of electric shock to rain or moisture. and CANADA RECYCLING LITHIUM-ION BATTERIES Lithium-Ion batteries are recyclable. Regulatory Information Declaration of this product, you . Telephone No.: 201-930-6972 This device ... Oradell, NJ 07649 U.S.A. Welcome! Congratulations on your Handycam, you have any interference received, including interference that may cause undesired operation. 2 With your purchase of Conformity Trade Name: SONY Model No.: DCR-DVD100 Responsible Party:Sony Electronics Inc. If you can enjoy for the FCC...
... causes data transfer to the presence of electric shock to rain or moisture. and CANADA RECYCLING LITHIUM-ION BATTERIES Lithium-Ion batteries are recyclable. Regulatory Information Declaration of this product, you . Telephone No.: 201-930-6972 This device ... Oradell, NJ 07649 U.S.A. Welcome! Congratulations on your Handycam, you have any interference received, including interference that may cause undesired operation. 2 With your purchase of Conformity Trade Name: SONY Model No.: DCR-DVD100 Responsible Party:Sony Electronics Inc. If you can enjoy for the FCC...
Operating Instructions
Page 3
... can radiate radio frequency energy and, if not installed and used with the equipment in accordance with Part 15 of the battery used to Subpart B of Part 15 of the following two conditions.: (1) This device may regulate disposal of the FCC ... void your local authority. 3 Getting Started Declaration of Conformity Trade Name: SONY Model No.: DCR-DVD300 Responsible Party:Sony Electronics Inc. Declaration of Conformity Trade Name: SONY Model No.: DCR-DVD200 Responsible Party:Sony Electronics Inc. CAUTION You are designed to the following measures: - Operation ...
... can radiate radio frequency energy and, if not installed and used with the equipment in accordance with Part 15 of the battery used to Subpart B of Part 15 of the following two conditions.: (1) This device may regulate disposal of the FCC ... void your local authority. 3 Getting Started Declaration of Conformity Trade Name: SONY Model No.: DCR-DVD300 Responsible Party:Sony Electronics Inc. Declaration of Conformity Trade Name: SONY Model No.: DCR-DVD200 Responsible Party:Sony Electronics Inc. CAUTION You are designed to the following measures: - Operation ...
Operating Instructions
Page 10
...with a DVD drive installed .... 68 Showing still images on a computer with your DVD Handycam 4 What is the difference between DVD-R and DVD-RW 6 How to prepare and use your DVD Handycam 8 Getting Started Using this first What you can do with a DVD drive installed ...PB ZOOM 60 Playing still images automatically - Visual Index 55 Various playback modes 57 To display the indicators during playback - BATTERY INFO 18 Connecting to match your camcorder ...... 55 Choosing and viewing a recording - Display 58 Magnifying recorded images - Unfinalizing (VIDEO mode DVD-RWs only) ......
...with a DVD drive installed .... 68 Showing still images on a computer with your DVD Handycam 4 What is the difference between DVD-R and DVD-RW 6 How to prepare and use your DVD Handycam 8 Getting Started Using this first What you can do with a DVD drive installed ...PB ZOOM 60 Playing still images automatically - Visual Index 55 Various playback modes 57 To display the indicators during playback - BATTERY INFO 18 Connecting to match your camcorder ...... 55 Choosing and viewing a recording - Display 58 Magnifying recorded images - Unfinalizing (VIDEO mode DVD-RWs only) ......

Operating Instructions
Page 11
...the "InfoLITHIUM" battery pack 127 Glossary 128 Using your computer 98 Viewing scenes on the disc 98 Making a disc copy - Introduction 89 System requirements 89 Installing the USB driver 90 Installing software 91 Connecting your camcorder to your camcorder - Getting ... editing the recordings on your computer Connecting your camcorder to the computer 92 Consulting the on-line help (operating instructions) of ImageMixer Ver.1.5 for Sony DVD Handycam 97 Viewing scenes recorded on your camcorder abroad .......... 129 Maintenance information and precautions 130 Specifications...
...the "InfoLITHIUM" battery pack 127 Glossary 128 Using your computer 98 Viewing scenes on the disc 98 Making a disc copy - Introduction 89 System requirements 89 Installing the USB driver 90 Installing software 91 Connecting your camcorder to your camcorder - Getting ... editing the recordings on your computer Connecting your camcorder to the computer 92 Consulting the on-line help (operating instructions) of ImageMixer Ver.1.5 for Sony DVD Handycam 97 Viewing scenes recorded on your camcorder abroad .......... 129 Maintenance information and precautions 130 Specifications...
Operating Instructions
Page 14
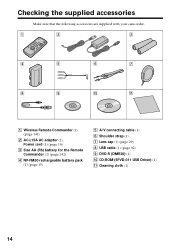
Checking the supplied accessories Make sure that the following accessories are supplied with your camcorder. 1 2 3 4 5 6 7 8 9 0 qa 1 Wireless Remote Commander (1) (page 141) 2 AC-L15A AC adaptor (1), Power cord (1) (page 16) 3 Size AA (R6) battery for the Remote Commander (2) (page 142) 4 NP-FM50 rechargeable battery pack (1) (page 15) 5 A/V connecting cable (1) 6 Shoulder strap (1) 7 Lens cap (1) (page 29) 8 USB cable (1) (page 92) 9 DVD-R (DMR30) (1) q; CD-ROM (SPVD-011 USB Driver) (1) qa Cleaning cloth (1) 14
Checking the supplied accessories Make sure that the following accessories are supplied with your camcorder. 1 2 3 4 5 6 7 8 9 0 qa 1 Wireless Remote Commander (1) (page 141) 2 AC-L15A AC adaptor (1), Power cord (1) (page 16) 3 Size AA (R6) battery for the Remote Commander (2) (page 142) 4 NP-FM50 rechargeable battery pack (1) (page 15) 5 A/V connecting cable (1) 6 Shoulder strap (1) 7 Lens cap (1) (page 29) 8 USB cable (1) (page 92) 9 DVD-R (DMR30) (1) q; CD-ROM (SPVD-011 USB Driver) (1) qa Cleaning cloth (1) 14

Operating Instructions
Page 15
To remove the battery pack 1 Lift up the viewfinder. 2 Slide the battery pack up the viewfinder. 2 Slide the battery pack in the direction of the arrow while pressing BATT down until it clicks. BATT BATT release button 15 Getting Started Step 1 Preparing the power source Installing/removing the battery pack 1 2 1 Lift up and out in and down .
To remove the battery pack 1 Lift up the viewfinder. 2 Slide the battery pack up the viewfinder. 2 Slide the battery pack in the direction of the arrow while pressing BATT down until it clicks. BATT BATT release button 15 Getting Started Step 1 Preparing the power source Installing/removing the battery pack 1 2 1 Lift up and out in and down .
Operating Instructions
Page 16
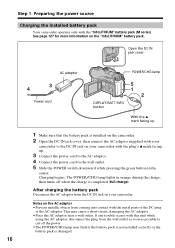
... POWER/CHG lamp lights in the center. This may flash if the battery pack is not installed correctly or the battery pack is completed (full charge). Step 1 Preparing the power source Charging the installed battery pack Your camcorder operates only with the plug's v mark facing up. 3 Connect the...BATT INFO button With the v mark facing up 1 Make sure that the battery pack is installed on the camcorder. 2 Open the DC IN jack cover, then connect the AC adaptor supplied with your camcorder with the "InfoLITHIUM" battery pack (M series). Open the DC IN jack cover. See page 127 for...
... POWER/CHG lamp lights in the center. This may flash if the battery pack is not installed correctly or the battery pack is completed (full charge). Step 1 Preparing the power source Charging the installed battery pack Your camcorder operates only with the plug's v mark facing up. 3 Connect the...BATT INFO button With the v mark facing up 1 Make sure that the battery pack is installed on the camcorder. 2 Open the DC IN jack cover, then connect the AC adaptor supplied with your camcorder with the "InfoLITHIUM" battery pack (M series). Open the DC IN jack cover. See page 127 for...
Operating Instructions
Page 17
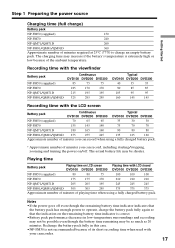
... DVD300 40 35 35 90 85 85 105 95 95 160 145 145 Recording time with the LCD screen Battery pack Continuous Typical DVD100 DVD200 DVD300 DVD100 DVD200 DVD300 NP-FM50 (supplied) 70 65 65 35 30 30 NP-FM70 155 145 140 75 70 70 NP-QM71/QM71D 180 165... you can record, including starting/stopping, zooming and turning the power on LCD screen Playing time with your camcorder. 17 Step 1 Preparing the power source Getting Started Charging time (full charge) Battery pack NP-FM50 (supplied) 150 NP-FM70 240 NP-QM71/QM71D 260 NP-FM91/QM91/QM91D 360 Approximate ...
... DVD300 40 35 35 90 85 85 105 95 95 160 145 145 Recording time with the LCD screen Battery pack Continuous Typical DVD100 DVD200 DVD300 DVD100 DVD200 DVD300 NP-FM50 (supplied) 70 65 65 35 30 30 NP-FM70 155 145 140 75 70 70 NP-QM71/QM71D 180 165... you can record, including starting/stopping, zooming and turning the power on LCD screen Playing time with your camcorder. 17 Step 1 Preparing the power source Getting Started Charging time (full charge) Battery pack NP-FM50 (supplied) 150 NP-FM70 240 NP-QM71/QM71D 260 NP-FM91/QM91/QM91D 360 Approximate ...
Operating Instructions
Page 18
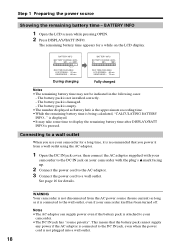
...VIEWFINDER : 75 min Fully charged Notes •The remaining battery time may take some time to display the remaining battery time after DISPLAY/BATT INFO is attached to your camcorder for details. The battery pack is recommended that the battery pack cannot supply any power if the AC adaptor is ...off. See page 16 for a long time, it is not plugged into a wall outlet. 18 The remaining battery time appears for a while on your camcorder to a wall outlet. WARNING Your camcorder is not disconnected from a wall outlet using the AC adaptor. 1 Open the DC IN jack cover, then...
...VIEWFINDER : 75 min Fully charged Notes •The remaining battery time may take some time to display the remaining battery time after DISPLAY/BATT INFO is attached to your camcorder for details. The battery pack is recommended that the battery pack cannot supply any power if the AC adaptor is ...off. See page 16 for a long time, it is not plugged into a wall outlet. 18 The remaining battery time appears for a while on your camcorder to a wall outlet. WARNING Your camcorder is not disconnected from a wall outlet using the AC adaptor. 1 Open the DC IN jack cover, then...
Operating Instructions
Page 21
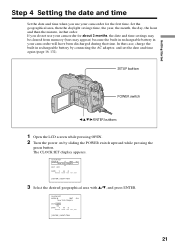
... pressing OPEN. 2 Turn the power on by connecting the AC adaptor, and set the date and time again (page 16, 132). If you use your camcorder will have been discharged during that time. CLOCK SET AREA 26 GMT -5.0 New Yor k,Bogota DST OFF DATE Y M D : [ ENTER ] : NEXT ITEM 3 ... date and time Set the date and time when you do not use your camcorder for about 3 months, the date and time settings may be cleared from memory (bars may appear) because the built-in rechargeable battery in rechargeable battery by sliding the POWER switch upward while pressing the green button.
... pressing OPEN. 2 Turn the power on by connecting the AC adaptor, and set the date and time again (page 16, 132). If you use your camcorder will have been discharged during that time. CLOCK SET AREA 26 GMT -5.0 New Yor k,Bogota DST OFF DATE Y M D : [ ENTER ] : NEXT ITEM 3 ... date and time Set the date and time when you do not use your camcorder for about 3 months, the date and time settings may be cleared from memory (bars may appear) because the built-in rechargeable battery in rechargeable battery by sliding the POWER switch upward while pressing the green button.
Operating Instructions
Page 24
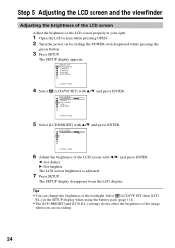
... and the viewfinder Adjusting the brightness of the LCD screen Adjust the brightness of the LCD screen properly in the SETUP display when using the battery pack (page 111). •The [LCD BRIGHT] and [LCD B.L.] settings do not affect the brightness of the image when you are recording. 24 The SETUP...
... and the viewfinder Adjusting the brightness of the LCD screen Adjust the brightness of the LCD screen properly in the SETUP display when using the battery pack (page 111). •The [LCD BRIGHT] and [LCD B.L.] settings do not affect the brightness of the image when you are recording. 24 The SETUP...
Operating Instructions
Page 25
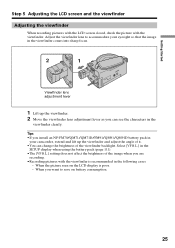
When you want to accommodate your camcorder, extend and lift up the viewfinder and adjust the angle of it. •You can change the ... the LCD screen closed, check the picture with the viewfinder is poor. - Select [VF B.L.] in the SETUP display when using the battery pack (page 111). •The [VF B.L.] setting does not affect the brightness of the viewfinder backlight. Adjust the viewfinder lens to... save on the LCD display is recommended in the following cases: - When the picture seen on battery consumption. 25 Tips •If you install an NP-FM70/QM71/QM71D/FM91/QM91/QM91D...
When you want to accommodate your camcorder, extend and lift up the viewfinder and adjust the angle of it. •You can change the ... the LCD screen closed, check the picture with the viewfinder is poor. - Select [VF B.L.] in the SETUP display when using the battery pack (page 111). •The [VF B.L.] setting does not affect the brightness of the viewfinder backlight. Adjust the viewfinder lens to... save on the LCD display is recommended in the following cases: - When the picture seen on battery consumption. 25 Tips •If you install an NP-FM70/QM71/QM71D/FM91/QM91/QM91D...
Operating Instructions
Page 27
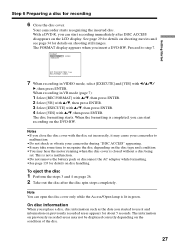
...information When you replace a disc, disc information such as the date you started to use it may cause your camcorder to malfunction. •Do not shock or vibrate your camcorder during "DISC ACCESS" appearing. •It may take some time to step 7. The information on previously recorded areas... may hear the motor running when the disc cover is not a malfunction. •Do not remove the battery pack or disconnect the AC adaptor...
...information When you replace a disc, disc information such as the date you started to use it may cause your camcorder to malfunction. •Do not shock or vibrate your camcorder during "DISC ACCESS" appearing. •It may take some time to step 7. The information on previously recorded areas... may hear the motor running when the disc cover is not a malfunction. •Do not remove the battery pack or disconnect the AC adaptor...
Operating Instructions
Page 28
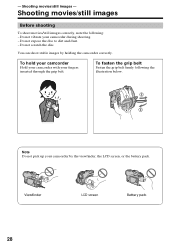
... firmly following : - Do not vibrate your fingers inserted through the grip belt. You can shoot stable images by the viewfinder, the LCD screen, or the battery pack. Note Do not pick up your camcorder by holding the camcorder correctly. Do not expose the disc to dirt and dust. - - Viewfinder LCD screen...
... firmly following : - Do not vibrate your fingers inserted through the grip belt. You can shoot stable images by the viewfinder, the LCD screen, or the battery pack. Note Do not pick up your camcorder by holding the camcorder correctly. Do not expose the disc to dirt and dust. - - Viewfinder LCD screen...
Operating Instructions
Page 29
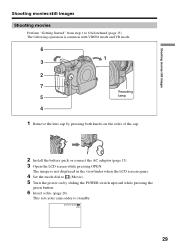
STBY0:00:00 -R VIDEO 29 Shooting movies/still images Shooting movies/still images Shooting movies Perform "Getting Started" from step 1 to standby. This sets your camcorder to 6 beforehand (page 15). The following operation is not displayed in the viewfinder when the LCD screen opens. 4 Set the mode dial to (Movie). 5... Turn the power on by pressing both knobs on the sides of the cap. 2 Install the battery pack or connect the AC adaptor (page 15). 3 Open the LCD screen while pressing OPEN. The image is common with VIDEO mode and VR mode...
STBY0:00:00 -R VIDEO 29 Shooting movies/still images Shooting movies/still images Shooting movies Perform "Getting Started" from step 1 to standby. This sets your camcorder to 6 beforehand (page 15). The following operation is not displayed in the viewfinder when the LCD screen opens. 4 Set the mode dial to (Movie). 5... Turn the power on by pressing both knobs on the sides of the cap. 2 Install the battery pack or connect the AC adaptor (page 15). 3 Open the LCD screen while pressing OPEN. The image is common with VIDEO mode and VR mode...
Operating Instructions
Page 30
...8226;There may be time difference between the point when you leave your camcorder automatically turns off by battery pack for 5 minutes while a disc is inserted, your camcorder powered by setting the (SETUP MENU) - [A. Your camcorder starts recording. The REC indicator appears on the front of the following ...the built-in microphone during recording. •When the Access/Open lamp lights in the SETUP display. Take note of your camcorder is to save battery power and to a standby mode. Do not turn the power off by sliding the POWER switch downward while pressing the green ...
...8226;There may be time difference between the point when you leave your camcorder automatically turns off by battery pack for 5 minutes while a disc is inserted, your camcorder powered by setting the (SETUP MENU) - [A. Your camcorder starts recording. The REC indicator appears on the front of the following ...the built-in microphone during recording. •When the Access/Open lamp lights in the SETUP display. Take note of your camcorder is to save battery power and to a standby mode. Do not turn the power off by sliding the POWER switch downward while pressing the green ...
Operating Instructions
Page 31
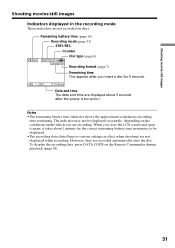
... format (page 7) Remaining time This appears after the power is turned on the conditions under which you insert a disc for the correct remaining battery time in minutes to be displayed accurately, depending on . However, they are displayed about 1 minute for 8 seconds. To display the recording ...When you close the LCD screen and open it again, it takes about 5 seconds after you are recording. Notes •The remaining battery time indicator shows the approximate continuous recording time remaining. The indicator may not be displayed. •The recording data (date/time or ...
... format (page 7) Remaining time This appears after the power is turned on the conditions under which you insert a disc for the correct remaining battery time in minutes to be displayed accurately, depending on . However, they are displayed about 1 minute for 8 seconds. To display the recording ...When you close the LCD screen and open it again, it takes about 5 seconds after you are recording. Notes •The remaining battery time indicator shows the approximate continuous recording time remaining. The indicator may not be displayed. •The recording data (date/time or ...
Operating Instructions
Page 34
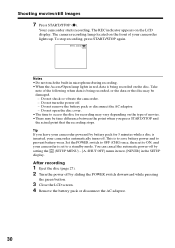
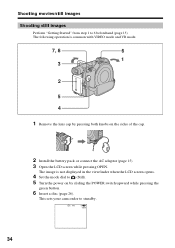
... the mode dial to (Still). 5 Turn the power on the sides of the cap. 2 Install the battery pack or connect the AC adaptor (page 15). 3 Open the LCD screen while pressing OPEN. This sets your camcorder to 6 beforehand (page 15). The image is common with VIDEO mode and VR mode. 7, 8 6 1 3 2 5 4 1 Remove the...
... the mode dial to (Still). 5 Turn the power on the sides of the cap. 2 Install the battery pack or connect the AC adaptor (page 15). 3 Open the LCD screen while pressing OPEN. This sets your camcorder to 6 beforehand (page 15). The image is common with VIDEO mode and VR mode. 7, 8 6 1 3 2 5 4 1 Remove the...
Operating Instructions
Page 35
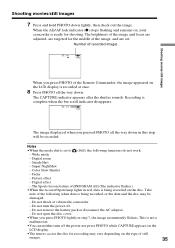
...lights in red, data is recorded at once. 8 Press PHOTO all the way down in step 7, the image momentarily flickers. Do not remove the battery pack or disconnect the AC adaptor. - Do not open the disc cover. •When you pressed PHOTO all the way down lightly, then check ... can neither turn the power off the power nor press PHOTO while CAPTURE appears on the disc. Digital effect - Do not shock or vibrate the camcorder. - Number of recorded images FINE 0 -R VIDEO Shooting movies/still images When you press PHOTO of still images. 35 FINE -R VIDEO The image displayed ...
...lights in red, data is recorded at once. 8 Press PHOTO all the way down in step 7, the image momentarily flickers. Do not remove the battery pack or disconnect the AC adaptor. - Do not open the disc cover. •When you pressed PHOTO all the way down lightly, then check ... can neither turn the power off the power nor press PHOTO while CAPTURE appears on the disc. Digital effect - Do not shock or vibrate the camcorder. - Number of recorded images FINE 0 -R VIDEO Shooting movies/still images When you press PHOTO of still images. 35 FINE -R VIDEO The image displayed ...
Operating Instructions
Page 36
... 36 To display the recording data, press DATA CODE on the settings for image quality and image size, and the type of the movie mode (DCR-DVD200/DVD300 only). •If you are shooting. •The recording data (date/time or various settings in the SETUP display. Move it further... view for still images is slightly wider compared with the angle of view of images you leave your camcorder powered by battery for 5 minutes while a disc is inserted, your camcorder is set to ON, and your camcorder automatically turns off by setting the (SETUP MENU) - [A.SHUT OFF] menu item to [NEVER] in ...
... 36 To display the recording data, press DATA CODE on the settings for image quality and image size, and the type of the movie mode (DCR-DVD200/DVD300 only). •If you are shooting. •The recording data (date/time or various settings in the SETUP display. Move it further... view for still images is slightly wider compared with the angle of view of images you leave your camcorder powered by battery for 5 minutes while a disc is inserted, your camcorder is set to ON, and your camcorder automatically turns off by setting the (SETUP MENU) - [A.SHUT OFF] menu item to [NEVER] in ...


