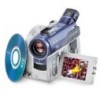

Operating Instructions
Page 11
...89 Installing the USB driver 90 Installing software 91 Connecting your camcorder to the computer 92 Consulting the on-line help (operating instructions) of ImageMixer Ver.1.5 for Sony DVD Handycam 97 Viewing scenes recorded on your computer 98 Viewing scenes on a disc 104 Connecting your camcorder to a TV... and a VCR Dubbing a disc to a tape 105 Connecting your camcorder to a VCR 105 Dubbing to a tape...
...89 Installing the USB driver 90 Installing software 91 Connecting your camcorder to the computer 92 Consulting the on-line help (operating instructions) of ImageMixer Ver.1.5 for Sony DVD Handycam 97 Viewing scenes recorded on your computer 98 Viewing scenes on a disc 104 Connecting your camcorder to a TV... and a VCR Dubbing a disc to a tape 105 Connecting your camcorder to a VCR 105 Dubbing to a tape...
Operating Instructions
Page 14
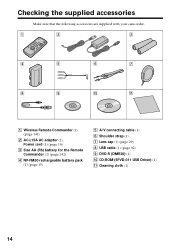
CD-ROM (SPVD-011 USB Driver) (1) qa Cleaning cloth (1) 14 Checking the supplied accessories Make sure that the following accessories are supplied with your camcorder. 1 2 3 4 5 6 7 8 9 0 qa 1 Wireless Remote Commander (1) (page 141) 2 AC-L15A AC adaptor (1), Power cord (1) (page 16) 3 Size AA (R6) battery for the Remote Commander (2) (page 142) 4 NP-FM50 rechargeable battery pack (1) (page 15) 5 A/V connecting cable (1) 6 Shoulder strap (1) 7 Lens cap (1) (page 29) 8 USB cable (1) (page 92) 9 DVD-R (DMR30) (1) q;
CD-ROM (SPVD-011 USB Driver) (1) qa Cleaning cloth (1) 14 Checking the supplied accessories Make sure that the following accessories are supplied with your camcorder. 1 2 3 4 5 6 7 8 9 0 qa 1 Wireless Remote Commander (1) (page 141) 2 AC-L15A AC adaptor (1), Power cord (1) (page 16) 3 Size AA (R6) battery for the Remote Commander (2) (page 142) 4 NP-FM50 rechargeable battery pack (1) (page 15) 5 A/V connecting cable (1) 6 Shoulder strap (1) 7 Lens cap (1) (page 29) 8 USB cable (1) (page 92) 9 DVD-R (DMR30) (1) q;
Operating Instructions
Page 89
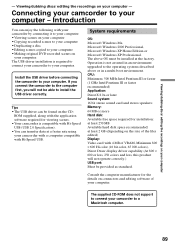
... software required for viewing scenes. •Your camcorder is required to connect your camcorder to a Macintosh computer. 89 Connecting your camcorder to your camcorder to your computer. The USB driver installation is compatible with your camcorder by connecting it to your computer: •...editing the recordings on your computer - Viewing/dubbing discs/ editing the recordings on your computer - Install the USB driver before connecting the camcorder to connect your computer - Consult the computer manufacturer for installation: at least 250 MB Available hard disk space...
... software required for viewing scenes. •Your camcorder is required to connect your camcorder to a Macintosh computer. 89 Connecting your camcorder to your camcorder to your computer. The USB driver installation is compatible with your camcorder by connecting it to your computer: •...editing the recordings on your computer - Viewing/dubbing discs/ editing the recordings on your computer - Install the USB driver before connecting the camcorder to connect your computer - Consult the computer manufacturer for installation: at least 250 MB Available hard disk space...

Operating Instructions
Page 90
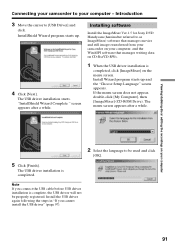
Connecting your camcorder to your computer. Installing the USB driver Start the following operation before connecting the USB cable to your computer - If the menu screen does not appear, double-click [My Computer,] then [ImageMixer] (CD-ROM Drive). Install the USB driver to load. When your computer ... recovers from Suspend/ Resume, or from your computer. The installation menu screen appears. Communications with your computer Communications between your camcorder and your computer may not recover properly even after a while. 90 If you open a still image file. The menu ...
Connecting your camcorder to your computer. Installing the USB driver Start the following operation before connecting the USB cable to your computer - If the menu screen does not appear, double-click [My Computer,] then [ImageMixer] (CD-ROM Drive). Install the USB driver to load. When your computer ... recovers from Suspend/ Resume, or from your computer. The installation menu screen appears. Communications with your computer Communications between your camcorder and your computer may not recover properly even after a while. 90 If you open a still image file. The menu ...
Operating Instructions
Page 91
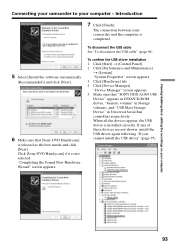
...Ver.1.5 for Sony DVD Handycam (hereinafter referred to as ImageMixer) software that manages movies and still images transferred from your camcorder on your computer, and the WinASPI software that manages writing data on CD-Rs/CD-RWs. 1 When the USB driver installation is ...Complete " screen appears after a while. Connecting your camcorder to your computer 2 Select the language to be properly registered. The menu screen appears after a while. Introduction 3 Move the cursor to [USB Driver] and click. The USB driver installation starts. Viewing/dubbing discs/ editing the recordings on...
...Ver.1.5 for Sony DVD Handycam (hereinafter referred to as ImageMixer) software that manages movies and still images transferred from your camcorder on your computer, and the WinASPI software that manages writing data on CD-Rs/CD-RWs. 1 When the USB driver installation is ...Complete " screen appears after a while. Connecting your camcorder to your computer 2 Select the language to be properly registered. The menu screen appears after a while. Introduction 3 Move the cursor to [USB Driver] and click. The USB driver installation starts. Viewing/dubbing discs/ editing the recordings on...
Operating Instructions
Page 93
... the USB driver installation 1 Click [Start] t [Control Panel]. 2 Click [Performance and Maintenance] t [System]. The connection between your computer - "Device Manager" screen appears. 5 Make sure that [Sony DVD Handycam] is completed. Introduction 7 Click [Finish]. "System Properties" screen appears. 3 Click [Hardware] tab. 4 Click [Device Manager]. Viewing/dubbing discs/ editing the recordings on your computer Connecting your camcorder...
... the USB driver installation 1 Click [Start] t [Control Panel]. 2 Click [Performance and Maintenance] t [System]. The connection between your computer - "Device Manager" screen appears. 5 Make sure that [Sony DVD Handycam] is completed. Introduction 7 Click [Finish]. "System Properties" screen appears. 3 Click [Hardware] tab. 4 Click [Device Manager]. Viewing/dubbing discs/ editing the recordings on your computer Connecting your camcorder...

Operating Instructions
Page 95
...SONY DDX-A1000 USB Device" appears in DVD/CD-ROM drives, "Generic volume" in Storage volumes, and "USB Mass Storage Device" in the on your camcorder by sliding the POWER switch upward while pressing the green button. 4 Connect the (USB) jacks of the camcorder and the (USB) port of these devices are not shown, install the USB driver... adaptor to (Play/Edit). 3 Turn the power on - If any of the computer using the USB cable supplied with your camcorder. Introduction To confirm the USB driver installation 1 Click [Start] t [Settings] t [Control Panel]. 2 Click [System]. The connection ...
...SONY DDX-A1000 USB Device" appears in DVD/CD-ROM drives, "Generic volume" in Storage volumes, and "USB Mass Storage Device" in the on your camcorder by sliding the POWER switch upward while pressing the green button. 4 Connect the (USB) jacks of the camcorder and the (USB) port of these devices are not shown, install the USB driver... adaptor to (Play/Edit). 3 Turn the power on - If any of the computer using the USB cable supplied with your camcorder. Introduction To confirm the USB driver installation 1 Click [Start] t [Settings] t [Control Panel]. 2 Click [System]. The connection ...

Operating Instructions
Page 96
... shown, install the USB driver again following "If you cannot install the USB driver" (page 97). Turning off your camcorder keeping connection to the computer may cause a damage to the disc. 96 "Device Manager" screen appears. 4 Make sure that "SONY DDX-A1000 USB Device" appears in CD-ROM, "Sony DVD Handycam" in Storage device, and "USB Mass Storage Device" in...
... shown, install the USB driver again following "If you cannot install the USB driver" (page 97). Turning off your camcorder keeping connection to the computer may cause a damage to the disc. 96 "Device Manager" screen appears. 4 Make sure that "SONY DDX-A1000 USB Device" appears in CD-ROM, "Sony DVD Handycam" in Storage device, and "USB Mass Storage Device" in...
Operating Instructions
Page 97
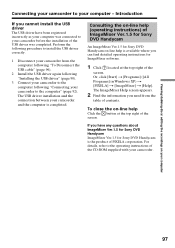
...Find the information you cannot install the USB driver The USB driver have any questions about ImageMixer Ver.1.5 for Sony DVD Handycam ImageMixer Ver.1.5 for ImageMixer software. 1 Click located at the top right of the CD-ROM supplied with your camcorder to the computer" (page 92)....can find detailed operating instructions for Sony DVD Handycam is completed. For details, refer to the computer following procedure to install the USB driver correctly. 1 Disconnect your camcorder from the table of the USB driver was connected to your camcorder and the computer is the product...
...Find the information you cannot install the USB driver The USB driver have any questions about ImageMixer Ver.1.5 for Sony DVD Handycam ImageMixer Ver.1.5 for ImageMixer software. 1 Click located at the top right of the CD-ROM supplied with your camcorder to the computer" (page 92)....can find detailed operating instructions for Sony DVD Handycam is completed. For details, refer to the computer following procedure to install the USB driver correctly. 1 Disconnect your camcorder from the table of the USB driver was connected to your camcorder and the computer is the product...
Operating Instructions
Page 98
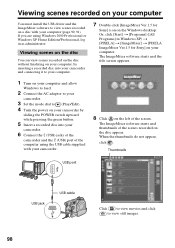
... load. 2 Connect the AC adaptor to your camcorder. 3 Set the mode dial to your computer. 7 Double-click [ImageMixer Ver.1.5 for Sony] on your computer. Viewing scenes recorded on your computer You must install the USB driver and the ImageMixer software to view still images. Thumbnails USB port USB jack USB cable 98 Click to view movies and...
... load. 2 Connect the AC adaptor to your camcorder. 3 Set the mode dial to your computer. 7 Double-click [ImageMixer Ver.1.5 for Sony] on your computer. Viewing scenes recorded on your computer You must install the USB driver and the ImageMixer software to view still images. Thumbnails USB port USB jack USB cable 98 Click to view movies and...
Operating Instructions
Page 99
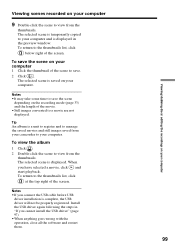
...the movie. •Still images converted to the thumbnails list, click below right of the screen. The selected scene is complete, the USB driver will not be properly registered. Install the USB driver again following the steps in the preview window. To return to a movie are not displayed. Notes •If you connect the... 2 Click . Tip An album is a unit to register and to your computer. To view the album 1 Click . 2 Double-click the scene to view from your camcorder to your computer and is temporarily copied to manage the saved movies and still images saved from the thumbnails.
...the movie. •Still images converted to the thumbnails list, click below right of the screen. The selected scene is complete, the USB driver will not be properly registered. Install the USB driver again following the steps in the preview window. To return to a movie are not displayed. Notes •If you connect the... 2 Click . Tip An album is a unit to register and to your computer. To view the album 1 Click . 2 Double-click the scene to view from your camcorder to your computer and is temporarily copied to manage the saved movies and still images saved from the thumbnails.
Operating Instructions
Page 121
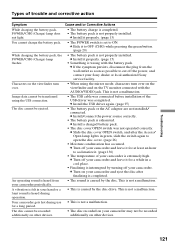
... battery pack. • The disc cover OPEN switch was completed. c Turn off your Sony dealer or local authorized Sony service facility. • When using the USB connection. Your camcorder gets hot during operation. You cannot charge the battery pack. c Install the USB driver again. (page 97) • The battery pack or the AC adaptor are not...
... battery pack. • The disc cover OPEN switch was completed. c Turn off your Sony dealer or local authorized Sony service facility. • When using the USB connection. Your camcorder gets hot during operation. You cannot charge the battery pack. c Install the USB driver again. (page 97) • The battery pack or the AC adaptor are not...


