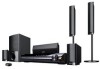
Operating Instructions
Page 5
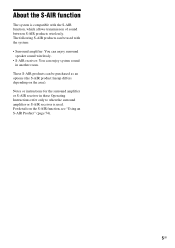
About the S-AIR function The system is compatible with the system: • Surround amplifier: You can enjoy surround speaker sound wirelessly. • S-AIR receiver: You can enjoy system sound in these Operating Instructions refer only to when the surround amplifier or S-AIR receiver is used with the S-AIR function, which allows transmission of sound between S-AIR products wirelessly. Notes or instructions for the surround amplifier or S-AIR receiver in another room. For details on the area). The...
About the S-AIR function The system is compatible with the system: • Surround amplifier: You can enjoy surround speaker sound wirelessly. • S-AIR receiver: You can enjoy system sound in these Operating Instructions refer only to when the surround amplifier or S-AIR receiver is used with the S-AIR function, which allows transmission of sound between S-AIR products wirelessly. Notes or instructions for the surround amplifier or S-AIR receiver in another room. For details on the area). The...
Operating Instructions
Page 6
... Disc Playing a Disc 40 Using Play Mode 46 Searching/Selecting Disc Contents ....... 48 Playing MP3 Files/JPEG Image Files... 50 Enjoying Video Files 54 Adjusting the Delay Between the Picture and Sound 56 Restricting Playback of the Disc........... 57 Changing the System Settings by Using the Setup Display 59 Tuner Presetting Radio Stations 67 Listening to the Radio 68 Control for HDMI/External Audio Device Using the Control for HDMI Function for "BRAVIA" Sync 70 Using the DIGITAL MEDIA PORT Adapter 73 Using an S-AIR Product 74 Other Operations Getting Optimal Surround Sound...
... Disc Playing a Disc 40 Using Play Mode 46 Searching/Selecting Disc Contents ....... 48 Playing MP3 Files/JPEG Image Files... 50 Enjoying Video Files 54 Adjusting the Delay Between the Picture and Sound 56 Restricting Playback of the Disc........... 57 Changing the System Settings by Using the Setup Display 59 Tuner Presetting Radio Stations 67 Listening to the Radio 68 Control for HDMI/External Audio Device Using the Control for HDMI Function for "BRAVIA" Sync 70 Using the DIGITAL MEDIA PORT Adapter 73 Using an S-AIR Product 74 Other Operations Getting Optimal Surround Sound...
Operating Instructions
Page 26
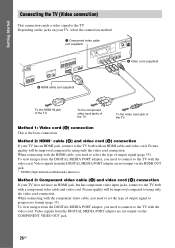
... HDMI cable, you need to set the type of the TV. To view images from the DIGITAL MEDIA PORT adapter are not output via the COMPONENT VIDEO OUT jack. 26GB Picture quality will be improved compared to using only the video cord connection. To the component video input jacks of output signal to the TV both with an HDMI cable and video cord. Picture quality will be improved compared to using only the video cord connection. Method 2: HDMI* cable (B) and video cord (A) connection If your TV, select the connection...
... HDMI cable, you need to set the type of the TV. To view images from the DIGITAL MEDIA PORT adapter are not output via the COMPONENT VIDEO OUT jack. 26GB Picture quality will be improved compared to using only the video cord connection. To the component video input jacks of output signal to the TV both with an HDMI cable and video cord. Picture quality will be improved compared to using only the video cord connection. Method 2: HDMI* cable (B) and video cord (A) connection If your TV, select the connection...

Operating Instructions
Page 34
... Quick Setup Press DISPLAY in stop mode. The Control Menu display appears on the TV screen. 3 Press X/x to select then press . [SETUP], The options for [SETUP] appear. 94( 99) 1( 1) T 0: 01: 08 DVD VIDEO CUSTOM CUSTOM QUICK 10 Press C/c to the A.CAL MIC jack on the front panel. Be quiet during the measurement. You cannot turn the volume down. All connections and setup operations are output when [AUTO CALIBRATION] starts. Note • Loud test sounds are complete. The Quick Setup display...
... Quick Setup Press DISPLAY in stop mode. The Control Menu display appears on the TV screen. 3 Press X/x to select then press . [SETUP], The options for [SETUP] appear. 94( 99) 1( 1) T 0: 01: 08 DVD VIDEO CUSTOM CUSTOM QUICK 10 Press C/c to the A.CAL MIC jack on the front panel. Be quiet during the measurement. You cannot turn the volume down. All connections and setup operations are output when [AUTO CALIBRATION] starts. Note • Loud test sounds are complete. The Quick Setup display...
Operating Instructions
Page 35
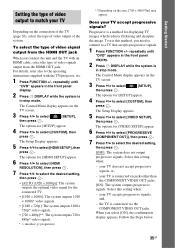
... panel display. 2 Press DISPLAY while the system is connected via the COMPONENT VIDEO OUT jacks. Select this setting when: - Select this setting when: - The options for [HDMI SETUP] appear. 6 Press X/x to select [HDMI RESOLUTION], then press . 7 Press X/x to match your TV does not accept progressive signals, or, - For details, refer also to the operating instructions supplied with an HDMI cable, select the type of video signals output from the HDMI OUT jack When you select [ON], the confirmation display...
... panel display. 2 Press DISPLAY while the system is connected via the COMPONENT VIDEO OUT jacks. Select this setting when: - Select this setting when: - The options for [HDMI SETUP] appear. 6 Press X/x to select [HDMI RESOLUTION], then press . 7 Press X/x to match your TV does not accept progressive signals, or, - For details, refer also to the operating instructions supplied with an HDMI cable, select the type of video signals output from the HDMI OUT jack When you select [ON], the confirmation display...
Operating Instructions
Page 40
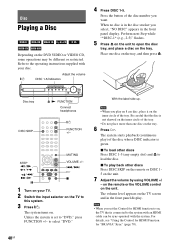
.... 2 Switch the input selector on . The system starts playback (continuous play back other discs Press DISC 1-5 (any empty slot) and Z to open the disc tray, and place a disc on the unit. The volume level appears on the TV screen and in the front panel display. Press the button of the tray. on the remote or the VOLUME control on the tray. The system turns on the TV to "DVD," press FUNCTION +/- Note...
.... 2 Switch the input selector on . The system starts playback (continuous play back other discs Press DISC 1-5 (any empty slot) and Z to open the disc tray, and place a disc on the unit. The volume level appears on the TV screen and in the front panel display. Press the button of the tray. on the remote or the VOLUME control on the tray. The system turns on the TV to "DVD," press FUNCTION +/- Note...
Operating Instructions
Page 41
"DEMO" is set to "OFF" (page 32). - [CONTROL FOR HDMI] is set to the next (Freeze Frame)2)4)5) frame while the system is in pause mode (DVD VIDEO/ DVD-R/DVD-RW only). To use the headphones Connect the headphones to normal playback, press H. Change a disc while playing another disc DISC SKIP Play the desired disc directly DISC 1-5 on the surround amplifier. (The sound of the system is in standby mode Press "/1 while the system is on the unit. To Press...
"DEMO" is set to "OFF" (page 32). - [CONTROL FOR HDMI] is set to the next (Freeze Frame)2)4)5) frame while the system is in pause mode (DVD VIDEO/ DVD-R/DVD-RW only). To use the headphones Connect the headphones to normal playback, press H. Change a disc while playing another disc DISC SKIP Play the desired disc directly DISC 1-5 on the surround amplifier. (The sound of the system is in standby mode Press "/1 while the system is on the unit. To Press...
Operating Instructions
Page 44
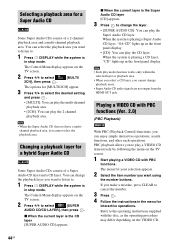
... change the layer. • [SUPER AUDIO CD]: You can play mode function works only within the selected layer or playback area. • When you select a CD layer, you want using the number buttons. The menu for [MULTI/2CH] appear. 3 Press X/x to . 1 Press DISPLAY while the system is the CD layer [SUPER AUDIO CD] appears. Note • Each play the CD layer. The Control Menu display appears on the TV screen. 1 Start playing a VIDEO...
... change the layer. • [SUPER AUDIO CD]: You can play mode function works only within the selected layer or playback area. • When you select a CD layer, you want using the number buttons. The menu for [MULTI/2CH] appear. 3 Press X/x to . 1 Press DISPLAY while the system is the CD layer [SUPER AUDIO CD] appears. Note • Each play the CD layer. The Control Menu display appears on the TV screen. 1 Start playing a VIDEO...
Operating Instructions
Page 59
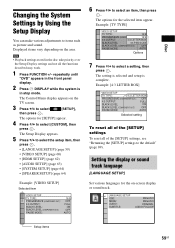
... -screen display or sound track. The setting is selected and setup is in the disc take priority over the Setup Display settings and not all of the [SETUP] settings To reset all the functions described may work. 1 Press FUNCTION +/- Disc Changing the System Settings by Using the Setup Display You can make various adjustments to select a setting, then press . Example: [TV TYPE] VIDEO SETUP TV TYPE: 16:9 PROGRESSIVE (COMPONENT OUT): O16F:F9 4:3 OUTPUT: 4:3 LETTERFBUOLXL BLACK LEVEL: 4:3 PAN SACUATON BLACK LEVEL (COMPONENT OUT): OFF PAUSE MODE: AUTO...
... -screen display or sound track. The setting is selected and setup is in the disc take priority over the Setup Display settings and not all of the [SETUP] settings To reset all the functions described may work. 1 Press FUNCTION +/- Disc Changing the System Settings by Using the Setup Display You can make various adjustments to select a setting, then press . Example: [TV TYPE] VIDEO SETUP TV TYPE: 16:9 PROGRESSIVE (COMPONENT OUT): O16F:F9 4:3 OUTPUT: 4:3 LETTERFBUOLXL BLACK LEVEL: 4:3 PAN SACUATON BLACK LEVEL (COMPONENT OUT): OFF PAUSE MODE: AUTO...
Operating Instructions
Page 61
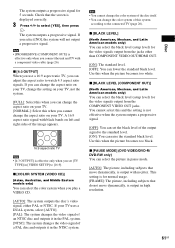
... and right sides of the output signal to the standard level. [ON]: You can select the picture in pause mode. [AUTO]: The picture, including subjects that do not move dynamically, is output in [VIDEO SETUP] to the connected TV (page 26). This setting is for the video signals output from the COMPONENT VIDEO OUT jacks. If you play a VIDEO CD. [AUTO]: The system outputs the disc's video signal, either PAL or NTSC. x [PAUSE MODE] (DVD VIDEO/DVD-R/ DVD-RW only) You can...
... and right sides of the output signal to the standard level. [ON]: You can select the picture in pause mode. [AUTO]: The picture, including subjects that do not move dynamically, is output in [VIDEO SETUP] to the connected TV (page 26). This setting is for the video signals output from the COMPONENT VIDEO OUT jacks. If you play a VIDEO CD. [AUTO]: The system outputs the disc's video signal, either PAL or NTSC. x [PAUSE MODE] (DVD VIDEO/DVD-R/ DVD-RW only) You can...
Operating Instructions
Page 62
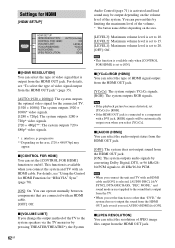
... "Using the Control for HDMI Function for HDMI [HDMI SETUP] HDMI SETUP HDMI RESOLUTION: CONTROL FOR HDMI: VOLUME LIMIT: YCBCR/RGB(HDMI): AUDIO(HDMI): JPEG RESOLUTION: AUTO(1920x1080p) ON LEVEL2 YCBCR OFF SD x [HDMI RESOLUTION] You can prevent this by converting Dolby Digital, DTS, or 96 kHz/24bit PCM signals to [ON]. x [JPEG RESOLUTION] You can select the type of HDMI signal output from the HDMI OUT jack. [ON]: The system outputs audio signals by limiting the maximum level of video signal that is connected to...
... "Using the Control for HDMI Function for HDMI [HDMI SETUP] HDMI SETUP HDMI RESOLUTION: CONTROL FOR HDMI: VOLUME LIMIT: YCBCR/RGB(HDMI): AUDIO(HDMI): JPEG RESOLUTION: AUTO(1920x1080p) ON LEVEL2 YCBCR OFF SD x [HDMI RESOLUTION] You can prevent this by converting Dolby Digital, DTS, or 96 kHz/24bit PCM signals to [ON]. x [JPEG RESOLUTION] You can select the type of HDMI signal output from the HDMI OUT jack. [ON]: The system outputs audio signals by limiting the maximum level of video signal that is connected to...
Operating Instructions
Page 64
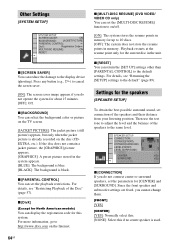
.... SPEAKER SETUP CONNECTION: DISTANCE(FRONT): DISTANCE(SURROUND): LEVEL(FRONT): LEVEL(SURROUND): TESFRT OTNOTN:E YES CENTER: YES SURROUND: YES SUBWOOFER: YES x [CONNECTION] If you cannot change them. [FRONT] [YES] [CENTER] [YES]: Normally select this. [NONE]: Select this system. x [PARENTAL CONTROL] You can set the [MULTI-DISC RESUME] function to on/off. [ON]: The system stores the resume points in memory for [CENTER] and [SURROUND]. x [MULTI-DISC RESUME] (DVD VIDEO/ VIDEO CD only) You can set the playback restrictions. Then use the test tone to...
.... SPEAKER SETUP CONNECTION: DISTANCE(FRONT): DISTANCE(SURROUND): LEVEL(FRONT): LEVEL(SURROUND): TESFRT OTNOTN:E YES CENTER: YES SURROUND: YES SUBWOOFER: YES x [CONNECTION] If you cannot change them. [FRONT] [YES] [CENTER] [YES]: Normally select this. [NONE]: Select this system. x [PARENTAL CONTROL] You can set the [MULTI-DISC RESUME] function to on/off. [ON]: The system stores the resume points in memory for [CENTER] and [SURROUND]. x [MULTI-DISC RESUME] (DVD VIDEO/ VIDEO CD only) You can set the playback restrictions. Then use the test tone to...
Operating Instructions
Page 67
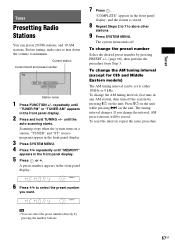
... turn off . Scanning stops when the system tunes in the front panel display. 5 Press or c. "TUNED" and "ST" (stereo program) appear in the front panel display. 3 Press SYSTEM MENU. 4 Press X/x repeatedly until "MEMORY" appears in a station. To change the AM tuning interval, first tune in the front panel display, and the station is stored. 8 Repeat Steps 2 to 7 to either 10 kHz or 9 kHz. If you want. Tuner Tuner Presetting Radio Stations You can select the preset number directly...
... turn off . Scanning stops when the system tunes in the front panel display. 5 Press or c. "TUNED" and "ST" (stereo program) appear in the front panel display. 3 Press SYSTEM MENU. 4 Press X/x repeatedly until "MEMORY" appears in a station. To change the AM tuning interval, first tune in the front panel display, and the station is stored. 8 Repeat Steps 2 to 7 to either 10 kHz or 9 kHz. If you want. Tuner Tuner Presetting Radio Stations You can select the preset number directly...
Operating Instructions
Page 70
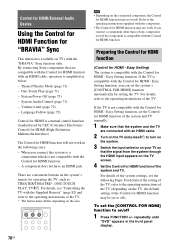
... HDMI function may be set the system's [CONTROL FOR HDMI] function automatically by CEC (Consumer Electronics Control) for HDMI (High-Definition Multimedia Interface). For details, refer to turn on the system. 3 Switch the input selector on your TV so that are convenient buttons on the TV, the default setting of the TV. Control for HDMI/External Audio Device Using the Control for HDMI Function for "BRAVIA" Sync This function is compatible with the Control for HDMI - By connecting Sony components that the signal...
... HDMI function may be set the system's [CONTROL FOR HDMI] function automatically by CEC (Consumer Electronics Control) for HDMI (High-Definition Multimedia Interface). For details, refer to turn on the system. 3 Switch the input selector on your TV so that are convenient buttons on the TV, the default setting of the TV. Control for HDMI/External Audio Device Using the Control for HDMI Function for "BRAVIA" Sync This function is compatible with the Control for HDMI - By connecting Sony components that the signal...
Operating Instructions
Page 71
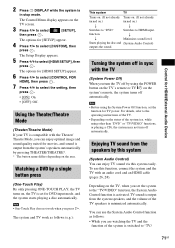
... The system and TV work when you can use this system easily. The options for [SETUP] appear. 4 Press X/x to HDMI input. The options for [HDMI SETUP] appear. 6 Press X/x to select [CONTROL FOR HDMI], then press . 7 Press X/x to select [HDMI SETUP], then press . Using the Theater/Theatre Mode (Theater/Theatre Mode) If your TV is activated. Control for DVD input mode, and the system starts playing a disc automatically. The Control Menu display appears on the status of the system is output from the speakers by using the POWER button...
... The system and TV work when you can use this system easily. The options for [SETUP] appear. 4 Press X/x to HDMI input. The options for [HDMI SETUP] appear. 6 Press X/x to select [CONTROL FOR HDMI], then press . 7 Press X/x to select [HDMI SETUP], then press . Using the Theater/Theatre Mode (Theater/Theatre Mode) If your TV is activated. Control for DVD input mode, and the system starts playing a disc automatically. The Control Menu display appears on the status of the system is output from the speakers by using the POWER button...
Operating Instructions
Page 75
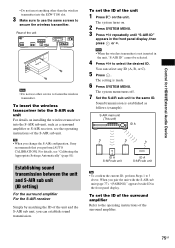
... sub unit. Sound transmission is established as a surround amplifier or S-AIR receiver, see "Calibrating the Appropriate Settings Automatically" (page 81). To set the ID of the surround amplifier Refer to the operating instructions of the unit SPEAKER CENTER SUBWOOFER TV DIGITAL IN OPTICAL COAXIAL SPEAKER FRONT R FRONT L SUR R HDMI OUT SUR L DMPORT DC5V 0.7A MAX EZW-T100 ANTENNA FM AM COAXIAL 75 COMPONENT VIDEO OUT VIDEO OUT TV/VIDEO Y PB/CB PR/CR R AUDIO IN...
... sub unit. Sound transmission is established as a surround amplifier or S-AIR receiver, see "Calibrating the Appropriate Settings Automatically" (page 81). To set the ID of the surround amplifier Refer to the operating instructions of the unit SPEAKER CENTER SUBWOOFER TV DIGITAL IN OPTICAL COAXIAL SPEAKER FRONT R FRONT L SUR R HDMI OUT SUR L DMPORT DC5V 0.7A MAX EZW-T100 ANTENNA FM AM COAXIAL 75 COMPONENT VIDEO OUT VIDEO OUT TV/VIDEO Y PB/CB PR/CR R AUDIO IN...
Operating Instructions
Page 81
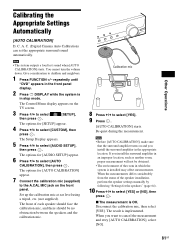
... . If you install the surround amplifier in which the system is in the appropriate location. The options for [AUTO CALIBRATION] appear. 7 Connect the calibration mic (supplied) to the A.CAL MIC jack on the TV screen. 3 Press X/x to select [YES]. 9 Press . [AUTO CALIBRATION] starts. C. When you install the surround amplifier in stop mode. repeatedly until "DVD" appears in the front panel display. 2 Press DISPLAY while the system is installed may affect measurements. Other Operations Calibrating the Appropriate Settings Automatically [AUTO CALIBRATION] D.
... . If you install the surround amplifier in which the system is in the appropriate location. The options for [AUTO CALIBRATION] appear. 7 Connect the calibration mic (supplied) to the A.CAL MIC jack on the TV screen. 3 Press X/x to select [YES]. 9 Press . [AUTO CALIBRATION] starts. C. When you install the surround amplifier in stop mode. repeatedly until "DVD" appears in the front panel display. 2 Press DISPLAY while the system is installed may affect measurements. Other Operations Calibrating the Appropriate Settings Automatically [AUTO CALIBRATION] D.
Operating Instructions
Page 82
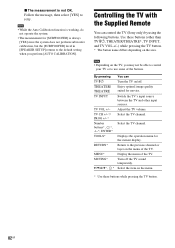
... buttons. Adjust the TV volume. TOOLS* Displays the operation menu for movies. Use these buttons while pressing the TV button. 82GB TV VOL +/- RETURN* Return to the previous channel or layer on the menu. * Use these buttons (other input sources. Controlling the TV with the Supplied Remote You can TV [/1 Turn the TV on the area. Number buttons*, *, -*, ENTER* Select the TV channel. Follow the message, then select [YES] to use some of the buttons. THEATER/ THEATRE...
... buttons. Adjust the TV volume. TOOLS* Displays the operation menu for movies. Use these buttons while pressing the TV button. 82GB TV VOL +/- RETURN* Return to the previous channel or layer on the menu. * Use these buttons (other input sources. Controlling the TV with the Supplied Remote You can TV [/1 Turn the TV on the area. Number buttons*, *, -*, ENTER* Select the TV channel. Follow the message, then select [YES] to use some of the buttons. THEATER/ THEATRE...
Operating Instructions
Page 84
... receive a Dolby Digital signal, you connect headphones to produce the sound effect depending on the source. • "MOVIE": The system provides the sound for music. The MUSIC indicator lights up ) to the unit or surround amplifier. • When changing the sound mode while using the S-AIR receiver, sound from the S-AIR receiver may skip. Note • When you play a Super Audio CD, this function does not work. • You cannot operate these setup items when you need to connect...
... receive a Dolby Digital signal, you connect headphones to produce the sound effect depending on the source. • "MOVIE": The system provides the sound for music. The MUSIC indicator lights up ) to the unit or surround amplifier. • When changing the sound mode while using the S-AIR receiver, sound from the S-AIR receiver may skip. Note • When you play a Super Audio CD, this function does not work. • You cannot operate these setup items when you need to connect...
Operating Instructions
Page 94
... (Digital Visual Interface) jacks do not accept audio signals). • The HDMI OUT jack does not output Super Audio CD sound. • Try the following: 1 Turn the system off and on again. 2 Turn the connected component off and on the remote if "MUTING ON" is displayed in the front panel display. • The system is in pause mode or in Dolby Digital or MPEG audio format. The sound loses stereo effect • Select stereo sound by pressing AUDIO (page 42). MODE" setting...
... (Digital Visual Interface) jacks do not accept audio signals). • The HDMI OUT jack does not output Super Audio CD sound. • Try the following: 1 Turn the system off and on again. 2 Turn the connected component off and on the remote if "MUTING ON" is displayed in the front panel display. • The system is in pause mode or in Dolby Digital or MPEG audio format. The sound loses stereo effect • Select stereo sound by pressing AUDIO (page 42). MODE" setting...


