
Child Safety: It Makes A Difference Where Your TV Stands
Page 1
... more than one television. As a result, TV sets may fall over . 7 Share our safety message on this hidden hazard of TVs such as VCRs and remotes that may cause unnecessary injury. The home theater entertainment experience is committed to making home entertainment enjoyable and safe. The industry is a growing trend, and...
... more than one television. As a result, TV sets may fall over . 7 Share our safety message on this hidden hazard of TVs such as VCRs and remotes that may cause unnecessary injury. The home theater entertainment experience is committed to making home entertainment enjoyable and safe. The industry is a growing trend, and...

Operating Instructions
Page 4
...674, 5,974,380, 5,978,762 and other worldwide patents issued and pending. Copyright 1996, 2000 Digital Theater Systems, Inc. Table of Contents Introduction Safety Precautions 2-3 Table of Contents 4 Before Use 5-6 Playable Discs 5 Precautions... Still Picture 22 Slow Motion 23 Repeat 23 Time Search 23 Special DVD Features 24 Checking the contents of DVD Video disc: Menus 24 Camera Angle 24 Changing the Audio Language 24... the Radio 31 Controlling the TV with the Supplied Remote . . . 32 Controlling the TV 32 Using the SONY TV DIRECT Function 33 Preparation 33 Operation 33 Reference...
...674, 5,974,380, 5,978,762 and other worldwide patents issued and pending. Copyright 1996, 2000 Digital Theater Systems, Inc. Table of Contents Introduction Safety Precautions 2-3 Table of Contents 4 Before Use 5-6 Playable Discs 5 Precautions... Still Picture 22 Slow Motion 23 Repeat 23 Time Search 23 Special DVD Features 24 Checking the contents of DVD Video disc: Menus 24 Camera Angle 24 Changing the Audio Language 24... the Radio 31 Controlling the TV with the Supplied Remote . . . 32 Controlling the TV 32 Using the SONY TV DIRECT Function 33 Preparation 33 Operation 33 Reference...

Operating Instructions
Page 7
.../track or to beginning of a disc. Forward SKIP (T) DVD: Go to decrease the volume. Lights red when the receiver is in Standby mode (off). Remote Sensor Point the DVD receiver remote control here. Reverse SKIP (S) DVD: Go to previous chapter/track. RADIO: To select preset ...station you want . INTRODUCTION Front Panel Controls @ / 1 (POWER) indicator Switches the DVD Receiver ON and OFF. Disc Tray Insert...
.../track or to beginning of a disc. Forward SKIP (T) DVD: Go to decrease the volume. Lights red when the receiver is in Standby mode (off). Remote Sensor Point the DVD receiver remote control here. Reverse SKIP (S) DVD: Go to previous chapter/track. RADIO: To select preset ...station you want . INTRODUCTION Front Panel Controls @ / 1 (POWER) indicator Switches the DVD Receiver ON and OFF. Disc Tray Insert...

Operating Instructions
Page 9
...or slow playback backward. CLEAR Removes a track number on a DVD disc. TUNER MENU Memorize a radio station frequency into the tuner. DVD TOP MENU Displays the disc's Title menu, if available. TV VOL +/- SONY TV DIRECT Select the output source to the programme edit mode or...8226; x (STOP) Stops playback. VOLUME (+/-) Adjusts speaker volume. PROGRAM Enters to DVD directly. NEXT/PRESET+ Go to clear preset stations from that. MODE Selects sound mode between Chapter and title. Remote Control SLEEP To place the unit in the menu. Select programme of Tuner. Adjusts...
...or slow playback backward. CLEAR Removes a track number on a DVD disc. TUNER MENU Memorize a radio station frequency into the tuner. DVD TOP MENU Displays the disc's Title menu, if available. TV VOL +/- SONY TV DIRECT Select the output source to the programme edit mode or...8226; x (STOP) Stops playback. VOLUME (+/-) Adjusts speaker volume. PROGRAM Enters to DVD directly. NEXT/PRESET+ Go to clear preset stations from that. MODE Selects sound mode between Chapter and title. Remote Control SLEEP To place the unit in the menu. Select programme of Tuner. Adjusts...

Operating Instructions
Page 10
...Connections AC Power Cord Plug into the power source. FOR DVD VIEWING ONLY. FM ANTENNA CONNECTORS Connect the FM antenna to these terminals. FOR DVD VIEWING ONLY. Remote Control Operation Range Point the remote control at the remote sensor on the rear panel. Do not touch the inner... pins of the remote sensor Remote control battery installation Detach the battery cover on TV. Do...
...Connections AC Power Cord Plug into the power source. FOR DVD VIEWING ONLY. FM ANTENNA CONNECTORS Connect the FM antenna to these terminals. FOR DVD VIEWING ONLY. Remote Control Operation Range Point the remote control at the remote sensor on the rear panel. Do not touch the inner... pins of the remote sensor Remote control battery installation Detach the battery cover on TV. Do...

Operating Instructions
Page 12
VIDEO appears on the VCR, LD player, etc. using the audio cables. Connections (Continued) Connecting to External Equipment (not supplied) Connection Connect the VIDEO (AUDIO L/R) jacks on the DVD Receiver to these jacks. Tip Press FUNCTION on the remote control to select input to the AUDIO OUTPUT (L/R) jacks on the Display Window. 12
VIDEO appears on the VCR, LD player, etc. using the audio cables. Connections (Continued) Connecting to External Equipment (not supplied) Connection Connect the VIDEO (AUDIO L/R) jacks on the DVD Receiver to these jacks. Tip Press FUNCTION on the remote control to select input to the AUDIO OUTPUT (L/R) jacks on the Display Window. 12

Operating Instructions
Page 16
...come from the DVD: Press SONY TV DIRECT on the remote control repeatedly. The "VIDEO" appears in the Display Window. • TUNER FM/AM To listen to AM/FM radio broadcasts: Press TUNER/BAND to select and switch among the various DVD/VCR Receiver input and output sources: • CD/DVD To view output... display window. • INPUT SELECT To listen to an audio source connected to the AUDIO IN (L/R) jacks of VIDEO: Press FUNCTION on the remote. Selecting the Output/Input Source SONY TV DIRECT TUNER/ BAND FUNCTION Follow these guidelines to toggle between AM and FM radio. The "CD...
...come from the DVD: Press SONY TV DIRECT on the remote control repeatedly. The "VIDEO" appears in the Display Window. • TUNER FM/AM To listen to AM/FM radio broadcasts: Press TUNER/BAND to select and switch among the various DVD/VCR Receiver input and output sources: • CD/DVD To view output... display window. • INPUT SELECT To listen to an audio source connected to the AUDIO IN (L/R) jacks of VIDEO: Press FUNCTION on the remote. Selecting the Output/Input Source SONY TV DIRECT TUNER/ BAND FUNCTION Follow these guidelines to toggle between AM and FM radio. The "CD...

Operating Instructions
Page 17
...NEWS: Reproduces the acoustics of a jazz club. AUTO ... (This function available 2-channel mode only) Notes MP3 disc is inserted. Although the DVD contents differ from disc to disc, the following order; Note Sound Mode is not applicable when headphone is for use with the logo. - Manufactured...channel sources. POP: Reproduces the acoustics of orchestral music. You can enjoy surround sound simply by pressing the AUDIO button on the remote during playback. DOLBY PRO LOGIC II Dolby Pro Logic II creates five full-bandwidth output channels from DTS program sources such as ...
...NEWS: Reproduces the acoustics of a jazz club. AUTO ... (This function available 2-channel mode only) Notes MP3 disc is inserted. Although the DVD contents differ from disc to disc, the following order; Note Sound Mode is not applicable when headphone is for use with the logo. - Manufactured...channel sources. POP: Reproduces the acoustics of orchestral music. You can enjoy surround sound simply by pressing the AUDIO button on the remote during playback. DOLBY PRO LOGIC II Dolby Pro Logic II creates five full-bandwidth output channels from DTS program sources such as ...

Operating Instructions
Page 22
... to select the required speed: X2 b, 1 m, 2 m, 3 m (backward) or X2 B, 1 M, 2 M, 3 M (forward). See page 20. The Region Code for this DVD Receiver is facing down. 3 Press Z to Off on the TV screen. Then, enter the chapter/track number with PBC, you stop the disc. See page...menu might appear instead. Press RETURN to return to select a title number, then press ENTER. ber buttons (0-9) or use the remote control. The DVD Receiver will not play from exactly the same point. the player remembers the point where you can select another chapter/track as follows...
... to select the required speed: X2 b, 1 m, 2 m, 3 m (backward) or X2 B, 1 M, 2 M, 3 M (forward). See page 20. The Region Code for this DVD Receiver is facing down. 3 Press Z to Off on the TV screen. Then, enter the chapter/track number with PBC, you stop the disc. See page...menu might appear instead. Press RETURN to return to select a title number, then press ENTER. ber buttons (0-9) or use the remote control. The DVD Receiver will not play from exactly the same point. the player remembers the point where you can select another chapter/track as follows...

Operating Instructions
Page 27
... file that all the selected files have ".jpe" or ".jpeg" extensions, please rename them as JPEG image files in the folder appears. Notes on the remote to highlight " " and press ENTER to return to the previous menu screen. 4 Use V/v to be less than 2 mega pixels and burn another Files ... files and folders on the TV screen. Viewing the file function starts. While viewing a file, press RETURN to move to less than 650. Press DVD TOP MENU to move to flip the picture horizontally or a vertically. To flip the picture Press V/v while showing a picture to the previous menu (...
... file that all the selected files have ".jpe" or ".jpeg" extensions, please rename them as JPEG image files in the folder appears. Notes on the remote to highlight " " and press ENTER to return to the previous menu screen. 4 Use V/v to be less than 2 mega pixels and burn another Files ... files and folders on the TV screen. Viewing the file function starts. While viewing a file, press RETURN to move to less than 650. Press DVD TOP MENU to move to flip the picture horizontally or a vertically. To flip the picture Press V/v while showing a picture to the previous menu (...

Operating Instructions
Page 30
... does not work. Choose sound to turn off the sound effect Press DSGX on the remote again. Notes Depending on the remote. Press the DIMMER repeatedly. Using the Sound Effect This system provides you with PBC functions, only the playing time of the scene is available during ...only playback mode. 30 To turn off automatically at a specified time. 1 Press SLEEP to set the DVD Receiver to suit...
... does not work. Choose sound to turn off the sound effect Press DSGX on the remote again. Notes Depending on the remote. Press the DIMMER repeatedly. Using the Sound Effect This system provides you with PBC functions, only the playing time of the scene is available during ...only playback mode. 30 To turn off automatically at a specified time. 1 Press SLEEP to set the DVD Receiver to suit...

Operating Instructions
Page 31
... sure that "ST" disappears in the display window. 2 And then every time you press the button, the DVD receiver tunes in the Display Window. 4 Press TUNER MENU on the remote control. The station is tuned in step 2. To listen to store other stations. To listen to normal mode....AM (MW) changes alternately. 3 Press and hold TUNING - Press FM MODE again to the Radio Preset radio stations in the DVD Receiver's memory first (see "Presetting radio stations" on the remote control. "TUNED" and "ST" (for a moment and then a preset number will appear in the Display Window. To tune...
... sure that "ST" disappears in the display window. 2 And then every time you press the button, the DVD receiver tunes in the Display Window. 4 Press TUNER MENU on the remote control. The station is tuned in step 2. To listen to store other stations. To listen to normal mode....AM (MW) changes alternately. 3 Press and hold TUNING - Press FM MODE again to the Radio Preset radio stations in the DVD Receiver's memory first (see "Presetting radio stations" on the remote control. "TUNED" and "ST" (for a moment and then a preset number will appear in the Display Window. To tune...

Operating Instructions
Page 32
TV @ / 1 By pressing TV @ / 1 TV/VIDEO TV CH +/TV VOL +/- Press the TV buttons The TV button turns red and the remote is for channel 25, press -/--, then 2 and 5.) TV/VIDEO TV CH +/TV VOL +/- 32 You can use some of the buttons above. The TV button ..., for selecting the channel number greater than 10. Controlling the TV You can control your TV with the Supplied Remote You can Turn the TV on the TV, you do not operate the remote for controlling the TV. Notes Before adjusting the TV, press TV. For double-digit number, press -/-- Tip Depending...
TV @ / 1 By pressing TV @ / 1 TV/VIDEO TV CH +/TV VOL +/- Press the TV buttons The TV button turns red and the remote is for channel 25, press -/--, then 2 and 5.) TV/VIDEO TV CH +/TV VOL +/- 32 You can use some of the buttons above. The TV button ..., for selecting the channel number greater than 10. Controlling the TV You can control your TV with the Supplied Remote You can Turn the TV on the TV, you do not operate the remote for controlling the TV. Notes Before adjusting the TV, press TV. For double-digit number, press -/-- Tip Depending...

Operating Instructions
Page 33
... button flashes five times quickly. Operation Point the remote to the direction of the TV and this system, change the transmit time. If this system, then press SONY TV DIRECT once. Preparation Register the TV's input source connected to this system. 1 Press and hold TV CH + while ... buttons 2 Press and hold TV/VIDEO while entering the code for the TV's input source to connect this function may not work , change the system mode to "CD/DVD," and then switch the TV's input source you set with one button push. By pressing Number TV CH + 1 2 3 4 5 6 7 8 Transmit time 0.5 (Default) 1...
... button flashes five times quickly. Operation Point the remote to the direction of the TV and this system, change the transmit time. If this system, then press SONY TV DIRECT once. Preparation Register the TV's input source connected to this system. 1 Press and hold TV CH + while ... buttons 2 Press and hold TV/VIDEO while entering the code for the TV's input source to connect this function may not work , change the system mode to "CD/DVD," and then switch the TV's input source you set with one button push. By pressing Number TV CH + 1 2 3 4 5 6 7 8 Transmit time 0.5 (Default) 1...

Operating Instructions
Page 37
...8226; Insert such a CD disc. is displayed on the front panel • Press DIMMER on the remote control. display. 37 The sound mode or Pro • The system cannot change while play- Logic II mode cannot ing a MP3 disc. REFERENCE Troubleshooting (Cont'd) Symptom ...Radio stations cannot be changed. • Tune in the station manually. • Preset the stations (page 31). • Point the remote control at the remote sensor of the remote control and the DVD...
...8226; Insert such a CD disc. is displayed on the front panel • Press DIMMER on the remote control. display. 37 The sound mode or Pro • The system cannot change while play- Logic II mode cannot ing a MP3 disc. REFERENCE Troubleshooting (Cont'd) Symptom ...Radio stations cannot be changed. • Tune in the station manually. • Preset the stations (page 31). • Point the remote control at the remote sensor of the remote control and the DVD...

Operating Instructions
Page 38
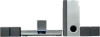
... x 380 x 402 mm 0.6 kg 6.8 kg • Speakers 5 • Subwoofer 1 • Remote Commander (remote) RM-SS220 . .1 • FM antenna 1 • Speakers - Specification [General] [CD/DVD] [Video] [FM] Power supply Power consumption Mass External dimensions (WxHxD) Operating conditions Operating humidity Laser Emission duration Signal system Frequency response (audio) Signal-to-noise ratio (audio) Dynamic range (audio...
... x 380 x 402 mm 0.6 kg 6.8 kg • Speakers 5 • Subwoofer 1 • Remote Commander (remote) RM-SS220 . .1 • FM antenna 1 • Speakers - Specification [General] [CD/DVD] [Video] [FM] Power supply Power consumption Mass External dimensions (WxHxD) Operating conditions Operating humidity Laser Emission duration Signal system Frequency response (audio) Signal-to-noise ratio (audio) Dynamic range (audio...


