Operating Instructions
Page 4
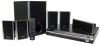
... Discs 5 Getting Started Step 1: Positioning the System ...10 Step 2: Connecting the System ...13 Step 3: Performing the Quick Setup 21 Step 4: Enjoying Sound from all the Speakers 24 Sound Adjustment Enjoying Surround Sound by Using Decoding Mode 26 Selecting the Sound Mode 28 Enjoying Multiplex Broadcast Sound ... 28 Disc Playing a Disc 29...
... Discs 5 Getting Started Step 1: Positioning the System ...10 Step 2: Connecting the System ...13 Step 3: Performing the Quick Setup 21 Step 4: Enjoying Sound from all the Speakers 24 Sound Adjustment Enjoying Surround Sound by Using Decoding Mode 26 Selecting the Sound Mode 28 Enjoying Multiplex Broadcast Sound ... 28 Disc Playing a Disc 29...
Operating Instructions
Page 8
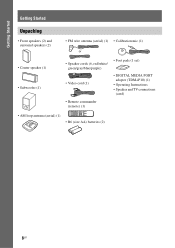
Getting Started Getting Started Unpacking • Front speakers (2) and surround speakers (2) • FM wire antenna (aerial) (1) • Calibration mic (1) or • Center speaker (1) • Subwoofer (1) • Speaker cords (6, red/white/ green/gray/blue/purple) • Foot pads (1 set) • Video cord (1) • DIGITAL MEDIA PORT adapter (TDM-iP10) (1) • Operating Instructions • Speaker and TV connections (card) • Remote commander (remote) (1) • AM loop antenna (aerial) (1) • R6 (size AA) batteries (2) 8US
Getting Started Getting Started Unpacking • Front speakers (2) and surround speakers (2) • FM wire antenna (aerial) (1) • Calibration mic (1) or • Center speaker (1) • Subwoofer (1) • Speaker cords (6, red/white/ green/gray/blue/purple) • Foot pads (1 set) • Video cord (1) • DIGITAL MEDIA PORT adapter (TDM-iP10) (1) • Operating Instructions • Speaker and TV connections (card) • Remote commander (remote) (1) • AM loop antenna (aerial) (1) • R6 (size AA) batteries (2) 8US

Operating Instructions
Page 10
... than the subwoofer should be placed from 0.9 to 6.9 meters (3 to the front speakers. Dusty or dirty - Subject to the speakers on the speaker, as the speaker may result. • Do not use any type of the speakers, Sony recommends that are: - Place the system as staining or discoloration may fall down. Extremely hot or cold - D E Note...
... than the subwoofer should be placed from 0.9 to 6.9 meters (3 to the front speakers. Dusty or dirty - Subject to the speakers on the speaker, as the speaker may result. • Do not use any type of the speakers, Sony recommends that are: - Place the system as staining or discoloration may fall down. Extremely hot or cold - D E Note...

Operating Instructions
Page 11
...13/32 inch) Hole on the speakers: the speaker cord with the color tube to 3, and the speaker cord without the color tube to the appropriate terminals on the back of the speaker Rear of the speaker 11US Be sure to match the speaker cords to #. See the illustrations ... mm (7/32 inch) 10 mm (13/32 inch) Hole on the back of the speaker 2 Fasten the screws to the speaker. Color tube Front speaker (L): White Front speaker (R): Red Center speaker: Green Surround speaker (L): Blue Surround speaker (R): Gray 1 Prepare screws (not supplied) that are suitable for the hole on the back...
...13/32 inch) Hole on the speakers: the speaker cord with the color tube to 3, and the speaker cord without the color tube to the appropriate terminals on the back of the speaker Rear of the speaker 11US Be sure to match the speaker cords to #. See the illustrations ... mm (7/32 inch) 10 mm (13/32 inch) Hole on the back of the speaker 2 Fasten the screws to the speaker. Color tube Front speaker (L): White Front speaker (R): Red Center speaker: Green Surround speaker (L): Blue Surround speaker (R): Gray 1 Prepare screws (not supplied) that are suitable for the hole on the back...

Operating Instructions
Page 12
Getting Started Note • Use screws that are suitable for accident or damage caused by improper installation, insufficient wall strength or improper screw installation, natural calamity, etc. 12US As a plaster board wall is especially fragile, attach the screws securely to a beam and fasten them to be used. • Sony is applied. • Contact a screw shop or installer regarding the wall material or screws to the wall. Install the speakers on a vertical and flat wall where reinforcement is not responsible for the wall material and strength.
Getting Started Note • Use screws that are suitable for accident or damage caused by improper installation, insufficient wall strength or improper screw installation, natural calamity, etc. 12US As a plaster board wall is especially fragile, attach the screws securely to a beam and fasten them to be used. • Sony is applied. • Contact a screw shop or installer regarding the wall material or screws to the wall. Install the speakers on a vertical and flat wall where reinforcement is not responsible for the wall material and strength.
Operating Instructions
Page 13
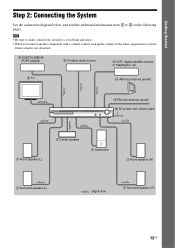
... 3 Portable audio source 3 VCR, digital satellite receiver, or PlayStation, etc. 2 TV 4 AM loop antenna (aerial) 4 FM wire antenna (aerial) 5 AC power cord (mains lead) 1 Front speaker (L) 1 Center speaker 1 Subwoofer 1 Front speaker (R) 1 Surround speaker (L) :Signal flow 1 Surround...
... 3 Portable audio source 3 VCR, digital satellite receiver, or PlayStation, etc. 2 TV 4 AM loop antenna (aerial) 4 FM wire antenna (aerial) 5 AC power cord (mains lead) 1 Front speaker (L) 1 Center speaker 1 Subwoofer 1 Front speaker (R) 1 Surround speaker (L) :Signal flow 1 Surround...

Operating Instructions
Page 14
... AM SPEAKESRUBWOOFER CENTER To the center speaker (green) To the subwoofer (purple) To the surround speaker (L) (blue) To the surround speaker (R) (gray) FRONT R SPEAKESRUR R FRONT L SUR L To the front speaker (R) (red) To the front speaker (L) (white) 14US Be sure to match the speaker cords to the appropriate terminals on the speakers: the speaker cord with the color tube...
... AM SPEAKESRUBWOOFER CENTER To the center speaker (green) To the subwoofer (purple) To the surround speaker (L) (blue) To the surround speaker (R) (gray) FRONT R SPEAKESRUR R FRONT L SUR L To the front speaker (R) (red) To the front speaker (L) (white) 14US Be sure to match the speaker cords to the appropriate terminals on the speakers: the speaker cord with the color tube...
Operating Instructions
Page 15
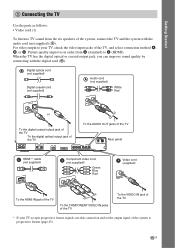
Picture quality improves in order from the six speakers of the system, connect the TV and the system with the digital cord (B). Digital optical cord (not supplied) Digital coaxial cord (not supplied) Audio cord (... OUT jacks of the TV To the digital coaxial output jack of the TV To the digital optical output jack of the TV SPEAKER FRONT R FRONT L SUR R SUR L SPEAKER CENTER SUBWOOFER DIGITAL IN COAXIAL OPTICAL TV/VIDEO HDMI OUT DC5V 0.7A MAX DMPORT Y PB/CB PR/CR COMPONENT VIDEO OUT R AUDIO IN...
Picture quality improves in order from the six speakers of the system, connect the TV and the system with the digital cord (B). Digital optical cord (not supplied) Digital coaxial cord (not supplied) Audio cord (... OUT jacks of the TV To the digital coaxial output jack of the TV To the digital optical output jack of the TV SPEAKER FRONT R FRONT L SUR R SUR L SPEAKER CENTER SUBWOOFER DIGITAL IN COAXIAL OPTICAL TV/VIDEO HDMI OUT DC5V 0.7A MAX DMPORT Y PB/CB PR/CR COMPONENT VIDEO OUT R AUDIO IN...
Operating Instructions
Page 17
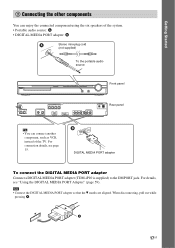
...(page 59). For details, see page 15. A 17US Getting Started 3 Connecting the other components You can enjoy the connected component using the six speakers of the system. • Portable audio source: A • DIGITAL MEDIA PORT adapter: B Stereo mini-plug cord (not supplied) To the ...portable audio source Front panel SPEAKER CENTER SUBWOOFER DIGITAL IN COAXIAL OPTICAL TV/VIDEO SPEAKER FRONT R FRONT L SUR R SUR L HDMI OUT DC5V 0.7A MAX DMPORT Y PB/CB PR/CR COMPONENT VIDEO OUT R ...
...(page 59). For details, see page 15. A 17US Getting Started 3 Connecting the other components You can enjoy the connected component using the six speakers of the system. • Portable audio source: A • DIGITAL MEDIA PORT adapter: B Stereo mini-plug cord (not supplied) To the ...portable audio source Front panel SPEAKER CENTER SUBWOOFER DIGITAL IN COAXIAL OPTICAL TV/VIDEO SPEAKER FRONT R FRONT L SUR R SUR L HDMI OUT DC5V 0.7A MAX DMPORT Y PB/CB PR/CR COMPONENT VIDEO OUT R ...
Operating Instructions
Page 18
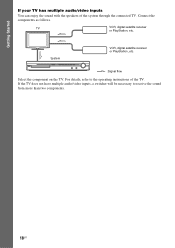
Connect the components as follows. Getting Started If your TV has multiple audio/video inputs You can enjoy the sound with the speakers of the TV. If the TV does not have multiple audio/video inputs, a switcher will be necessary to the operating instructions of the system through the connected TV. For details, refer to receive the sound from more than two components. 18US System VCR, digital satellite receiver or PlayStation, etc. :Signal flow Select the component on the TV. TV VCR, digital satellite receiver or PlayStation, etc.
Connect the components as follows. Getting Started If your TV has multiple audio/video inputs You can enjoy the sound with the speakers of the TV. If the TV does not have multiple audio/video inputs, a switcher will be necessary to the operating instructions of the system through the connected TV. For details, refer to receive the sound from more than two components. 18US System VCR, digital satellite receiver or PlayStation, etc. :Signal flow Select the component on the TV. TV VCR, digital satellite receiver or PlayStation, etc.
Operating Instructions
Page 19
... DIGITAL IN COAXIAL OPTICAL TV/VIDEO SPEAKER FRONT R FRONT L SUR R SUR L HDMI OUT DC5V 0.7A MAX DMPORT Y PB/CB PR/CR COMPONENT VIDEO OUT R AUDIO IN L VIDEO OUT TV/VIDEO ANTENNA COAXIAL ...
... DIGITAL IN COAXIAL OPTICAL TV/VIDEO SPEAKER FRONT R FRONT L SUR R SUR L HDMI OUT DC5V 0.7A MAX DMPORT Y PB/CB PR/CR COMPONENT VIDEO OUT R AUDIO IN L VIDEO OUT TV/VIDEO ANTENNA COAXIAL ...
Operating Instructions
Page 20
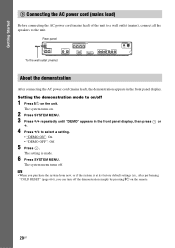
... "COLD RESET" (page 66)), you purchase the system from new, or if the system is made. 6 Press SYSTEM MENU. Rear panel SPEAKER CENTER SUBWOOFER DIGITAL IN COAXIAL OPTICAL TV/VIDEO SPEAKER FRONT R FRONT L SUR R SUR L HDMI OUT DC5V 0.7A MAX DMPORT To the wall outlet (mains) Y PB/CB PR/CR COMPONENT VIDEO... 5 Connecting the AC power cord (mains lead) Before connecting the AC power cord (mains lead) of the unit to a wall outlet (mains), connect all the speakers to the unit.
... "COLD RESET" (page 66)), you purchase the system from new, or if the system is made. 6 Press SYSTEM MENU. Rear panel SPEAKER CENTER SUBWOOFER DIGITAL IN COAXIAL OPTICAL TV/VIDEO SPEAKER FRONT R FRONT L SUR R SUR L HDMI OUT DC5V 0.7A MAX DMPORT To the wall outlet (mains) Y PB/CB PR/CR COMPONENT VIDEO... 5 Connecting the AC power cord (mains lead) Before connecting the AC power cord (mains lead) of the unit to a wall outlet (mains), connect all the speakers to the unit.
Operating Instructions
Page 21
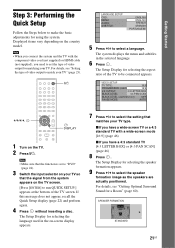
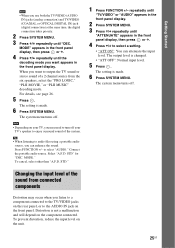
...FRENCH SPANISH PORTUGUESE 5 Press X/x to be connected appears. The Setup Display for selecting the aspect ratio of the TV to select a language. SPEAKER FORMATION STANDARD 21US For details, see "Getting Optimal Surround Sound for matching your TV. If this message does not appear, recall the Quick ...your TV so that the signal from the system appears on -screen display appears. 7 Press X/x to make the basic adjustments for selecting the speaker formation appears. 9 Press C/c to run QUICK SETUP.] appears at the bottom of video output for a Room" (page 60). The Setup Display...
...FRENCH SPANISH PORTUGUESE 5 Press X/x to be connected appears. The Setup Display for selecting the aspect ratio of the TV to select a language. SPEAKER FORMATION STANDARD 21US For details, see "Getting Optimal Surround Sound for matching your TV. If this message does not appear, recall the Quick ...your TV so that the signal from the system appears on -screen display appears. 7 Press X/x to make the basic adjustments for selecting the speaker formation appears. 9 Press C/c to run QUICK SETUP.] appears at the bottom of video output for a Room" (page 60). The Setup Display...
Operating Instructions
Page 22
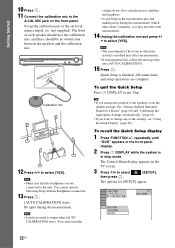
... 1 Press FUNCTION +/- Note • Make sure that the headphones are complete. Be quiet during the measurement (which the system is in any of the speakers, reset the speaker settings. See "Getting Optimal Surround Sound for [SETUP] appear. 94( 99) 1( 1) T 0: 01: 08 DVD VIDEO CUSTOM CUSTOM QUICK 22US Quick Setup is output when... of the room in the measurement area and making noise during the measurement. You cannot turn the volume down. Note • The environment of each speaker should face the calibration mic, and there should be no obstruction between the...
... 1 Press FUNCTION +/- Note • Make sure that the headphones are complete. Be quiet during the measurement (which the system is in any of the speakers, reset the speaker settings. See "Getting Optimal Surround Sound for [SETUP] appear. 94( 99) 1( 1) T 0: 01: 08 DVD VIDEO CUSTOM CUSTOM QUICK 22US Quick Setup is output when... of the room in the measurement area and making noise during the measurement. You cannot turn the volume down. Note • The environment of each speaker should face the calibration mic, and there should be no obstruction between the...
Operating Instructions
Page 24
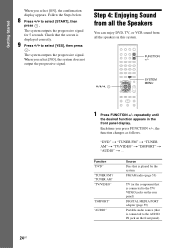
... . Getting Started When you select [NO], the system does not output the progressive signal. Step 4: Enjoying Sound from all the Speakers You can enjoy DVD, TV, or VCR sound from all the speakers in the front panel display. When you select [ON], the confirmation display appears. Each time you press FUNCTION +/-, the...
... . Getting Started When you select [NO], the system does not output the progressive signal. Step 4: Enjoying Sound from all the Speakers You can enjoy DVD, TV, or VCR sound from all the speakers in the front panel display. When you select [ON], the confirmation display appears. Each time you press FUNCTION +/-, the...
Operating Instructions
Page 25
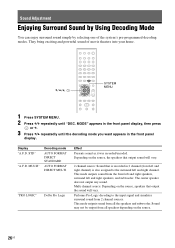
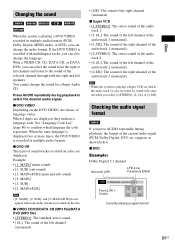
... turns off . Changing the input level of the system. For details, see page 26. 5 Press . to enjoy surround sound of the sound from the six speakers, select the "PRO LOGIC," "PLII MOVIE," or "PLII MUSIC" decoding mode. STD" for "DEC. repeatedly until "TV/VIDEO" or "AUDIO" appears in the front panel... source, you want to output the TV sound or stereo sound of a 2 channel source from connected components Distortion may need to turn off your TV's speaker to select "AUDIO." The system menu turns off . To cancel, select other than "A.F.D.
... turns off . Changing the input level of the system. For details, see page 26. 5 Press . to enjoy surround sound of the sound from the six speakers, select the "PRO LOGIC," "PLII MOVIE," or "PLII MUSIC" decoding mode. STD" for "DEC. repeatedly until "TV/VIDEO" or "AUDIO" appears in the front panel... source, you want to output the TV sound or stereo sound of a 2 channel source from connected components Distortion may need to turn off your TV's speaker to select "AUDIO." The system menu turns off . To cancel, select other than "A.F.D.
Operating Instructions
Page 26
... Multi channel source: Depending on the source, the speakers that output sound will vary. 2 channel source: Sound that output the sound will vary. This mode outputs sound from all the speakers and subwoofer. Depending on the source, speakers that is also assigned to the input signal and ...simulates surround sound from the front left and right speakers, surround left and right channel. The center speaker does not output any sound. Performs Pro Logic decoding to the surround left and right speakers, and subwoofer. They bring exciting and powerful sound of the ...
... Multi channel source: Depending on the source, the speakers that output sound will vary. 2 channel source: Sound that output the sound will vary. This mode outputs sound from all the speakers and subwoofer. Depending on the source, speakers that is also assigned to the input signal and ...simulates surround sound from the front left and right speakers, surround left and right channel. The center speaker does not output any sound. Performs Pro Logic decoding to the surround left and right speakers, and subwoofer. They bring exciting and powerful sound of the ...

Operating Instructions
Page 27
... not be output from 2 channel sources. Performs Pro Logic II music mode decoding to 2 channels. Outputs the sound from headphone left and right speakers and subwoofer. To turn the surround effect off . Note • When the input signal is multi channel source, "PRO LOGIC," "PLII MOVIE...VIRTUAL 4 Press . STD" or "2CH STEREO" for "DEC. The system menu turns off Select "A.F.D. This mode outputs sound from all the speakers and subwoofer. MULTI," the surround or stereo effect may not be effective. The setting is ideal for normal stereo sources such as surround from ...
... not be output from 2 channel sources. Performs Pro Logic II music mode decoding to 2 channels. Outputs the sound from headphone left and right speakers and subwoofer. To turn the surround effect off . Note • When the input signal is multi channel source, "PRO LOGIC," "PLII MOVIE...VIRTUAL 4 Press . STD" or "2CH STEREO" for "DEC. The system menu turns off Select "A.F.D. This mode outputs sound from all the speakers and subwoofer. MULTI," the surround or stereo effect may not be effective. The setting is ideal for normal stereo sources such as surround from ...
Operating Instructions
Page 31
With a VIDEO CD, CD, DATA CD, or DATA DVD, you can select the sound from the right or left speakers. When the same language is displayed two or more times, the DVD VIDEO is recorded in multiple audio formats (PCM, Dolby Digital, MPEG audio, or ...
With a VIDEO CD, CD, DATA CD, or DATA DVD, you can select the sound from the right or left speakers. When the same language is displayed two or more times, the DVD VIDEO is recorded in multiple audio formats (PCM, Dolby Digital, MPEG audio, or ...
Operating Instructions
Page 39
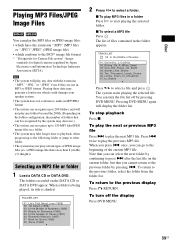
... MP3 files or JPEG image files: • which have the extension ".MP3" (MP3 file) or ".JPG"/".JPEG" (JPEG image file) • which could damage your speaker system. • The system does not conform to audio in MP3PRO format. • The system can recognize up to 150 MP3 files/JPEG image files...
... MP3 files or JPEG image files: • which have the extension ".MP3" (MP3 file) or ".JPG"/".JPEG" (JPEG image file) • which could damage your speaker system. • The system does not conform to audio in MP3PRO format. • The system can recognize up to 150 MP3 files/JPEG image files...


