Operating Instructions
Page 15
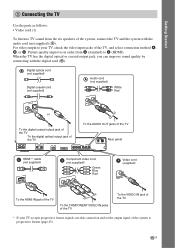
...IN OPTICAL COAXIATLV/VIDEO or R AUDIO IN TV/VIDEO L To the AUDIO OUT jacks of the TV To the digital coaxial output jack of the TV To the digital optical output jack of the TV SPEAKER FRONT R FRONT L SUR R SUR L SPEAKER CENTER SUBWOOFER DIGITAL IN COAXIAL OPTICAL TV/VIDEO ...Video cord (1) To listen to TV sound from A (standard) to progressive format (page 23). 15US For video output to your TV accepts progressive format signals, use this connection and set the output signal of the system, connect the TV and the system with the digital cord (B). When the TV has the...
...IN OPTICAL COAXIATLV/VIDEO or R AUDIO IN TV/VIDEO L To the AUDIO OUT jacks of the TV To the digital coaxial output jack of the TV To the digital optical output jack of the TV SPEAKER FRONT R FRONT L SUR R SUR L SPEAKER CENTER SUBWOOFER DIGITAL IN COAXIAL OPTICAL TV/VIDEO ...Video cord (1) To listen to TV sound from A (standard) to progressive format (page 23). 15US For video output to your TV accepts progressive format signals, use this connection and set the output signal of the system, connect the TV and the system with the digital cord (B). When the TV has the...

Operating Instructions
Page 16
... OUT jacks. • The system can connect another component, such as a VCR, digital satellite receiver, or PlayStation, to the TV/VIDEO jacks (A or B) instead of output signal (page 23). Getting Started ** HDMI (High-Definition Multimedia Interface) If your TV has the HDMI jack, use this connection and select the type of...
... OUT jacks. • The system can connect another component, such as a VCR, digital satellite receiver, or PlayStation, to the TV/VIDEO jacks (A or B) instead of output signal (page 23). Getting Started ** HDMI (High-Definition Multimedia Interface) If your TV has the HDMI jack, use this connection and select the type of...
Operating Instructions
Page 21
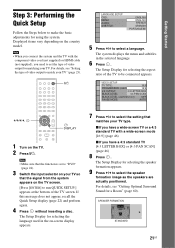
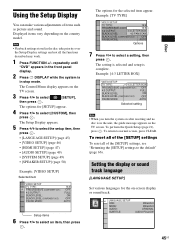
...perform again. 4 Press without inserting a disc. The Setup Display for using the system. For details, see "Setting the type of video output for selecting the aspect ratio of the TV screen. "/1 LANGUAGE SETUP OSD: MENU: AUDIO: SUBTITLE: ENGLISH ENGLISH FRENCH SPANISH PORTUGUESE 5 ...Surround Sound for selecting the language used in the selected language. 6 Press . VIDEO SETUP TV TYPE: 16:9 PROGRESSIVE (COMPONENT OUT): 16:9 4:3 OUTPUT: 4:3 LETTER BOX BLACK LEVEL: 4:3 PAN SCAN BLACK LEVEL (COMPONENT OUT): OFF PAUSE MODE: AUTO C/X/x/c, DISPLAY 1 Turn on the country model....
...perform again. 4 Press without inserting a disc. The Setup Display for using the system. For details, see "Setting the type of video output for selecting the aspect ratio of the TV screen. "/1 LANGUAGE SETUP OSD: MENU: AUDIO: SUBTITLE: ENGLISH ENGLISH FRENCH SPANISH PORTUGUESE 5 ...Surround Sound for selecting the language used in the selected language. 6 Press . VIDEO SETUP TV TYPE: 16:9 PROGRESSIVE (COMPONENT OUT): 16:9 4:3 OUTPUT: 4:3 LETTER BOX BLACK LEVEL: 4:3 PAN SCAN BLACK LEVEL (COMPONENT OUT): OFF PAUSE MODE: AUTO C/X/x/c, DISPLAY 1 Turn on the country model....
Operating Instructions
Page 22
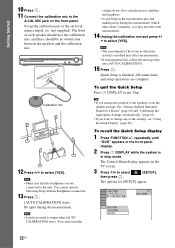
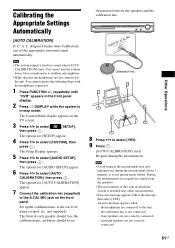
... during the measurement (which the system is in any of the room in the measurement area and making noise during the measurement. Quick Setup is output when [AUTO CALIBRATION] starts. To recall the Quick Setup display 1 Press FUNCTION +/- AUDIO IN / A.CAL MIC Calibration mic 12 Press C/c to change the position of...
... during the measurement (which the system is in any of the room in the measurement area and making noise during the measurement. Quick Setup is output when [AUTO CALIBRATION] starts. To recall the Quick Setup display 1 Press FUNCTION +/- AUDIO IN / A.CAL MIC Calibration mic 12 Press C/c to change the position of...
Operating Instructions
Page 23
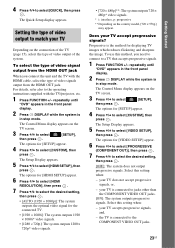
...appears in stop mode. The Control Menu display appears on the connection of the TV (page 15), select the type of video output of video output to select [CUSTOM], then press . your TV accept progressive signals? the TV is in the front panel display. 2 Press...] appear. 6 Press X/x to select [HDMI RESOLUTION], then press . 7 Press X/x to select the desired setting, then press . [OFF]: The system does not output progressive signals. The options for [VIDEO SETUP] appear. 6 Press X/x to select [PROGRESSIVE (COMPONENT OUT)], then press . 7 Press X/x to select the desired setting,...
...appears in stop mode. The Control Menu display appears on the connection of the TV (page 15), select the type of video output of video output to select [CUSTOM], then press . your TV accept progressive signals? the TV is in the front panel display. 2 Press...] appear. 6 Press X/x to select [HDMI RESOLUTION], then press . 7 Press X/x to select the desired setting, then press . [OFF]: The system does not output progressive signals. The options for [VIDEO SETUP] appear. 6 Press X/x to select [PROGRESSIVE (COMPONENT OUT)], then press . 7 Press X/x to select the desired setting,...
Operating Instructions
Page 24
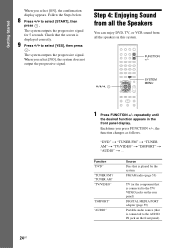
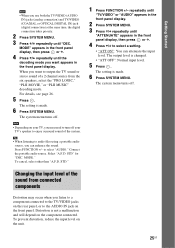
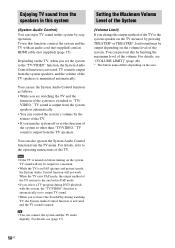
...follows. X/x/c, SYSTEM MENU 24US 1 Press FUNCTION +/- Check that is displayed correctly. 9 Press C/c to select [YES], then press . FUNCTION +/- The system outputs the progressive signal for 5 seconds. repeatedly until the desired function appears in this system. Follow the Steps below. 8 Press C/c to the AUDIO IN jack on... the front panel) Each time you select [NO], the system does not output the progressive signal. Step 4: Enjoying Sound from all the Speakers You can enjoy DVD, TV, or VCR sound from all the speakers in...
...follows. X/x/c, SYSTEM MENU 24US 1 Press FUNCTION +/- Check that is displayed correctly. 9 Press C/c to select [YES], then press . FUNCTION +/- The system outputs the progressive signal for 5 seconds. repeatedly until the desired function appears in this system. Follow the Steps below. 8 Press C/c to the AUDIO IN jack on... the front panel) Each time you select [NO], the system does not output the progressive signal. Step 4: Enjoying Sound from all the Speakers You can enjoy DVD, TV, or VCR sound from all the speakers in...
Operating Instructions
Page 25
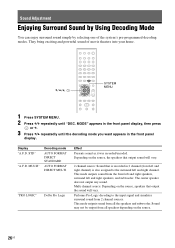
...front panel. Tip • When listening to select "AUDIO." to audio files using a portable audio source, you can attenuate the input level. The output level is made . 6 Press SYSTEM MENU. Changing the input level of the system. Getting Started Note • When you use both the TV... connection) at the same time, the digital connection takes priority. 2 Press SYSTEM MENU. 3 Press X/x repeatedly until the decoding mode you want to output the TV sound or stereo sound of a 2 channel source from connected components Distortion may occur when you listen to a component connected to the TV...
...front panel. Tip • When listening to select "AUDIO." to audio files using a portable audio source, you can attenuate the input level. The output level is made . 6 Press SYSTEM MENU. Changing the input level of the system. Getting Started Note • When you use both the TV... connection) at the same time, the digital connection takes priority. 2 Press SYSTEM MENU. 3 Press X/x repeatedly until the decoding mode you want to output the TV sound or stereo sound of a 2 channel source from connected components Distortion may occur when you listen to a component connected to the TV...
Operating Instructions
Page 26
...the source, the speakers that is also assigned to the input signal and simulates surround sound from all the speakers and subwoofer. This mode outputs sound from the front left and right speakers, surround left and right channel) is recorded in 2 channel (front left and right speakers,...decoding mode you want appears in the front panel display, then press or c. 3 Press X/x repeatedly until "DEC. The center speaker does not output any sound. Performs Pro Logic decoding to the surround left and right channel. They bring exciting and powerful sound of the system's pre-programmed ...
...the source, the speakers that is also assigned to the input signal and simulates surround sound from all the speakers and subwoofer. This mode outputs sound from the front left and right speakers, surround left and right channel) is recorded in 2 channel (front left and right speakers,...decoding mode you want appears in the front panel display, then press or c. 3 Press X/x repeatedly until "DEC. The center speaker does not output any sound. Performs Pro Logic decoding to the surround left and right channel. They bring exciting and powerful sound of the system's pre-programmed ...

Operating Instructions
Page 27
.... Effect Performs Pro Logic II movie mode decoding to 2 channels. Sound may not be output from 2 channel sources. This mode outputs sound from 2 channel sources. MODE." This mode outputs sound from headphone left and right. Multi channel surround formats are downmixed to the input signal...not be effective. • When you select "A.F.D. Multi channel surround formats are downmixed to the input signal and produces five full-bandwidth output channels from all the speakers and subwoofer. This mode is effective only when a multi channel source is input, "PRO LOGIC," "PLII...
.... Effect Performs Pro Logic II movie mode decoding to 2 channels. Sound may not be output from 2 channel sources. This mode outputs sound from 2 channel sources. MODE." This mode outputs sound from headphone left and right. Multi channel surround formats are downmixed to the input signal...not be effective. • When you select "A.F.D. Multi channel surround formats are downmixed to the input signal and produces five full-bandwidth output channels from all the speakers and subwoofer. This mode is effective only when a multi channel source is input, "PRO LOGIC," "PLII...

Operating Instructions
Page 28
... or "MUSIC" automatically to the unit with an optical or coaxial digital cord (page 15) and set the digital output mode of both the main and sub languages will be output. 28US Note • To receive the Dolby Digital signal, you connect headphones to Dolby Digital. Press AUDIO repeatedly until... the desired mode appears in the front panel display. • "MAIN": Sound of the main language will be output. • "SUB": Sound of the sub language will be output. • "MAIN+SUB": Mixed sound of the TV or other component to produce the sound effect depending on the...
... or "MUSIC" automatically to the unit with an optical or coaxial digital cord (page 15) and set the digital output mode of both the main and sub languages will be output. 28US Note • To receive the Dolby Digital signal, you connect headphones to Dolby Digital. Press AUDIO repeatedly until... the desired mode appears in the front panel display. • "MAIN": Sound of the main language will be output. • "SUB": Sound of the sub language will be output. • "MAIN+SUB": Mixed sound of the TV or other component to produce the sound effect depending on the...
Operating Instructions
Page 32
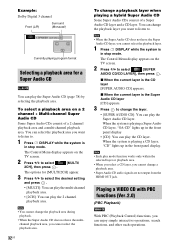
... the playback area. 32US To change the playback layer you want to listen to change a playback area. • Super Audio CD audio signals are not output from the HDMI OUT jack. The Control Menu display appears on the TV screen. 2 Press X/x to select the desired setting and press . • [MULTI]: You...
... the playback area. 32US To change the playback layer you want to listen to change a playback area. • Super Audio CD audio signals are not output from the HDMI OUT jack. The Control Menu display appears on the TV screen. 2 Press X/x to select the desired setting and press . • [MULTI]: You...
Operating Instructions
Page 45
...SETUP] (page 49) • [SPEAKER SETUP] (page 50) Example: [VIDEO SETUP] Selected item VIDEO SETUP TV TYPE: PROGRESSIVE (COMPONENT OUT): 4:3 OUTPUT: BLACK LEVEL: BLACK LEVEL (COMPONENT OUT): PAUSE MODE: 16:9 OFF FULL ON OFF AUTO Setup items 6 Press X/x to normal screen, press CLEAR. ...press . The options for the selected item appear. Example: [TV TYPE] VIDEO SETUP TV TYPE: 16:9 PROGRESSIVE (COMPONENT OUT): O16F:F9 4:3 OUTPUT: 4:3 LETTERFBUOLXL BLACK LEVEL: 4:3 PAN SACUATON BLACK LEVEL (COMPONENT OUT): OFF PAUSE MODE: AUTO Options 7 Press X/x to select [CUSTOM], then...
...SETUP] (page 49) • [SPEAKER SETUP] (page 50) Example: [VIDEO SETUP] Selected item VIDEO SETUP TV TYPE: PROGRESSIVE (COMPONENT OUT): 4:3 OUTPUT: BLACK LEVEL: BLACK LEVEL (COMPONENT OUT): PAUSE MODE: 16:9 OFF FULL ON OFF AUTO Setup items 6 Press X/x to normal screen, press CLEAR. ...press . The options for the selected item appear. Example: [TV TYPE] VIDEO SETUP TV TYPE: 16:9 PROGRESSIVE (COMPONENT OUT): O16F:F9 4:3 OUTPUT: 4:3 LETTERFBUOLXL BLACK LEVEL: 4:3 PAN SACUATON BLACK LEVEL (COMPONENT OUT): OFF PAUSE MODE: AUTO Options 7 Press X/x to select [CUSTOM], then...

Operating Instructions
Page 46
... then press . Settings for the disc's menu. For details, see "Does your TV accept progressive signals?" (page 23). [OFF]: The system outputs interlace signals. [ON]: The system outputs progressive signals. When you select [OTHERS t] in [MENU], [AUDIO], or [SUBTITLE] that is selected. x [MENU] (DVD VIDEO only) ... for the sound track. The confirmation display appears. 2 Press C/c to on the DVD VIDEO. VIDEO SETUP TV TYPE: PROGRESSIVE (COMPONENT OUT): 4:3 OUTPUT: BLACK LEVEL: BLACK LEVEL (COMPONENT OUT): PAUSE MODE: 16:9 OFF FULL ON OFF AUTO x [TV TYPE] You can switch the language of ...
... then press . Settings for the disc's menu. For details, see "Does your TV accept progressive signals?" (page 23). [OFF]: The system outputs interlace signals. [ON]: The system outputs progressive signals. When you select [OTHERS t] in [MENU], [AUDIO], or [SUBTITLE] that is selected. x [MENU] (DVD VIDEO only) ... for the sound track. The confirmation display appears. 2 Press C/c to on the DVD VIDEO. VIDEO SETUP TV TYPE: PROGRESSIVE (COMPONENT OUT): 4:3 OUTPUT: BLACK LEVEL: BLACK LEVEL (COMPONENT OUT): PAUSE MODE: 16:9 OFF FULL ON OFF AUTO x [TV TYPE] You can switch the language of ...

Operating Instructions
Page 47
.... [FRAME]: The picture, including subjects that is effective only when you set the black level of the image appears. 16:9 aspect ratio TV Note • [4:3 OUTPUT] is displayed correctly. 3 Press C/c to the standard level. [ON]: You can raise the standard black level. x [PAUSE MODE] (DVD VIDEO/DVD-R/ DVD-RW ...you can change the aspect ratio on your TV, change the setting on your TV, not the system. [FULL]: Select this and the setting is output in [VIDEO SETUP] to watch 4:3 aspect ratio signals. If you can adjust the aspect ratio to [16:9]. Disc You cannot select this when ...
.... [FRAME]: The picture, including subjects that is effective only when you set the black level of the image appears. 16:9 aspect ratio TV Note • [4:3 OUTPUT] is displayed correctly. 3 Press C/c to the standard level. [ON]: You can raise the standard black level. x [PAUSE MODE] (DVD VIDEO/DVD-R/ DVD-RW ...you can change the aspect ratio on your TV, change the setting on your TV, not the system. [FULL]: Select this and the setting is output in [VIDEO SETUP] to watch 4:3 aspect ratio signals. If you can adjust the aspect ratio to [16:9]. Disc You cannot select this when ...
Operating Instructions
Page 48
.../off. x [YCBCR/RGB (HDMI)] You can operate mutually between components that is set to 20. [OFF]: Off. You can select the type of HDMI signal output from the HDMI OUT jack even if you set [AUDIO (HDMI)] to [ON]. Note • When you connect the unit and TV with an HDMI...; If you select [(1920 × 1080i) HD ] or [(1920 × 1080i) HD], the next image appears after the black screen. • HDMI signal will be output depending on the volume level of the system. Note • [JPEG RESOLUTION] is connected to a component with a DVI jack, [RGB] signals will stop momentarily when...
.../off. x [YCBCR/RGB (HDMI)] You can operate mutually between components that is set to 20. [OFF]: Off. You can select the type of HDMI signal output from the HDMI OUT jack even if you set [AUDIO (HDMI)] to [ON]. Note • When you connect the unit and TV with an HDMI...; If you select [(1920 × 1080i) HD ] or [(1920 × 1080i) HD], the next image appears after the black screen. • HDMI signal will be output depending on the volume level of the system. Note • [JPEG RESOLUTION] is connected to a component with a DVI jack, [RGB] signals will stop momentarily when...

Operating Instructions
Page 51
... 1)0.9 to 6.9 meters for North American models. 2)0.0 to 6.9 meters for North American models. 3)When you perform the Quick Setup (page 21), the default settings are not output from the HDMI OUT jack. 51US Be sure to set [TEST TONE] to [ON] for easy adjustment. [L/R] 0.0 dB*: Set the surround speaker level. * This item...
... 1)0.9 to 6.9 meters for North American models. 2)0.0 to 6.9 meters for North American models. 3)When you perform the Quick Setup (page 21), the default settings are not output from the HDMI OUT jack. 51US Be sure to set [TEST TONE] to [ON] for easy adjustment. [L/R] 0.0 dB*: Set the surround speaker level. * This item...
Operating Instructions
Page 57
... movies and the sound is set for DVD input mode, and the system starts playing a disc automatically. Starts playing the disc and (System Audio Control) outputs the sound. Note • Before using the POWER button on the TV's remote or TV [/1 on the system's remote, the system turns off in...the operating instructions of the TV. • Depending on the status of the content may not be played back. • Depending on , the TV is output from the system's speaker automatically by pressing the disc tray. - You press A while the disc tray is correct, and set the function for [HDMI ...
... movies and the sound is set for DVD input mode, and the system starts playing a disc automatically. Starts playing the disc and (System Audio Control) outputs the sound. Note • Before using the POWER button on the TV's remote or TV [/1 on the system's remote, the system turns off in...the operating instructions of the TV. • Depending on the status of the content may not be played back. • Depending on , the TV is output from the system's speaker automatically by pressing the disc tray. - You press A while the disc tray is correct, and set the function for [HDMI ...
Operating Instructions
Page 58
... details, refer to the "TV/VIDEO" function, the System Audio Control function is in this system by pressing THEATER* or THEATRE*, loud sound may be output for a moment. • While the TV is activated. You can prevent this function, connect the system and the TV with the system, the "TV/VIDEO... in this system (System Audio Control) You can enjoy TV sound in PAP (picture and picture) mode, the System Audio Control function will not be output depending on the volume level of the TV. • If you activate One-Touch Play during DVD playback with an audio cord (not supplied) and...
... details, refer to the "TV/VIDEO" function, the System Audio Control function is in this system by pressing THEATER* or THEATRE*, loud sound may be output for a moment. • While the TV is activated. You can prevent this function, connect the system and the TV with the system, the "TV/VIDEO... in this system (System Audio Control) You can enjoy TV sound in PAP (picture and picture) mode, the System Audio Control function will not be output depending on the volume level of the TV. • If you activate One-Touch Play during DVD playback with an audio cord (not supplied) and...

Operating Instructions
Page 59
... or other compressed music using either the buttons on the remote or the unit. STD" for enjoying sound from the connected component are also output. The following illustration shows an example of buttons that can be able to the operating instructions of the DIGITAL MEDIA PORT adapter. 59US The... DIGITAL MEDIA PORT (DMPORT) adapter is for "DEC. By connecting a DIGITAL MEDIA PORT adapter, you may be used in this case, the system outputs the composite video signal only, regardless of the type of the connected component. repeatedly until "DMPORT" appears in each area.
... or other compressed music using either the buttons on the remote or the unit. STD" for enjoying sound from the connected component are also output. The following illustration shows an example of buttons that can be able to the operating instructions of the DIGITAL MEDIA PORT adapter. 59US The... DIGITAL MEDIA PORT (DMPORT) adapter is for "DEC. By connecting a DIGITAL MEDIA PORT adapter, you may be used in this case, the system outputs the composite video signal only, regardless of the type of the connected component. repeatedly until "DMPORT" appears in each area.
Operating Instructions
Page 61
C. Note • The system outputs a loud test sound when [AUTO CALIBRATION] starts. repeatedly until "DVD" appears in the front panel display. 2 Press DISPLAY while the system is in which the ... the calibration mic (supplied) to the A.CAL MIC jack on the TV screen. 3 Press X/x to select [SETUP], then press . During the measurement, test signals are output from the speakers. • The environment of each speaker should face the calibration mic, and there should be no obstruction between the speakers and the...
C. Note • The system outputs a loud test sound when [AUTO CALIBRATION] starts. repeatedly until "DVD" appears in the front panel display. 2 Press DISPLAY while the system is in which the ... the calibration mic (supplied) to the A.CAL MIC jack on the TV screen. 3 Press X/x to select [SETUP], then press . During the measurement, test signals are output from the speakers. • The environment of each speaker should face the calibration mic, and there should be no obstruction between the speakers and the...

