
Operating Instructions
Page 2
...use of optical instruments with this apparatus to them whenever you call upon your Sony dealer regarding this product, please contact your local Civic Office, your household waste... 2GB resources. Disposal of fire, do not place objects filled with separate collection systems) This symbol on the product or on the apparatus. Record the serial number ...in accordance with batteryinstalled to persons. Do not expose batteries or apparatus with the installation instructions. DAV-HDX285/DAV-HDX585 Serial No Date of Manufacture Marking is not disconnected from the mains, ...
...use of optical instruments with this apparatus to them whenever you call upon your Sony dealer regarding this product, please contact your local Civic Office, your household waste... 2GB resources. Disposal of fire, do not place objects filled with separate collection systems) This symbol on the product or on the apparatus. Record the serial number ...in accordance with batteryinstalled to persons. Do not expose batteries or apparatus with the installation instructions. DAV-HDX285/DAV-HDX585 Serial No Date of Manufacture Marking is not disconnected from the mains, ...

Operating Instructions
Page 3
... the ENERGY STAR® guidelines for your authority to operate this apparatus near any changes or modifications not expressly approved in a particular installation. Consult the dealer or an experienced radio/TV technician for a Class B digital device, pursuant to correct the interference by turning the...cloth. 7) Do not block any way, such as radiators, heat registers, stoves, or other . As an ENERGY STAR® partner, Sony Corporation has determined that produce heat. 9) Do not defeat the safety purpose of the following measures: - Servicing is required when the apparatus has...
... the ENERGY STAR® guidelines for your authority to operate this apparatus near any changes or modifications not expressly approved in a particular installation. Consult the dealer or an experienced radio/TV technician for a Class B digital device, pursuant to correct the interference by turning the...cloth. 7) Do not block any way, such as radiators, heat registers, stoves, or other . As an ENERGY STAR® partner, Sony Corporation has determined that produce heat. 9) Do not defeat the safety purpose of the following measures: - Servicing is required when the apparatus has...

Operating Instructions
Page 6
Table of Contents About These Operating Instructions ....... 4 About the S-AIR function 5 Playable Discs 7 Getting Started Step 1: Installing the System .......14 Step 2: Connecting the System ...25 Step 3: Performing the Quick Setup 33 Step 4: Selecting the Source .......36 Step 5: Enjoying Surround Sound 37 Disc ...Presetting Radio Stations 67 Listening to the Radio 68 Control for HDMI/External Audio Device Using the Control for HDMI Function for "BRAVIA" Sync 70 Using the DIGITAL MEDIA PORT Adapter 73 Using an S-AIR Product 74 Other Operations Getting Optimal Surround Sound for ...
Table of Contents About These Operating Instructions ....... 4 About the S-AIR function 5 Playable Discs 7 Getting Started Step 1: Installing the System .......14 Step 2: Connecting the System ...25 Step 3: Performing the Quick Setup 33 Step 4: Selecting the Source .......36 Step 5: Enjoying Surround Sound 37 Disc ...Presetting Radio Stations 67 Listening to the Radio 68 Control for HDMI/External Audio Device Using the Control for HDMI Function for "BRAVIA" Sync 70 Using the DIGITAL MEDIA PORT Adapter 73 Using an S-AIR Product 74 Other Operations Getting Optimal Surround Sound for ...
Operating Instructions
Page 14
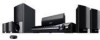
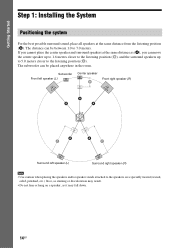
... left speaker (L) Surround right speaker (R) Note • Use caution when placing the speakers and/or speaker stands attached to 7.0 meters. Getting Started Step 1: Installing the System Positioning the system For the best possible surround sound, place all speakers at the same distance as (A), you cannot place the center speaker and surround speakers at...
... left speaker (L) Surround right speaker (R) Note • Use caution when placing the speakers and/or speaker stands attached to 7.0 meters. Getting Started Step 1: Installing the System Positioning the system For the best possible surround sound, place all speakers at the same distance as (A), you cannot place the center speaker and surround speakers at...

Operating Instructions
Page 16
...). 16GB Tip • You can use the speaker without the speaker stand by installing it on the floor to the SPEAKER jacks, see page 25. Getting Started Assembling the speakers (DAV-HDX585/DAV-HDX685 only) Before connecting the speakers, attach the speaker stand to the speaker. ...(For the front speakers of DAV-HDX585, and the front and surround speakers of DAV-HDX685) Use the parts as follows: DAV-HDX585 • Front speakers (2) • Speaker cords (2, red/white) • Posts (2) • Bases (2) • ...
...). 16GB Tip • You can use the speaker without the speaker stand by installing it on the floor to the SPEAKER jacks, see page 25. Getting Started Assembling the speakers (DAV-HDX585/DAV-HDX685 only) Before connecting the speakers, attach the speaker stand to the speaker. ...(For the front speakers of DAV-HDX585, and the front and surround speakers of DAV-HDX685) Use the parts as follows: DAV-HDX585 • Front speakers (2) • Speaker cords (2, red/white) • Posts (2) • Bases (2) • ...

Operating Instructions
Page 22
Getting Started Installing the speakers on the speakers: the speaker cord with the color tube to 3, and the speaker cord without the color tube to #. DAV-HDX285 For the center speaker 145 mm (5 3/4 inches) For the other speakers 8 to 10 mm (11/32 to 13/32 inch) 8 to 10 mm... screws to be used. • Use screws that are suitable for the wall material and strength. Before installing the speakers on a vertical and flat wall where reinforcement is applied. • Sony is especially fragile, attach the screws securely to the wall. Color tube Front left speaker (L): White Front ...
Getting Started Installing the speakers on the speakers: the speaker cord with the color tube to 3, and the speaker cord without the color tube to #. DAV-HDX285 For the center speaker 145 mm (5 3/4 inches) For the other speakers 8 to 10 mm (11/32 to 13/32 inch) 8 to 10 mm... screws to be used. • Use screws that are suitable for the wall material and strength. Before installing the speakers on a vertical and flat wall where reinforcement is applied. • Sony is especially fragile, attach the screws securely to the wall. Color tube Front left speaker (L): White Front ...

Operating Instructions
Page 34
... location. Note • Loud test sounds are actually positioned, then press . The Quick Setup display appears. The front of the speaker installation, perform the speaker settings manually by following "Settings for [SETUP] appear. 94( 99) 1( 1) T 0: 01: 08 DVD VIDEO... +/- Give consideration to select [YES], then press . [AUTO CALIBRATION] starts. repeatedly until "DVD" appears in which the system is installed may affect measurements. Calibration mic location, such as the speakers are output when [AUTO CALIBRATION] starts. All connections and setup operations...
... location. Note • Loud test sounds are actually positioned, then press . The Quick Setup display appears. The front of the speaker installation, perform the speaker settings manually by following "Settings for [SETUP] appear. 94( 99) 1( 1) T 0: 01: 08 DVD VIDEO... +/- Give consideration to select [YES], then press . [AUTO CALIBRATION] starts. repeatedly until "DVD" appears in which the system is installed may affect measurements. Calibration mic location, such as the speakers are output when [AUTO CALIBRATION] starts. All connections and setup operations...

Operating Instructions
Page 75
...sub unit to 3 above. When you perform [AUTO CALIBRATION]. Rear of the surround amplifier. 75GB The system turns on installing the wireless transceiver into the S-AIR sub unit For details on . 2 Press SYSTEM MENU. 3 Press X/x repeatedly until "S-AIR ID" appears in the front panel display. To insert the ...sub unit Tip • To confirm the current ID, perform Steps 1 to the same ID. Tip • When you change the S-AIR configuration, Sony recommends that you pair the unit with the S-AIR sub unit (page 77), "(PAIRING)" appears beside ID in the front panel display, then press ...
...sub unit to 3 above. When you perform [AUTO CALIBRATION]. Rear of the surround amplifier. 75GB The system turns on installing the wireless transceiver into the S-AIR sub unit For details on . 2 Press SYSTEM MENU. 3 Press X/x repeatedly until "S-AIR ID" appears in the front panel display. To insert the ...sub unit Tip • To confirm the current ID, perform Steps 1 to the same ID. Tip • When you change the S-AIR configuration, Sony recommends that you pair the unit with the S-AIR sub unit (page 77), "(PAIRING)" appears beside ID in the front panel display, then press ...

Operating Instructions
Page 80
... X/x to select [SETUP], then press . NO CENTER]: Select this when you install the front and surround speakers in stop mode. For better surround sound, Sony recommends that first you cannot install some speakers. The options for [AUDIO SETUP] appear. 6 Press X/x to select... [CUSTOM], then press . Follow the procedure from Step 7 of the speakers. 1 Press FUNCTION +/- repeatedly until "DVD" appears in the front panel display. 2 Press DISPLAY while the system...
... X/x to select [SETUP], then press . NO CENTER]: Select this when you install the front and surround speakers in stop mode. For better surround sound, Sony recommends that first you cannot install some speakers. The options for [AUDIO SETUP] appear. 6 Press X/x to select... [CUSTOM], then press . Follow the procedure from Step 7 of the speakers. 1 Press FUNCTION +/- repeatedly until "DVD" appears in the front panel display. 2 Press DISPLAY while the system...

Operating Instructions
Page 81
... not be no obstruction between the speakers and the calibration mic. x The measurement is in which the system is implemented. When you install the surround amplifier in the front panel display. 2 Press DISPLAY while the system is OK. The options for [AUTO CALIBRATION] appear. 7 Connect the calibration mic (supplied) to the A.CAL MIC...
... not be no obstruction between the speakers and the calibration mic. x The measurement is in which the system is implemented. When you install the surround amplifier in the front panel display. 2 Press DISPLAY while the system is OK. The options for [AUTO CALIBRATION] appear. 7 Connect the calibration mic (supplied) to the A.CAL MIC...

Operating Instructions
Page 90
... components with a high power amplifier. repeatedly to select "DVD." 2 Make sure that may condense on after 15 to your nearest Sony dealer. "MECHA LOCK" and "UNPLUG" appear alternately in a place subject to prevent heat build-up the volume while listening to this... cloth slightly moistened with adequate ventilation to direct sunlight, excessive dust, mechanical vibration, or shock. • Do not install the system in a horizontal position only. • Keep the system and discs away from the unit. 3 Press H and "/1 simultaneously. On cleaning discs, disc/lens cleaners •...
... components with a high power amplifier. repeatedly to select "DVD." 2 Make sure that may condense on after 15 to your nearest Sony dealer. "MECHA LOCK" and "UNPLUG" appear alternately in a place subject to prevent heat build-up the volume while listening to this... cloth slightly moistened with adequate ventilation to direct sunlight, excessive dust, mechanical vibration, or shock. • Do not install the system in a horizontal position only. • Keep the system and discs away from the unit. 3 Press H and "/1 simultaneously. On cleaning discs, disc/lens cleaners •...

Operating Instructions
Page 92
...and S-AIR sub unit). Troubleshooting If you experience any problem persist, consult your nearest Sony dealer. 92GB When you using the system, use this troubleshooting guide to turn off the system, and check the following difficulties while using only the specified speakers? • Is ...after "STANDBY" disappears. • Are the + and - Should any of the system? • After checking the above items, consult your nearest Sony dealer. speaker cords short-circuited? • Are you install the S-AIR sub unit (optional), in the front panel display. Note that the AC...
...and S-AIR sub unit). Troubleshooting If you experience any problem persist, consult your nearest Sony dealer. 92GB When you using the system, use this troubleshooting guide to turn off the system, and check the following difficulties while using only the specified speakers? • Is ...after "STANDBY" disappears. • Are the + and - Should any of the system? • After checking the above items, consult your nearest Sony dealer. speaker cords short-circuited? • Are you install the S-AIR sub unit (optional), in the front panel display. Note that the AC...

Operating Instructions
Page 93
... TV and the unit using the "DMPORT" function, the video signal is not set so that you can view pictures from the system. • Check the output method on your system (page 26). • You have set the aspect • The aspect ratio on the front panel does not light up) (page... TV cannot accept the progressive signal. Color irregularity occurs on a TV stand, health care device, toy, etc.) is compatible with a CRT-based TV or projector, install the speakers at least 0.3 meters (1.0 ft) from the HDMI OUT jack. ratio in [TV TYPE] of video signal output from the TV set. • If...
... TV and the unit using the "DMPORT" function, the video signal is not set so that you can view pictures from the system. • Check the output method on your system (page 26). • You have set the aspect • The aspect ratio on the front panel does not light up) (page... TV cannot accept the progressive signal. Color irregularity occurs on a TV stand, health care device, toy, etc.) is compatible with a CRT-based TV or projector, install the speakers at least 0.3 meters (1.0 ft) from the HDMI OUT jack. ratio in [TV TYPE] of video signal output from the TV set. • If...


