
Operating Instructions
Page 1
4-122-238-12(1) DVD Home Theatre System Operating Instructions DAV-HDX285 / HDX585 / HDX685 ©2009 Sony Corporation
4-122-238-12(1) DVD Home Theatre System Operating Instructions DAV-HDX285 / HDX585 / HDX685 ©2009 Sony Corporation

Operating Instructions
Page 2
...risk of this product, please contact your local Civic Office, your Sony dealer regarding this apparatus must be securely attached to the floor/wall... below. Other versions may be caused by inappropriate waste handling of the apparatus with separate collection systems) This symbol on the product or on the rear exterior. The use only. To reduce the... alert the user to the presence of Manufacture Marking is intended to alert the user to persons. DAV-HDX285/DAV-HDX585 Serial No Date of important operating and maintenance (servicing) instructions in the unit, disconnect the...
...risk of this product, please contact your local Civic Office, your Sony dealer regarding this apparatus must be securely attached to the floor/wall... below. Other versions may be caused by inappropriate waste handling of the apparatus with separate collection systems) This symbol on the product or on the rear exterior. The use only. To reduce the... alert the user to the presence of Manufacture Marking is intended to alert the user to persons. DAV-HDX285/DAV-HDX585 Serial No Date of important operating and maintenance (servicing) instructions in the unit, disconnect the...

Operating Instructions
Page 3
... is required when the apparatus has been damaged in any changes or modifications not expressly approved in a particular installation. As an ENERGY STAR® partner, Sony Corporation has determined that produce heat. 9) Do not defeat the safety purpose of the FCC Rules. CAUTION You are cautioned that interference will not occur...
... is required when the apparatus has been damaged in any changes or modifications not expressly approved in a particular installation. As an ENERGY STAR® partner, Sony Corporation has determined that produce heat. 9) Do not defeat the safety purpose of the FCC Rules. CAUTION You are cautioned that interference will not occur...

Operating Instructions
Page 4
... the DTS** Digital Surround System. * Manufactured under license (Except for North American models). and worldwide patents issued & pending. This system incorporates High-Definition Multimedia Interface... under license under U.S. DivX® is underlined. patents and other U.S. "BRAVIA" is a trademark of Sony Corporation. DivX, DivX Certified, and associated logos are trademarks of DivX, Inc...762; 6,487,535 & other intellectual property rights. About MPEG-4 Visual (Except for home and other limited viewing uses only unless otherwise authorized by Macrovision. HDMI, the HDMI...
... the DTS** Digital Surround System. * Manufactured under license (Except for North American models). and worldwide patents issued & pending. This system incorporates High-Definition Multimedia Interface... under license under U.S. DivX® is underlined. patents and other U.S. "BRAVIA" is a trademark of Sony Corporation. DivX, DivX Certified, and associated logos are trademarks of DivX, Inc...762; 6,487,535 & other intellectual property rights. About MPEG-4 Visual (Except for home and other limited viewing uses only unless otherwise authorized by Macrovision. HDMI, the HDMI...
Operating Instructions
Page 5
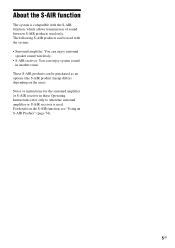
...Instructions refer only to when the surround amplifier or S-AIR receiver is compatible with the system: • Surround amplifier: You can enjoy surround speaker sound wirelessly. • S-AIR receiver: You can enjoy system sound in another room. For details on the area). These S-AIR products can be...product lineup differs depending on the S-AIR function, see "Using an S-AIR Product" (page 74). 5GB About the S-AIR function The system is used with the S-AIR function, which allows transmission of sound between S-AIR products wirelessly. The following S-AIR products can be used .
...Instructions refer only to when the surround amplifier or S-AIR receiver is compatible with the system: • Surround amplifier: You can enjoy surround speaker sound wirelessly. • S-AIR receiver: You can enjoy system sound in another room. For details on the area). These S-AIR products can be...product lineup differs depending on the S-AIR function, see "Using an S-AIR Product" (page 74). 5GB About the S-AIR function The system is used with the S-AIR function, which allows transmission of sound between S-AIR products wirelessly. The following S-AIR products can be used .

Operating Instructions
Page 6
... Files... 50 Enjoying Video Files 54 Adjusting the Delay Between the Picture and Sound 56 Restricting Playback of the Disc........... 57 Changing the System Settings by Using the Setup Display 59 Tuner Presetting Radio Stations 67 Listening to the Radio 68 Control for HDMI/External Audio Device Using... the Control for HDMI Function for "BRAVIA" Sync 70 Using the DIGITAL MEDIA PORT Adapter 73 Using an S-AIR Product 74 Other Operations Getting Optimal Surround Sound for a Room 80...
... Files... 50 Enjoying Video Files 54 Adjusting the Delay Between the Picture and Sound 56 Restricting Playback of the Disc........... 57 Changing the System Settings by Using the Setup Display 59 Tuner Presetting Radio Stations 67 Listening to the Radio 68 Control for HDMI/External Audio Device Using... the Control for HDMI Function for "BRAVIA" Sync 70 Using the DIGITAL MEDIA PORT Adapter 73 Using an S-AIR Product 74 Other Operations Getting Optimal Surround Sound for a Room 80...

Operating Instructions
Page 7
... files1), JPEG image files2), DivX video files3), and MPEG4 video files3), and conforming to the DCF image file format. (DCF "Design rule for Camera File system": Image standards for digital cameras regulated by ISO/MPEG for compresses audio data.
... files1), JPEG image files2), DivX video files3), and MPEG4 video files3), and conforming to the DCF image file format. (DCF "Design rule for Camera File system": Image standards for digital cameras regulated by ISO/MPEG for compresses audio data.

Operating Instructions
Page 8
...VIDEO with a different region code (page 9) • A disc that has a non-standard shape (e.g., card, heart) • A disc with paper or stickers on this system due to the Compact Disc (CD) standard, therefore, these discs may not work with some of the music discs encoded with copyright protection technologies do... and folders on discs This product is designed to playback discs that some playback functions may not be played back. • This system can play a Multi Session CD when an MP3 file is contained in the first session. Note that conform to the operating instructions for...
...VIDEO with a different region code (page 9) • A disc that has a non-standard shape (e.g., card, heart) • A disc with paper or stickers on this system due to the Compact Disc (CD) standard, therefore, these discs may not work with some of the music discs encoded with copyright protection technologies do... and folders on discs This product is designed to playback discs that some playback functions may not be played back. • This system can play a Multi Session CD when an MP3 file is contained in the first session. Note that conform to the operating instructions for...
Operating Instructions
Page 9
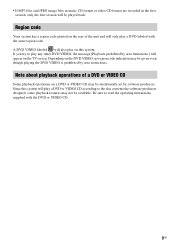
...no region code indication may be given even though playing the DVD VIDEO is prohibited by software producers. Depending on the TV screen. Since this system. Note about playback operations of a DVD or VIDEO CD Some playback operations on the rear of the unit and will only play a DVD ... play a DVD or VIDEO CD according to the disc contents the software producers designed, some playback features may not be available. Region code Your system has a region code printed on a DVD or VIDEO CD may be intentionally set by area restrictions. Be sure to read the operating instructions supplied...
...no region code indication may be given even though playing the DVD VIDEO is prohibited by software producers. Depending on the TV screen. Since this system. Note about playback operations of a DVD or VIDEO CD Some playback operations on the rear of the unit and will only play a DVD ... play a DVD or VIDEO CD according to the disc contents the software producers designed, some playback features may not be available. Region code Your system has a region code printed on a DVD or VIDEO CD may be intentionally set by area restrictions. Be sure to read the operating instructions supplied...

Operating Instructions
Page 10
... MEDIA PORT adapter (TDM-iP20) For U.S. models • Setup Disc (DVD) • Calibration mic (1) • AM loop antenna (aerial) (1) 10GB Getting Started Getting Started Unpacking DAV-HDX285 • Front speakers (2) • Center speaker (1) • Surround speakers (2) • FM wire antenna (aerial) (1) • Foot pads (1 set) or • Speaker cords (6, red/white/ green...
... MEDIA PORT adapter (TDM-iP20) For U.S. models • Setup Disc (DVD) • Calibration mic (1) • AM loop antenna (aerial) (1) 10GB Getting Started Getting Started Unpacking DAV-HDX285 • Front speakers (2) • Center speaker (1) • Surround speakers (2) • FM wire antenna (aerial) (1) • Foot pads (1 set) or • Speaker cords (6, red/white/ green...

Operating Instructions
Page 11
Getting Started DAV-HDX585 • Front speakers (2) • Center speaker (1) • Surround speakers (2) • Subwoofer (1) • FM wire antenna (aerial) (1) • Posts (2) or • Bases (2) • Speaker cords (6, ...
Getting Started DAV-HDX585 • Front speakers (2) • Center speaker (1) • Surround speakers (2) • Subwoofer (1) • FM wire antenna (aerial) (1) • Posts (2) or • Bases (2) • Speaker cords (6, ...

Operating Instructions
Page 12
Getting Started DAV-HDX685 • Front speakers (2) • AM loop antenna (aerial) (1) • Calibration mic (1) • Center speaker (1) • Surround speakers (2) • Subwoofer (1) • FM wire antenna (aerial) (1) &#...
Getting Started DAV-HDX685 • Front speakers (2) • AM loop antenna (aerial) (1) • Calibration mic (1) • Center speaker (1) • Surround speakers (2) • Subwoofer (1) • FM wire antenna (aerial) (1) &#...

Operating Instructions
Page 13
To use the remote, point it at the remote sensor on the batteries to avoid possible damage from battery leakage and corrosion. 13GB Doing so may cause a malfunction. • If you do not intend to use a new battery with an old one. • Do not drop any foreign object into the remote Insert two R6 (size AA) batteries (supplied) by matching the 3 and # ends on the unit. Getting Started Inserting batteries into the remote casing, particularly when replacing the batteries. • Do not expose the remote sensor to direct sunlight or lighting apparatus. Note • Do not leave ...
To use the remote, point it at the remote sensor on the batteries to avoid possible damage from battery leakage and corrosion. 13GB Doing so may cause a malfunction. • If you do not intend to use a new battery with an old one. • Do not drop any foreign object into the remote Insert two R6 (size AA) batteries (supplied) by matching the 3 and # ends on the unit. Getting Started Inserting batteries into the remote casing, particularly when replacing the batteries. • Do not expose the remote sensor to direct sunlight or lighting apparatus. Note • Do not leave ...
Operating Instructions
Page 14
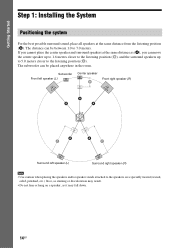
The subwoofer can be between 1.0 to 7.0 meters. Getting Started Step 1: Installing the System Positioning the system For the best possible surround sound, place all speakers at the same distance as it may fall down. 14GB If you can be placed anywhere ...
The subwoofer can be between 1.0 to 7.0 meters. Getting Started Step 1: Installing the System Positioning the system For the best possible surround sound, place all speakers at the same distance as it may fall down. 14GB If you can be placed anywhere ...

Operating Instructions
Page 15
Getting Started Attaching the foot pads to the subwoofer Attach the foot pads (supplied) to the bottom of the subwoofer to stabilize the subwoofer and prevent it from slipping. , Remove the foot pads from the protective cover. 15GB
Getting Started Attaching the foot pads to the subwoofer Attach the foot pads (supplied) to the bottom of the subwoofer to stabilize the subwoofer and prevent it from slipping. , Remove the foot pads from the protective cover. 15GB

Operating Instructions
Page 16
... only) Before connecting the speakers, attach the speaker stand to the speaker. (For the front speakers of DAV-HDX585, and the front and surround speakers of DAV-HDX685) Use the parts as follows: DAV-HDX585 • Front speakers (2) • Speaker cords (2, red/white) • Posts (2) • ...Bases (2) • Screws (black) (4) • Screws (with washer) (4) DAV-HDX685 • Front and surround speakers (4) • Speaker cords (4, red/white/blue/gray) • Posts (4) • Bases (4) • Screws (black) ...
... only) Before connecting the speakers, attach the speaker stand to the speaker. (For the front speakers of DAV-HDX585, and the front and surround speakers of DAV-HDX685) Use the parts as follows: DAV-HDX585 • Front speakers (2) • Speaker cords (2, red/white) • Posts (2) • ...Bases (2) • Screws (black) (4) • Screws (with washer) (4) DAV-HDX685 • Front and surround speakers (4) • Speaker cords (4, red/white/blue/gray) • Posts (4) • Bases (4) • Screws (black) ...

Operating Instructions
Page 17
You can be increased by using the holes in order from A to the holes on the rear of the speaker. Adjust the screw holes of the post to D. The height of the speaker can change the height of the speaker depending on the screw positions. Speaker Screw , Post 2 Adjust the height of the speaker Example: Lowest position A B C D Post Secure two screws (with washer). Rear of the speaker, then secure the post with two screws (with washer). 17GB Getting Started 1 Insert the post into the hole on the bottom of the speaker so that the screw on the post faces the front of the ...
You can be increased by using the holes in order from A to the holes on the rear of the speaker. Adjust the screw holes of the post to D. The height of the speaker can change the height of the speaker depending on the screw positions. Speaker Screw , Post 2 Adjust the height of the speaker Example: Lowest position A B C D Post Secure two screws (with washer). Rear of the speaker, then secure the post with two screws (with washer). 17GB Getting Started 1 Insert the post into the hole on the bottom of the speaker so that the screw on the post faces the front of the ...

Operating Instructions
Page 18
... are the same color as follows: • Front left speaker (L): White • Front right speaker (R): Red • Surround left speaker (L): Blue (DAV-HDX685 only) • Surround right speaker (R): Gray (DAV-HDX685 only) Be careful with the orientation of the jacks to be connected. Getting Started 3 Thread the speaker cord through the hole...
... are the same color as follows: • Front left speaker (L): White • Front right speaker (R): Red • Surround left speaker (L): Blue (DAV-HDX685 only) • Surround right speaker (R): Gray (DAV-HDX685 only) Be careful with the orientation of the jacks to be connected. Getting Started 3 Thread the speaker cord through the hole...

Operating Instructions
Page 19
...: the speaker cord with the two screws (black). Color tube Front left speaker (L): White Front right speaker (R): Red Surround left speaker (L): Blue (DAV-HDX685 only) Surround right speaker (R): Gray (DAV-HDX685 only) Rear of the base, then secure the post with the color tube to 3, and the speaker cord without the color...
...: the speaker cord with the two screws (black). Color tube Front left speaker (L): White Front right speaker (R): Red Surround left speaker (L): Blue (DAV-HDX685 only) Surround right speaker (R): Gray (DAV-HDX685 only) Rear of the base, then secure the post with the color tube to 3, and the speaker cord without the color...

Operating Instructions
Page 20
Take up any speaker cord slack. Secure the speaker cord by pulling from the bottom of the cord. Fully-assembled illustration DAV-HDX585 Front left speaker (L): White label Front right speaker (R): Red label White Red 20GB Getting Started 6 Take up slack in the speaker cord by running it through the slot. Adjust the length of the base.
Take up any speaker cord slack. Secure the speaker cord by pulling from the bottom of the cord. Fully-assembled illustration DAV-HDX585 Front left speaker (L): White label Front right speaker (R): Red label White Red 20GB Getting Started 6 Take up slack in the speaker cord by running it through the slot. Adjust the length of the base.
