

Operating Instructions
Page 2
...OPERATION IS SUBJECT TO THE FOLLOWING TWO CONDITIONS: (1) THIS DEVICE MAY NOT CAUSE HARMFUL INTERFERENCE, AND (2) THIS DEVICE MUST ACCEPT ANY INTERFERENCE RECEIVED, INCLUDING INTERFERENCE THAT MAY CAUSE UNDESIRED OPERATION. Notice for the customers in Canada This class B digital apparatus complies with the limits for ... This equipment generates, uses, and can be determined by one or more of Apple Inc., registered in cabinet. In this system so that interference will not occur in accordance with the instructions, may cause harmful interference to comply with Canadian ICES-003. ...
...OPERATION IS SUBJECT TO THE FOLLOWING TWO CONDITIONS: (1) THIS DEVICE MAY NOT CAUSE HARMFUL INTERFERENCE, AND (2) THIS DEVICE MUST ACCEPT ANY INTERFERENCE RECEIVED, INCLUDING INTERFERENCE THAT MAY CAUSE UNDESIRED OPERATION. Notice for the customers in Canada This class B digital apparatus complies with the limits for ... This equipment generates, uses, and can be determined by one or more of Apple Inc., registered in cabinet. In this system so that interference will not occur in accordance with the instructions, may cause harmful interference to comply with Canadian ICES-003. ...
Operating Instructions
Page 2
... this product will not occur in the space provided below. Model No. DAV-HDX277WC/DAV-HDX279W/ DAV-HDX576WF Serial No Date of Manufacture Marking is located on , the user is... reasonable protection against harmful interference in a residential installation. Increase the separation between the equipment and receiver. - A polarized plug has two Do not install the appliance in a confined space, such... the rear exterior of this model manufactured for sale in this manual could void your Sony dealer regarding this apparatus near water. 6) Clean only with the manufacturer's instructions. 8)...
... this product will not occur in the space provided below. Model No. DAV-HDX277WC/DAV-HDX279W/ DAV-HDX576WF Serial No Date of Manufacture Marking is located on , the user is... reasonable protection against harmful interference in a residential installation. Increase the separation between the equipment and receiver. - A polarized plug has two Do not install the appliance in a confined space, such... the rear exterior of this model manufactured for sale in this manual could void your Sony dealer regarding this apparatus near water. 6) Clean only with the manufacturer's instructions. 8)...
Operating Instructions
Page 4
... of the S-AIR products is as follows: • DAV-HDX277WC: Surround amplifier (optional) S-AIR receiver (supplied) • DAV-HDX279W: Surround amplifier (supplied) S-AIR receiver (optional) • DAV-HDX576WF: Surround amplifier (supplied) S-AIR receiver (supplied) The S-AIR product can enjoy system sound in another room. DAV-HDX277WC is the model used for DAVHDX277WC, DAV-HDX279W, and DAVHDX576WF. For details on the unit...
... of the S-AIR products is as follows: • DAV-HDX277WC: Surround amplifier (optional) S-AIR receiver (supplied) • DAV-HDX279W: Surround amplifier (supplied) S-AIR receiver (optional) • DAV-HDX576WF: Surround amplifier (supplied) S-AIR receiver (supplied) The S-AIR product can enjoy system sound in another room. DAV-HDX277WC is the model used for DAVHDX277WC, DAV-HDX279W, and DAVHDX576WF. For details on the unit...
Operating Instructions
Page 9
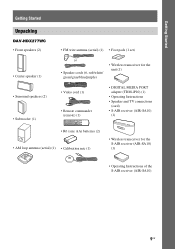
Getting Started Getting Started Unpacking DAV-HDX277WC • Front speakers (2) • Center speaker (1) • Surround speakers (2) • Subwoofer (1) • FM wire antenna (aerial) (1) • Foot pads (1 set) or • Speaker... cord (1) • Remote commander (remote) (1) • DIGITAL MEDIA PORT adapter (TDM-iP10) (1) • Operating Instructions • Speaker and TV connections (card) • S-AIR receiver (AIR-SA10) (1) • R6 (size AA) batteries (2) • AM loop antenna (aerial) (1) • Calibration mic (1) • Wireless transceiver for the S-AIR...
Getting Started Getting Started Unpacking DAV-HDX277WC • Front speakers (2) • Center speaker (1) • Surround speakers (2) • Subwoofer (1) • FM wire antenna (aerial) (1) • Foot pads (1 set) or • Speaker... cord (1) • Remote commander (remote) (1) • DIGITAL MEDIA PORT adapter (TDM-iP10) (1) • Operating Instructions • Speaker and TV connections (card) • S-AIR receiver (AIR-SA10) (1) • R6 (size AA) batteries (2) • AM loop antenna (aerial) (1) • Calibration mic (1) • Wireless transceiver for the S-AIR...
Operating Instructions
Page 11
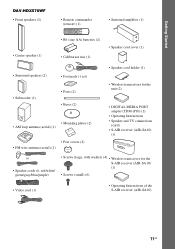
Getting Started DAV-HDX576WF • Front speakers (2) • Remote commander (remote) (1) • Surround amplifier (1) • Center speaker (1) • R6 (size AA) batteries (2) • Calibration mic (1) • Speaker ... (1) • Wireless transceivers for the unit (2) • DIGITAL MEDIA PORT adapter (TDM-iP10) (1) • Operating Instructions • Speaker and TV connections (card) • S-AIR receiver (AIR-SA10) (1) or • Speaker cords (6, red/white/ green/gray/blue/purple) • Screws (large, with washer) (4) • Wireless transceiver for the S-AIR...
Getting Started DAV-HDX576WF • Front speakers (2) • Remote commander (remote) (1) • Surround amplifier (1) • Center speaker (1) • R6 (size AA) batteries (2) • Calibration mic (1) • Speaker ... (1) • Wireless transceivers for the unit (2) • DIGITAL MEDIA PORT adapter (TDM-iP10) (1) • Operating Instructions • Speaker and TV connections (card) • S-AIR receiver (AIR-SA10) (1) or • Speaker cords (6, red/white/ green/gray/blue/purple) • Screws (large, with washer) (4) • Wireless transceiver for the S-AIR...
Operating Instructions
Page 22
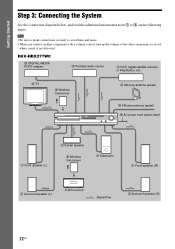
...volume control, turn up the volume of the other components to 6 on the following pages. DAV-HDX277WC 3 DIGITAL MEDIA PORT adapter 3 Portable audio source 3 VCR, digital satellite receiver, or PlayStation, etc. 2 TV 5 Wireless transceiver 4 AM loop antenna (aerial) 4 ... (L) 1 Center speaker 5 Wireless transceiver 1 Subwoofer 1 Front speaker (R) 1 Surround speaker (L) S-AIR receiver :Signal flow 1 Surround speaker (R) 22US Getting Started Step 3: Connecting the System See the connection diagram below, and read the additional information from 1 to a level where sound is ...
...volume control, turn up the volume of the other components to 6 on the following pages. DAV-HDX277WC 3 DIGITAL MEDIA PORT adapter 3 Portable audio source 3 VCR, digital satellite receiver, or PlayStation, etc. 2 TV 5 Wireless transceiver 4 AM loop antenna (aerial) 4 ... (L) 1 Center speaker 5 Wireless transceiver 1 Subwoofer 1 Front speaker (R) 1 Surround speaker (L) S-AIR receiver :Signal flow 1 Surround speaker (R) 22US Getting Started Step 3: Connecting the System See the connection diagram below, and read the additional information from 1 to a level where sound is ...
Operating Instructions
Page 23
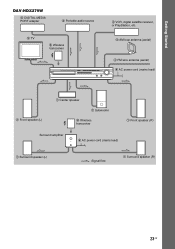
Getting Started DAV-HDX279W 3 DIGITAL MEDIA PORT adapter 3 Portable audio source 2 TV 5 Wireless transceiver 3 VCR, digital satellite receiver, or PlayStation, etc. 4 AM loop antenna (aerial) 4 FM wire antenna (aerial) 6 AC power cord (mains lead) 1 Front speaker (L) 1 Center speaker 1 Subwoofer 5 Wireless transceiver 1 Front speaker (R) Surround amplifier 6 AC power cord (mains lead) 1 Surround speaker (L) :Signal flow 1 Surround speaker (R) 23US
Getting Started DAV-HDX279W 3 DIGITAL MEDIA PORT adapter 3 Portable audio source 2 TV 5 Wireless transceiver 3 VCR, digital satellite receiver, or PlayStation, etc. 4 AM loop antenna (aerial) 4 FM wire antenna (aerial) 6 AC power cord (mains lead) 1 Front speaker (L) 1 Center speaker 1 Subwoofer 5 Wireless transceiver 1 Front speaker (R) Surround amplifier 6 AC power cord (mains lead) 1 Surround speaker (L) :Signal flow 1 Surround speaker (R) 23US
Operating Instructions
Page 30
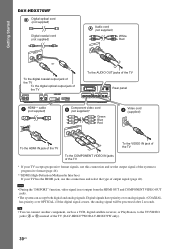
...8226; The system can connect another component, such as a VCR, digital satellite receiver, or PlayStation, to progressive format (page 46). ** HDMI (High-Definition Multimedia Interface) If your TV has the HDMI jack, use this connection and select the type of the TV (DAV-HDX277WC/DAV-HDX279W only...). 30US Digital signals have priority over analog signals. (COAXIAL has priority over OPTICAL.) If the digital signal ceases, the analog signal will be processed after 2 seconds. Getting Started DAV-HDX576WF Digital optical cord (not supplied...
...8226; The system can connect another component, such as a VCR, digital satellite receiver, or PlayStation, to progressive format (page 46). ** HDMI (High-Definition Multimedia Interface) If your TV has the HDMI jack, use this connection and select the type of the TV (DAV-HDX277WC/DAV-HDX279W only...). 30US Digital signals have priority over analog signals. (COAXIAL has priority over OPTICAL.) If the digital signal ceases, the analog signal will be processed after 2 seconds. Getting Started DAV-HDX576WF Digital optical cord (not supplied...
Operating Instructions
Page 31
... Started 3 Connecting the other components You can enjoy the connected component using the six speakers of the system. • Portable audio source: A • DIGITAL MEDIA PORT adapter: B • VCR, digital satellite receiver, or PlayStation, etc.: C DAV-HDX277WC Stereo mini-plug cord (not supplied) To the portable audio source Front panel SPEAKER CENTER SUBWOOFER SPEAKER...
... Started 3 Connecting the other components You can enjoy the connected component using the six speakers of the system. • Portable audio source: A • DIGITAL MEDIA PORT adapter: B • VCR, digital satellite receiver, or PlayStation, etc.: C DAV-HDX277WC Stereo mini-plug cord (not supplied) To the portable audio source Front panel SPEAKER CENTER SUBWOOFER SPEAKER...
Operating Instructions
Page 34
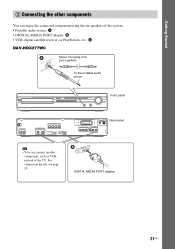
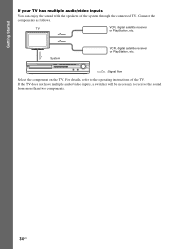
Getting Started If your TV has multiple audio/video inputs You can enjoy the sound with the speakers of the TV. System VCR, digital satellite receiver or PlayStation, etc. :Signal flow Select the component on the TV. For details, refer to receive the sound from more than two components. 34US Connect the components as follows. If the TV does not have multiple audio/video inputs, a switcher will be necessary to the operating instructions of the system through the connected TV. TV VCR, digital satellite receiver or PlayStation, etc.
Getting Started If your TV has multiple audio/video inputs You can enjoy the sound with the speakers of the TV. System VCR, digital satellite receiver or PlayStation, etc. :Signal flow Select the component on the TV. For details, refer to receive the sound from more than two components. 34US Connect the components as follows. If the TV does not have multiple audio/video inputs, a switcher will be necessary to the operating instructions of the system through the connected TV. TV VCR, digital satellite receiver or PlayStation, etc.
Operating Instructions
Page 38
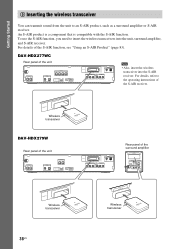
An S-AIR product is a component that is compatible with the S-AIR function. DAV-HDX277WC Rear panel of the S-AIR receiver. To use the S-AIR function, you need to insert the wireless transceivers into the S-AIR receiver. For details of the surround amplifier EZW-RT10 S-AIR ID A B C PAIRING SPEAKER L SURROUND SELECTOR R SURROUND SURROUND BACK EZW-RT10...
An S-AIR product is a component that is compatible with the S-AIR function. DAV-HDX277WC Rear panel of the S-AIR receiver. To use the S-AIR function, you need to insert the wireless transceivers into the S-AIR receiver. For details of the surround amplifier EZW-RT10 S-AIR ID A B C PAIRING SPEAKER L SURROUND SELECTOR R SURROUND SURROUND BACK EZW-RT10...
Operating Instructions
Page 39
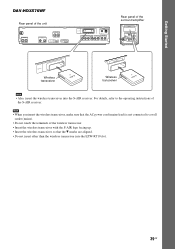
Getting Started DAV-HDX576WF Rear panel of the unit SPEAKER CENTER SUBWOOFER SPEAKER TV DIGITAL IN... transceiver so that the AC power cord (mains lead) is not connected to the operating instructions of the S-AIR receiver. Note • When you insert the wireless transceiver, make sure that the V marks are aligned. • Do... not insert other than the wireless transceiver into the S-AIR receiver. For details, refer to a wall outlet (mains). • Do not touch the terminals of the surround amplifier EZW-RT10 S-...
Getting Started DAV-HDX576WF Rear panel of the unit SPEAKER CENTER SUBWOOFER SPEAKER TV DIGITAL IN... transceiver so that the AC power cord (mains lead) is not connected to the operating instructions of the S-AIR receiver. Note • When you insert the wireless transceiver, make sure that the V marks are aligned. • Do... not insert other than the wireless transceiver into the S-AIR receiver. For details, refer to a wall outlet (mains). • Do not touch the terminals of the surround amplifier EZW-RT10 S-...
Operating Instructions
Page 50
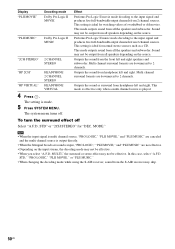
... effective. • Depending on the source. Sound may not be effective. This mode is effective only when a multi channel source is made. 5 Press SYSTEM MENU. To turn the surround effect off . MODE." MULTI," the surround or stereo effect may skip. 50US STD," "PRO LOGIC," "PLII MOVIE," or...depending on the input stream, the decoding mode may not be output from the front left and right. This mode outputs sound from the S-AIR receiver may not be effective. • When you select "A.F.D. Outputs the sound from headphone left and right. In this case, select "A.F.D. Effect ...
... effective. • Depending on the source. Sound may not be effective. This mode is effective only when a multi channel source is made. 5 Press SYSTEM MENU. To turn the surround effect off . MODE." MULTI," the surround or stereo effect may skip. 50US STD," "PRO LOGIC," "PLII MOVIE," or...depending on the input stream, the decoding mode may not be output from the front left and right. This mode outputs sound from the S-AIR receiver may not be effective. • When you select "A.F.D. Outputs the sound from headphone left and right. In this case, select "A.F.D. Effect ...
Operating Instructions
Page 51
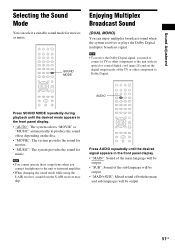
... the front panel display. • "AUTO": The system selects "MOVIE" or "MUSIC" automatically to the unit or surround amplifier. • When changing the sound mode while using the S-AIR receiver, sound from the S-AIR receiver may skip. Sound Adjustment Selecting the Sound Mode You ...can enjoy multiplex broadcast sound when the system receives or plays the Dolby Digital multiplex broadcast signal. SOUND MODE Enjoying Multiplex...
... the front panel display. • "AUTO": The system selects "MOVIE" or "MUSIC" automatically to the unit or surround amplifier. • When changing the sound mode while using the S-AIR receiver, sound from the S-AIR receiver may skip. Sound Adjustment Selecting the Sound Mode You ...can enjoy multiplex broadcast sound when the system receives or plays the Dolby Digital multiplex broadcast signal. SOUND MODE Enjoying Multiplex...
Operating Instructions
Page 72
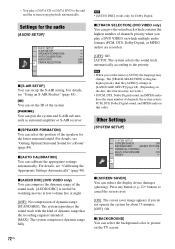
...AUDIO DRC] works only for a Room" (page 89). x [TRACK SELECTION] (DVD VIDEO only) You can pair the system and S-AIR sub unit, such as surround amplifier or S-AIR receiver. x [BACKGROUND] You can reduce the display device damages (ghosting). x [SPEAKER FORMATION] You can set the ID of ... S-AIR Product" (page 83). [ID] You can set up the S-AIR setting. Press any button (e.g., H button) to the end and the system stops playback automatically. - For details, see "Calibrating the Appropriate Settings Automatically" (page 90). You play a DVD VIDEO on the disc, this function ...
...AUDIO DRC] works only for a Room" (page 89). x [TRACK SELECTION] (DVD VIDEO only) You can pair the system and S-AIR sub unit, such as surround amplifier or S-AIR receiver. x [BACKGROUND] You can reduce the display device damages (ghosting). x [SPEAKER FORMATION] You can set the ID of ... S-AIR Product" (page 83). [ID] You can set up the S-AIR setting. Press any button (e.g., H button) to the end and the system stops playback automatically. - For details, see "Calibrating the Appropriate Settings Automatically" (page 90). You play a DVD VIDEO on the disc, this function ...
Operating Instructions
Page 77
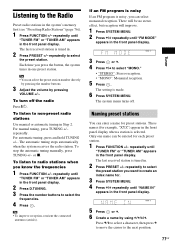
...off . Tip • To improve reception, reorient the connected antennas (aerials). The system menu turns off the radio Press "/1. Tip • You can select monaural reception. The last received station is tuned in the front panel display when a station is noisy, you can... for preset stations. or x. repeatedly. The automatic tuning stops automatically when the system receives the radio station. The setting is made. 6 Press SYSTEM MENU. repeatedly to select the preset station you press the button, the system tunes in the front panel display. 5 Press or c. 6 Create a name...
...off . Tip • To improve reception, reorient the connected antennas (aerials). The system menu turns off the radio Press "/1. Tip • You can select monaural reception. The last received station is tuned in the front panel display when a station is noisy, you can... for preset stations. or x. repeatedly. The automatic tuning stops automatically when the system receives the radio station. The setting is made. 6 Press SYSTEM MENU. repeatedly to select the preset station you press the button, the system tunes in the front panel display. 5 Press or c. 6 Create a name...
Operating Instructions
Page 83
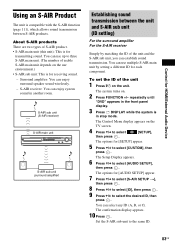
... receiving sound. - S-AIR receiver: You can select any ID (A, B, or C). To set the ID of usable S-AIR main unit depends on the use multiple S-AIR main unit by matching the ID of S-AIR product. • S-AIR main unit (this unit): This is for transmitting sound. The system ... the S-AIR function (page 111), which allows sound transmission between the unit and S-AIR sub unit (ID setting) For the surround amplifier For the S-AIR receiver Simply by setting a different ID for [AUDIO SETUP] appear. 7 Press X/x to select [S-AIR SETUP t], then press . 8 Press X/x to select [ID], then ...
... receiving sound. - S-AIR receiver: You can select any ID (A, B, or C). To set the ID of usable S-AIR main unit depends on the use multiple S-AIR main unit by matching the ID of S-AIR product. • S-AIR main unit (this unit): This is for transmitting sound. The system ... the S-AIR function (page 111), which allows sound transmission between the unit and S-AIR sub unit (ID setting) For the surround amplifier For the S-AIR receiver Simply by setting a different ID for [AUDIO SETUP] appear. 7 Press X/x to select [S-AIR SETUP t], then press . 8 Press X/x to select [ID], then ...

Operating Instructions
Page 84
...PAIRING)] appears beside ID on the remote. Note • It is set the ID of the S-AIR receiver Refer to 7 above. Note • When you are the same, or you can enjoy the system's sound by performing the pairing operation (page 86). To set the ID of the surround amplifier 1 ...change the ID of the unit. To prevent this, you may also receive your system's sound if IDs are using the S-AIR receiver. When you need to establish sound transmission. Enjoying the system's sound in another room For the S-AIR receiver You can identify the unit with a specific S-AIR sub unit by ...
...PAIRING)] appears beside ID on the remote. Note • It is set the ID of the S-AIR receiver Refer to 7 above. Note • When you are the same, or you can enjoy the system's sound by performing the pairing operation (page 86). To set the ID of the surround amplifier 1 ...change the ID of the unit. To prevent this, you may also receive your system's sound if IDs are using the S-AIR receiver. When you need to establish sound transmission. Enjoying the system's sound in another room For the S-AIR receiver You can identify the unit with a specific S-AIR sub unit by ...
Operating Instructions
Page 85
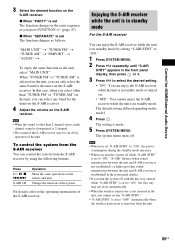
...turned on the model. 4 Press . Enjoying the S-AIR receiver while the unit is in standby mode For the S-AIR receiver You can enjoy the S-AIR receiver while the unit is in standby mode by setting "S-AIR STBY" to "ON." 1 Press SYSTEM MENU. 2 Press X/x repeatedly until "S-AIR STBY" appears ...in the unit, you turn the system off . Change the function of the S-AIR receiver. Control for HDMI/External Audio Device 3 Select the desired function on the S-AIR receiver. x When "PARTY" is made. 5 Press SYSTEM MENU. To control the system from the S-AIR receiver You can only select the same ...
...turned on the model. 4 Press . Enjoying the S-AIR receiver while the unit is in standby mode For the S-AIR receiver You can enjoy the S-AIR receiver while the unit is in standby mode by setting "S-AIR STBY" to "ON." 1 Press SYSTEM MENU. 2 Press X/x repeatedly until "S-AIR STBY" appears ...in the unit, you turn the system off . Change the function of the S-AIR receiver. Control for HDMI/External Audio Device 3 Select the desired function on the S-AIR receiver. x When "PARTY" is made. 5 Press SYSTEM MENU. To control the system from the S-AIR receiver You can only select the same ...
Operating Instructions
Page 86
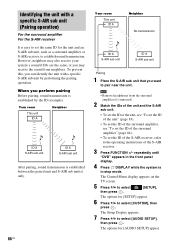
...with a specific S-AIR sub unit (Pairing operation) For the surround amplifier For the S-AIR receiver It is in the front panel display. 4 Press DISPLAY while the system is easy to set the ID of the S-AIR receiver. 3 Press FUNCTION +/- The options for [SETUP] appear. 6 Press X/x to select [SETUP...A Neighbor No transmission ID A S-AIR sub unit ID A S-AIR sub unit Pairing 1 Place the S-AIR sub unit that you may also receive your system's sound if IDs are the same, or you want to establish sound transmission. The options for [AUDIO SETUP] appear. Identifying the unit with...
...with a specific S-AIR sub unit (Pairing operation) For the surround amplifier For the S-AIR receiver It is in the front panel display. 4 Press DISPLAY while the system is easy to set the ID of the S-AIR receiver. 3 Press FUNCTION +/- The options for [SETUP] appear. 6 Press X/x to select [SETUP...A Neighbor No transmission ID A S-AIR sub unit ID A S-AIR sub unit Pairing 1 Place the S-AIR sub unit that you may also receive your system's sound if IDs are the same, or you want to establish sound transmission. The options for [AUDIO SETUP] appear. Identifying the unit with...


