
Child Safety: It Makes A Difference Where Your TV Stands
Page 1
... on or play with your family and friends. The Industry Cares! Sometimes televisions are improperly secured or inappropriately situated on dressers, bookcases, shelves, desks, audio speakers, chests or carts. The Consumer Electronics Association formed the Home Entertainment Support Safety Committee comprised of television and consumer electronics furniture manufacturers to advocate children...
... on or play with your family and friends. The Industry Cares! Sometimes televisions are improperly secured or inappropriately situated on dressers, bookcases, shelves, desks, audio speakers, chests or carts. The Consumer Electronics Association formed the Home Entertainment Support Safety Committee comprised of television and consumer electronics furniture manufacturers to advocate children...
DAVFX80 Instructions (complete HT system)
Page 4
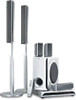
... Discs 6 Guide to the Control Menu Display...... 10 Getting Started Unpacking 13 Inserting Batteries into the Remote....... 13 Hookup Overview 14 Step 1: Speaker System Hookup........... 15 Step 2: Antenna (Aerial) Hookup ......... 24 Step 3: TV Hookup 25 Step 4: Other Component Hookup........ 30 Step 5: Connecting ...Step 6: Turning off the Demonstration 32 Step 7: Performing the Quick Setup ..... 33 Speaker Setup 35 Playing Discs Playing Discs 36 Using the DVD's Menu 41 Selecting [ORIGINAL] or [PLAY LIST] on a DVD-RW 42 Selecting a Playback Area for a Super Audio CD 42 Playing VIDEO ...
... Discs 6 Guide to the Control Menu Display...... 10 Getting Started Unpacking 13 Inserting Batteries into the Remote....... 13 Hookup Overview 14 Step 1: Speaker System Hookup........... 15 Step 2: Antenna (Aerial) Hookup ......... 24 Step 3: TV Hookup 25 Step 4: Other Component Hookup........ 30 Step 5: Connecting ...Step 6: Turning off the Demonstration 32 Step 7: Performing the Quick Setup ..... 33 Speaker Setup 35 Playing Discs Playing Discs 36 Using the DVD's Menu 41 Selecting [ORIGINAL] or [PLAY LIST] on a DVD-RW 42 Selecting a Playback Area for a Super Audio CD 42 Playing VIDEO ...

DAVFX80 Instructions (complete HT system)
Page 5
Settings and Adjustments Using the Setup Display 77 Setting the Display or Sound Track Language 78 [LANGUAGE SETUP] Settings for the Display 79 [SCREEN SETUP] Custom Settings 81 [CUSTOM SETUP] Settings for the Speakers 82 [SPEAKER SETUP] Additional Information Precautions 85 Notes about the Discs 86 Troubleshooting 86 Self-diagnosis Function 89 (When letters/numbers appear in the display) Specifications 90 Glossary 91 Language Code List 94 Index to Parts and Controls 95 DVD Setup Display List 100 AMP Menu List 102 Index 103 5US
Settings and Adjustments Using the Setup Display 77 Setting the Display or Sound Track Language 78 [LANGUAGE SETUP] Settings for the Display 79 [SCREEN SETUP] Custom Settings 81 [CUSTOM SETUP] Settings for the Speakers 82 [SPEAKER SETUP] Additional Information Precautions 85 Notes about the Discs 86 Troubleshooting 86 Self-diagnosis Function 89 (When letters/numbers appear in the display) Specifications 90 Glossary 91 Language Code List 94 Index to Parts and Controls 95 DVD Setup Display List 100 AMP Menu List 102 Index 103 5US

DAVFX80 Instructions (complete HT system)
Page 11
... JPEG files. *1 Displays the scene number for VIDEO CDs (PBC is on -screen display, the aspect ratio of the TV, and the size of the speakers you are using. [CUSTOM] Setup In addition to the Quick Setup setting, you want. [SHUFFLE] (page 39) Plays the track in random order. [REPEAT] ... available. [PROGRAM] (page 38) Selects the track to choose the desired language of titles (DVD-RW) to be played, the [ORIGINAL] one title/chapter/track/album repeatedly. [PARENTAL CONTROL] (page 65) Sets to prohibit playback on this system. [SETUP] (page 77) [QUICK] Setup (page 33) Use Quick Setup to play in ...
... JPEG files. *1 Displays the scene number for VIDEO CDs (PBC is on -screen display, the aspect ratio of the TV, and the size of the speakers you are using. [CUSTOM] Setup In addition to the Quick Setup setting, you want. [SHUFFLE] (page 39) Plays the track in random order. [REPEAT] ... available. [PROGRAM] (page 38) Selects the track to choose the desired language of titles (DVD-RW) to be played, the [ORIGINAL] one title/chapter/track/album repeatedly. [PARENTAL CONTROL] (page 65) Sets to prohibit playback on this system. [SETUP] (page 77) [QUICK] Setup (page 33) Use Quick Setup to play in ...
DAVFX80 Instructions (complete HT system)
Page 13
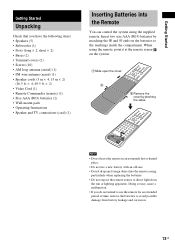
... Posts (long × 2, short × 2) • Bases (2) • Terminal covers (2) • Screws (10) • AM loop antenna (aerial) (1) • FM wire antenna (aerial) (1) • Speaker cords (5 m × 4, 15 m × 2) (16.5 ft. × 4, 49.5 ft. × 2) • Video Cord (1) • Remote Commander (remote) (1) • Size AAA (R03) ...with an old one. • Do not drop any foreign object into the Remote You can control the system using the remote, point it at the remote sensor on the system. 1 Slide open the cover. 2 2 Remove the cover by matching the 3 and # ends on the...
... Posts (long × 2, short × 2) • Bases (2) • Terminal covers (2) • Screws (10) • AM loop antenna (aerial) (1) • FM wire antenna (aerial) (1) • Speaker cords (5 m × 4, 15 m × 2) (16.5 ft. × 4, 49.5 ft. × 2) • Video Cord (1) • Remote Commander (remote) (1) • Size AAA (R03) ...with an old one. • Do not drop any foreign object into the Remote You can control the system using the remote, point it at the remote sensor on the system. 1 Slide open the cover. 2 2 Remove the cover by matching the 3 and # ends on the...

DAVFX80 Instructions (complete HT system)
Page 14
..., and is output from the speakers of this system. audio signals are processed by following Steps 1 to 7. Hookup Overview Perform all connections and settings by this system and output from the TV screen; "Step 1: Speaker System Hookup" (page 15) "Step... 2: Antenna (Aerial) Hookup" (page 24) "Step 3: TV Hookup" (page 25) "Step 4: Other Component Hookup" (page 30) "Step 5: Connecting the AC Power Cord (Mains Lead)" (page 32) "Step 6: Turning off the Demonstration" (page 32) "Step 7: Performing the Quick Setup" (page 33) Video signal is sent to DVDs...
..., and is output from the speakers of this system. audio signals are processed by following Steps 1 to 7. Hookup Overview Perform all connections and settings by this system and output from the TV screen; "Step 1: Speaker System Hookup" (page 15) "Step... 2: Antenna (Aerial) Hookup" (page 24) "Step 3: TV Hookup" (page 25) "Step 4: Other Component Hookup" (page 30) "Step 5: Connecting the AC Power Cord (Mains Lead)" (page 32) "Step 6: Turning off the Demonstration" (page 32) "Step 7: Performing the Quick Setup" (page 33) Video signal is sent to DVDs...
DAVFX80 Instructions (complete HT system)
Page 15
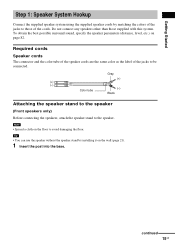
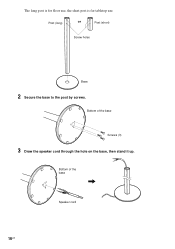
... (-) Black Attaching the speaker stand to the speaker (Front speakers only) Before connecting the speakers, attach the speaker stand to the speaker. continued 15US Required cords Speaker cords The connector and the color tube of the speaker cords are the same color as the label of the cords. Getting Started Step 1: Speaker System Hookup Connect the supplied speaker system using the supplied...
... (-) Black Attaching the speaker stand to the speaker (Front speakers only) Before connecting the speakers, attach the speaker stand to the speaker. continued 15US Required cords Speaker cords The connector and the color tube of the speaker cords are the same color as the label of the cords. Getting Started Step 1: Speaker System Hookup Connect the supplied speaker system using the supplied...
DAVFX80 Instructions (complete HT system)
Page 16
Bottom of the base Screws (3) 3 Draw the speaker cord through the hole on the base, then stand it up. Bottom of the base , Speaker cord 16US The long post is for floor use, the short post is for tabletop use. Post (long) or Post (short) Screw holes Base 2 Secure the base to the post by screws.
Bottom of the base Screws (3) 3 Draw the speaker cord through the hole on the base, then stand it up. Bottom of the base , Speaker cord 16US The long post is for floor use, the short post is for tabletop use. Post (long) or Post (short) Screw holes Base 2 Secure the base to the post by screws.
DAVFX80 Instructions (complete HT system)
Page 17
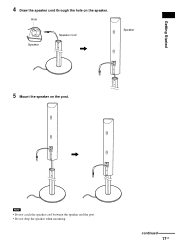
continued 17US Hole Speaker Speaker cord , Speaker 5 Mount the speaker on the speaker. Getting Started 4 Draw the speaker cord through the hole on the post. , Note • Do not catch the speaker cord between the speaker and the post. • Do not drop the speaker when mounting.
continued 17US Hole Speaker Speaker cord , Speaker 5 Mount the speaker on the speaker. Getting Started 4 Draw the speaker cord through the hole on the post. , Note • Do not catch the speaker cord between the speaker and the post. • Do not drop the speaker when mounting.
DAVFX80 Instructions (complete HT system)
Page 18
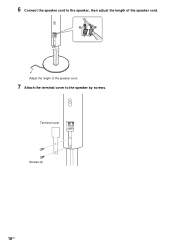
6 Connect the speaker cord to the speaker, then adjust the length of the speaker cord. 7 Attach the terminal cover to the speaker by screws. Adjust the length of the speaker cord. Terminal cover Screws (2) 18US
6 Connect the speaker cord to the speaker, then adjust the length of the speaker cord. 7 Attach the terminal cover to the speaker by screws. Adjust the length of the speaker cord. Terminal cover Screws (2) 18US

DAVFX80 Instructions (complete HT system)
Page 19
Surround speaker (L) continued 19US Getting Started Connecting the speakers Front speaker (R) Front speaker (L) Rear side of the front speaker Rear side of the front speaker Center speaker FRONT R FRONT L SURR R SURR L CENTER WOOFER SPEAKER COAXIAL IN R AUDIO IN L VIDEO IN Y PB/CB PR/CR S VIDEO (DVD ONLY) OPTICAL DIGITAL IN VIDEO 2 HDMI OUT VIDEO 1 R (DVD ONLY) L AUDIO IN VIDEO 2 COMPONENT VIDEO OUT VIDEO IN (DVD ONLY) VIDEO MONITOR OUT AM COAXIAL FM 75 Surround speaker (R) Subwoofer Note • Do not set the speakers in an inclined position.
Surround speaker (L) continued 19US Getting Started Connecting the speakers Front speaker (R) Front speaker (L) Rear side of the front speaker Rear side of the front speaker Center speaker FRONT R FRONT L SURR R SURR L CENTER WOOFER SPEAKER COAXIAL IN R AUDIO IN L VIDEO IN Y PB/CB PR/CR S VIDEO (DVD ONLY) OPTICAL DIGITAL IN VIDEO 2 HDMI OUT VIDEO 1 R (DVD ONLY) L AUDIO IN VIDEO 2 COMPONENT VIDEO OUT VIDEO IN (DVD ONLY) VIDEO MONITOR OUT AM COAXIAL FM 75 Surround speaker (R) Subwoofer Note • Do not set the speakers in an inclined position.
DAVFX80 Instructions (complete HT system)
Page 20
... (not supplied) that are: - To prevent this, be sure to vibrations - Extremely hot or cold - • Do not place the speakers in locations that are attached with the speakers on a specially treated (waxed, oiled, polished, etc.) floor, as staining or discoloration may result. • When cleaning, use a soft cloth such as a cleaning...; Do not use any type of abrasive pad, scouring powder, or solvent such as alcohol or benzine. • Do not lean or hang on the speaker, as the speaker may damage the system.
... (not supplied) that are: - To prevent this, be sure to vibrations - Extremely hot or cold - • Do not place the speakers in locations that are attached with the speakers on a specially treated (waxed, oiled, polished, etc.) floor, as staining or discoloration may result. • When cleaning, use a soft cloth such as a cleaning...; Do not use any type of abrasive pad, scouring powder, or solvent such as alcohol or benzine. • Do not lean or hang on the speaker, as the speaker may damage the system.

DAVFX80 Instructions (complete HT system)
Page 21
...(6 1/2 inch) 7 to 8 mm (9/32 to 11/32 inch) 8 to 9 mm (11/32 to #. Getting Started After connecting all the speakers are connected correctly. If this happens, check the speaker connection again. See the illustrations below. 25 mm (1 inch) 4 mm (5/32 inch) 4.6 mm (3/16 inch) 10 mm (13/32 inch) Hole... on the Setup Display, the speaker may be short-circuited. For details on the components: 3 to 3, and # to 3/8 inch) 3 Peel the seals off the two screw points on the back of...
...(6 1/2 inch) 7 to 8 mm (9/32 to 11/32 inch) 8 to 9 mm (11/32 to #. Getting Started After connecting all the speakers are connected correctly. If this happens, check the speaker connection again. See the illustrations below. 25 mm (1 inch) 4 mm (5/32 inch) 4.6 mm (3/16 inch) 10 mm (13/32 inch) Hole... on the Setup Display, the speaker may be short-circuited. For details on the components: 3 to 3, and # to 3/8 inch) 3 Peel the seals off the two screw points on the back of...
DAVFX80 Instructions (complete HT system)
Page 22
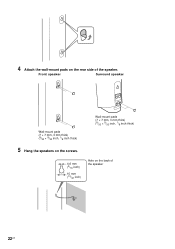
4 Attach the wall-mount pads on the back of the speaker. Front speaker Surround speaker Wall-mount pads (7 × 7 mm, 3 mm thick) (9/32 × 9/32 inch, 1/8 inch thick) Wall-mount pads (7 × 7 mm, 3 mm thick) (9/32 × 9/32 inch, 1/8 inch thick) 5 Hang the speakers on the screws. 4.6 mm (3/16 inch) 10 mm (13/32 inch) Hole on the rear side of the speaker 22US
4 Attach the wall-mount pads on the back of the speaker. Front speaker Surround speaker Wall-mount pads (7 × 7 mm, 3 mm thick) (9/32 × 9/32 inch, 1/8 inch thick) Wall-mount pads (7 × 7 mm, 3 mm thick) (9/32 × 9/32 inch, 1/8 inch thick) 5 Hang the speakers on the screws. 4.6 mm (3/16 inch) 10 mm (13/32 inch) Hole on the rear side of the speaker 22US

DAVFX80 Instructions (complete HT system)
Page 23
As a plaster board wall is not responsible for the wall material and strength. Install the speakers on a vertical and flat wall where reinforcement is applied. • Contact a screw shop or installer regarding the wall material or screws to be used. • Sony is especially fragile, attach the screws securely to a beam and fasten them to the wall. Getting Started Note • Use screws that are suitable for accident or damage caused by improper installation, insufficient wall strength or improper screw installation, natural calamity, etc. 23US
As a plaster board wall is not responsible for the wall material and strength. Install the speakers on a vertical and flat wall where reinforcement is applied. • Contact a screw shop or installer regarding the wall material or screws to be used. • Sony is especially fragile, attach the screws securely to a beam and fasten them to the wall. Getting Started Note • Use screws that are suitable for accident or damage caused by improper installation, insufficient wall strength or improper screw installation, natural calamity, etc. 23US

DAVFX80 Instructions (complete HT system)
Page 25
...FRONT R FRONT L SURR R SURR L CENTER WOOFER SPEAKER COAXIAL IN R AUDIO IN L VIDEO IN Y PB/CB PR/CR S VIDEO (DVD ONLY) OPTICAL DIGITAL IN VIDEO 2 HDMI OUT VIDEO 1 R (DVD ONLY) L AUDIO IN VIDEO 2 COMPONENT VIDEO OUT VIDEO IN (DVD ONLY) VIDEO MONITOR OUT AM COAXIAL FM 75 To... jack * HDMI (high-definition multimedia interface) TV with COMPONENT VIDEO IN jacks The system is based on version 1.1 of your TV's audio output connected to this system, you can listen to TV sound through the system speakers. continued 25US With your TV, and choose the A, B, C, or D connection....
...FRONT R FRONT L SURR R SURR L CENTER WOOFER SPEAKER COAXIAL IN R AUDIO IN L VIDEO IN Y PB/CB PR/CR S VIDEO (DVD ONLY) OPTICAL DIGITAL IN VIDEO 2 HDMI OUT VIDEO 1 R (DVD ONLY) L AUDIO IN VIDEO 2 COMPONENT VIDEO OUT VIDEO IN (DVD ONLY) VIDEO MONITOR OUT AM COAXIAL FM 75 To... jack * HDMI (high-definition multimedia interface) TV with COMPONENT VIDEO IN jacks The system is based on version 1.1 of your TV's audio output connected to this system, you can listen to TV sound through the system speakers. continued 25US With your TV, and choose the A, B, C, or D connection....
DAVFX80 Instructions (complete HT system)
Page 28
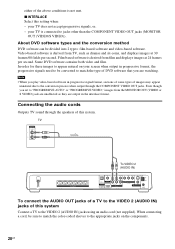
... play video-based software in the interlace format. Some DVD software contains both video and film. x INTERLACE Select this system Connect a TV to the VIDEO 2 (AUDIO IN) jacks using an audio cord (not supplied). TV AUDIO OUT L R FRONT R FRONT L SURR R SURR L CENTER WOOFER SPEAKER To VIDEO 2 (AUDIO IN) COAXIAL IN R AUDIO IN L VIDEO...
... play video-based software in the interlace format. Some DVD software contains both video and film. x INTERLACE Select this system Connect a TV to the VIDEO 2 (AUDIO IN) jacks using an audio cord (not supplied). TV AUDIO OUT L R FRONT R FRONT L SURR R SURR L CENTER WOOFER SPEAKER To VIDEO 2 (AUDIO IN) COAXIAL IN R AUDIO IN L VIDEO...
DAVFX80 Instructions (complete HT system)
Page 29
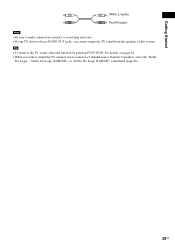
Getting Started White (L/audio) Red (R/audio) Note • Be sure to make connections securely to avoid hum and noise. • If your TV does not have AUDIO OUT jacks, you want to the TV sound, select the function by pressing FUNCTION. For details, see page 62. • When you cannot output the TV sound from the speakers of a 2 channel source from the 6 speakers, select the "Dolby Pro Logic," "Dolby Pro Logic II MOVIE," or "Dolby Pro Logic II MUSIC" sound field (page 60). 29US Tip • To listen to output the TV sound or stereo sound of this system.
Getting Started White (L/audio) Red (R/audio) Note • Be sure to make connections securely to avoid hum and noise. • If your TV does not have AUDIO OUT jacks, you want to the TV sound, select the function by pressing FUNCTION. For details, see page 62. • When you cannot output the TV sound from the speakers of a 2 channel source from the 6 speakers, select the "Dolby Pro Logic," "Dolby Pro Logic II MOVIE," or "Dolby Pro Logic II MUSIC" sound field (page 60). 29US Tip • To listen to output the TV sound or stereo sound of this system.

DAVFX80 Instructions (complete HT system)
Page 30
...) FRONT R FRONT L SURR R SURR L CENTER WOOFER SPEAKER COAXIAL IN R AUDIO IN L VIDEO IN Y PB/CB PR/CR S VIDEO (DVD ONLY) OPTICAL DIGITAL IN VIDEO 2 HDMI OUT VIDEO 1 R (DVD ONLY) L AUDIO IN VIDEO 2 COMPONENT VIDEO OUT VIDEO IN (DVD ONLY) VIDEO MONITOR OUT AM COAXIAL FM 75 OPTICAL DIGITAL... the VIDEO/AUDIO OUT jacks of other component to the appropriate jacks on the components. Connecting the system and the other component Outputs the other component through the speakers of this system Connect the VCR or other component by connecting the VIDEO/AUDIO OUT jacks of this...
...) FRONT R FRONT L SURR R SURR L CENTER WOOFER SPEAKER COAXIAL IN R AUDIO IN L VIDEO IN Y PB/CB PR/CR S VIDEO (DVD ONLY) OPTICAL DIGITAL IN VIDEO 2 HDMI OUT VIDEO 1 R (DVD ONLY) L AUDIO IN VIDEO 2 COMPONENT VIDEO OUT VIDEO IN (DVD ONLY) VIDEO MONITOR OUT AM COAXIAL FM 75 OPTICAL DIGITAL... the VIDEO/AUDIO OUT jacks of other component to the appropriate jacks on the components. Connecting the system and the other component Outputs the other component through the speakers of this system Connect the VCR or other component by connecting the VIDEO/AUDIO OUT jacks of this...
DAVFX80 Instructions (complete HT system)
Page 32
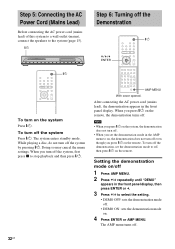
... Step 5: Connecting the AC Power Cord (Mains Lead) Before connecting the AC power cord (mains lead) of this system to a wall outlet (mains), connect the speakers to off the system Press "/1. Doing so may cancel the menu settings. When you turn on the remote. The AMP menu turns off ...even though you press "/1 on the system Press "/1. The system enters standby mode. When you press "/1 on the remote, the ...
... Step 5: Connecting the AC Power Cord (Mains Lead) Before connecting the AC power cord (mains lead) of this system to a wall outlet (mains), connect the speakers to off the system Press "/1. Doing so may cancel the menu settings. When you turn on the remote. The AMP menu turns off ...even though you press "/1 on the system Press "/1. The system enters standby mode. When you press "/1 on the remote, the ...


