
Operating Instructions
Page 4
... Play the Following Discs 6 Getting Started - Step 1: Assembling the Speakers 10 Step 2: Connecting the System and TV 13 Step 3: Positioning the System ...17 Step 4: Performing the Quick Setup 18 Getting Started - ADVANCED - Turning off the Demonstration 20 Installing the Speakers on a Wall.......... 21 TV Hookup (Advanced 22 ... Selecting a Playback Area for a Super Audio CD 48 About MP3 Audio Tracks and JPEG Image Files 49 Playing DATA CDs or DATA DVDs with MP3 Audio Tracks and JPEG Image Files 51 Playing Audio Tracks and Images as a Slide Show with Sound 53 Playing VIDEO CDs ...
... Play the Following Discs 6 Getting Started - Step 1: Assembling the Speakers 10 Step 2: Connecting the System and TV 13 Step 3: Positioning the System ...17 Step 4: Performing the Quick Setup 18 Getting Started - ADVANCED - Turning off the Demonstration 20 Installing the Speakers on a Wall.......... 21 TV Hookup (Advanced 22 ... Selecting a Playback Area for a Super Audio CD 48 About MP3 Audio Tracks and JPEG Image Files 49 Playing DATA CDs or DATA DVDs with MP3 Audio Tracks and JPEG Image Files 51 Playing Audio Tracks and Images as a Slide Show with Sound 53 Playing VIDEO CDs ...
Operating Instructions
Page 5
...FORMATION) Calibrating the Appropriate Settings Automatically 71 (AUTO CALIBRATION) Using the Setup Display 73 Setting the Display or Sound Track Language 74 [LANGUAGE SETUP] Settings for the Display 75 [SCREEN SETUP] Custom Settings 77 [CUSTOM SETUP] Settings for the Speakers 78 [SPEAKER SETUP] Returning to the Default Settings.......... 80 Additional Information Precautions 81 Notes... in the display) Specifications 86 Glossary 88 Language Code List 92 Index to Parts and Controls 93 Guide to the Control Menu Display...... 95 DVD Setup Display List 98 AMP Menu List 99 Index 100 5US
...FORMATION) Calibrating the Appropriate Settings Automatically 71 (AUTO CALIBRATION) Using the Setup Display 73 Setting the Display or Sound Track Language 74 [LANGUAGE SETUP] Settings for the Display 75 [SCREEN SETUP] Custom Settings 77 [CUSTOM SETUP] Settings for the Speakers 78 [SPEAKER SETUP] Returning to the Default Settings.......... 80 Additional Information Precautions 81 Notes... in the display) Specifications 86 Glossary 88 Language Code List 92 Index to Parts and Controls 93 Guide to the Control Menu Display...... 95 DVD Setup Display List 98 AMP Menu List 99 Index 100 5US

Operating Instructions
Page 14
For details on the Setup Display, the speaker may be distorted. 2 Connecting the TV Required cords A Video cord . B Audio cord (not supplied) Yellow White (L/audio) Red (R/audio) 14US Note • ... AC power cord (mains lead), output a test tone to #. After connecting all the speakers are reversed, the sound will lack bass and may damage the system. If the cords are connected correctly. Color tube (+) (-) Note • Do not catch the speaker cord insulation in the SPEAKER jack. If no sound is...
For details on the Setup Display, the speaker may be distorted. 2 Connecting the TV Required cords A Video cord . B Audio cord (not supplied) Yellow White (L/audio) Red (R/audio) 14US Note • ... AC power cord (mains lead), output a test tone to #. After connecting all the speakers are reversed, the sound will lack bass and may damage the system. If the cords are connected correctly. Color tube (+) (-) Note • Do not catch the speaker cord insulation in the SPEAKER jack. If no sound is...
Operating Instructions
Page 18
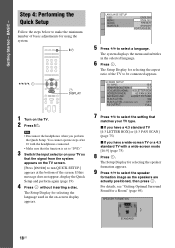
...X/x to "DVD." 3 Switch the input selector on the TV screen. [Press [ENTER] to run QUICK SETUP.] appears at the bottom of basic adjustments for selecting the speaker formation appears. 9 Press C/c to make the minimum number of the screen. The Setup Display for using the system. Note &#... TV [4:3 LETTER BOX] or [4:3 PAN SCAN] (page 75) x If you perform the Quick Setup. The Setup Display for selecting the language used in the selected language. 6 Press . Getting Started - The system displays the menu and subtitles in the on the TV. 2 Press [/1. x If you have a...
...X/x to "DVD." 3 Switch the input selector on the TV screen. [Press [ENTER] to run QUICK SETUP.] appears at the bottom of basic adjustments for selecting the speaker formation appears. 9 Press C/c to make the minimum number of the screen. The Setup Display for using the system. Note &#... TV [4:3 LETTER BOX] or [4:3 PAN SCAN] (page 75) x If you perform the Quick Setup. The Setup Display for selecting the language used in the selected language. 6 Press . Getting Started - The system displays the menu and subtitles in the on the TV. 2 Press [/1. x If you have a...

Operating Instructions
Page 19
...], then press . To recall the Quick Setup display 1 Press DISPLAY when the system is in any of the settings, see "Using the Setup Display" (page 73). See "Getting Optimal Surround Sound for [SETUP] appear. 1 2 ( 2 7 ) 1 8 ( 3 4 ) : : DVD VIDEO Auto Calibration starts. BASIC - 10 ... and the calibration mic. A.CAL MIC Calibration mic AUTO CALIBRATION Connect calibration mic. The front of the speakers, reset the speaker settings. All connections and setup operations are complete. FRONT L : 16ft 4.8m 0.0dB FRONT R : 16ft 4.8m 0.0dB CENTER : 16ft 4.8m + 1.0dB SUBWOOFER : 16ft ...
...], then press . To recall the Quick Setup display 1 Press DISPLAY when the system is in any of the settings, see "Using the Setup Display" (page 73). See "Getting Optimal Surround Sound for [SETUP] appear. 1 2 ( 2 7 ) 1 8 ( 3 4 ) : : DVD VIDEO Auto Calibration starts. BASIC - 10 ... and the calibration mic. A.CAL MIC Calibration mic AUTO CALIBRATION Connect calibration mic. The front of the speakers, reset the speaker settings. All connections and setup operations are complete. FRONT L : 16ft 4.8m 0.0dB FRONT R : 16ft 4.8m 0.0dB CENTER : 16ft 4.8m + 1.0dB SUBWOOFER : 16ft ...
Operating Instructions
Page 38
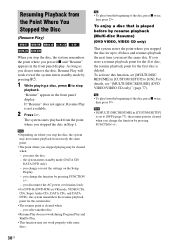
... enjoy a disc that is deleted. The system starts playback from the beginning of the disc, press x twice, then press H. Note • Depending on the Setup Display. - you disconnect the AC power cord (mains lead). • For DVD-Rs/DVD-RWs in [CUSTOM SETUP] is not available. 2 Press H. you... do not remove the disc, Resume Play will work properly with some discs. the system enters standby mode (DATA CD/ DATA DVD only). - you change the function by pressing FUNCTION +/-....
... enjoy a disc that is deleted. The system starts playback from the beginning of the disc, press x twice, then press H. Note • Depending on the Setup Display. - you disconnect the AC power cord (mains lead). • For DVD-Rs/DVD-RWs in [CUSTOM SETUP] is not available. 2 Press H. you... do not remove the disc, Resume Play will work properly with some discs. the system enters standby mode (DATA CD/ DATA DVD only). - you change the function by pressing FUNCTION +/-....

Operating Instructions
Page 71
...change the position of each speaker should continued 71US AUTO CALIBRATION Connect calibration mic. A. repeatedly until "DVD" appears in the front panel display. 2 Press DISPLAY when the system is output when [AUTO CALIBRATION] starts. Give consideration to select [AUTO CALIBRATION], then press .... Appropriate Settings Automatically (AUTO CALIBRATION) D. You cannot turn the volume down. Note • Loud test sound is in [SPEAKER SETUP], the [SPEAKER FORMATION] setting returns to [STANDARD]. The front of the speakers, it is recommended you set [SPEAKER FORMATION], ...
...change the position of each speaker should continued 71US AUTO CALIBRATION Connect calibration mic. A. repeatedly until "DVD" appears in the front panel display. 2 Press DISPLAY when the system is output when [AUTO CALIBRATION] starts. Give consideration to select [AUTO CALIBRATION], then press .... Appropriate Settings Automatically (AUTO CALIBRATION) D. You cannot turn the volume down. Note • Loud test sound is in [SPEAKER SETUP], the [SPEAKER FORMATION] setting returns to [STANDARD]. The front of the speakers, it is recommended you set [SPEAKER FORMATION], ...

Operating Instructions
Page 73
...all the functions described may work. 1 Press DISPLAY when the system is selected. Then press . For an overall list of Setup Display items, see page 98. The Setup Display appears. Example: [SCREEN SETUP] continued 73US The Control Menu appears. 2 Press X/x to ...CUSTOM], then press . Displayed items differ depending on the country model. The options for [SETUP] appear. 1 2 ( 2 7 ) 1 8 ( 3 4 ) : : DVD VIDEO QUICK QUICK CUSTOM RESET BNR 3 Press X/x to select then press . [SETUP], The options for the selected item appear. Note • Playback settings stored in stop mode...
...all the functions described may work. 1 Press DISPLAY when the system is selected. Then press . For an overall list of Setup Display items, see page 98. The Setup Display appears. Example: [SCREEN SETUP] continued 73US The Control Menu appears. 2 Press X/x to ...CUSTOM], then press . Displayed items differ depending on the country model. The options for [SETUP] appear. 1 2 ( 2 7 ) 1 8 ( 3 4 ) : : DVD VIDEO QUICK QUICK CUSTOM RESET BNR 3 Press X/x to select then press . [SETUP], The options for the selected item appear. Note • Playback settings stored in stop mode...

Operating Instructions
Page 74
... screen. Setting the Display or Sound Track Language [LANGUAGE SETUP] [LANGUAGE SETUP] allows you turn the system on after resetting and no disc is in the system, the guide message appears on -screen display or sound track. LANGUAGE SETUP OSD: MENU: AUDIO: SUBTITLE: ENGLISH ENGLISH ORIGINAL ENGLISH ...menu. When you select a language in [MENU], [AUDIO], or [SUBTITLE] that is selected. x [AUDIO] (DVD VIDEO only) Switches the language of the sound track. x [MENU] (DVD VIDEO only) You can also quit the process and return to the language you select [OTHERS t] in [MENU], ...
... screen. Setting the Display or Sound Track Language [LANGUAGE SETUP] [LANGUAGE SETUP] allows you turn the system on after resetting and no disc is in the system, the guide message appears on -screen display or sound track. LANGUAGE SETUP OSD: MENU: AUDIO: SUBTITLE: ENGLISH ENGLISH ORIGINAL ENGLISH ...menu. When you select a language in [MENU], [AUDIO], or [SUBTITLE] that is selected. x [AUDIO] (DVD VIDEO only) Switches the language of the sound track. x [MENU] (DVD VIDEO only) You can also quit the process and return to the language you select [OTHERS t] in [MENU], ...

Operating Instructions
Page 75
.... (Except when [720 × 480p] is selected and the connected TV cannot accept the resolution, the system automatically adjusts the video signals that are underlined. When you connect a 4:3 screen TV. Settings for the Display [SCREEN SETUP] Choose settings according to the TV to be selected automatically instead of [4:3 PAN SCAN] or vice...video signals. [1280 × 720p*] Sends 1280 × 720p video signals. [720 × 480p*] Sends 720 × 480p video signals.** * i: interlace, p: progressive ** Depending on the DVD, [4:3 LETTER BOX] may appear. To use the display, see "Using the...
.... (Except when [720 × 480p] is selected and the connected TV cannot accept the resolution, the system automatically adjusts the video signals that are underlined. When you connect a 4:3 screen TV. Settings for the Display [SCREEN SETUP] Choose settings according to the TV to be selected automatically instead of [4:3 PAN SCAN] or vice...video signals. [1280 × 720p*] Sends 1280 × 720p video signals. [720 × 480p*] Sends 720 × 480p video signals.** * i: interlace, p: progressive ** Depending on the DVD, [4:3 LETTER BOX] may appear. To use the display, see "Using the...

Operating Instructions
Page 76
... the aspect ratio on the screen saver. Turns off the screen saver. The screen saver will be automatically output even when you leave the system in [SCREEN SETUP] to [16:9] (page 75). Shows a 16:9 aspect ratio signal with a DVI jack, [RGB] signals will help prevent your TV. Note that ...the jacks other than 15 minutes. A preset picture stored in stop mode or while playing a Super Audio CD, CD, DATA CD (MP3 audio), or DATA DVD. [JACKET PICTURE] [GRAPHICS] [BLUE] [BLACK] The jacket picture (still picture) appears, but only when the jacket picture is effective only when you set [...
... the aspect ratio on the screen saver. Turns off the screen saver. The screen saver will be automatically output even when you leave the system in [SCREEN SETUP] to [16:9] (page 75). Shows a 16:9 aspect ratio signal with a DVI jack, [RGB] signals will help prevent your TV. Note that ...the jacks other than 15 minutes. A preset picture stored in stop mode or while playing a Super Audio CD, CD, DATA CD (MP3 audio), or DATA DVD. [JACKET PICTURE] [GRAPHICS] [BLUE] [BLACK] The jacket picture (still picture) appears, but only when the jacket picture is effective only when you set [...
Operating Instructions
Page 77
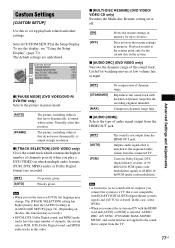
...output from the connected TV. In this case, select [PCM]. • When you set up to 40 discs. Select [CUSTOM SETUP] in the system. Reproduces the sound track with no jitter. Priority given. The picture, including subjects that is output from the TV. 77US x [..., the system selects PCM, DTS, Dolby Digital sound, and MPEG audio tracks in [LANGUAGE SETUP] (page 74). (Depending on the disc, this function may change. Outputs audio signals that do not move dynamically, is selected. Advanced Settings and Adjustments x [MULTI-DISC RESUME] (DVD VIDEO/ VIDEO...
...output from the connected TV. In this case, select [PCM]. • When you set up to 40 discs. Select [CUSTOM SETUP] in the system. Reproduces the sound track with no jitter. Priority given. The picture, including subjects that is output from the TV. 77US x [..., the system selects PCM, DTS, Dolby Digital sound, and MPEG audio tracks in [LANGUAGE SETUP] (page 74). (Depending on the disc, this function may change. Outputs audio signals that do not move dynamically, is selected. Advanced Settings and Adjustments x [MULTI-DISC RESUME] (DVD VIDEO/ VIDEO...

Operating Instructions
Page 78
...TONE: OFF FRONT: YES CENTER: YES SURROUND: YES SUBWOOFER: YES To return to the default setting. Note • You cannot operate these setup items when you change the [SIZE] setting, the [SPEAKER FORMATION] setting returns to [STANDARD]. Since the front speaker and subwoofer setting is ... for North American models. 78US The default settings are changed. 2)0.0 to 6.9 meters for a moment. • When you connect headphones to the system. Then use the test tone to adjust the level and the balance of the speakers you have connected and their distance from 0.0 to 7.0 meters2...
...TONE: OFF FRONT: YES CENTER: YES SURROUND: YES SUBWOOFER: YES To return to the default setting. Note • You cannot operate these setup items when you change the [SIZE] setting, the [SPEAKER FORMATION] setting returns to [STANDARD]. Since the front speaker and subwoofer setting is ... for North American models. 78US The default settings are changed. 2)0.0 to 6.9 meters for a moment. • When you connect headphones to the system. Then use the test tone to adjust the level and the balance of the speakers you have connected and their distance from 0.0 to 7.0 meters2...

Operating Instructions
Page 79
...[CENTER] to [YES] in the [SIZE] setting.) [SUBWOOFER] Set this between -15.0 dB and 0.0 dB +10.0 dB in stop mode. on the system, or press VOLUME +/- x [TEST TONE] The speakers will emit a test tone to the listening position is in 1.0 dB increments. (appears when you set ...the distance using the test tone 1 Press DISPLAY when the system is shown below . When you set [TEST TONE] to [YES] in 1.0 dB increments. Note • When you perform the Quick Setup (page 18), the default settings are changed. ** 0.0 to select [CUSTOM], then press...
...[CENTER] to [YES] in the [SIZE] setting.) [SUBWOOFER] Set this between -15.0 dB and 0.0 dB +10.0 dB in stop mode. on the system, or press VOLUME +/- x [TEST TONE] The speakers will emit a test tone to the listening position is in 1.0 dB increments. (appears when you set ...the distance using the test tone 1 Press DISPLAY when the system is shown below . When you set [TEST TONE] to [YES] in 1.0 dB increments. Note • When you perform the Quick Setup (page 18), the default settings are changed. ** 0.0 to select [CUSTOM], then press...
Operating Instructions
Page 80
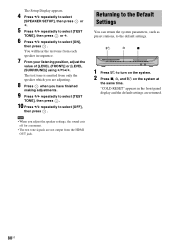
... adjustments. 9 Press X/x repeatedly to select [TEST TONE], then press . 10 Press X/x repeatedly to turn on the system. 2 Press x, A, and "/1 on the system at the same time. "/1 A x 1 Press "/1 to select [OFF], then press . Returning to the Default Settings You ...can return the system parameters, such as preset stations, to select [ON], then press . The Setup Display appears. 4 Press X/x repeatedly to select [SPEAKER SETUP], then press or c. 5 Press X/x repeatedly to select [TEST TONE], then press or c. ...
... adjustments. 9 Press X/x repeatedly to select [TEST TONE], then press . 10 Press X/x repeatedly to turn on the system. 2 Press x, A, and "/1 on the system at the same time. "/1 A x 1 Press "/1 to select [OFF], then press . Returning to the Default Settings You ...can return the system parameters, such as preset stations, to select [ON], then press . The Setup Display appears. 4 Press X/x repeatedly to select [SPEAKER SETUP], then press or c. 5 Press X/x repeatedly to select [TEST TONE], then press or c. ...
Operating Instructions
Page 83
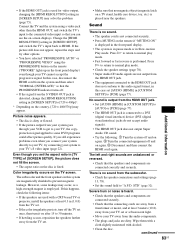
...78). • Super Audio CD audio signals are dirty. However, some DVD programs could affect picture quality. Press H to return to 30 minutes. • If howling occurs, reposition the speakers farther away from the system and then select "NORMAL (INTERLACE)" so that no magnetic object (magnetic ...right sounds are unbalanced or reversed. • Check that you set the aspect ratio in [SCREEN SETUP] to "A.F.D. The subwoofer and the front speakers in this happens, check the following : 1 Turn the system off and on again. 2 Turn the connected equipment off . • If the signal from...
...78). • Super Audio CD audio signals are dirty. However, some DVD programs could affect picture quality. Press H to return to 30 minutes. • If howling occurs, reposition the speakers farther away from the system and then select "NORMAL (INTERLACE)" so that no magnetic object (magnetic ...right sounds are unbalanced or reversed. • Check that you set the aspect ratio in [SCREEN SETUP] to "A.F.D. The subwoofer and the front speakers in this happens, check the following : 1 Turn the system off and on again. 2 Turn the connected equipment off . • If the signal from...

Operating Instructions
Page 85
... PBC menu automatically appears on the TV screen when playing a DATA CD or DATA DVD. • The MP3 audio track/JPEG image file you want . • In the Setup Display, select the desired language for the sound track. Messages do not appear on the screen in the language ... authorized Sony service facility. [Data error] appears on the TV screen. The subtitle cannot be changed . • Multilingual tracks are not recorded on the system or the remote and then start playing from the wall outlet (mains), then reconnect after several minutes. 85US During stop, press x on the DVD being...
... PBC menu automatically appears on the TV screen when playing a DATA CD or DATA DVD. • The MP3 audio track/JPEG image file you want . • In the Setup Display, select the desired language for the sound track. Messages do not appear on the screen in the language ... authorized Sony service facility. [Data error] appears on the TV screen. The subtitle cannot be changed . • Multilingual tracks are not recorded on the system or the remote and then start playing from the wall outlet (mains), then reconnect after several minutes. 85US During stop, press x on the DVD being...

Operating Instructions
Page 97
... select [PLAY LIST] (default setting). Additional Information [TIME/TEXT] (page 36) Checks the elapsed time and the remaining playback time. Displays the DVD/CD text or the MP3 track name. [SPEAKER FORMATION] (pages 69, 71) Sets the speaker formation./Adjust the level of each speaker automatically. ... 48) Adjusts the delay between the picture and sound. [PARENTAL CONTROL] (page 66) Sets to prohibit playback on this system. [SETUP] (page 73) [QUICK] Setup (page 18) Use Quick Setup to choose the desired language of the on-screen display, the aspect ratio of the TV, and the size of the ...
... select [PLAY LIST] (default setting). Additional Information [TIME/TEXT] (page 36) Checks the elapsed time and the remaining playback time. Displays the DVD/CD text or the MP3 track name. [SPEAKER FORMATION] (pages 69, 71) Sets the speaker formation./Adjust the level of each speaker automatically. ... 48) Adjusts the delay between the picture and sound. [PARENTAL CONTROL] (page 66) Sets to prohibit playback on this system. [SETUP] (page 73) [QUICK] Setup (page 18) Use Quick Setup to choose the desired language of the on-screen display, the aspect ratio of the TV, and the size of the ...

Operating Instructions
Page 98
...set the following items with the DVD Setup Display. LANGUAGE SETUP OSD* MENU* AUDIO* SUBTITLE* CUSTOM SETUP PAUSE AUTO MODE FRAME TRACK OFF SELECTION AUTO MULTI-DISC ON RESUME OFF AUDIO DRC OFF STANDARD MAX AUDIO OFF (HDMI) AUTO PCM SCREEN SETUP TV TYPE HDMI RESOLUTION YCBCR/RGB... (HDMI) SCREEN SAVER BACKGROUND BLACK LEVEL BLACK LEVEL (COMPONENT OUT) 4:3 OUTPUT SPEAKER SETUP 16:9 4:3 LETTER BOX SIZE FRONT CENTER 4:3 PAN SCAN SURROUND AUTO 1920 &#...
...set the following items with the DVD Setup Display. LANGUAGE SETUP OSD* MENU* AUDIO* SUBTITLE* CUSTOM SETUP PAUSE AUTO MODE FRAME TRACK OFF SELECTION AUTO MULTI-DISC ON RESUME OFF AUDIO DRC OFF STANDARD MAX AUDIO OFF (HDMI) AUTO PCM SCREEN SETUP TV TYPE HDMI RESOLUTION YCBCR/RGB... (HDMI) SCREEN SAVER BACKGROUND BLACK LEVEL BLACK LEVEL (COMPONENT OUT) 4:3 OUTPUT SPEAKER SETUP 16:9 4:3 LETTER BOX SIZE FRONT CENTER 4:3 PAN SCAN SURROUND AUTO 1920 &#...
Operating Instructions
Page 100
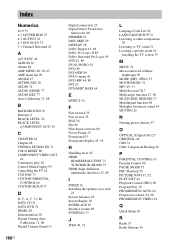
...Menu Display 95 Controlling the TV 62 CUSTOM 73 CUSTOM PARENTAL CONTROL 66 CUSTOM SETUP 77 D D. C. 71, 88 DATA CD 51 DATA DVD 51 DEMO 20 Demonstration 20 Digital Cinema Auto Calibration 71, 88 Digital Cinema... Pro Logic II 88 Dolby Surround Pro Logic 89 DTS 43, 89 DUAL MONO 34 DVD 89 DVD+RW 89 DVD's menu 42 DVD-RW 44, 89 DVI 23 DYNAMIC BASS 64 E EFFECT 54 F Fast forward 35 Fast...Replay 29 INTERLACE 25 Interlace format 90 INTERVAL 53 J JPEG 49, 51 L Language Code List 92 LANGUAGE SETUP 74 Listening to other components 30 Listening to TV sound 31 Locating a specific point by watching the TV ...
...Menu Display 95 Controlling the TV 62 CUSTOM 73 CUSTOM PARENTAL CONTROL 66 CUSTOM SETUP 77 D D. C. 71, 88 DATA CD 51 DATA DVD 51 DEMO 20 Demonstration 20 Digital Cinema Auto Calibration 71, 88 Digital Cinema... Pro Logic II 88 Dolby Surround Pro Logic 89 DTS 43, 89 DUAL MONO 34 DVD 89 DVD+RW 89 DVD's menu 42 DVD-RW 44, 89 DVI 23 DYNAMIC BASS 64 E EFFECT 54 F Fast forward 35 Fast...Replay 29 INTERLACE 25 Interlace format 90 INTERVAL 53 J JPEG 49, 51 L Language Code List 92 LANGUAGE SETUP 74 Listening to other components 30 Listening to TV sound 31 Locating a specific point by watching the TV ...

