Operating Instructions
Page 3
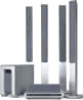
...unit on surfaces (rugs, blankets, etc.) or near materials (curtains, draperies) that this product meets the ENERGY STAR® guidelines for purchasing Sony DVD Home Theatre System. On adjusting volume Do not turn off . • Unplug the unit from the wall outlet if you do not intend to use it ...inputs or no audio signals. Should this case, remove the disc and leave the system turned on the unit. • If the unit is placed in a place subject to standby mode by pressing the "/1 button (the STANDBY indicator lights up the volume while listening to a warm location, or is brought ...
...unit on surfaces (rugs, blankets, etc.) or near materials (curtains, draperies) that this product meets the ENERGY STAR® guidelines for purchasing Sony DVD Home Theatre System. On adjusting volume Do not turn off . • Unplug the unit from the wall outlet if you do not intend to use it ...inputs or no audio signals. Should this case, remove the disc and leave the system turned on the unit. • If the unit is placed in a place subject to standby mode by pressing the "/1 button (the STANDBY indicator lights up the volume while listening to a warm location, or is brought ...
Operating Instructions
Page 19
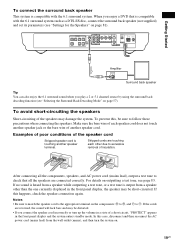
...other due to check that is output from the wall outlet (mains), and then turn up the volume in the front panel display and the system enters standby mode. If this , be short-circuited. If no sound is heard from a speaker while outputting a test tone, or a test tone... is compatible with the 6.1 surround system. SPEAKER FRONT R CENTER FRONT L WOOFER R VIDEO AUDIO IN Y L PB/CB PR/CR S VIDEO (DVD ONLY) OPTICAL DIGITAL IN SURR R SURROUND BACK R ...
...other due to check that is output from the wall outlet (mains), and then turn up the volume in the front panel display and the system enters standby mode. If this , be short-circuited. If no sound is heard from a speaker while outputting a test tone, or a test tone... is compatible with the 6.1 surround system. SPEAKER FRONT R CENTER FRONT L WOOFER R VIDEO AUDIO IN Y L PB/CB PR/CR S VIDEO (DVD ONLY) OPTICAL DIGITAL IN SURR R SURROUND BACK R ...

Operating Instructions
Page 20
...; When using the subwoofer cord, note that the cord marked with letters are negative. (-) (-) (+) (+) (-) (-) • If you connect the subwoofer cord incorrectly or turn the system on. Tips • You can use a different speaker cable, you can detach the plug for attachment to another cable. In this case, disconnect and then... of gauge cord AWG #18 - AWG #22. • Before attaching a new cable, strip off 10 mm (13/32 in the front panel display and the system enters standby mode.
...; When using the subwoofer cord, note that the cord marked with letters are negative. (-) (-) (+) (+) (-) (-) • If you connect the subwoofer cord incorrectly or turn the system on. Tips • You can use a different speaker cable, you can detach the plug for attachment to another cable. In this case, disconnect and then... of gauge cord AWG #18 - AWG #22. • Before attaching a new cable, strip off 10 mm (13/32 in the front panel display and the system enters standby mode.

Operating Instructions
Page 30
... To play ) of the system is ready for loading the disc. The system turns on the DVD or VIDEO CD, some operations may be different or restricted. Example: When you want to load the disc to select "DVD." Adjust the volume on the system. Disc1-5/Z/ Disc slot indicators Adjust the volume "/1 STANDBY indicator FUNCTION Connect headphones...
... To play ) of the system is ready for loading the disc. The system turns on the DVD or VIDEO CD, some operations may be different or restricted. Example: When you want to load the disc to select "DVD." Adjust the volume on the system. Disc1-5/Z/ Disc slot indicators Adjust the volume "/1 STANDBY indicator FUNCTION Connect headphones...

Operating Instructions
Page 31
...Discs After following the instructions on the menu. (DVD: page 33), (VIDEO CD: page 33). The system turns on by pressing "/1. To turn off the system, first press x to the next chapter, > track, scene, or file in standby mode Press "/1 while the system turns on (the STANDBY indicator on the disc, a menu may cancel ..., do not turn off . In standby mode, the system also turns on . To save the power in continuous play from the control menu. 31US If you want to go to the next title or go back to preceding title, press DVD TOP MENU or DVD MENU and then select the title you...
...Discs After following the instructions on the menu. (DVD: page 33), (VIDEO CD: page 33). The system turns on by pressing "/1. To turn off the system, first press x to the next chapter, > track, scene, or file in standby mode Press "/1 while the system turns on (the STANDBY indicator on the disc, a menu may cancel ..., do not turn off . In standby mode, the system also turns on . To save the power in continuous play from the control menu. 31US If you want to go to the next title or go back to preceding title, press DVD TOP MENU or DVD MENU and then select the title you...

Operating Instructions
Page 32
.... 2 Press H. you pressed x and "RESUME" appears in the front panel display. "RESUME" appears in Step 1. When you stop the disc, the system remembers the point where you change the play from the beginning of the disc, press x twice, then press H. As long as you change the setting... where you stop playback. you do not remove the disc, Resume Play will work even if the system enters standby mode by pressing "/1. H x 1 While playing a disc, press x to stop the disc, the system may not resume playback from exactly the same point. • The point where you stopped the disc...
.... 2 Press H. you pressed x and "RESUME" appears in the front panel display. "RESUME" appears in Step 1. When you stop the disc, the system remembers the point where you change the play from the beginning of the disc, press x twice, then press H. As long as you change the setting... where you stop playback. you do not remove the disc, Resume Play will work even if the system enters standby mode by pressing "/1. H x 1 While playing a disc, press x to stop the disc, the system may not resume playback from exactly the same point. • The point where you stopped the disc...
Operating Instructions
Page 88
... connections and settings (pages 29, 81). • Set the sound field to some DVD programs could affect picture quality. If the indicator still flashes, or if the cause of the system? • Is the subwoofer connected incorrectly? The STANDBY indicator flashes. In this case, return the setting to [PROGRESSIVE]. If you still experience.... • The speaker cord is not connected securely. • Press MUTING on the remote if "MUTING ON" is displayed in [SCREEN SETUP] to your nearest Sony dealer. Even though you set [COMPONENT OUT] in the front panel display. • The...
... connections and settings (pages 29, 81). • Set the sound field to some DVD programs could affect picture quality. If the indicator still flashes, or if the cause of the system? • Is the subwoofer connected incorrectly? The STANDBY indicator flashes. In this case, return the setting to [PROGRESSIVE]. If you still experience.... • The speaker cord is not connected securely. • Press MUTING on the remote if "MUTING ON" is displayed in [SCREEN SETUP] to your nearest Sony dealer. Even though you set [COMPONENT OUT] in the front panel display. • The...

Operating Instructions
Page 97
Front Panel A [/1 (power) switch/STANDBY indicator (30) B DISC1-5 Z (eject)/indicators (30) C (remote sensor) (13) D Front panel display (98) E PHONES (on the side of the system) jack (30) F VOLUME +/- (30, 83) G ./> (31, 33) H x (stop) (31) I (play/pause) (30) J FUNCTION (30, 70, 73) K Disc slot (30) Additional Information 97US Index to Parts and Controls For more information, refer to the pages indicated in parentheses.
Front Panel A [/1 (power) switch/STANDBY indicator (30) B DISC1-5 Z (eject)/indicators (30) C (remote sensor) (13) D Front panel display (98) E PHONES (on the side of the system) jack (30) F VOLUME +/- (30, 83) G ./> (31, 33) H x (stop) (31) I (play/pause) (30) J FUNCTION (30, 70, 73) K Disc slot (30) Additional Information 97US Index to Parts and Controls For more information, refer to the pages indicated in parentheses.
Operating Instructions
Page 101
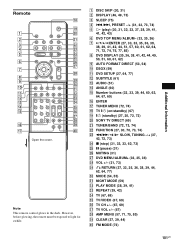
...I AUTO FORMAT DIRECT (53, 54) J DSGX (59) K DVD SETUP (27, 64, 77) L SUBTITLE (61) M AUDIO (51) N ANGLE (60) O Number buttons (33, 33, 39, 44, 60, 62, 64, 67, 69) P ENTER Q TUNER MENU (72, 74) R TV [/1 (on/standby) (67) S "/1 (standby) (27, 30, 72, 73) T SONY TV DIRECT (69) U TUNER/BAND (72, 73, 74) ...V FUNCTION (27, 30, 70, 73, 74) W m/M/ / SLOW, TUNING -/+ (37, 43, 72, 73) X x (stop) (31, 32, 33, 62, 73) Y X (pause) (31) Z MUTING (31) wj DVD MENU/ALBUM+ (33, 35, 36) wk VOL...
...I AUTO FORMAT DIRECT (53, 54) J DSGX (59) K DVD SETUP (27, 64, 77) L SUBTITLE (61) M AUDIO (51) N ANGLE (60) O Number buttons (33, 33, 39, 44, 60, 62, 64, 67, 69) P ENTER Q TUNER MENU (72, 74) R TV [/1 (on/standby) (67) S "/1 (standby) (27, 30, 72, 73) T SONY TV DIRECT (69) U TUNER/BAND (72, 73, 74) ...V FUNCTION (27, 30, 70, 73, 74) W m/M/ / SLOW, TUNING -/+ (37, 43, 72, 73) X x (stop) (31, 32, 33, 62, 73) Y X (pause) (31) Z MUTING (31) wj DVD MENU/ALBUM+ (33, 35, 36) wk VOL...


