Operating Instructions
Page 5
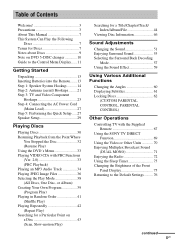
... the Following Discs 7 Terms for Discs 7 Notes about Discs 9 Note on DVD 5-DISC changer 10 Guide to the Control Menu Display...... 11 Getting Started Unpacking 13 Inserting Batteries into the Remote....... 13 Step 1: Speaker System Hookup........... 14 Step 2: Antenna (aerial) Hookups......... 21 Step 3: TV and...60 Displaying Subtitles 61 Locking Discs 62 (CUSTOM PARENTAL CONTROL, PARENTAL CONTROL) Other Operations Controlling TV with the Supplied Remote 67 Using the SONY TV DIRECT Function 69 Using the Video or Other Units 70 Enjoying Multiplex Broadcast Sound (DUAL MONO 71 Enjoying ...
... the Following Discs 7 Terms for Discs 7 Notes about Discs 9 Note on DVD 5-DISC changer 10 Guide to the Control Menu Display...... 11 Getting Started Unpacking 13 Inserting Batteries into the Remote....... 13 Step 1: Speaker System Hookup........... 14 Step 2: Antenna (aerial) Hookups......... 21 Step 3: TV and...60 Displaying Subtitles 61 Locking Discs 62 (CUSTOM PARENTAL CONTROL, PARENTAL CONTROL) Other Operations Controlling TV with the Supplied Remote 67 Using the SONY TV DIRECT Function 69 Using the Video or Other Units 70 Enjoying Multiplex Broadcast Sound (DUAL MONO 71 Enjoying ...
Operating Instructions
Page 6
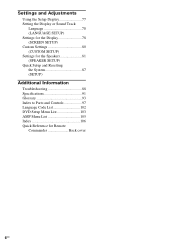
Settings and Adjustments Using the Setup Display 77 Setting the Display or Sound Track Language 78 (LANGUAGE SETUP) Settings for the Display 78 (SCREEN SETUP) Custom Settings 80 (CUSTOM SETUP) Settings for the Speakers 81 (SPEAKER SETUP) Quick Setup and Resetting the System 87 (SETUP) Additional Information Troubleshooting 88 Specifications 91 Glossary 93 Index to Parts and Controls 97 Language Code List 102 DVD Setup Menu List 103 AMP Menu List 105 Index 106 Quick Reference for Remote Commander Back cover 6US
Settings and Adjustments Using the Setup Display 77 Setting the Display or Sound Track Language 78 (LANGUAGE SETUP) Settings for the Display 78 (SCREEN SETUP) Custom Settings 80 (CUSTOM SETUP) Settings for the Speakers 81 (SPEAKER SETUP) Quick Setup and Resetting the System 87 (SETUP) Additional Information Troubleshooting 88 Specifications 91 Glossary 93 Index to Parts and Controls 97 Language Code List 102 DVD Setup Menu List 103 AMP Menu List 105 Index 106 Quick Reference for Remote Commander Back cover 6US
Operating Instructions
Page 7
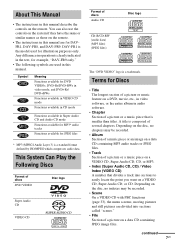
... they have the same or similar names as those on a data CD containing JPEG image files. This System Can Play the Following Discs Format of discs DVD VIDEO Disc logo Super Audio CD VIDEO CD Format of discs Audio CD CD-R/CD-RW (audio data) (MP3 files) (JPEG files...the remote. Symbol Meaning Functions available for DVD VIDEOs, DVD-Rs/DVD-RWs in video mode, and DVD+Rs/ DVD+RWs Functions available in VIDEO CD mode Functions available in CD mode Functions available in Super Audio CD and Audio CD mode Functions available for MP3* audio tracks Functions available for DAVFR1, DAV-FR8, and DAV-FR9...
... they have the same or similar names as those on a data CD containing JPEG image files. This System Can Play the Following Discs Format of discs DVD VIDEO Disc logo Super Audio CD VIDEO CD Format of discs Audio CD CD-R/CD-RW (audio data) (MP3 files) (JPEG files...the remote. Symbol Meaning Functions available for DVD VIDEOs, DVD-Rs/DVD-RWs in video mode, and DVD+Rs/ DVD+RWs Functions available in VIDEO CD mode Functions available in CD mode Functions available in Super Audio CD and Audio CD mode Functions available for MP3* audio tracks Functions available for DAVFR1, DAV-FR8, and DAV-FR9...
Operating Instructions
Page 13
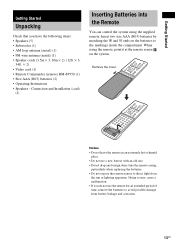
...(R03) batteries by matching the 3 and # ends on the system. When using the supplied remote. Remove the cover. Connection and Installation (card) (1) Inserting Batteries into the remote casing, particularly when replacing the batteries. • Do not expose the remote sensor to avoid possible damage from the sun or lighting apparatus. ...Check that you do not use a new battery with an old one. • Do not drop any foreign object into the Remote You can control the system using the remote, point it at the remote sensor on the batteries to the markings inside the compartment.
...(R03) batteries by matching the 3 and # ends on the system. When using the supplied remote. Remove the cover. Connection and Installation (card) (1) Inserting Batteries into the remote casing, particularly when replacing the batteries. • Do not expose the remote sensor to avoid possible damage from the sun or lighting apparatus. ...Check that you do not use a new battery with an old one. • Do not drop any foreign object into the Remote You can control the system using the remote, point it at the remote sensor on the batteries to the markings inside the compartment.

Operating Instructions
Page 30
... headphones 4 Press DISC1-5 Z. To load other discs, press DISC SKIP on your disc. Push the disc into the system automatically and "READING" appears in the front panel display. 6 Press H on the remote or on the DVD or VIDEO CD, some operations may be different or restricted. Playing Discs Playing Discs Depending on the...
... headphones 4 Press DISC1-5 Z. To load other discs, press DISC SKIP on your disc. Push the disc into the system automatically and "READING" appears in the front panel display. 6 Press H on the remote or on the DVD or VIDEO CD, some operations may be different or restricted. Playing Discs Playing Discs Depending on the...

Operating Instructions
Page 35
... track starts playing. To return to the track or the album list. 5 Select a track using X/x and press ENTER. To turn off the display Press DVD DISPLAY. Press C or O RETURN to return to the previous display Press O RETURN or C. Tip When an MP3 data disc is displayed. on the window...BOSSANOVA 3 Select an album you want to select then press ENTER or c. (ALBUM) The list of all tracks or albums cannot be displayed on the remote. 35US Notes • Only alphabetical letters and numbers can select an album using X/x. Press c to select the jump bar icon, and then scroll ...
... track starts playing. To return to the track or the album list. 5 Select a track using X/x and press ENTER. To turn off the display Press DVD DISPLAY. Press C or O RETURN to return to the previous display Press O RETURN or C. Tip When an MP3 data disc is displayed. on the window...BOSSANOVA 3 Select an album you want to select then press ENTER or c. (ALBUM) The list of all tracks or albums cannot be displayed on the remote. 35US Notes • Only alphabetical letters and numbers can select an album using X/x. Press c to select the jump bar icon, and then scroll ...

Operating Instructions
Page 37
... H when you want to the previous display Press O RETURN or C. Note Slide show , the interval time changes. To turn off the display Press DVD DISPLAY. Anything else is displayed as " ". • Until playing the disc or selecting an album in step 2, album name is displayed as follows:... jump bar appears. on a JPEG data disc M H 1 Press M while displaying a JPEG image. The selected file starts playing. Slide show on the remote. Press C or O RETURN to return to a number) in only one direction. 37US Enjoying Slide show starts from the current image. With each press, ...
... H when you want to the previous display Press O RETURN or C. Note Slide show , the interval time changes. To turn off the display Press DVD DISPLAY. Anything else is displayed as " ". • Until playing the disc or selecting an album in step 2, album name is displayed as follows:... jump bar appears. on a JPEG data disc M H 1 Press M while displaying a JPEG image. The selected file starts playing. Slide show on the remote. Press C or O RETURN to return to a number) in only one direction. 37US Enjoying Slide show starts from the current image. With each press, ...
Operating Instructions
Page 42
... cannot operate DISC SKIP on the remote or DISC1-5 on a disc. Note While shuffling all the titles/tracks/files or a single title/chapter/track on the system. In Shuffle or Program Play mode, the system repeats tracks in green. 3 Select the Repeat Play setting, then press ENTER. 1:DVD DVD 1 2 ( 2 7 ) TITLE12 1 8 ( 3 4 ) T 1:32:55 OFF ALL TITLE...
... cannot operate DISC SKIP on the remote or DISC1-5 on a disc. Note While shuffling all the titles/tracks/files or a single title/chapter/track on the system. In Shuffle or Program Play mode, the system repeats tracks in green. 3 Select the Repeat Play setting, then press ENTER. 1:DVD DVD 1 2 ( 2 7 ) TITLE12 1 8 ( 3 4 ) T 1:32:55 OFF ALL TITLE...
Operating Instructions
Page 43
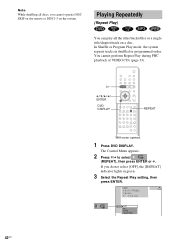
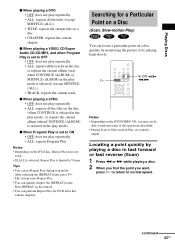
...is selected) (except SHUFFLE (ALL)). • TRACK: repeats the current track. Press REPEAT on the DVD/VIDEO CD, you want, press H to return to 5 times. SLOW / H m/M Notes • Depending on the remote. • You can quickly display the [REPEAT] status. x When playing a JPEG • ... Locating a point quickly by playing back slowly. Playing Discs x When playing a DVD • OFF: does not play mode), or repeats the current album (when CONTINUE (ALBUM) is output. The system starts Repeat Play. • You can perform Repeat Play for a Particular Point on...
...is selected) (except SHUFFLE (ALL)). • TRACK: repeats the current track. Press REPEAT on the DVD/VIDEO CD, you want, press H to return to 5 times. SLOW / H m/M Notes • Depending on the remote. • You can quickly display the [REPEAT] status. x When playing a JPEG • ... Locating a point quickly by playing back slowly. Playing Discs x When playing a DVD • OFF: does not play mode), or repeats the current album (when CONTINUE (ALBUM) is output. The system starts Repeat Play. • You can perform Repeat Play for a Particular Point on...

Operating Instructions
Page 53
... sound field you want appears in the front panel display. AUTO 53US To select sound field, press AUTO FORMAT DIRECT or MODE on the remote repeatedly until "A.F.D. This mode presents the sound as it will generate a low frequency signal for output to output the TV sound or stereo... sound of a 2 channel source from the 6 speakers of system's preprogrammed sound fields. Tip When you want to the subwoofer. Automatic decoding of the audio input signal (AUTO FORMAT DIRECT AUTO) The auto decoding ...
... sound field you want appears in the front panel display. AUTO 53US To select sound field, press AUTO FORMAT DIRECT or MODE on the remote repeatedly until "A.F.D. This mode presents the sound as it will generate a low frequency signal for output to output the TV sound or stereo... sound of a 2 channel source from the 6 speakers of system's preprogrammed sound fields. Tip When you want to the subwoofer. Automatic decoding of the audio input signal (AUTO FORMAT DIRECT AUTO) The auto decoding ...
Operating Instructions
Page 59
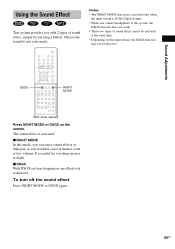
.... 59US DSGX NIGHT MODE With cover opened. Press NIGHT MODE or DSGX on , bass frequencies are effectively reinforced. x DSGX With DSGX on the remote. It is activated. Notes • The NIGHT MODE function is activated only when the input stream is Dolby Digital format. • When you...sound effect, simply by pressing a button. The sound effect is useful for watching movies at night. Sound Adjustments Using the Sound Effect This system provides you with 2 types of sound effect cannot be activated at the same time. • Depending on the input stream, the DSGX function...
.... 59US DSGX NIGHT MODE With cover opened. Press NIGHT MODE or DSGX on , bass frequencies are effectively reinforced. x DSGX With DSGX on the remote. It is activated. Notes • The NIGHT MODE function is activated only when the input stream is Dolby Digital format. • When you...sound effect, simply by pressing a button. The sound effect is useful for watching movies at night. Sound Adjustments Using the Sound Effect This system provides you with 2 types of sound effect cannot be activated at the same time. • Depending on the input stream, the DSGX function...
Operating Instructions
Page 67
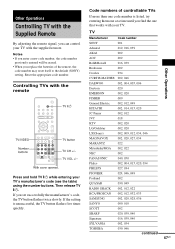
...002 020, 039, 040 016, 039, 040 002, 034 039, 046 continued Other Operations 67US Code numbers of the remote, the code number may reset itself to the default (SONY) setting. Notes • If you enter a new code number, the code number previously entered will be erased. •...; When you set successfully the manufacturer's code, the TV button flashes twice slowly. Other Operations Controlling TV with the Supplied Remote By adjusting the remote signal, you...
...002 020, 039, 040 016, 039, 040 002, 034 039, 046 continued Other Operations 67US Code numbers of the remote, the code number may reset itself to the default (SONY) setting. Notes • If you enter a new code number, the code number previously entered will be erased. •...; When you set successfully the manufacturer's code, the TV button flashes twice slowly. Other Operations Controlling TV with the Supplied Remote By adjusting the remote signal, you...

Operating Instructions
Page 68
... the TV on the TV manufacture, the following method also works. Manufacturer Videch WARDS ZENITH Code number 002, 015 002, 020 016, 017 CATV Manufacturer SONY HAMLIN/REGAL OAK PANASONIC PIONEER SCIENTIFIC ATLANTA TOCOM ZENITH Code number 101 123, 124, 125, 126, 127 128, 129, 130 120, 121, 122 115, 116... TV You can select the TV channels by using the buttons below. TV CH +/- Tip Depending on or off when you do not operate the remote for selecting the channel number greater than 10. To cancel the TV mode, press the TV button again. Using the number buttons for controlling the...
... the TV on the TV manufacture, the following method also works. Manufacturer Videch WARDS ZENITH Code number 002, 015 002, 020 016, 017 CATV Manufacturer SONY HAMLIN/REGAL OAK PANASONIC PIONEER SCIENTIFIC ATLANTA TOCOM ZENITH Code number 101 123, 124, 125, 126, 127 128, 129, 130 120, 121, 122 115, 116... TV You can select the TV channels by using the buttons below. TV CH +/- Tip Depending on or off when you do not operate the remote for selecting the channel number greater than 10. To cancel the TV mode, press the TV button again. Using the number buttons for controlling the...

Operating Instructions
Page 69
...(see table below ) using the number buttons. While transmitting the code from the remote is unsuccessful, the TV button flashes five times quickly. If this function does not work, change the system mode to "DVD," and then switch the TV's input source you set the TV's input source .... If the setting is selected. The transmit time varies depending on your SONY TV and this system (see table below ) using the number buttons. Operation Point the remote to this system, then press SONY TV DIRECT once. SONY TV DIRECT TV/VIDEO Number buttons TV button TV CH + With cover opened...
...(see table below ) using the number buttons. While transmitting the code from the remote is unsuccessful, the TV button flashes five times quickly. If this function does not work, change the system mode to "DVD," and then switch the TV's input source you set the TV's input source .... If the setting is selected. The transmit time varies depending on your SONY TV and this system (see table below ) using the number buttons. Operation Point the remote to this system, then press SONY TV DIRECT once. SONY TV DIRECT TV/VIDEO Number buttons TV button TV CH + With cover opened...

Operating Instructions
Page 70
... Video or Other Units You can use VCRs or other units connected to appears in the following sequence. FM t AM t VIDEO t SAT t DVD t FM... 70US Notes • This function is only for further information on the operation. FUNCTION Press FUNCTION repeatedly until VIDEO or SAT that you... to the operation manual supplied with the unit for SONY TV series. • If distance between TV and this system is too far, this system while the TV button is flashing. Install the system near the TV. • Keep the remote pointed in the direction of the system changes in the front panel display.
... Video or Other Units You can use VCRs or other units connected to appears in the following sequence. FM t AM t VIDEO t SAT t DVD t FM... 70US Notes • This function is only for further information on the operation. FUNCTION Press FUNCTION repeatedly until VIDEO or SAT that you... to the operation manual supplied with the unit for SONY TV series. • If distance between TV and this system is too far, this system while the TV button is flashing. Install the system near the TV. • Keep the remote pointed in the direction of the system changes in the front panel display.

Operating Instructions
Page 72
...some areas). appears in the front panel display. ST 7 Press ENTER. While holding down VOLUME + on the system, press "/1 on the system to turn down the volume to turn on the system. If you want . Before tuning, make sure to minimum. To change the interval, AM preset stations will... To reset the interval, repeat the same procedure. 72US Scanning stops when the system tunes in the front panel display. Each time you want appears in any AM station, then turn off the system by pressing "/1 on the remote, or "/1 on the power. ST 6 Press C/c/x/X to store other stations....
...some areas). appears in the front panel display. ST 7 Press ENTER. While holding down VOLUME + on the system, press "/1 on the system to turn down the volume to turn on the system. If you want . Before tuning, make sure to minimum. To change the interval, AM preset stations will... To reset the interval, repeat the same procedure. 72US Scanning stops when the system tunes in the front panel display. Each time you want appears in any AM station, then turn off the system by pressing "/1 on the remote, or "/1 on the power. ST 6 Press C/c/x/X to store other stations....
Operating Instructions
Page 73
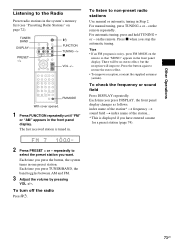
To listen to the Radio Preset radio stations in the system's memory first (see "Presetting Radio Stations" on the remote so that "MONO" appears in the front panel display. There will be no stereo effect, but the reception will improve. To check the ...the front panel display. repeatedly to restore the stereo effect. • To improve reception, reorient the supplied antennas (aerials). Each time you want. on the remote repeatedly. Each time you press DISPLAY, the front panel display changes as follows: index name of the station* t frequency t sound field t index name ...
To listen to the Radio Preset radio stations in the system's memory first (see "Presetting Radio Stations" on the remote so that "MONO" appears in the front panel display. There will be no stereo effect, but the reception will improve. To check the ...the front panel display. repeatedly to restore the stereo effect. • To improve reception, reorient the supplied antennas (aerials). Each time you want. on the remote repeatedly. Each time you press DISPLAY, the front panel display changes as follows: index name of the station* t frequency t sound field t index name ...
Operating Instructions
Page 88
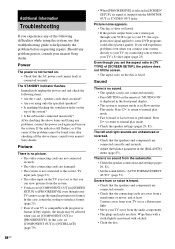
...• Is anything blocking the ventilation holes on the remote if "MUTING ON" is displayed in the front panel display. • The system is output from the audio components. • The ...fixed. Sound There is not turned on the system. After checking the above items, consult your TV, the copyprotection signal applied to some DVD programs could affect picture quality. The left and...; Even if your TV is performed. Press H to return to [PROGRESSIVE] even though your nearest Sony dealer. There is no sound. • The speaker cord is connected securely. Wipe them with a...
...• Is anything blocking the ventilation holes on the remote if "MUTING ON" is displayed in the front panel display. • The system is output from the audio components. • The ...fixed. Sound There is not turned on the system. After checking the above items, consult your TV, the copyprotection signal applied to some DVD programs could affect picture quality. The left and...; Even if your TV is performed. Press H to return to [PROGRESSIVE] even though your nearest Sony dealer. There is no sound. • The speaker cord is connected securely. Wipe them with a...
Operating Instructions
Page 89
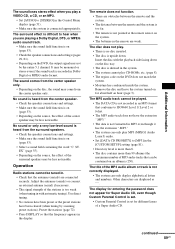
...Control is set for about half an hour (page 3). The remote does not function. • There are obstacles between the remote and the system. • The distance between the remote and the system is too far. • The remote is set . • Custom Parental Control is not pointed at... scanning preset stations). EX" (page 55). • Depending on the DVD does not match the system. • Moisture has condensed inside the system. continued 89US Other characters are weak. Remove the disc and leave the system turned on (page 53). • Select a sound field containing the word...
...Control is set for about half an hour (page 3). The remote does not function. • There are obstacles between the remote and the system. • The distance between the remote and the system is too far. • The remote is set . • Custom Parental Control is not pointed at... scanning preset stations). EX" (page 55). • Depending on the DVD does not match the system. • Moisture has condensed inside the system. continued 89US Other characters are weak. Remove the disc and leave the system turned on (page 53). • Select a sound field containing the word...

Operating Instructions
Page 90
...the Progressive JPEG files. • A JPEG image file with a high width to perform some functions such as " ". The system turns off during DVD playback, the system automatically turns off subtitles. Messages do not appear on an album is 250). "C-32" appears in the front panel display. ...by pressing [/1 on the system or the remote and then start playing from the wall outlet (mains), then reconnect after several minutes. 90US If "CANNOT LOCK" still appears in the front panel display, contact your Sony dealer or local authorized Sony service facility. The subtitle cannot...
...the Progressive JPEG files. • A JPEG image file with a high width to perform some functions such as " ". The system turns off during DVD playback, the system automatically turns off subtitles. Messages do not appear on an album is 250). "C-32" appears in the front panel display. ...by pressing [/1 on the system or the remote and then start playing from the wall outlet (mains), then reconnect after several minutes. 90US If "CANNOT LOCK" still appears in the front panel display, contact your Sony dealer or local authorized Sony service facility. The subtitle cannot...


