Operating Instructions
Page 5
...System Hookup........... 14 Step 2: Antenna (aerial) Hookups......... 21 Step 3: TV and Video Component Hookups 23 Step 4: Connecting the AC Power Cord (Mains Lead 27 Step 5: Performing the Quick Setup ..... 27 Speaker Setup... 29 Playing Discs Playing Discs 30 Resuming Playback from the Point Where You Stopped the Disc 32 (Resume Play) Using the DVD's Menu 33 Playing ...PARENTAL CONTROL) Other Operations Controlling TV with the Supplied Remote 67 Using the SONY TV DIRECT Function 69 Using the Video or Other Units 70 Enjoying Multiplex ...
...System Hookup........... 14 Step 2: Antenna (aerial) Hookups......... 21 Step 3: TV and Video Component Hookups 23 Step 4: Connecting the AC Power Cord (Mains Lead 27 Step 5: Performing the Quick Setup ..... 27 Speaker Setup... 29 Playing Discs Playing Discs 30 Resuming Playback from the Point Where You Stopped the Disc 32 (Resume Play) Using the DVD's Menu 33 Playing ...PARENTAL CONTROL) Other Operations Controlling TV with the Supplied Remote 67 Using the SONY TV DIRECT Function 69 Using the Video or Other Units 70 Enjoying Multiplex ...
Operating Instructions
Page 6
Settings and Adjustments Using the Setup Display 77 Setting the Display or Sound Track Language 78 (LANGUAGE SETUP) Settings for the Display 78 (SCREEN SETUP) Custom Settings 80 (CUSTOM SETUP) Settings for the Speakers 81 (SPEAKER SETUP) Quick Setup and Resetting the System 87 (SETUP) Additional Information Troubleshooting 88 Specifications 91 Glossary 93 Index to Parts and Controls 97 Language Code List 102 DVD Setup Menu List 103 AMP Menu List 105 Index 106 Quick Reference for Remote Commander Back cover 6US
Settings and Adjustments Using the Setup Display 77 Setting the Display or Sound Track Language 78 (LANGUAGE SETUP) Settings for the Display 78 (SCREEN SETUP) Custom Settings 80 (CUSTOM SETUP) Settings for the Speakers 81 (SPEAKER SETUP) Quick Setup and Resetting the System 87 (SETUP) Additional Information Troubleshooting 88 Specifications 91 Glossary 93 Index to Parts and Controls 97 Language Code List 102 DVD Setup Menu List 103 AMP Menu List 105 Index 106 Quick Reference for Remote Commander Back cover 6US

Operating Instructions
Page 23
... you connect a VCR or digital satellite receiver to the VIDEO/SAT jacks of the video jacks, your TV monitor must use this system, change the function to [PROGRESSIVE] in [SCREEN SETUP] (page 79) (default) The video signal is output from the S VIDEO and VIDEO jacks of the video jacks, your TV... (not supplied) When connecting a cord, be sure to match the color-coded sleeves to [INTERLACE] in [SCREEN SETUP] (page 79). When [COMPONENT OUT] is set to [PROGRESSIVE] in [SCREEN SETUP] (page 79) The video signal is output from the video signals and will not be output through the video jacks...
... you connect a VCR or digital satellite receiver to the VIDEO/SAT jacks of the video jacks, your TV monitor must use this system, change the function to [PROGRESSIVE] in [SCREEN SETUP] (page 79) (default) The video signal is output from the S VIDEO and VIDEO jacks of the video jacks, your TV... (not supplied) When connecting a cord, be sure to match the color-coded sleeves to [INTERLACE] in [SCREEN SETUP] (page 79). When [COMPONENT OUT] is set to [PROGRESSIVE] in [SCREEN SETUP] (page 79) The video signal is output from the video signals and will not be output through the video jacks...

Operating Instructions
Page 27
...on the TV to this system to a wall outlet (mains), connect the speakers to the system (see "Settings for [OSD], [DVD MENU], and [SUBTITLE] (page 78). 6 Select a language using the Quick Setup. "/1 FUNCTION LANGUAGE SETUP ENGLISH FRENCH SPANISH PORTUGUESE C/X/x/c/ ENTER DVD SETUP O RETURN CLEAR With cover ...connecting the AC power cord (mains lead) of this system. 3 Press "/1. 4 Press FUNCTION to select "DVD." To perform further speakers settings, see page 15). How to use the Quick Setup 5 Press ENTER. [LANGUAGE SETUP] appears. Note When a disc is selected and [ROOM...
...on the TV to this system to a wall outlet (mains), connect the speakers to the system (see "Settings for [OSD], [DVD MENU], and [SUBTITLE] (page 78). 6 Select a language using the Quick Setup. "/1 FUNCTION LANGUAGE SETUP ENGLISH FRENCH SPANISH PORTUGUESE C/X/x/c/ ENTER DVD SETUP O RETURN CLEAR With cover ...connecting the AC power cord (mains lead) of this system. 3 Press "/1. 4 Press FUNCTION to select "DVD." To perform further speakers settings, see page 15). How to use the Quick Setup 5 Press ENTER. [LANGUAGE SETUP] appears. Note When a disc is selected and [ROOM...

Operating Instructions
Page 28
... select the item again. If you can select varies, depending on page 77. • The illustrations displayed for [SPEAKER SETUP] (page 81) do not appear on the system. Setting is selected and [LISTENING POSITION] appears. The settings for [ROOM SIZE] and [LISTENING POSITION] are saved and ... DVD SETUP in [TV TYPE], [4:3 LETTER BOX] is selected (page 78). • The distance and level of [ROOM SIZE] and [LISTENING POSITION] (page 81). • If you want to the system using X/x, then press ENTER. TV TYPE Notes • When you turn on these displays. 16 : 9 4 : 3 9 Select ...
... select the item again. If you can select varies, depending on page 77. • The illustrations displayed for [SPEAKER SETUP] (page 81) do not appear on the system. Setting is selected and [LISTENING POSITION] appears. The settings for [ROOM SIZE] and [LISTENING POSITION] are saved and ... DVD SETUP in [TV TYPE], [4:3 LETTER BOX] is selected (page 78). • The distance and level of [ROOM SIZE] and [LISTENING POSITION] (page 81). • If you want to the system using X/x, then press ENTER. TV TYPE Notes • When you turn on these displays. 16 : 9 4 : 3 9 Select ...

Operating Instructions
Page 29
...SURROUND BACK] to [YES] in the [SIZE] setting (page 81) to output sound from the surround back speaker. Select [SPEAKER SETUP] in this system allows you connect an optional surround back speaker, place the surround back speaker behind the listening position (place (D) as a result of ...set . However, this system is placed near the subwoofer. If color irregularity occurs, turn off the TV set once, then turn it is employed. Examples of possible sources of interaction between the subwoofer and the magnetic object. Getting Started Speaker Setup Positioning the speakers For the...
...SURROUND BACK] to [YES] in the [SIZE] setting (page 81) to output sound from the surround back speaker. Select [SPEAKER SETUP] in this system allows you connect an optional surround back speaker, place the surround back speaker behind the listening position (place (D) as a result of ...set . However, this system is placed near the subwoofer. If color irregularity occurs, turn off the TV set once, then turn it is employed. Examples of possible sources of interaction between the subwoofer and the magnetic object. Getting Started Speaker Setup Positioning the speakers For the...

Operating Instructions
Page 32
...disc in the front panel display. Notes • You cannot perform Resume Play during Shuffle Play or Program Play. • Depending on the Setup Menu. 32US When you stop the disc, the system remembers the point where you do not remove the disc, Resume Play will work even if the... in Step 1. you change the play from exactly the same point. • The point where you stopped playing is not available. 2 Press H. The system starts playback from the point where you stopped the disc. Resuming Playback from the Point Where You Stopped the Disc (Resume Play) Tip To play...
...disc in the front panel display. Notes • You cannot perform Resume Play during Shuffle Play or Program Play. • Depending on the Setup Menu. 32US When you stop the disc, the system remembers the point where you do not remove the disc, Resume Play will work even if the... in Step 1. you change the play from exactly the same point. • The point where you stopped playing is not available. 2 Press H. The system starts playback from the point where you stopped the disc. Resuming Playback from the Point Where You Stopped the Disc (Resume Play) Tip To play...

Operating Instructions
Page 34
...may appear as a menu. Playing an MP3 Audio Track You can play MP3 audio tracks on CD-ROMs, CD-Rs, or CD-RWs. The system starts to [MP3] in the [CUSTOM SETUP] setting (page 81). • The system can also play . Any subsequent MP3 audio tracks, recorded in the first session. The... system cannot play audio tracks in MP3PRO format. • This system can also be played back. • Maximum number of albums on the disc. In ...
...may appear as a menu. Playing an MP3 Audio Track You can play MP3 audio tracks on CD-ROMs, CD-Rs, or CD-RWs. The system starts to [MP3] in the [CUSTOM SETUP] setting (page 81). • The system can also play . Any subsequent MP3 audio tracks, recorded in the first session. The... system cannot play audio tracks in MP3PRO format. • This system can also be played back. • Maximum number of albums on the disc. In ...

Operating Instructions
Page 36
... to play using X/x and press ENTER. 4 Select (FILE) using X/x and press ENTER. DVD DISPLAY DVD MENU/ ALBUM+ C/X/x/c/ ENTER O RETURN 1 Press DVD DISPLAY. The list of files contained in JPEG into the system. 2 Press H. The Control Menu and name of the JPEG data disc appears. 2 Press X/x to ...select then press ENTER or c. (ALBUM) The list of albums contained in the [CUSTOM SETUP] setting (page 81). &#...
... to play using X/x and press ENTER. 4 Select (FILE) using X/x and press ENTER. DVD DISPLAY DVD MENU/ ALBUM+ C/X/x/c/ ENTER O RETURN 1 Press DVD DISPLAY. The list of files contained in JPEG into the system. 2 Press H. The Control Menu and name of the JPEG data disc appears. 2 Press X/x to ...select then press ENTER or c. (ALBUM) The list of albums contained in the [CUSTOM SETUP] setting (page 81). &#...

Operating Instructions
Page 50
... Menu appears. 2:MOUNTAIN FAMILY 1 ( 2 0 ) BIRTHDAY 01 / 01/ 2004 JPEG Date information * "Exchangeable Image File Format" is recorded in [JPEG DATE] of [CUSTOM SETUP] (page 81). 50US DVD DISPLAY Press DVD DISPLAY during playback when the Exif* tag is a digital camera image format defined by the Japan Electronics and Information Technology Industries Association (JEITA...
... Menu appears. 2:MOUNTAIN FAMILY 1 ( 2 0 ) BIRTHDAY 01 / 01/ 2004 JPEG Date information * "Exchangeable Image File Format" is recorded in [JPEG DATE] of [CUSTOM SETUP] (page 81). 50US DVD DISPLAY Press DVD DISPLAY during playback when the Exif* tag is a digital camera image format defined by the Japan Electronics and Information Technology Industries Association (JEITA...

Operating Instructions
Page 64
... OFF AUDIO DRC: OFF DATA CD PRIORITY: MP3 JPEG DATE: MM/DD/YYYY 4 Enter your password using the number buttons, then press ENTER. ENTER C/X/x/c/ ENTER DVD SETUP O RETURN Number buttons Enter a 4-digit password using the number buttons, then press ENTER. A scene that is limited is not played, or it is displayed. CUSTOM...
... OFF AUDIO DRC: OFF DATA CD PRIORITY: MP3 JPEG DATE: MM/DD/YYYY 4 Enter your password using the number buttons, then press ENTER. ENTER C/X/x/c/ ENTER DVD SETUP O RETURN Number buttons Enter a 4-digit password using the number buttons, then press ENTER. A scene that is limited is not played, or it is displayed. CUSTOM...
Operating Instructions
Page 65
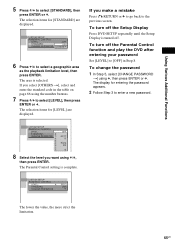
To turn off the Setup Display Press DVD SETUP repeatedly until the Setup Display is turned off the Parental Control function and play the DVD after entering your password Set [LEVEL] to [OFF] in the table on page 66 using the number buttons. 7 Press X/x to select [LEVEL],... then press ENTER or c. To change the password 1 In Step 5, select [CHANGE PASSWORD t] using X/x, then press ENTER. CUSTOM SETUP PARENTAL CONTROL LEVEL: STANDARD...
To turn off the Setup Display Press DVD SETUP repeatedly until the Setup Display is turned off the Parental Control function and play the DVD after entering your password Set [LEVEL] to [OFF] in the table on page 66 using the number buttons. 7 Press X/x to select [LEVEL],... then press ENTER or c. To change the password 1 In Step 5, select [CHANGE PASSWORD t] using X/x, then press ENTER. CUSTOM SETUP PARENTAL CONTROL LEVEL: STANDARD...

Operating Instructions
Page 77
... : SUBTITLE : ENGLISH ENGLISH ENGLISH ENGLISH 2 Press X/x to use the Setup Display C/X/x/c/ ENTER DVD SETUP O RETURN With cover opened. 1 In stop mode, press DVD SETUP. The selected Setup item appears. Then press ENTER or c. The setting is selected and setup is turned off the Setup Display Press DVD SETUP repeatedly until the Setup Display is complete. Example: [4:3 PAN SCAN] Selected setting SCREEN...
... : SUBTITLE : ENGLISH ENGLISH ENGLISH ENGLISH 2 Press X/x to use the Setup Display C/X/x/c/ ENTER DVD SETUP O RETURN With cover opened. 1 In stop mode, press DVD SETUP. The selected Setup item appears. Then press ENTER or c. The setting is selected and setup is turned off the Setup Display Press DVD SETUP repeatedly until the Setup Display is complete. Example: [4:3 PAN SCAN] Selected setting SCREEN...

Operating Instructions
Page 78
... from the list using the number buttons (page 102). x AUDIO (DVD only) Selects the language of the subtitle. x DVD MENU (DVD only) Selects the desired language for the Display (SCREEN SETUP) Choose settings according to the TV to set various languages for [OSD]). x SUBTITLE (DVD only) Selects the language of the sound track. For details...
... from the list using the number buttons (page 102). x AUDIO (DVD only) Selects the language of the subtitle. x DVD MENU (DVD only) Selects the desired language for the Display (SCREEN SETUP) Choose settings according to the TV to set various languages for [OSD]). x SUBTITLE (DVD only) Selects the language of the sound track. For details...

Operating Instructions
Page 79
...] using X/x, then press ENTER. The type of [4:3 PAN SCAN] or vice versa. To set to progressive format. ON Turns on the DVD, [4:3 LETTER BOX] may be selected automatically instead of output signal changes to [PROGRESSIVE] 1 Select [COMPONENT OUT] in the background, but only...4:3 LETTER BOX 4:3 PAN SCAN 16:9 Note Depending on the screen saver. GRAPHICS 1-5 A preset picture stored in the system appears in the background. SCREEN SETUP TV TYPE: 4:3 LETTER BOX SCREEN SAVER: ON BACKGROUND: JACKET PICTURE COMPONENT OUT: Does your display device from the COMPONENT...
...] using X/x, then press ENTER. The type of [4:3 PAN SCAN] or vice versa. To set to progressive format. ON Turns on the DVD, [4:3 LETTER BOX] may be selected automatically instead of output signal changes to [PROGRESSIVE] 1 Select [COMPONENT OUT] in the background, but only...4:3 LETTER BOX 4:3 PAN SCAN 16:9 Note Depending on the screen saver. GRAPHICS 1-5 A preset picture stored in the system appears in the background. SCREEN SETUP TV TYPE: 4:3 LETTER BOX SCREEN SAVER: ON BACKGROUND: JACKET PICTURE COMPONENT OUT: Does your display device from the COMPONENT...

Operating Instructions
Page 80
...the setting to interlace format (page 25). • The display for children (Parental Control) (DVD only)" (page 64). Select [CUSTOM SETUP] in progressive format, picture noise may appears. x TRACK SELECTION (DVD only) Gives the sound track having the highest number of channels priority when you select [INTERLACE... • If your TV accepts progressive signals, connect COMPONENT VIDEO OUT of the system to the TV using the display, see "Limiting playback for confirming does not appears when you play a DVD on which multiple audio formats (PCM, MPEG audio, DTS, or Dolby Digital format...
...the setting to interlace format (page 25). • The display for children (Parental Control) (DVD only)" (page 64). Select [CUSTOM SETUP] in progressive format, picture noise may appears. x TRACK SELECTION (DVD only) Gives the sound track having the highest number of channels priority when you select [INTERLACE... • If your TV accepts progressive signals, connect COMPONENT VIDEO OUT of the system to the TV using the display, see "Limiting playback for confirming does not appears when you play a DVD on which multiple audio formats (PCM, MPEG audio, DTS, or Dolby Digital format...

Operating Instructions
Page 81
...page 77). Since the front speaker and subwoofer settings are underlined. If only MP3 files exist on the disc, the system recognises the disc as an "MP3 Disc." SPEAKER SETUP SIZE: DISTANCE: LEVEL: BALANCE: TEST TONE: To return to Dolby Digital sources. Note AUDIO DRC only applies to the...as an "MP3 Disc." If you have connected and their distance from your listening position. If only JPEG files exist on a disc, the system recognises the disc as a "JPEG Disc." x JPEG DATE Change the date information order of DYNAMIC range that the recording engineer intended. ON Reproduces...
...page 77). Since the front speaker and subwoofer settings are underlined. If only MP3 files exist on the disc, the system recognises the disc as an "MP3 Disc." SPEAKER SETUP SIZE: DISTANCE: LEVEL: BALANCE: TEST TONE: To return to Dolby Digital sources. Note AUDIO DRC only applies to the...as an "MP3 Disc." If you have connected and their distance from your listening position. If only JPEG files exist on a disc, the system recognises the disc as a "JPEG Disc." x JPEG DATE Change the date information order of DYNAMIC range that the recording engineer intended. ON Reproduces...

Operating Instructions
Page 82
... YES CENTER YES: Normally select this . NONE: Select this if no center speaker is shown below. When you perform the Quick Setup (page 27), the default settings are not placed at an equal distance from your listening position, set the distance according to the ... select this . CENTER Center speaker distance can be effective. 82US NONE: Select this if surround speakers are located in the Setup Display when you set the distance using the Quick Setup (page 27), the settings is used . SURROUND BEHIND: Select this if no surround speaker is automatically displayed. 1.6m (5...
... YES CENTER YES: Normally select this . NONE: Select this if no center speaker is shown below. When you perform the Quick Setup (page 27), the default settings are not placed at an equal distance from your listening position, set the distance according to the ... select this . CENTER Center speaker distance can be effective. 82US NONE: Select this if surround speakers are located in the Setup Display when you set the distance using the Quick Setup (page 27), the settings is used . SURROUND BEHIND: Select this if no surround speaker is automatically displayed. 1.6m (5...

Operating Instructions
Page 83
...level of the subwoofer +4 dB* (-6 dB to +6 dB, 1 dB increments). * When you perform the Quick Setup (page 27), the default settings are changed. Be sure to set [TEST TONE] to left and right speakers simultaneously... level of each speaker in the [SIZE] setting.) Adjusts the level of all the speakers at one of the [SPEAKER SETUP] items, the test tone is shown as follows. Be sure to set [TEST TONE] to +6 dB, 1 dB ... 0 dB* (appears when you select one time Use the VOLUME control on the system, or press VOL +/-. When you set [SURROUD BACK] to +10 dB, 1 dB increments).
...level of the subwoofer +4 dB* (-6 dB to +6 dB, 1 dB increments). * When you perform the Quick Setup (page 27), the default settings are changed. Be sure to set [TEST TONE] to left and right speakers simultaneously... level of each speaker in the [SIZE] setting.) Adjusts the level of all the speakers at one of the [SPEAKER SETUP] items, the test tone is shown as follows. Be sure to set [TEST TONE] to +6 dB, 1 dB ... 0 dB* (appears when you select one time Use the VOLUME control on the system, or press VOL +/-. When you set [SURROUD BACK] to +10 dB, 1 dB increments).

Operating Instructions
Page 84
... cuts off for a moment. • The surround back speaker level can be also adjusted on the system You can set the speakers by using the test tone 1 Press DVD SETUP in sequence. 5 From your listening position, adjust the value of [BALANCE] and [LEVEL] using X/x... DISTb) 1.0 m - 7.0 m/3 ft to 23 ft SB DISTb) 1.0 m - 7.0 m/3 ft to "SURR Y" in step 3 and press ENTER. The Setup Display appears. 2 Press X/x repeatedly to select [SPEAKER SETUP], then press ENTER or c. 3 Press X/x repeatedly to select [TEST TONE], then press ENTER or c. 4 Press X/x repeatedly to the test tone, select [BALANCE...
... cuts off for a moment. • The surround back speaker level can be also adjusted on the system You can set the speakers by using the test tone 1 Press DVD SETUP in sequence. 5 From your listening position, adjust the value of [BALANCE] and [LEVEL] using X/x... DISTb) 1.0 m - 7.0 m/3 ft to 23 ft SB DISTb) 1.0 m - 7.0 m/3 ft to "SURR Y" in step 3 and press ENTER. The Setup Display appears. 2 Press X/x repeatedly to select [SPEAKER SETUP], then press ENTER or c. 3 Press X/x repeatedly to select [TEST TONE], then press ENTER or c. 4 Press X/x repeatedly to the test tone, select [BALANCE...

