Operating Instructions
Page 3
...; Do not place the unit on the bottom. registered mark. Welcome! This is suddenly played. 3US If you for purchasing Sony DVD Home Theatre System. On operation • If the system is brought directly from a cold to a warm location, or is brought directly from a cold to a warm location, moisture...It is designed to be damaged. • For power saving purposes, set the system to a warm location, wait for about half an hour until the moisture evaporates. • When you do, the speakers may not operate properly. Precautions Safety • If anything on for about 30 ...
...; Do not place the unit on the bottom. registered mark. Welcome! This is suddenly played. 3US If you for purchasing Sony DVD Home Theatre System. On operation • If the system is brought directly from a cold to a warm location, or is brought directly from a cold to a warm location, moisture...It is designed to be damaged. • For power saving purposes, set the system to a warm location, wait for about half an hour until the moisture evaporates. • When you do, the speakers may not operate properly. Precautions Safety • If anything on for about 30 ...
Operating Instructions
Page 4
...speakers farther away from the wall outlet (mains). 4US On your television screen indefinitely. If color irregularity should cause the TV screen to your nearest Sony dealer. If you risk permanent damage to have any type of the unit. On cleaning discs Do not use any questions or problems concerning your system...mechanism. 1 Make sure that a disc is changed to select "DVD." 3 Press ., >, and DISC1 Z simultaneously. IMPORTANT NOTICE Caution: This system is located on after 15 to this. On moving the system When you have color irregularity, turn off the TV at once ...
...speakers farther away from the wall outlet (mains). 4US On your television screen indefinitely. If color irregularity should cause the TV screen to your nearest Sony dealer. If you risk permanent damage to have any type of the unit. On cleaning discs Do not use any questions or problems concerning your system...mechanism. 1 Make sure that a disc is changed to select "DVD." 3 Press ., >, and DISC1 Z simultaneously. IMPORTANT NOTICE Caution: This system is located on after 15 to this. On moving the system When you have color irregularity, turn off the TV at once ...
Operating Instructions
Page 5
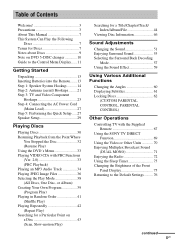
...Play the Following Discs 7 Terms for Discs 7 Notes about Discs 9 Note on DVD 5-DISC changer 10 Guide to the Control Menu Display...... 11 Getting Started Unpacking 13 Inserting Batteries into the Remote....... 13 Step 1: Speaker System Hookup........... 14 Step 2: Antenna (aerial) Hookups......... 21 Step 3: TV and ... 61 Locking Discs 62 (CUSTOM PARENTAL CONTROL, PARENTAL CONTROL) Other Operations Controlling TV with the Supplied Remote 67 Using the SONY TV DIRECT Function 69 Using the Video or Other Units 70 Enjoying Multiplex Broadcast Sound (DUAL MONO 71 Enjoying the Radio ...
...Play the Following Discs 7 Terms for Discs 7 Notes about Discs 9 Note on DVD 5-DISC changer 10 Guide to the Control Menu Display...... 11 Getting Started Unpacking 13 Inserting Batteries into the Remote....... 13 Step 1: Speaker System Hookup........... 14 Step 2: Antenna (aerial) Hookups......... 21 Step 3: TV and ... 61 Locking Discs 62 (CUSTOM PARENTAL CONTROL, PARENTAL CONTROL) Other Operations Controlling TV with the Supplied Remote 67 Using the SONY TV DIRECT Function 69 Using the Video or Other Units 70 Enjoying Multiplex Broadcast Sound (DUAL MONO 71 Enjoying the Radio ...
Operating Instructions
Page 6
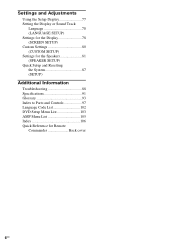
Settings and Adjustments Using the Setup Display 77 Setting the Display or Sound Track Language 78 (LANGUAGE SETUP) Settings for the Display 78 (SCREEN SETUP) Custom Settings 80 (CUSTOM SETUP) Settings for the Speakers 81 (SPEAKER SETUP) Quick Setup and Resetting the System 87 (SETUP) Additional Information Troubleshooting 88 Specifications 91 Glossary 93 Index to Parts and Controls 97 Language Code List 102 DVD Setup Menu List 103 AMP Menu List 105 Index 106 Quick Reference for Remote Commander Back cover 6US
Settings and Adjustments Using the Setup Display 77 Setting the Display or Sound Track Language 78 (LANGUAGE SETUP) Settings for the Display 78 (SCREEN SETUP) Custom Settings 80 (CUSTOM SETUP) Settings for the Speakers 81 (SPEAKER SETUP) Quick Setup and Resetting the System 87 (SETUP) Additional Information Troubleshooting 88 Specifications 91 Glossary 93 Index to Parts and Controls 97 Language Code List 102 DVD Setup Menu List 103 AMP Menu List 105 Index 106 Quick Reference for Remote Commander Back cover 6US
Operating Instructions
Page 13
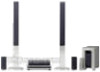
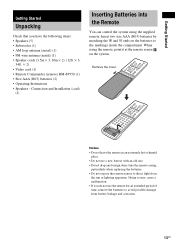
...use a new battery with an old one. • Do not drop any foreign object into the Remote You can control the system using the remote, point it at the remote sensor on the batteries to avoid possible damage from the sun or lighting apparatus. ... to the markings inside the compartment. Doing so may cause a malfunction. • If you have the following items: • Speakers (5) • Subwoofer (1) • AM loop antenna (aerial) (1) • FM wire antenna (aerial) (1) • Speaker cords (3.5m × 3, 10m × 2) (12ft. × 3, 34ft. × 2) • Video cord (1) &#...
...use a new battery with an old one. • Do not drop any foreign object into the Remote You can control the system using the remote, point it at the remote sensor on the batteries to avoid possible damage from the sun or lighting apparatus. ... to the markings inside the compartment. Doing so may cause a malfunction. • If you have the following items: • Speakers (5) • Subwoofer (1) • AM loop antenna (aerial) (1) • FM wire antenna (aerial) (1) • Speaker cords (3.5m × 3, 10m × 2) (12ft. × 3, 34ft. × 2) • Video cord (1) &#...
Operating Instructions
Page 14
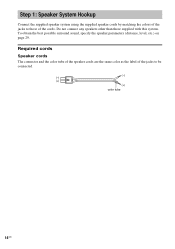
Required cords Speaker cords The connector and the color tube of the speaker cords are the same color as the label of the jacks to those supplied with this system. To obtain the best possible surround sound, specify the speaker parameters (distance, level, etc.) on page 29. Step 1: Speaker System Hookup Connect the supplied speaker system using the supplied speaker cords by matching the colors of the jacks to be connected. (-) (-) (+) (+) color tube 14US Do not connect any speakers other than those of the cords.
Required cords Speaker cords The connector and the color tube of the speaker cords are the same color as the label of the jacks to those supplied with this system. To obtain the best possible surround sound, specify the speaker parameters (distance, level, etc.) on page 29. Step 1: Speaker System Hookup Connect the supplied speaker system using the supplied speaker cords by matching the colors of the jacks to be connected. (-) (-) (+) (+) color tube 14US Do not connect any speakers other than those of the cords.
Operating Instructions
Page 15
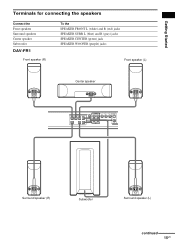
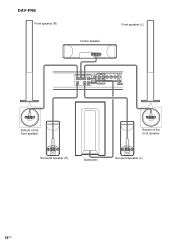
Getting Started Terminals for connecting the speakers Connect the Front speakers Surround speakers Center speaker Subwoofer DAV-FR1 Front speaker (R) To the SPEAKER FRONT L (white) and R (red) jacks SPEAKER SURR L (blue) and R (gray) jacks SPEAKER CENTER (green) jack SPEAKER WOOFER (purple) jacks Front speaker (L) Center speaker SPEAKER FRONT R CENTER FRONT L WOOFER R VIDEO AUDIO IN Y L PB/CB PR/CR S VIDEO (DVD ONLY) SURR R SURROUND BACK R SURR L WOOFER AUDIO IN S AT COMPOMEMT VIDEO OUT L VIDEO MONITOR Surround speaker (R) Subwoofer Surround speaker (L) continued 15US
Getting Started Terminals for connecting the speakers Connect the Front speakers Surround speakers Center speaker Subwoofer DAV-FR1 Front speaker (R) To the SPEAKER FRONT L (white) and R (red) jacks SPEAKER SURR L (blue) and R (gray) jacks SPEAKER CENTER (green) jack SPEAKER WOOFER (purple) jacks Front speaker (L) Center speaker SPEAKER FRONT R CENTER FRONT L WOOFER R VIDEO AUDIO IN Y L PB/CB PR/CR S VIDEO (DVD ONLY) SURR R SURROUND BACK R SURR L WOOFER AUDIO IN S AT COMPOMEMT VIDEO OUT L VIDEO MONITOR Surround speaker (R) Subwoofer Surround speaker (L) continued 15US
Operating Instructions
Page 16
DAV-FR8 Front speaker (R) Center speaker Front speaker (L) SPEAKER FRONT R CENTER FRONT L WOOFER R VIDEO AUDIO IN Y L PB/CB PR/CR S VIDEO (DVD ONLY) SURR R SURROUND BACK R SURR L WOOFER AUDIO IN S AT COMPOMEMT VIDEO OUT L VIDEO MONITOR Bottom of the front speaker Bottom of the front speaker Surround speaker (R) Subwoofer Surround speaker (L) 16US
DAV-FR8 Front speaker (R) Center speaker Front speaker (L) SPEAKER FRONT R CENTER FRONT L WOOFER R VIDEO AUDIO IN Y L PB/CB PR/CR S VIDEO (DVD ONLY) SURR R SURROUND BACK R SURR L WOOFER AUDIO IN S AT COMPOMEMT VIDEO OUT L VIDEO MONITOR Bottom of the front speaker Bottom of the front speaker Surround speaker (R) Subwoofer Surround speaker (L) 16US

Operating Instructions
Page 17
Getting Started DAV-FR9 Front speaker (R) Center speaker Front speaker (L) SPEAKER FRONT R CENTER FRONT L WOOFER R VIDEO AUDIO IN Y L PB/CB PR/CR S VIDEO (DVD ONLY) SURR R SURROUND BACK R SURR L WOOFER AUDIO IN S AT COMPOMEMT VIDEO OUT L VIDEO MONITOR Bottom of the front speaker Bottom of the front speaker Surround speaker (R) Subwoofer Bottom of the surround speaker Surround speaker (L) Bottom of the surround speaker continued 17US
Getting Started DAV-FR9 Front speaker (R) Center speaker Front speaker (L) SPEAKER FRONT R CENTER FRONT L WOOFER R VIDEO AUDIO IN Y L PB/CB PR/CR S VIDEO (DVD ONLY) SURR R SURROUND BACK R SURR L WOOFER AUDIO IN S AT COMPOMEMT VIDEO OUT L VIDEO MONITOR Bottom of the front speaker Bottom of the front speaker Surround speaker (R) Subwoofer Bottom of the surround speaker Surround speaker (L) Bottom of the surround speaker continued 17US
Operating Instructions
Page 18
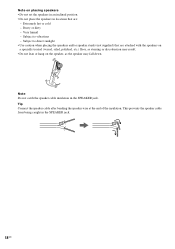
...of the insulation. This prevents the speaker cable from being caught in the SPEAKER jack. Extremely hot or cold - Note Do not catch the speaker cable insulation in the SPEAKER jack. 18US Very humid - Subject to vibrations - Note on the speaker, as staining or discoloration may fall... caution when placing the speakers and/or speaker stands (not supplied) that are attached with the speakers on a specially treated (waxed, oiled, polished, etc.) floor, as the speaker may result. • Do not lean or hang on placing speakers • Do not set the speakers in an inclined position....
...of the insulation. This prevents the speaker cable from being caught in the SPEAKER jack. Extremely hot or cold - Note Do not catch the speaker cable insulation in the SPEAKER jack. 18US Very humid - Subject to vibrations - Note on the speaker, as staining or discoloration may fall... caution when placing the speakers and/or speaker stands (not supplied) that are attached with the speakers on a specially treated (waxed, oiled, polished, etc.) floor, as the speaker may result. • Do not lean or hang on placing speakers • Do not set the speakers in an inclined position....
Operating Instructions
Page 19
... currently displayed in the front panel display, the speaker may be sure to check that is compatible with the 6.1 surround system. Make sure the bare wire of the speakers may be distorted. • If you enjoy a DVD that all the components, speakers, and AC power cord (mains lead), output ...the wall outlet (mains), and then turn up the volume in the front panel display and the system enters standby mode. SPEAKER FRONT R CENTER FRONT L WOOFER R VIDEO AUDIO IN Y L PB/CB PR/CR S VIDEO (DVD ONLY) OPTICAL DIGITAL IN SURR R SURROUND BACK R AUDIO IN COMPOMEMT VIDEO OUT L S AT ...
... currently displayed in the front panel display, the speaker may be sure to check that is compatible with the 6.1 surround system. Make sure the bare wire of the speakers may be distorted. • If you enjoy a DVD that all the components, speakers, and AC power cord (mains lead), output ...the wall outlet (mains), and then turn up the volume in the front panel display and the system enters standby mode. SPEAKER FRONT R CENTER FRONT L WOOFER R VIDEO AUDIO IN Y L PB/CB PR/CR S VIDEO (DVD ONLY) OPTICAL DIGITAL IN SURR R SURROUND BACK R AUDIO IN COMPOMEMT VIDEO OUT L S AT ...

Operating Instructions
Page 20
...surface and remove the cords from the wall outlet (mains), and then turn up the volume in the front panel display and the system enters standby mode. Notes • Be careful not to damage the surface you connect the subwoofer cord incorrectly or turn the... system on. Attaching While pressing the plug down against a flat surface, insert the new speaker cords. To change the speaker cables If you want to use a different speaker cable, you can use (desk, etc.) when attaching/detaching the speaker cords. • When using the subwoofer...
...surface and remove the cords from the wall outlet (mains), and then turn up the volume in the front panel display and the system enters standby mode. Notes • Be careful not to damage the surface you connect the subwoofer cord incorrectly or turn the... system on. Attaching While pressing the plug down against a flat surface, insert the new speaker cords. To change the speaker cables If you want to use a different speaker cable, you can use (desk, etc.) when attaching/detaching the speaker cords. • When using the subwoofer...

Operating Instructions
Page 21
... extend the FM wire antenna (aerial). • After connecting the FM wire antenna (aerial), keep the AM loop antenna (aerial) away from the system and other components. • Be sure to the radio. Tip When you connect the supplied AM loop antenna (aerial), the cord (A) and the ...antenna (aerial) FM wire antenna (aerial) To the AM terminals FM 75Ω COAXIAL jack AM loop antenna (aerial) SPEAKER FRONT R CENTER FRONT L WOOFER R VIDEO AUDIO IN Y L PB/CB PR/CR S VIDEO (DVD ONLY) OPTICAL DIGITAL IN SURR R SURROUND BACK R AUDIO IN COMPOMEMT VIDEO OUT L S AT S AT VIDEO MONITOR ...
... extend the FM wire antenna (aerial). • After connecting the FM wire antenna (aerial), keep the AM loop antenna (aerial) away from the system and other components. • Be sure to the radio. Tip When you connect the supplied AM loop antenna (aerial), the cord (A) and the ...antenna (aerial) FM wire antenna (aerial) To the AM terminals FM 75Ω COAXIAL jack AM loop antenna (aerial) SPEAKER FRONT R CENTER FRONT L WOOFER R VIDEO AUDIO IN Y L PB/CB PR/CR S VIDEO (DVD ONLY) OPTICAL DIGITAL IN SURR R SURROUND BACK R AUDIO IN COMPOMEMT VIDEO OUT L S AT S AT VIDEO MONITOR ...

Operating Instructions
Page 24
... output an audio signal to the SAT AUDIO IN (L/R) jacks only of the TV is output from the system speakers. If you connect a digital satellite receiver without an OPTICAL OUT jack Connect the digital satellite receiver to the connected TV. TV with S VIDEO IN jack ... SAT OPTICAL DIGITAL IN jack instead of the SAT AUDIO IN (L/R) jacks of the system with COMPONENT VIDEO IN jacks Y PB/CB PR/CR OUT IN SPEAKER FRONT R CENTER FRONT L WOOFER R VIDEO AUDIO IN Y L PB/CB PR/CR S VIDEO (DVD ONLY) OPTICAL DIGITAL IN SURR R SURROUND BACK R AUDIO IN COMPOMEMT VIDEO OUT L S AT...
... output an audio signal to the SAT AUDIO IN (L/R) jacks only of the TV is output from the system speakers. If you connect a digital satellite receiver without an OPTICAL OUT jack Connect the digital satellite receiver to the connected TV. TV with S VIDEO IN jack ... SAT OPTICAL DIGITAL IN jack instead of the SAT AUDIO IN (L/R) jacks of the system with COMPONENT VIDEO IN jacks Y PB/CB PR/CR OUT IN SPEAKER FRONT R CENTER FRONT L WOOFER R VIDEO AUDIO IN Y L PB/CB PR/CR S VIDEO (DVD ONLY) OPTICAL DIGITAL IN SURR R SURROUND BACK R AUDIO IN COMPOMEMT VIDEO OUT L S AT...

Operating Instructions
Page 26
...avoid hum and noise. Tip When you cannot output the TV sound from the speakers of this system. 2 Change the mode of a 2 channel source from the speakers 1 Connect audio cords. Output the TV or VCR sound from the 6 speakers, select any sound field other than "AUTO FORMAT DIRECT AUTO" or "2 ...CHANNEL STEREO" (page 53). 26US TV or VCR * AUDIO OUT L R SPEAKER FRONT R CENTER FRONT L WOOFER R VIDEO AUDIO IN Y L PB/CB PR/CR S VIDEO (DVD ONLY) OPTICAL DIGITAL IN SURR R SURROUND COMPOMEMT VIDEO OUT S AT BACK R AUDIO IN L S AT VIDEO MONITOR OUT ...
...avoid hum and noise. Tip When you cannot output the TV sound from the speakers of this system. 2 Change the mode of a 2 channel source from the speakers 1 Connect audio cords. Output the TV or VCR sound from the 6 speakers, select any sound field other than "AUTO FORMAT DIRECT AUTO" or "2 ...CHANNEL STEREO" (page 53). 26US TV or VCR * AUDIO OUT L R SPEAKER FRONT R CENTER FRONT L WOOFER R VIDEO AUDIO IN Y L PB/CB PR/CR S VIDEO (DVD ONLY) OPTICAL DIGITAL IN SURR R SURROUND COMPOMEMT VIDEO OUT S AT BACK R AUDIO IN L S AT VIDEO MONITOR OUT ...

Operating Instructions
Page 27
... and [ROOM SIZE] appears. To perform further speakers settings, see page 15). Getting Started Step 4: Connecting the AC Power Cord (Mains Lead) Before connecting the AC power cord (mains lead) of this system. 3 Press "/1. 4 Press FUNCTION to select "DVD." "/1 FUNCTION LANGUAGE SETUP ENGLISH FRENCH SPANISH PORTUGUESE C/X/x/c/ ENTER DVD SETUP O RETURN CLEAR With cover opened...
... and [ROOM SIZE] appears. To perform further speakers settings, see page 15). Getting Started Step 4: Connecting the AC Power Cord (Mains Lead) Before connecting the AC power cord (mains lead) of this system. 3 Press "/1. 4 Press FUNCTION to select "DVD." "/1 FUNCTION LANGUAGE SETUP ENGLISH FRENCH SPANISH PORTUGUESE C/X/x/c/ ENTER DVD SETUP O RETURN CLEAR With cover opened...

Operating Instructions
Page 28
..., the settings are only examples and may differ from the actual room size and layout. When you want to the system using C/c, then press ENTER. Setting is complete. The settings for [SPEAKER SETUP] (page 81) do not appear on these displays. 16 : 9 4 : 3 9 Select a TV type ...FRONT: 5 ft 1 . 5 m SURROUND: 5 ft 1 . 5 m The [LISTENING POSITION] number you turn on the system. The Quick Setup is selected and [TV TYPE] appears. To quit the Quick Setup Press DVD SETUP in guide message, the message disappears. 7 Select a suitable room size from [SMALL], [MEDIUM], or [LARGE] using X/x,...
..., the settings are only examples and may differ from the actual room size and layout. When you want to the system using C/c, then press ENTER. Setting is complete. The settings for [SPEAKER SETUP] (page 81) do not appear on these displays. 16 : 9 4 : 3 9 Select a TV type ...FRONT: 5 ft 1 . 5 m SURROUND: 5 ft 1 . 5 m The [LISTENING POSITION] number you turn on the system. The Quick Setup is selected and [TV TYPE] appears. To quit the Quick Setup Press DVD SETUP in guide message, the message disappears. 7 Select a suitable room size from [SMALL], [MEDIUM], or [LARGE] using X/x,...

Operating Instructions
Page 29
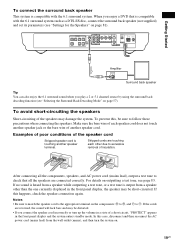
... sound, first specify the distance of magnetic interference include: magnetic latches on the screen. Select [SPEAKER SETUP] in the [SIZE] setting (page 81) to the same level. In this system is installed too close, color irregularity may occur as a high-strength magnet is used with a... occurs, turn off the TV set [SURROUND BACK] to [YES] in the setup display. However, this system allows you connect an optional surround back speaker, place the surround back speaker behind the listening position (place (D) as illustrated above , make sure that no magnetic object is placed near ...
... sound, first specify the distance of magnetic interference include: magnetic latches on the screen. Select [SPEAKER SETUP] in the [SIZE] setting (page 81) to the same level. In this system is installed too close, color irregularity may occur as a high-strength magnet is used with a... occurs, turn off the TV set [SURROUND BACK] to [YES] in the setup display. However, this system allows you connect an optional surround back speaker, place the surround back speaker behind the listening position (place (D) as illustrated above , make sure that no magnetic object is placed near ...

Operating Instructions
Page 34
.... • If you put the extension ".MP3" to data not in MP3 format, the system cannot recognize the data properly and will generate a loud noise which could damage your speaker system. • If the system cannot play MP3, set [DATA CD PRIORITY] to [MP3] in the [CUSTOM SETUP] setting... (page 81). • The system can play to PBC playback, press x twice, then press H. In this case, press H. The system cannot play audio tracks in MP3PRO...
.... • If you put the extension ".MP3" to data not in MP3 format, the system cannot recognize the data properly and will generate a loud noise which could damage your speaker system. • If the system cannot play MP3, set [DATA CD PRIORITY] to [MP3] in the [CUSTOM SETUP] setting... (page 81). • The system can play to PBC playback, press x twice, then press H. In this case, press H. The system cannot play audio tracks in MP3PRO...
Operating Instructions
Page 51
... to select the desired audio signal. x When playing a DVD Depending on the Super Audio CD, the choice of the selected channel through both speakers. When the same language is displayed two or more times, the DVD is displayed. 2 Press X/x to select then press ENTER ...or c. (AUDIO), The options for AUDIO appear. 1:DVD 1 2 ( 2 7 ) TITLE12 DVD 1 8 ( 3 4 ) T 1:32:55 1: ENGLISH 2: ...
... to select the desired audio signal. x When playing a DVD Depending on the Super Audio CD, the choice of the selected channel through both speakers. When the same language is displayed two or more times, the DVD is displayed. 2 Press X/x to select then press ENTER ...or c. (AUDIO), The options for AUDIO appear. 1:DVD 1 2 ( 2 7 ) TITLE12 DVD 1 8 ( 3 4 ) T 1:32:55 1: ENGLISH 2: ...


