The Sony Guide to Home Theater
Page 31
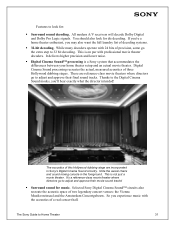
...It's a reference-class movie theater where directors go the extra step to Home Theater 31 This is a Sony system that accommodates the differences between your home theater setup and an actual movie theater. All modern A/V receivers will decode Dolby Digital and Dolby Pro Logic signals.... This is not just a movie theater. Selected Sony Digital Cinema Sound™ circuits also recreate the acoustic space ...
...It's a reference-class movie theater where directors go the extra step to Home Theater 31 This is a Sony system that accommodates the differences between your home theater setup and an actual movie theater. All modern A/V receivers will decode Dolby Digital and Dolby Pro Logic signals.... This is not just a movie theater. Selected Sony Digital Cinema Sound™ circuits also recreate the acoustic space ...

Operating Instructions
Page 5
... about Discs 9 Note on DVD 5-DISC changer 10 Guide to the Control Menu Display...... 11 Getting Started Unpacking 13 Inserting Batteries into the Remote....... 13 Step 1: Speaker System Hookup........... 14 Step 2: Antenna...AC Power Cord (Mains Lead 27 Step 5: Adjusting the Wireless System 28 Step 6: Performing the Quick Setup ..... 33 Speaker Setup 35 Playing Discs Playing Discs 36 Resuming Playback from the Point Where...PARENTAL CONTROL) Other Operations Controlling TV with the Supplied Remote 73 Using the SONY TV DIRECT Function 75 Using the Video or Other Units 76 Enjoying Multiplex ...
... about Discs 9 Note on DVD 5-DISC changer 10 Guide to the Control Menu Display...... 11 Getting Started Unpacking 13 Inserting Batteries into the Remote....... 13 Step 1: Speaker System Hookup........... 14 Step 2: Antenna...AC Power Cord (Mains Lead 27 Step 5: Adjusting the Wireless System 28 Step 6: Performing the Quick Setup ..... 33 Speaker Setup 35 Playing Discs Playing Discs 36 Resuming Playback from the Point Where...PARENTAL CONTROL) Other Operations Controlling TV with the Supplied Remote 73 Using the SONY TV DIRECT Function 75 Using the Video or Other Units 76 Enjoying Multiplex ...
Operating Instructions
Page 6
Settings and Adjustments Using the Setup Display 83 Setting the Display or Sound Track Language 84 (LANGUAGE SETUP) Settings for the Display 84 (SCREEN SETUP) Custom Settings 86 (CUSTOM SETUP) Settings for the Speakers 87 (SPEAKER SETUP) Quick Setup and Resetting the System 93 (SETUP) Additional Information Troubleshooting 94 Specifications 97 Glossary 99 Index to Parts and Controls 103 Language Code List 108 DVD Setup Menu List 109 AMP Menu List 111 Index 112 Quick Reference for Remote Commander 114 6US
Settings and Adjustments Using the Setup Display 83 Setting the Display or Sound Track Language 84 (LANGUAGE SETUP) Settings for the Display 84 (SCREEN SETUP) Custom Settings 86 (CUSTOM SETUP) Settings for the Speakers 87 (SPEAKER SETUP) Quick Setup and Resetting the System 93 (SETUP) Additional Information Troubleshooting 94 Specifications 97 Glossary 99 Index to Parts and Controls 103 Language Code List 108 DVD Setup Menu List 109 AMP Menu List 111 Index 112 Quick Reference for Remote Commander 114 6US

Operating Instructions
Page 23
... a VCR or digital satellite receiver to the VIDEO/SAT jacks of MONITOR OUT. - If your TV monitor must use this system, change the function to [PROGRESSIVE] in [SCREEN SETUP] (page 85). Getting Started Step 3: TV and Video Component Hookups Required cords Video cord for connecting video components Connect the ...COMPONENT VIDEO OUT jacks only. • When you must also be sure to match the color-coded sleeves to [PROGRESSIVE] in [SCREEN SETUP] (page 85) (default) The video signal is output from the S VIDEO and VIDEO jacks of this connection and set to [INTERLACE] in [SCREEN...
... a VCR or digital satellite receiver to the VIDEO/SAT jacks of MONITOR OUT. - If your TV monitor must use this system, change the function to [PROGRESSIVE] in [SCREEN SETUP] (page 85). Getting Started Step 3: TV and Video Component Hookups Required cords Video cord for connecting video components Connect the ...COMPONENT VIDEO OUT jacks only. • When you must also be sure to match the color-coded sleeves to [PROGRESSIVE] in [SCREEN SETUP] (page 85) (default) The video signal is output from the S VIDEO and VIDEO jacks of this connection and set to [INTERLACE] in [SCREEN...

Operating Instructions
Page 33
... appear on the TV to this system. 3 Press "/1. 4 Press FUNCTION to use the Quick Setup 5 Press ENTER. [LANGUAGE SETUP] appears. ROOM SIZE SMALL FRONT: 5 ft 1 . 5 m SURROUND: 5 ft 1 . 5 m continued 33US You can set the initial setting of movies, music CDs, etc. "/1 FUNCTION LANGUAGE SETUP ENGLISH FRENCH SPANISH PORTUGUESE C/X/x/c/ ENTER DVD SETUP O RETURN CLEAR With cover opened. 1 Turn...
... appear on the TV to this system. 3 Press "/1. 4 Press FUNCTION to use the Quick Setup 5 Press ENTER. [LANGUAGE SETUP] appears. ROOM SIZE SMALL FRONT: 5 ft 1 . 5 m SURROUND: 5 ft 1 . 5 m continued 33US You can set the initial setting of movies, music CDs, etc. "/1 FUNCTION LANGUAGE SETUP ENGLISH FRENCH SPANISH PORTUGUESE C/X/x/c/ ENTER DVD SETUP O RETURN CLEAR With cover opened. 1 Turn...

Operating Instructions
Page 34
... distance and level of [ROOM SIZE] and [LISTENING POSITION] (page 87). • If you want to the system using C/c, then press ENTER. The Quick Setup is selected and [LISTENING POSITION] appears. The settings for [ROOM SIZE] and [LISTENING POSITION] are saved and the... : 3 9 Select a TV type connecting to change settings, select [QUICK] from [SMALL], [MEDIUM], or [LARGE] using X/x, then press ENTER. To quit the Quick Setup Press DVD SETUP in any Step. 34US Setting is complete. LISTENING POSITION FRONT: 5 ft 1 . 5 m SURROUND: 5 ft 1 . 5 m The [LISTENING POSITION] number you need ...
... distance and level of [ROOM SIZE] and [LISTENING POSITION] (page 87). • If you want to the system using C/c, then press ENTER. The Quick Setup is selected and [LISTENING POSITION] appears. The settings for [ROOM SIZE] and [LISTENING POSITION] are saved and the... : 3 9 Select a TV type connecting to change settings, select [QUICK] from [SMALL], [MEDIUM], or [LARGE] using X/x, then press ENTER. To quit the Quick Setup Press DVD SETUP in any Step. 34US Setting is complete. LISTENING POSITION FRONT: 5 ft 1 . 5 m SURROUND: 5 ft 1 . 5 m The [LISTENING POSITION] number you need ...

Operating Instructions
Page 35
... Speakers" (page 87). 35US If color irregularity occurs, turn off the TV set once, then turn it is placed near the subwoofer. Select [SPEAKER SETUP] in this system allows you connect an optional surround back speaker, place the surround back speaker behind the listening position (place (D) as a high-strength magnet is used...
... Speakers" (page 87). 35US If color irregularity occurs, turn off the TV set once, then turn it is placed near the subwoofer. Select [SPEAKER SETUP] in this system allows you connect an optional surround back speaker, place the surround back speaker behind the listening position (place (D) as a high-strength magnet is used...
Operating Instructions
Page 38
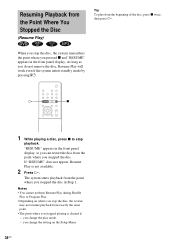
.... When you pressed x and "RESUME" appears in Step 1. As long as you stop the disc, the system may not resume playback from the beginning of the disc, press x twice, then press H. H x 1 While playing ...a disc, press x to stop the disc, the system remembers the point where you stop playback. If "RESUME" does not appear, Resume Play is cleared if: ... the setting on where you do not remove the disc, Resume Play will work even if the system enters standby mode by pressing "/1. Resuming Playback from the Point Where You Stopped the Disc (Resume...
.... When you pressed x and "RESUME" appears in Step 1. As long as you stop the disc, the system may not resume playback from the beginning of the disc, press x twice, then press H. H x 1 While playing ...a disc, press x to stop the disc, the system remembers the point where you stop playback. If "RESUME" does not appear, Resume Play is cleared if: ... the setting on where you do not remove the disc, Resume Play will work even if the system enters standby mode by pressing "/1. Resuming Playback from the Point Where You Stopped the Disc (Resume...

Operating Instructions
Page 40
..." to ISO9660 level 1, level 2, or Joliet format for details on the recording format. 1 Load a data disc recorded in the [CUSTOM SETUP] setting (page 87). • The system can play discs recorded in the first session. However, the discs must be contained on an album is 250.) • An album that...MP3 audio track in the instructions supplied with the disc. You can play . "Play without using PBC, press ./> or the number buttons while the system is located in Multi Session. To return to play still pictures such as "Press SELECT" in the first album on the disc. Notes •...
..." to ISO9660 level 1, level 2, or Joliet format for details on the recording format. 1 Load a data disc recorded in the [CUSTOM SETUP] setting (page 87). • The system can play discs recorded in the first session. However, the discs must be contained on an album is 250.) • An album that...MP3 audio track in the instructions supplied with the disc. You can play . "Play without using PBC, press ./> or the number buttons while the system is located in Multi Session. To return to play still pictures such as "Press SELECT" in the first album on the disc. Notes •...

Operating Instructions
Page 42
... you want to the previous file, press . or >. The system starts to recognize the files. However, the discs must be contained on CD-ROMs, CD-Rs, or CD-RWs. DVD DISPLAY DVD MENU/ ALBUM+ C/X/x/c/ ENTER O RETURN 1 Press DVD DISPLAY. You can play JPEG image files on an album is skipped.... • If the system cannot play JPEG, set [DATA CD PRIORITY] to [JPEG] in the [CUSTOM SETUP] setting (page 87). • A JPEG...
... you want to the previous file, press . or >. The system starts to recognize the files. However, the discs must be contained on CD-ROMs, CD-Rs, or CD-RWs. DVD DISPLAY DVD MENU/ ALBUM+ C/X/x/c/ ENTER O RETURN 1 Press DVD DISPLAY. You can play JPEG image files on an album is skipped.... • If the system cannot play JPEG, set [DATA CD PRIORITY] to [JPEG] in the [CUSTOM SETUP] setting (page 87). • A JPEG...

Operating Instructions
Page 56
.../ 2004 JPEG Date information * "Exchangeable Image File Format" is damaged on the disc, the system cannot display the date information. DVD DISPLAY Press DVD DISPLAY during playback when the Exif* tag is recorded in [JPEG DATE] of [CUSTOM SETUP] (page 87). 56US Checking the date information (JPEG only) You can change the date information...
.../ 2004 JPEG Date information * "Exchangeable Image File Format" is damaged on the disc, the system cannot display the date information. DVD DISPLAY Press DVD DISPLAY during playback when the Exif* tag is recorded in [JPEG DATE] of [CUSTOM SETUP] (page 87). 56US Checking the date information (JPEG only) You can change the date information...
Operating Instructions
Page 70
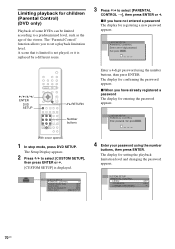
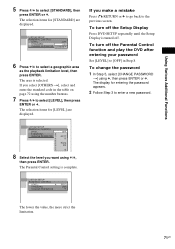
... buttons Enter a 4-digit password using the number buttons, then press ENTER. The Setup Display appears. 2 Press X/x to select [PARENTAL CONTROL t], then press ENTER or c. CUSTOM SETUP PARENTAL CONTROL Enter password, then press ENTER . With cover opened. 1 In stop mode, press DVD SETUP. x When you have not entered a password The display for confirming the password...
... buttons Enter a 4-digit password using the number buttons, then press ENTER. The Setup Display appears. 2 Press X/x to select [PARENTAL CONTROL t], then press ENTER or c. CUSTOM SETUP PARENTAL CONTROL Enter password, then press ENTER . With cover opened. 1 In stop mode, press DVD SETUP. x When you have not entered a password The display for confirming the password...
Operating Instructions
Page 71
...Setup Display Press DVD SETUP repeatedly until the Setup Display is turned off the Parental Control function and play the DVD after entering your password Set [LEVEL] to [OFF] in the table on page 72 using the number buttons. 7 Press X/x to select [LEVEL], then press ENTER or c. CUSTOM SETUP... screen. Using Various Additional Functions 5 Press X/x to select a geographic area as the playback limitation level, then press ENTER. CUSTOM SETUP PARENTAL CONTROL LEVEL: 4: STANDARD: CHANGE PASSWORD PG13 USA The lower the value, the more strict the limitation. 71US The selection items...
...Setup Display Press DVD SETUP repeatedly until the Setup Display is turned off the Parental Control function and play the DVD after entering your password Set [LEVEL] to [OFF] in the table on page 72 using the number buttons. 7 Press X/x to select [LEVEL], then press ENTER or c. CUSTOM SETUP... screen. Using Various Additional Functions 5 Press X/x to select a geographic area as the playback limitation level, then press ENTER. CUSTOM SETUP PARENTAL CONTROL LEVEL: 4: STANDARD: CHANGE PASSWORD PG13 USA The lower the value, the more strict the limitation. 71US The selection items...

Operating Instructions
Page 83
... ON JACKET PICTURE INTERLACE To turn off the Setup Display Press DVD SETUP repeatedly until the Setup Display is complete. You can make various adjustments to setup items. 4 Select a setting using X/x, then press ENTER or c. The Setup Display appears. The selected Setup item appears. The setting is selected and setup is turned off. 83US Example: [TV TYPE] SCREEN...
... ON JACKET PICTURE INTERLACE To turn off the Setup Display Press DVD SETUP repeatedly until the Setup Display is complete. You can make various adjustments to setup items. 4 Select a setting using X/x, then press ENTER or c. The Setup Display appears. The selected Setup item appears. The setting is selected and setup is turned off. 83US Example: [TV TYPE] SCREEN...

Operating Instructions
Page 84
... INTERLACE x OSD (On-Screen Display) Selects the display language on -screen display or sound track. x DVD MENU (DVD only) Selects the desired language for the Display (SCREEN SETUP) Choose settings according to the TV to set various languages for the on the screen. Select this if you... selection, the language code (4 digits) is not recorded on the upper and lower portions of the subtitle. Select [LANGUAGE SETUP] in the Setup Display. x TV TYPE (DVD only) Selects the aspect ratio of the sound track. For details on using the number buttons (page 108). For details...
... INTERLACE x OSD (On-Screen Display) Selects the display language on -screen display or sound track. x DVD MENU (DVD only) Selects the desired language for the Display (SCREEN SETUP) Choose settings according to the TV to set various languages for the on the screen. Select this if you... selection, the language code (4 digits) is not recorded on the upper and lower portions of the subtitle. Select [LANGUAGE SETUP] in the Setup Display. x TV TYPE (DVD only) Selects the aspect ratio of the sound track. For details on using the number buttons (page 108). For details...

Operating Instructions
Page 85
.... JACKET PICTURE The jacket picture (still picture) appears in the background, but only if a jacket picture is already recorded on the DVD, [4:3 LETTER BOX] may be selected automatically instead of [4:3 PAN SCAN] or vice versa. The display for more information about the different... Depending on the disc (CDEXTRA, etc.). ON Turns on and off the screen saver. GRAPHICS 1-5 A preset picture stored in the system appears in [SCREEN SETUP] using X/x, then press ENTER. To set to a standard (interlace format) TV. continued 85US BLACK The background color is blue. INTERLACE...
.... JACKET PICTURE The jacket picture (still picture) appears in the background, but only if a jacket picture is already recorded on the DVD, [4:3 LETTER BOX] may be selected automatically instead of [4:3 PAN SCAN] or vice versa. The display for more information about the different... Depending on the disc (CDEXTRA, etc.). ON Turns on and off the screen saver. GRAPHICS 1-5 A preset picture stored in the system appears in [SCREEN SETUP] using X/x, then press ENTER. To set to a standard (interlace format) TV. continued 85US BLACK The background color is blue. INTERLACE...

Operating Instructions
Page 86
... appears. CUSTOM SETUP PARENTAL CONTROL TRACK SELECTION OFF AUDIO DRC: OFF DATA CD PRIORITY: MP3 JPEG DATE: MM/DD/YYYY x PARENTAL CONTROL t (DVD only) Sets a password and playback limitation level for DVDs with priority may be predetermined. x TRACK SELECTION (DVD only) Gives the sound track having the highest number of channels, the system selects PCM...
... appears. CUSTOM SETUP PARENTAL CONTROL TRACK SELECTION OFF AUDIO DRC: OFF DATA CD PRIORITY: MP3 JPEG DATE: MM/DD/YYYY x PARENTAL CONTROL t (DVD only) Sets a password and playback limitation level for DVDs with priority may be predetermined. x TRACK SELECTION (DVD only) Gives the sound track having the highest number of channels, the system selects PCM...

Operating Instructions
Page 87
... [SURROUND] and specify the surround speaker position and height. For details, see "Using the Setup Display" (page 83). If a JPEG file exists on a disc, the system recognises the disc as a "JPEG Disc." SPEAKER SETUP SIZE: DISTANCE: LEVEL: BALANCE: TEST TONE: To return to the same level. MP3 JPEG... If an MP3 file exists on the disc, the system recognises the disc as an "MP3 Disc." x JPEG...
... [SURROUND] and specify the surround speaker position and height. For details, see "Using the Setup Display" (page 83). If a JPEG file exists on a disc, the system recognises the disc as a "JPEG Disc." SPEAKER SETUP SIZE: DISTANCE: LEVEL: BALANCE: TEST TONE: To return to the same level. MP3 JPEG... If an MP3 file exists on the disc, the system recognises the disc as an "MP3 Disc." x JPEG...

Operating Instructions
Page 88
..., the [DISTANCE] setting may be moved up to 4.6 meters (15 ft) closer (appears except when you set the distance using the Quick Setup (page 33), the settings is shown below. SURROUND NONE: Normally select this . x DISTANCE The default distance setting for the speakers in relation... (appears when you set [SURROUND] to the listening position from the front speaker distance, in the [SIZE] setting.) * When you perform the Quick Setup (page 33), the default settings are located in section B. Notes • When you set in the [SIZE] setting.) SUBWOOFER YES Notes •...
..., the [DISTANCE] setting may be moved up to 4.6 meters (15 ft) closer (appears except when you set the distance using the Quick Setup (page 33), the settings is shown below. SURROUND NONE: Normally select this . x DISTANCE The default distance setting for the speakers in relation... (appears when you set [SURROUND] to the listening position from the front speaker distance, in the [SIZE] setting.) * When you perform the Quick Setup (page 33), the default settings are located in section B. Notes • When you set in the [SIZE] setting.) SUBWOOFER YES Notes •...

Operating Instructions
Page 89
CENTER 0 dB* (appears when you set [CENTER] to +6 dB, 1 dB increments). * When you select one time Use the VOLUME control on the system, or press VOL +/-. The center position is shown as "---." (You can adjust from both left and right speakers simultaneously while adjusting balance. x TEST TONE The ....) Adjusts the level of the center speaker (-6 dB to left or right.) To adjust the volume of all the speakers at one of the [SPEAKER SETUP] items, the test tone is not emitted from each speaker as follows. x LEVEL You can vary the balance of the left and right speakers as...
CENTER 0 dB* (appears when you set [CENTER] to +6 dB, 1 dB increments). * When you select one time Use the VOLUME control on the system, or press VOL +/-. The center position is shown as "---." (You can adjust from both left and right speakers simultaneously while adjusting balance. x TEST TONE The ....) Adjusts the level of the center speaker (-6 dB to left or right.) To adjust the volume of all the speakers at one of the [SPEAKER SETUP] items, the test tone is not emitted from each speaker as follows. x LEVEL You can vary the balance of the left and right speakers as...

