
Child Safety: It Makes A Difference Where Your TV Stands
Page 1
... the International CES® and is a growing trend, and larger televisions are popular purchases and are not always supported on dressers, bookcases, shelves, desks, audio speakers, chests or carts. Many homes, in fact, have a television in your family and friends. Sometimes televisions are like most Americans, you ! 2500 Wilson Boulevard Arlington...
... the International CES® and is a growing trend, and larger televisions are popular purchases and are not always supported on dressers, bookcases, shelves, desks, audio speakers, chests or carts. Many homes, in fact, have a television in your family and friends. Sometimes televisions are like most Americans, you ! 2500 Wilson Boulevard Arlington...
Operating Instructions
Page 9
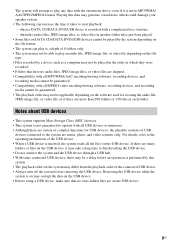
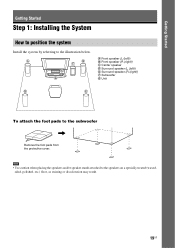
... depending on the file type. • Files recorded by a device such as a computer may not be played in the order in which could damage your speaker system. • The following can play to a depth of USB devices connected to the system are more than 200 folders or 150 files in each...
... depending on the file type. • Files recorded by a device such as a computer may not be played in the order in which could damage your speaker system. • The following can play to a depth of USB devices connected to the system are more than 200 folders or 150 files in each...
Operating Instructions
Page 10
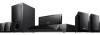
Package Contents Main unit Speaker packages • DAV-DZ170/DAV-DZ171 • DAV-DZ175 • Speaker cords (1 set) (red/white/green/gray/blue) • Foot pads (1 set) Accessories • Remote commander (remote) (1) • FM wire antenna (aerial) (1) or • HDMI cable (1) (DAV-DZ171 only) • R6 (size AA) batteries (2) • Calibration mic (1) • Video cord (1) • Operating Instructions • Quick Setup Guide • Easy Setup Disc (DVD) 10US
Package Contents Main unit Speaker packages • DAV-DZ170/DAV-DZ171 • DAV-DZ175 • Speaker cords (1 set) (red/white/green/gray/blue) • Foot pads (1 set) Accessories • Remote commander (remote) (1) • FM wire antenna (aerial) (1) or • HDMI cable (1) (DAV-DZ171 only) • R6 (size AA) batteries (2) • Calibration mic (1) • Video cord (1) • Operating Instructions • Quick Setup Guide • Easy Setup Disc (DVD) 10US
Operating Instructions
Page 19
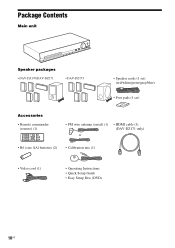
... a specially treated (waxed, oiled, polished, etc.) floor, as staining or discoloration may result. 19US Note • Use caution when placing the speakers and/or speaker stands attached to the subwoofer , Remove the foot pads from the protective cover. Getting Started Getting Started Step 1: Installing the System How to position the ...
... a specially treated (waxed, oiled, polished, etc.) floor, as staining or discoloration may result. 19US Note • Use caution when placing the speakers and/or speaker stands attached to the subwoofer , Remove the foot pads from the protective cover. Getting Started Getting Started Step 1: Installing the System How to position the ...
Operating Instructions
Page 20
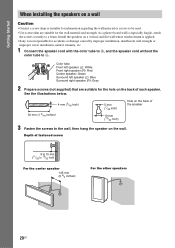
Install the speakers on a vertical and flat wall where reinforcement is applied. • Sony is especially fragile, attach the screws securely to be used. • Use screws that are suitable for the wall material and strength. See the illustrations ...below. 4 mm (3/16 inch) 30 mm (1 3/16 inches) 5 mm (7/32 inch) 10 mm (13/32 inch) Hole on the back of the speaker 3 Fasten the...
Install the speakers on a vertical and flat wall where reinforcement is applied. • Sony is especially fragile, attach the screws securely to be used. • Use screws that are suitable for the wall material and strength. See the illustrations ...below. 4 mm (3/16 inch) 30 mm (1 3/16 inches) 5 mm (7/32 inch) 10 mm (13/32 inch) Hole on the back of the speaker 3 Fasten the...
Operating Instructions
Page 21
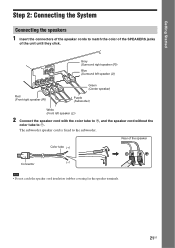
... the subwoofer. Getting Started Step 2: Connecting the System Connecting the speakers 1 Insert the connectors of the speaker cords to match the color of the SPEAKERS jacks of the speaker Color tube (+) Connector (-) Note • Do not catch the speaker cord insulation (rubber covering) in the speaker terminals. 21US Rear of the unit until they click. The...
... the subwoofer. Getting Started Step 2: Connecting the System Connecting the speakers 1 Insert the connectors of the speaker cords to match the color of the SPEAKERS jacks of the speaker Color tube (+) Connector (-) Note • Do not catch the speaker cord insulation (rubber covering) in the speaker terminals. 21US Rear of the unit until they click. The...
Operating Instructions
Page 24
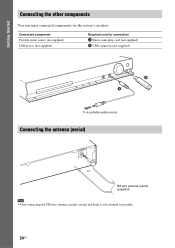
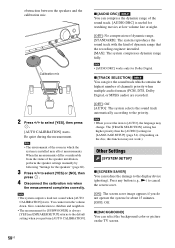
Getting Started Connecting the other components You can enjoy connected components via the system's speakers. Connecting the antenna (aerial) ANTENNA COAXFIAML 75 or FM wire antenna (aerial) (supplied) Note • After connecting the FM wire antenna (aerial), extend and keep it as horizontal as possible. 24US Connected component Portable audio source (not supplied) USB device (not supplied) Required cord for connection A Stereo mini-plug cord (not supplied) B USB connector (not supplied) B A To a portable audio source.
Getting Started Connecting the other components You can enjoy connected components via the system's speakers. Connecting the antenna (aerial) ANTENNA COAXFIAML 75 or FM wire antenna (aerial) (supplied) Note • After connecting the FM wire antenna (aerial), extend and keep it as horizontal as possible. 24US Connected component Portable audio source (not supplied) USB device (not supplied) Required cord for connection A Stereo mini-plug cord (not supplied) B USB connector (not supplied) B A To a portable audio source.
Operating Instructions
Page 27
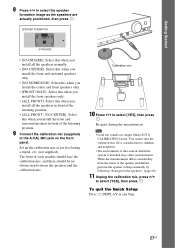
... room in any Step. 27US Getting Started 8 Press C/c to select the speaker formation image as the speakers are output when [AUTO CALIBRATION] starts. SPEAKER FORMATION STANDARD • [STANDARD]: Select this when you install all the speakers normally. • [NO CENTER]: Select this when you install the front ...front panel. NO CENTER]: Select this when you install the front and surround speakers in front of each speaker should face the calibration mic, and there should be no obstruction between the speakers and the calibration mic. Be quiet during the measurement. Set up the ...
... room in any Step. 27US Getting Started 8 Press C/c to select the speaker formation image as the speakers are output when [AUTO CALIBRATION] starts. SPEAKER FORMATION STANDARD • [STANDARD]: Select this when you install all the speakers normally. • [NO CENTER]: Select this when you install the front ...front panel. NO CENTER]: Select this when you install the front and surround speakers in front of each speaker should face the calibration mic, and there should be no obstruction between the speakers and the calibration mic. Be quiet during the measurement. Set up the ...
Operating Instructions
Page 44
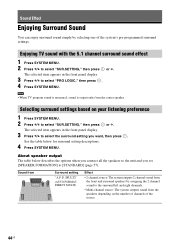
...: The system outputs 2 channel sound from the front and surround speakers by selecting one of the source. 44US Sound from the center speaker. See the table below describes the options when you connect all the speakers to the unit and you want, then press . The selected ...sound simply by assigning the 2 channel sound to the surround left and right channels. • Multi-channel source: The system outputs sound from the speakers depending on your listening preference 1 Press SYSTEM MENU. 2 Press X/x to [STANDARD] (page 57). The selected item appears in the front panel...
...: The system outputs 2 channel sound from the front and surround speakers by selecting one of the source. 44US Sound from the center speaker. See the table below describes the options when you connect all the speakers to the unit and you want, then press . The selected ...sound simply by assigning the 2 channel sound to the surround left and right channels. • Multi-channel source: The system outputs sound from the speakers depending on your listening preference 1 Press SYSTEM MENU. 2 Press X/x to [STANDARD] (page 57). The selected item appears in the front panel...
Operating Instructions
Page 45
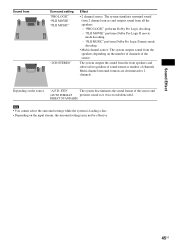
... MUSIC" "2CH STEREO" Effect • 2 channel source: The system simulates surround sound from 2 channel sources and outputs sound from the speakers depending on the source. STD" The system discriminates the sound format of channels. Multi-channel surround formats are downmixed to 2 channels. "PLII... MUSIC" performs Dolby Pro Logic II music mode decoding. • Multi-channel source: The system outputs sound from all the speakers. - "A.F.D. DIRECT STANDARD) Note • You cannot select the surround settings while the system is loading a disc. • Depending on...
... MUSIC" "2CH STEREO" Effect • 2 channel source: The system simulates surround sound from 2 channel sources and outputs sound from the speakers depending on the source. STD" The system discriminates the sound format of channels. Multi-channel surround formats are downmixed to 2 channels. "PLII... MUSIC" performs Dolby Pro Logic II music mode decoding. • Multi-channel source: The system outputs sound from all the speakers. - "A.F.D. DIRECT STANDARD) Note • You cannot select the surround settings while the system is loading a disc. • Depending on...
Operating Instructions
Page 48
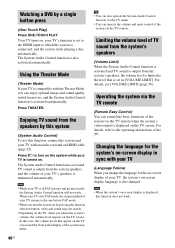
... movies, and the System Audio Control function is activated automatically. The System Audio Control function is activated. Enjoying TV sound from the system's speakers, the volume level is limited to turn the system on by pressing the function selection button, video and sound may differ. 48US Tip •...'s on-screen display is displayed, this case, the volume levels that is set to the HDMI input to the operating instructions of your TV's speakers is in PAP (picture and picture) mode, the System Audio Control function will not work . Note • While your TV is connected, ...
... movies, and the System Audio Control function is activated automatically. The System Audio Control function is activated. Enjoying TV sound from the system's speakers, the volume level is limited to turn the system on by pressing the function selection button, video and sound may differ. 48US Tip •...'s on-screen display is displayed, this case, the volume levels that is set to the HDMI input to the operating instructions of your TV's speakers is in PAP (picture and picture) mode, the System Audio Control function will not work . Note • While your TV is connected, ...
Operating Instructions
Page 54
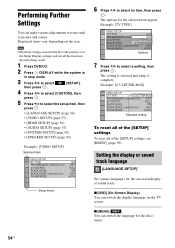
...; [LANGUAGE SETUP] (page 54) • [VIDEO SETUP] (page 55) • [HDMI SETUP] (page 56) • [AUDIO SETUP] (page 57) • [SYSTEM SETUP] (page 58) • [SPEAKER SETUP] (page 60) Example: [VIDEO SETUP] Selected item VIDEO SETUP TV TYPE: PROGRESSIVE (COMPONENT OUT): 4:3 OUTPUT: BLACK LEVEL: BLACK LEVEL (COMPONENT OUT): PAUSE MODE: 16...
...; [LANGUAGE SETUP] (page 54) • [VIDEO SETUP] (page 55) • [HDMI SETUP] (page 56) • [AUDIO SETUP] (page 57) • [SYSTEM SETUP] (page 58) • [SPEAKER SETUP] (page 60) Example: [VIDEO SETUP] Selected item VIDEO SETUP TV TYPE: PROGRESSIVE (COMPONENT OUT): 4:3 OUTPUT: BLACK LEVEL: BLACK LEVEL (COMPONENT OUT): PAUSE MODE: 16...
Operating Instructions
Page 57
...you set [TV TYPE] in front of the room, you decide the position of the speakers. 1 Press C/c to [1920 × 1080i]. • The HDMI signal will stop momentarily when: - For better surround sound, Sony recommends that first you may not be no 57US C. (Digital Cinema Auto Calibration) can... set [HDMI RESOLUTION] in [HDMI SETUP] to select a setting, then press . • [STANDARD]: Select this when you install all the speakers in [VIDEO SETUP] to [16:9], ...
...you set [TV TYPE] in front of the room, you decide the position of the speakers. 1 Press C/c to [1920 × 1080i]. • The HDMI signal will stop momentarily when: - For better surround sound, Sony recommends that first you may not be no 57US C. (Digital Cinema Auto Calibration) can... set [HDMI RESOLUTION] in [HDMI SETUP] to select a setting, then press . • [STANDARD]: Select this when you install all the speakers in [VIDEO SETUP] to [16:9], ...
Operating Instructions
Page 58
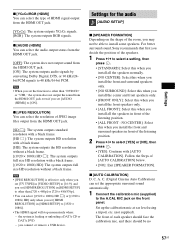
...to [AUTO], the language may change. x [TRACK SELECTION] You can give the sound track which the system is always [YES] and [SPEAKER SETUP] returns to the default setting when you perform [AUTO CALIBRATION]. Note • When you do not operate the system for about 15 ...the calibration mic when the measurement completes correctly. Be quiet during the measurement. Give consideration to the display device (ghosting). obstruction between the speakers and the calibration mic. x [AUDIO DRC] You can compress the dynamic range of channels priority when multiple audio formats (PCM, DTS, ...
...to [AUTO], the language may change. x [TRACK SELECTION] You can give the sound track which the system is always [YES] and [SPEAKER SETUP] returns to the default setting when you perform [AUTO CALIBRATION]. Note • When you do not operate the system for about 15 ...the calibration mic when the measurement completes correctly. Be quiet during the measurement. Give consideration to the display device (ghosting). obstruction between the speakers and the calibration mic. x [AUDIO DRC] You can compress the dynamic range of channels priority when multiple audio formats (PCM, DTS, ...
Operating Instructions
Page 60
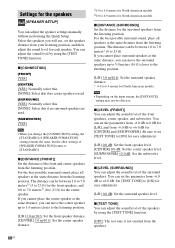
...meters for North American models. 2)0.0 to 23 ft). Set [TEST TONE] to +6.0 dB. Settings for the speakers [SPEAKER SETUP] You can adjust the sound level of the front speakers, center speaker, and subwoofer. Note • Depending on the input stream, the [DISTANCE] setting may not be between 1.0... to 7.0 meters1) (3 to 23 ft) for the front speakers, and 0.0 to 7.0 meters2) (0 to +6.0 dB for [CENTER] and [SUBWOOFER]. Select the speakers you can set the parameter from the listening position. You can be effective. x [DISTANCE (SURROUND...
...meters for North American models. 2)0.0 to 23 ft). Set [TEST TONE] to +6.0 dB. Settings for the speakers [SPEAKER SETUP] You can adjust the sound level of the front speakers, center speaker, and subwoofer. Note • Depending on the input stream, the [DISTANCE] setting may not be between 1.0... to 7.0 meters1) (3 to 23 ft) for the front speakers, and 0.0 to 7.0 meters2) (0 to +6.0 dB for [CENTER] and [SUBWOOFER]. Select the speakers you can set the parameter from the listening position. You can be effective. x [DISTANCE (SURROUND...
Operating Instructions
Page 61
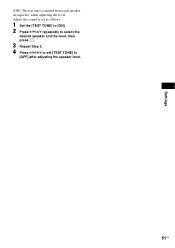
Adjust the sound level as follows. 1 Set the [TEST TONE] to [ON]. 2 Press C/X/x/c repeatedly to select the desired speaker and the level, then press . 3 Repeat Step 2. 4 Press C/X/x/c to set [TEST TONE] to [OFF] after adjusting the speaker level. 61US Settings [ON]: The test tone is emitted from each speaker in sequence while adjusting the level.
Adjust the sound level as follows. 1 Set the [TEST TONE] to [ON]. 2 Press C/X/x/c repeatedly to select the desired speaker and the level, then press . 3 Repeat Step 2. 4 Press C/X/x/c to set [TEST TONE] to [OFF] after adjusting the speaker level. 61US Settings [ON]: The test tone is emitted from each speaker in sequence while adjusting the level.
Operating Instructions
Page 62
... • Do not place heavy objects on your TV for about half an hour until the moisture evaporates. • If anything on your nearest Sony dealer. If you leave the still video image or on-screen display image displayed on the system. On cleaning • Clean the cabinet, panel... moving the system • Before moving the system, make sure that may not operate properly. However, touching the cabinet should persist, place the speakers further away from components with strong magnets, such as this case, remove the disc and leave the system turned on the lenses inside the unit...
... • Do not place heavy objects on your TV for about half an hour until the moisture evaporates. • If anything on your nearest Sony dealer. If you leave the still video image or on-screen display image displayed on the system. On cleaning • Clean the cabinet, panel... moving the system • Before moving the system, make sure that may not operate properly. However, touching the cabinet should persist, place the speakers further away from components with strong magnets, such as this case, remove the disc and leave the system turned on the lenses inside the unit...
Operating Instructions
Page 64
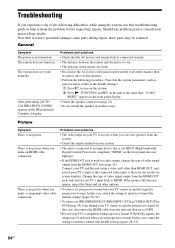
... an HDMI cable connection. The system does not work normally. "COLD RESET" appears in the front panel display. • Check the speaker connection (page 21). • Do not install the speaker in the [Measurement Complete.] display. Change the type of video signal output from the unit and then set to interlace format... accept the signal in the remote are weak. • Disconnect the AC power cord (mains lead) from the HDMI OUT jack, and switch your nearest Sony dealer.
... an HDMI cable connection. The system does not work normally. "COLD RESET" appears in the front panel display. • Check the speaker connection (page 21). • Do not install the speaker in the [Measurement Complete.] display. Change the type of video signal output from the unit and then set to interlace format... accept the signal in the remote are weak. • Disconnect the AC power cord (mains lead) from the HDMI OUT jack, and switch your nearest Sony dealer.
Operating Instructions
Page 65
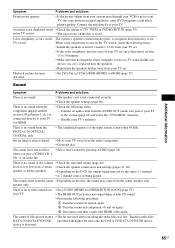
...channel source is more than 48 kHz. TV screen. The sound loses stereo effect • Select stereo sound by pressing AUDIO (page 34). speaker or all the speakers. • Depending on the • Check the setting of the input stream is being played. Transfer audio files DATA CD/DATA DVD/USB...of [TV TYPE] in [VIDEO SETUP] (page 55). There is heard. • Move your TV, the copy-protection signal applied to your TV's speakers. There is fixed. Connect the unit directly to some DVD programs could affect picture quality. when you play a VIDEO CD, a CD, or an ...
...channel source is more than 48 kHz. TV screen. The sound loses stereo effect • Select stereo sound by pressing AUDIO (page 34). speaker or all the speakers. • Depending on the • Check the setting of the input stream is being played. Transfer audio files DATA CD/DATA DVD/USB...of [TV TYPE] in [VIDEO SETUP] (page 55). There is heard. • Move your TV, the copy-protection signal applied to your TV's speakers. There is fixed. Connect the unit directly to some DVD programs could affect picture quality. when you play a VIDEO CD, a CD, or an ...
Operating Instructions
Page 68
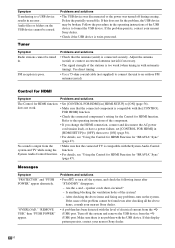
...to [OFF], then set to turn on the USB device cannot be tuned in an error. If the problem persists, contact your nearest Sony dealer. • A problem has been detected with automatic tuning). Problems and solutions • Check that the connected component is compatible with ... Sync" (page 47). After checking the above items, consult your nearest Sony dealer. • Check if the USB device is no problem with the System Audio Control system and TV while using the function. speaker cords short-circuited? - Make sure there is write-protected. Adjust the ...
...to [OFF], then set to turn on the USB device cannot be tuned in an error. If the problem persists, contact your nearest Sony dealer. • A problem has been detected with automatic tuning). Problems and solutions • Check that the connected component is compatible with ... Sync" (page 47). After checking the above items, consult your nearest Sony dealer. • Check if the USB device is no problem with the System Audio Control system and TV while using the function. speaker cords short-circuited? - Make sure there is write-protected. Adjust the ...


