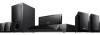

Child Safety: It Makes A Difference Where Your TV Stands
Page 1
.... The home theater entertainment experience is a growing trend, and larger televisions are popular purchases and are not always supported on dressers, bookcases, shelves, desks, audio speakers, chests or carts. Sometimes televisions are improperly secured or inappropriately situated on the proper TV stands. The Consumer Electronics Association formed the Home Entertainment Support...
.... The home theater entertainment experience is a growing trend, and larger televisions are popular purchases and are not always supported on dressers, bookcases, shelves, desks, audio speakers, chests or carts. Sometimes televisions are improperly secured or inappropriately situated on the proper TV stands. The Consumer Electronics Association formed the Home Entertainment Support...
Operating Instructions
Page 9
... off the system before an operation is performed by a device such as a computer may not be played in the order in which could damage your speaker system. • The following can play any data with the extensions above, even if it may take a long time to start playback: - Playing this system...
... off the system before an operation is performed by a device such as a computer may not be played in the order in which could damage your speaker system. • The following can play any data with the extensions above, even if it may take a long time to start playback: - Playing this system...
Operating Instructions
Page 10
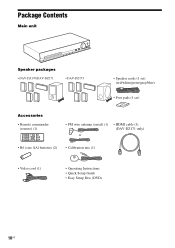
Package Contents Main unit Speaker packages • DAV-DZ170/DAV-DZ171 • DAV-DZ175 • Speaker cords (1 set) (red/white/green/gray/blue) • Foot pads (1 set) Accessories • Remote commander (remote) (1) • FM wire antenna (aerial) (1) or • HDMI cable (1) (DAV-DZ171 only) • R6 (size AA) batteries (2) • Calibration mic (1) • Video cord (1) • Operating Instructions • Quick Setup Guide • Easy Setup Disc (DVD) 10US
Package Contents Main unit Speaker packages • DAV-DZ170/DAV-DZ171 • DAV-DZ175 • Speaker cords (1 set) (red/white/green/gray/blue) • Foot pads (1 set) Accessories • Remote commander (remote) (1) • FM wire antenna (aerial) (1) or • HDMI cable (1) (DAV-DZ171 only) • R6 (size AA) batteries (2) • Calibration mic (1) • Video cord (1) • Operating Instructions • Quick Setup Guide • Easy Setup Disc (DVD) 10US
Operating Instructions
Page 19
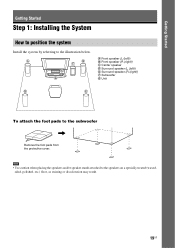
... the System How to position the system Install the system by referring to the speakers on a specially treated (waxed, oiled, polished, etc.) floor, as staining or discoloration may result. 19US A B F C G A Front speaker (L (left)) B Front speaker (R (right)) C Center speaker D Surround speaker (L (left)) E Surround speaker (R (right)) F Subwoofer G Unit D E To attach the foot pads to the subwoofer , Remove the...
... the System How to position the system Install the system by referring to the speakers on a specially treated (waxed, oiled, polished, etc.) floor, as staining or discoloration may result. 19US A B F C G A Front speaker (L (left)) B Front speaker (R (right)) C Center speaker D Surround speaker (L (left)) E Surround speaker (R (right)) F Subwoofer G Unit D E To attach the foot pads to the subwoofer , Remove the...
Operating Instructions
Page 20
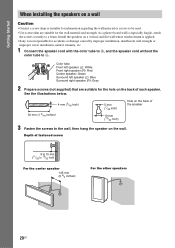
... a vertical and flat wall where reinforcement is applied. • Sony is especially fragile, attach the screws securely to the wall, then hang the speaker on the wall. Color tube Front left speaker (L): White Front right speaker (R): Red Center speaker: Green Surround left speaker (L): Blue Surround right speaker (R): Gray 2 Prepare screws (not supplied) that are suitable for the...
... a vertical and flat wall where reinforcement is applied. • Sony is especially fragile, attach the screws securely to the wall, then hang the speaker on the wall. Color tube Front left speaker (L): White Front right speaker (R): Red Center speaker: Green Surround left speaker (L): Blue Surround right speaker (R): Gray 2 Prepare screws (not supplied) that are suitable for the...
Operating Instructions
Page 21
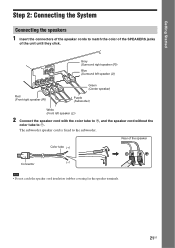
... the unit until they click. SPEAKERSUSR L SUR R FRONT R FRONSTPLEAKSEURBWSOOFER CENTER Red (Front right speaker (R)) Gray (Surround right speaker (R)) Blue (Surround left speaker (L)) Green (Center speaker) Purple (Subwoofer) White (Front left speaker (L)) 2 Connect the speaker cord with the color tube to 3, and the speaker cord without the color tube to the subwoofer. Getting Started Step 2: Connecting the System...
... the unit until they click. SPEAKERSUSR L SUR R FRONT R FRONSTPLEAKSEURBWSOOFER CENTER Red (Front right speaker (R)) Gray (Surround right speaker (R)) Blue (Surround left speaker (L)) Green (Center speaker) Purple (Subwoofer) White (Front left speaker (L)) 2 Connect the speaker cord with the color tube to 3, and the speaker cord without the color tube to the subwoofer. Getting Started Step 2: Connecting the System...
Operating Instructions
Page 24
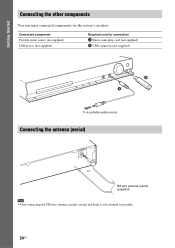
Connecting the antenna (aerial) ANTENNA COAXFIAML 75 or FM wire antenna (aerial) (supplied) Note • After connecting the FM wire antenna (aerial), extend and keep it as horizontal as possible. 24US Connected component Portable audio source (not supplied) USB device (not supplied) Required cord for connection A Stereo mini-plug cord (not supplied) B USB connector (not supplied) B A To a portable audio source. Getting Started Connecting the other components You can enjoy connected components via the system's speakers.
Connecting the antenna (aerial) ANTENNA COAXFIAML 75 or FM wire antenna (aerial) (supplied) Note • After connecting the FM wire antenna (aerial), extend and keep it as horizontal as possible. 24US Connected component Portable audio source (not supplied) USB device (not supplied) Required cord for connection A Stereo mini-plug cord (not supplied) B USB connector (not supplied) B A To a portable audio source. Getting Started Connecting the other components You can enjoy connected components via the system's speakers.
Operating Instructions
Page 27
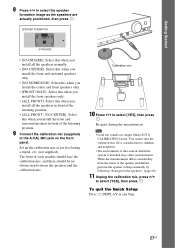
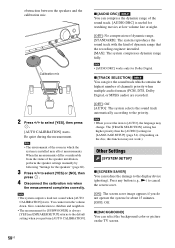
... the calibration mic (supplied) to the A.CAL MIC jack on the front panel. The front of the speaker installation, perform the speaker settings manually by following "Settings for the speakers" (page 60). 11 Unplug the calibration mic, press C/c to select [YES], then press . When the... measurements differ considerably from the status of each speaker should face the calibration mic, and there should be no obstruction between the speakers and the calibration mic. SPEAKER FORMATION STANDARD • [STANDARD]: Select this when you install the front and surround...
... the calibration mic (supplied) to the A.CAL MIC jack on the front panel. The front of the speaker installation, perform the speaker settings manually by following "Settings for the speakers" (page 60). 11 Unplug the calibration mic, press C/c to select [YES], then press . When the... measurements differ considerably from the status of each speaker should face the calibration mic, and there should be no obstruction between the speakers and the calibration mic. SPEAKER FORMATION STANDARD • [STANDARD]: Select this when you install the front and surround...
Operating Instructions
Page 44
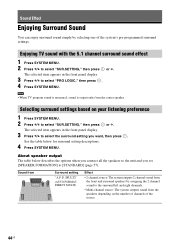
... program sound is monaural, sound is output only from Surround setting "A.F.D. See the table below describes the options when you connect all the speakers to the unit and you want, then press . MULTI" (AUTO FORMAT DIRECT MULTI) Effect • 2 channel source: The system outputs... 2 channel sound from the front and surround speakers by selecting one of the source. 44US About speaker output The table below for surround setting descriptions. 4 Press SYSTEM MENU. Sound Effect Enjoying Surround Sound You can enjoy ...
... program sound is monaural, sound is output only from Surround setting "A.F.D. See the table below describes the options when you connect all the speakers to the unit and you want, then press . MULTI" (AUTO FORMAT DIRECT MULTI) Effect • 2 channel source: The system outputs... 2 channel sound from the front and surround speakers by selecting one of the source. 44US About speaker output The table below for surround setting descriptions. 4 Press SYSTEM MENU. Sound Effect Enjoying Surround Sound You can enjoy ...
Operating Instructions
Page 45
"PRO LOGIC" performs Dolby Pro Logic decoding. - The system outputs the sound from the front speakers and subwoofer regardless of sound format or number of the source and (AUTO FORMAT presents sound as it was recorded/encoded. Depending on the number ... II movie mode decoding. - "PLII MUSIC" performs Dolby Pro Logic II music mode decoding. • Multi-channel source: The system outputs sound from all the speakers. - DIRECT STANDARD) Note • You cannot select the surround settings while the system is loading a disc. • Depending on the input stream, the surround settings...
"PRO LOGIC" performs Dolby Pro Logic decoding. - The system outputs the sound from the front speakers and subwoofer regardless of sound format or number of the source and (AUTO FORMAT presents sound as it was recorded/encoded. Depending on the number ... II movie mode decoding. - "PLII MUSIC" performs Dolby Pro Logic II music mode decoding. • Multi-channel source: The system outputs sound from all the speakers. - DIRECT STANDARD) Note • You cannot select the surround settings while the system is loading a disc. • Depending on the input stream, the surround settings...
Operating Instructions
Page 48
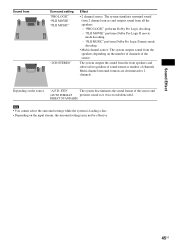
... display of the system may not match. • Depending on the TV, when you change the language for the on-screen display of your TV's speakers is also changed. When your TV exits PAP mode, the output method of the system via the TV remote when the system's video output is... Limit) When the System Audio Control function is activated and TV sound is output from the system's speakers, the volume level is output from the speakers by pressing the function selection button, video and sound may differ. 48US Tip • You can also operate the System Audio Control function via the ...
... display of the system may not match. • Depending on the TV, when you change the language for the on-screen display of your TV's speakers is also changed. When your TV exits PAP mode, the output method of the system via the TV remote when the system's video output is... Limit) When the System Audio Control function is activated and TV sound is output from the system's speakers, the volume level is output from the speakers by pressing the function selection button, video and sound may differ. 48US Tip • You can also operate the System Audio Control function via the ...
Operating Instructions
Page 54
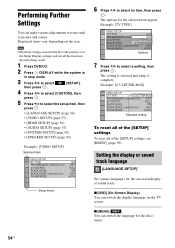
...; [LANGUAGE SETUP] (page 54) • [VIDEO SETUP] (page 55) • [HDMI SETUP] (page 56) • [AUDIO SETUP] (page 57) • [SYSTEM SETUP] (page 58) • [SPEAKER SETUP] (page 60) Example: [VIDEO SETUP] Selected item VIDEO SETUP TV TYPE: PROGRESSIVE (COMPONENT OUT): 4:3 OUTPUT: BLACK LEVEL: BLACK LEVEL (COMPONENT OUT): PAUSE MODE: 16...
...; [LANGUAGE SETUP] (page 54) • [VIDEO SETUP] (page 55) • [HDMI SETUP] (page 56) • [AUDIO SETUP] (page 57) • [SYSTEM SETUP] (page 58) • [SPEAKER SETUP] (page 60) Example: [VIDEO SETUP] Selected item VIDEO SETUP TV TYPE: PROGRESSIVE (COMPONENT OUT): 4:3 OUTPUT: BLACK LEVEL: BLACK LEVEL (COMPONENT OUT): PAUSE MODE: 16...
Operating Instructions
Page 57
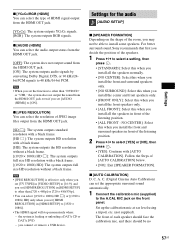
... RESOLUTION] is loading or unloading a DATA CD or DATA DVD. - Settings for the audio [AUDIO SETUP] x [SPEAKER FORMATION] Depending on the front panel. For better surround sound, Sony recommends that first you decide the position of the speakers. 1 Press C/c to select a setting, then press . • [STANDARD]: Select this when you install all the...
... RESOLUTION] is loading or unloading a DATA CD or DATA DVD. - Settings for the audio [AUDIO SETUP] x [SPEAKER FORMATION] Depending on the front panel. For better surround sound, Sony recommends that first you decide the position of the speakers. 1 Press C/c to select a setting, then press . • [STANDARD]: Select this when you install all the...
Operating Instructions
Page 58
... dynamic range. [STANDARD]: The system reproduces the sound track with the kind of the sound track. [AUDIO DRC] is always [YES] and [SPEAKER SETUP] returns to the display device (ghosting). Note • The system outputs a loud test sound when [AUTO CALIBRATION] starts. Note •...; [AUDIO DRC] works only for the speakers" (page 60). 3 Press C/c to select [YES], then press . [AUTO CALIBRATION] starts. Give consideration to children and neighbors. • The measurement ...
... dynamic range. [STANDARD]: The system reproduces the sound track with the kind of the sound track. [AUDIO DRC] is always [YES] and [SPEAKER SETUP] returns to the display device (ghosting). Note • The system outputs a loud test sound when [AUTO CALIBRATION] starts. Note •...; [AUDIO DRC] works only for the speakers" (page 60). 3 Press C/c to select [YES], then press . [AUTO CALIBRATION] starts. Give consideration to children and neighbors. • The measurement ...
Operating Instructions
Page 60
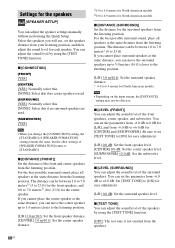
...TONE] to 23 ft). Note • Depending on the input stream, the [DISTANCE] setting may not be between 1.0 to 7.0 meters* (0 to [ON] for the center speaker. You can be between 1.0 to 7.0 meters1) (3 to 23 ft) for North American models. x [CONNECTION] [FRONT] [YES] [CENTER] [YES]: Normally select this. [...SUBWOOFER]. x [TEST TONE] You can adjust the sound level by using the [TEST TONE] function. You can adjust the sound level of the speakers by using the [TEST TONE] function. [OFF]: The test tone is used. [SURROUND] [YES]: Normally select this. [NONE]: Select this if no...
...TONE] to 23 ft). Note • Depending on the input stream, the [DISTANCE] setting may not be between 1.0 to 7.0 meters* (0 to [ON] for the center speaker. You can be between 1.0 to 7.0 meters1) (3 to 23 ft) for North American models. x [CONNECTION] [FRONT] [YES] [CENTER] [YES]: Normally select this. [...SUBWOOFER]. x [TEST TONE] You can adjust the sound level by using the [TEST TONE] function. You can adjust the sound level of the speakers by using the [TEST TONE] function. [OFF]: The test tone is used. [SURROUND] [YES]: Normally select this. [NONE]: Select this if no...
Operating Instructions
Page 61
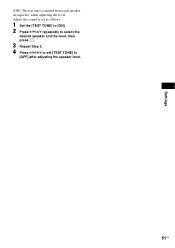
Adjust the sound level as follows. 1 Set the [TEST TONE] to [ON]. 2 Press C/X/x/c repeatedly to select the desired speaker and the level, then press . 3 Repeat Step 2. 4 Press C/X/x/c to set [TEST TONE] to [OFF] after adjusting the speaker level. 61US Settings [ON]: The test tone is emitted from each speaker in sequence while adjusting the level.
Adjust the sound level as follows. 1 Set the [TEST TONE] to [ON]. 2 Press C/X/x/c repeatedly to select the desired speaker and the level, then press . 3 Repeat Step 2. 4 Press C/X/x/c to set [TEST TONE] to [OFF] after adjusting the speaker level. 61US Settings [ON]: The test tone is emitted from each speaker in sequence while adjusting the level.
Operating Instructions
Page 62
... image or on-screen display image on after 15 to a warm location, or is suddenly played. On your TV's color • If the speakers should cause your nearest Sony dealer. Do not use cleaning discs or disc/lens cleaners (including wet or spray types). If color irregularity should be operated in a confined...
... image or on-screen display image on after 15 to a warm location, or is suddenly played. On your TV's color • If the speakers should cause your nearest Sony dealer. Do not use cleaning discs or disc/lens cleaners (including wet or spray types). If color irregularity should be operated in a confined...
Operating Instructions
Page 64
... remedy the problem before requesting repairs. "COLD RESET" appears in the front panel display. • Check the speaker connection (page 21). • Do not install the speaker in the [Measurement Complete.] display. There is no picture when you make an HDMI cable connection. In this ...picture when you make a component video cable connection. There is no picture. Troubleshooting If you experience any problem persist, consult your nearest Sony dealer. Change the type of the following procedure. (Note that is not turned on. The system does not work normally. General ...
... remedy the problem before requesting repairs. "COLD RESET" appears in the front panel display. • Check the speaker connection (page 21). • Do not install the speaker in the [Measurement Complete.] display. There is no picture when you make an HDMI cable connection. In this ...picture when you make a component video cable connection. There is no picture. Troubleshooting If you experience any problem persist, consult your nearest Sony dealer. Change the type of the following procedure. (Note that is not turned on. The system does not work normally. General ...
Operating Instructions
Page 65
... your TV to the system (page 22) and select the "TV/CABLE" function. - There is more than 48 kHz. There is placed near the speakers. • Reposition the speakers farther away from your TV. • Set [AUDIO (HDMI)] in [HDMI SETUP] to [ON] (page 57). • The HDMI OUT jack...on a TV stand, health care device, toy, etc.) is no sound from the DIGITAL IN OPTICAL/ COAXIAL jack. • The sampling frequency of your TV's speakers. An image is not displayed on the DVD, the output signal may not be the entire 5.1 channel. • A 2 channel source is not connected securely....
... your TV to the system (page 22) and select the "TV/CABLE" function. - There is more than 48 kHz. There is placed near the speakers. • Reposition the speakers farther away from your TV. • Set [AUDIO (HDMI)] in [HDMI SETUP] to [ON] (page 57). • The HDMI OUT jack...on a TV stand, health care device, toy, etc.) is no sound from the DIGITAL IN OPTICAL/ COAXIAL jack. • The sampling frequency of your TV's speakers. An image is not displayed on the DVD, the output signal may not be the entire 5.1 channel. • A 2 channel source is not connected securely....
Operating Instructions
Page 68
If the problem persists, contact your nearest Sony dealer. • Check if the USB device is no problem with the USB device. Use direct tuning. • Use a 75-ohm coaxial cable (not supplied) ... on the system. Problems and solutions • Check that the connected TV is connected securely. speaker cords short-circuited? - After checking the above items, consult your nearest Sony dealer. 68US If this display pattern persists, contact your nearest Sony dealer. • A problem has been detected with the [CONTROL FOR HDMI] function. • Check...
If the problem persists, contact your nearest Sony dealer. • Check if the USB device is no problem with the USB device. Use direct tuning. • Use a 75-ohm coaxial cable (not supplied) ... on the system. Problems and solutions • Check that the connected TV is connected securely. speaker cords short-circuited? - After checking the above items, consult your nearest Sony dealer. 68US If this display pattern persists, contact your nearest Sony dealer. • A problem has been detected with the [CONTROL FOR HDMI] function. • Check...


