
Child Safety: It Makes A Difference Where Your TV Stands
Page 1
...are not always supported on the proper TV stands. The Consumer Electronics Association formed the Home Entertainment Support Safety Committee comprised of TVs such as VCRs and remotes that may pique the children's curiosity. 6 Remember that children can become excited while ...manufacturer's instructions and product safety notices. 4 Don't allow children to secure your family and friends. The Industry Cares! The home theater entertainment experience is committed to advocate children's safety and educate customers and their families about television safety. Thank you have a ...
...are not always supported on the proper TV stands. The Consumer Electronics Association formed the Home Entertainment Support Safety Committee comprised of TVs such as VCRs and remotes that may pique the children's curiosity. 6 Remember that children can become excited while ...manufacturer's instructions and product safety notices. 4 Don't allow children to secure your family and friends. The Industry Cares! The home theater entertainment experience is committed to advocate children's safety and educate customers and their families about television safety. Thank you have a ...
Operating Instructions
Page 4
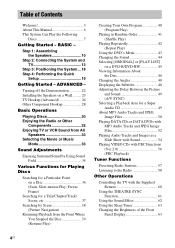
... (PBC Playback) Tuner Functions Presetting Radio Stations 57 Listening to the Radio 58 Other Operations Controlling the TV with the Supplied Remote 60 Using the THEATRE SYNC Function 61 Using the Sound Effect 62 Using the Sleep Timer 63 Changing the Brightness of Contents ...Welcome 3 About This Manual 6 This System Can Play the Following Discs 7 Getting Started - Step 1: Assembling the Speakers 10 Step 2: Connecting the System and TV 13 Step 3: Positioning the System ...18 Step 4: Performing the Quick Setup 19 Getting Started - ADVANCED -...
... (PBC Playback) Tuner Functions Presetting Radio Stations 57 Listening to the Radio 58 Other Operations Controlling the TV with the Supplied Remote 60 Using the THEATRE SYNC Function 61 Using the Sound Effect 62 Using the Sleep Timer 63 Changing the Brightness of Contents ...Welcome 3 About This Manual 6 This System Can Play the Following Discs 7 Getting Started - Step 1: Assembling the Speakers 10 Step 2: Connecting the System and TV 13 Step 3: Positioning the System ...18 Step 4: Performing the Quick Setup 19 Getting Started - ADVANCED -...
Operating Instructions
Page 6
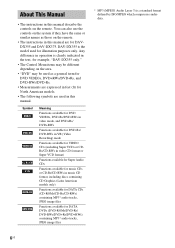
... purposes only. About This Manual • The instructions in this manual describe the controls on the remote. • The instructions in this manual are used in this manual. You can also use the controls on the system if they have the same or similar names as a general term for DVD VIDEOs, DVD...+RWs/DVD+Rs, and DVD-RWs/DVD-Rs. • Measurements are expressed in the text, for DAVDX355 and DAV-DX375. Any difference in operation is clearly indicated in...
... purposes only. About This Manual • The instructions in this manual describe the controls on the remote. • The instructions in this manual are used in this manual. You can also use the controls on the system if they have the same or similar names as a general term for DVD VIDEOs, DVD...+RWs/DVD+Rs, and DVD-RWs/DVD-Rs. • Measurements are expressed in the text, for DAVDX355 and DAV-DX375. Any difference in operation is clearly indicated in...
Operating Instructions
Page 9
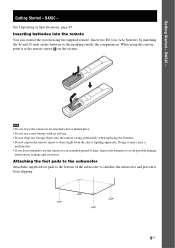
... on the batteries to use a new battery with an old one. • Do not drop any foreign object into the remote You can control the system using the remote, point it from the sun or lighting apparatus. Doing so may cause a malfunction. • If you do not intend to the ...markings inside the compartment. When using the supplied remote. Insert two R6 (size AA) batteries by matching the 3 and # ends on the system. BASIC -...
... on the batteries to use a new battery with an old one. • Do not drop any foreign object into the remote You can control the system using the remote, point it from the sun or lighting apparatus. Doing so may cause a malfunction. • If you do not intend to the ...markings inside the compartment. When using the supplied remote. Insert two R6 (size AA) batteries by matching the 3 and # ends on the system. BASIC -...
Operating Instructions
Page 22
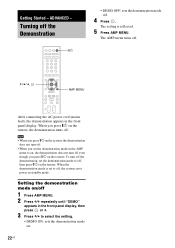
ADVANCED - The setting is set to off, the system saves power in the front panel display. When you press "/1 on the remote. The AMP menu turns off . X/x/c, AMP MENU After connecting the AC power cord (mains lead), the demonstration appears in standby mode. When the ...demonstration mode is reflected. 5 Press AMP MENU. To turn off , then press "/1 on the remote, the demonstration turns off . Note • When you press "/1 on the system, the demonstration does not turn off. • When you set the demonstration mode to select the setting. • DEMO...
ADVANCED - The setting is set to off, the system saves power in the front panel display. When you press "/1 on the remote. The AMP menu turns off . X/x/c, AMP MENU After connecting the AC power cord (mains lead), the demonstration appears in standby mode. When the ...demonstration mode is reflected. 5 Press AMP MENU. To turn off , then press "/1 on the remote, the demonstration turns off . Note • When you press "/1 on the system, the demonstration does not turn off. • When you set the demonstration mode to select the setting. • DEMO...
Operating Instructions
Page 30
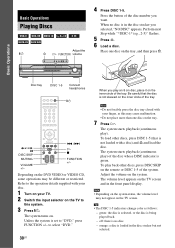
..."/1. Refer to the operation details supplied with your disc. 1 Turn on your finger, as follows: - The system starts playback (continuous play ) of the system. To play an 8 cm disc, place it on the remote or DISC 1-5 of the disc whose DISC indicator is not loaded with your TV. 2 Switch the input selector... on the TV to select "DVD." 30US When you selected, "NO DISC" appears. Unless the system is in the disc stocker you play back ...
..."/1. Refer to the operation details supplied with your disc. 1 Turn on your finger, as follows: - The system starts playback (continuous play ) of the system. To play an 8 cm disc, place it on the remote or DISC 1-5 of the disc whose DISC indicator is not loaded with your TV. 2 Switch the input selector... on the TV to select "DVD." 30US When you selected, "NO DISC" appears. Unless the system is in the disc stocker you play back ...
Operating Instructions
Page 60
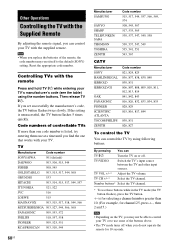
... and hold TV [/1 while entering your TV with the supplied remote. TV VOL +/-* Adjust the TV volume. If you set successfully the manufacturer's code, the TV button flashes twice slowly. TV Manufacturer Code number SONY/AIWA 501 (default) DAEWOO 503, 506, 515, 544 FISHER 508, 545 ... or off. By pressing You can control the TV by using the number buttons. Other Operations Controlling the TV with the Supplied Remote By adjusting the remote signal, you can control your TV's manufacturer's code (see the table) using following buttons. Number buttons* Select the TV channel...
... and hold TV [/1 while entering your TV with the supplied remote. TV VOL +/-* Adjust the TV volume. If you set successfully the manufacturer's code, the TV button flashes twice slowly. TV Manufacturer Code number SONY/AIWA 501 (default) DAEWOO 503, 506, 515, 544 FISHER 508, 545 ... or off. By pressing You can control the TV by using the number buttons. Other Operations Controlling the TV with the Supplied Remote By adjusting the remote signal, you can control your TV's manufacturer's code (see the table) using following buttons. Number buttons* Select the TV channel...
Operating Instructions
Page 61
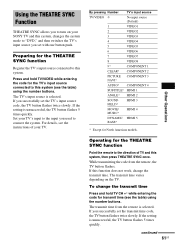
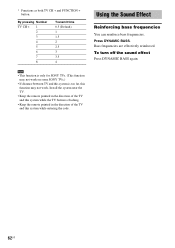
... the setting is selected. The transmit time varies depending on your TV. Preparing for the THEATRE SYNC function Point the remote to this system, then press THEATRE SYNC once. If the setting is selected. Other Operations Operating for the THEATRE SYNC function Register the TV's ...input source connected to the direction of your SONY TV and this system, changes the system mode to connect the system. Press and hold TV CH +* while entering the code for North American models.
... the setting is selected. The transmit time varies depending on your TV. Preparing for the THEATRE SYNC function Point the remote to this system, then press THEATRE SYNC once. If the setting is selected. Other Operations Operating for the THEATRE SYNC function Register the TV's ...input source connected to the direction of your SONY TV and this system, changes the system mode to connect the system. Press and hold TV CH +* while entering the code for North American models.
Operating Instructions
Page 62
... 1 2 3 4 5 6 7 8 Transmit time 0.5 (Default) 1 1.5 2 2.5 3 3.5 4 Note • This function is only for SONY TVs. (This function may not work on some SONY TVs.) • If distance between TV and this system is flashing. • Keep the remote pointed in the direction of the TV and this function may not work. To turn... off the sound effect Press DYNAMIC BASS again. 62US Install the system near the TV....
... 1 2 3 4 5 6 7 8 Transmit time 0.5 (Default) 1 1.5 2 2.5 3 3.5 4 Note • This function is only for SONY TVs. (This function may not work on some SONY TVs.) • If distance between TV and this system is flashing. • Keep the remote pointed in the direction of the TV and this function may not work. To turn... off the sound effect Press DYNAMIC BASS again. 62US Install the system near the TV....
Operating Instructions
Page 78
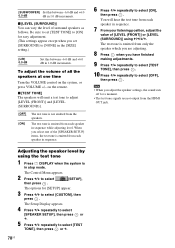
... finished making adjustments. 9 Press X/x repeatedly to select [TEST TONE], then press . 10 Press X/x repeatedly to select [ON], then press . on the system, or press VOLUME +/- x [TEST TONE] The speakers will hear the test tone from the HDMI OUT jack. The test tone is emitted from each speaker...the [SPEAKER SETUP] items, the test tone is emitted from only the speaker which you select one time Turn the VOLUME control on the remote. When you are not output from each speaker in sequence. 7 From your listening position, adjust the value of surround speakers as follows. ...
... finished making adjustments. 9 Press X/x repeatedly to select [TEST TONE], then press . 10 Press X/x repeatedly to select [ON], then press . on the system, or press VOLUME +/- x [TEST TONE] The speakers will hear the test tone from the HDMI OUT jack. The test tone is emitted from each speaker...the [SPEAKER SETUP] items, the test tone is emitted from only the speaker which you select one time Turn the VOLUME control on the remote. When you are not output from each speaker in sequence. 7 From your listening position, adjust the value of surround speakers as follows. ...
Operating Instructions
Page 82
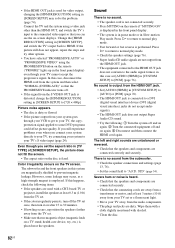
... the sound field to HDMI. There is no sound from the system and then select "NORMAL (INTERLACE)" so that the PROGRESSIVE indicator turns off and on the remote if "MUTING ON" is displayed in the front panel display. • The system is in pause mode or in [SCREEN SETUP] to [PCM]... (page 76). Connect the TV and the system using the PROGRESSIVE button on the remote ("PROGRE" lights up in this system are connected correctly and securely. The left and right sounds are unbalanced or reversed. • Check that no sound. • ...
... the sound field to HDMI. There is no sound from the system and then select "NORMAL (INTERLACE)" so that the PROGRESSIVE indicator turns off and on the remote if "MUTING ON" is displayed in the front panel display. • The system is in pause mode or in [SCREEN SETUP] to [PCM]... (page 76). Connect the TV and the system using the PROGRESSIVE button on the remote ("PROGRE" lights up in this system are connected correctly and securely. The left and right sounds are unbalanced or reversed. • Check that no sound. • ...
Operating Instructions
Page 83
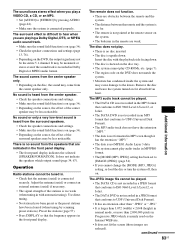
...There is no disc inserted. • The disc is upside down . • The disc is skewed on the disc tray. • The system cannot play audio tracks in the front panel display. • The front panel display indicates the selected [SPEAKER FORMATION]. Use direct tuning. •... antenna (aerial) is connected securely. The remote does not function. • There are obstacles between the remote and the system. • The distance between the remote and the system is too far. • The remote is not pointed at the remote sensor on the system. • The batteries in the front panel...
...There is no disc inserted. • The disc is upside down . • The disc is skewed on the disc tray. • The system cannot play audio tracks in the front panel display. • The front panel display indicates the selected [SPEAKER FORMATION]. Use direct tuning. •... antenna (aerial) is connected securely. The remote does not function. • There are obstacles between the remote and the system. • The distance between the remote and the system is too far. • The remote is not pointed at the remote sensor on the system. • The batteries in the front panel...
Operating Instructions
Page 84
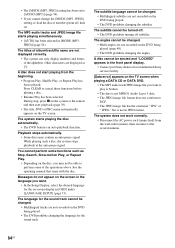
...may contain an auto pause signal. The angles cannot be ejected and "LOCKED" appears in the front panel display. • Contact your Sony dealer or local authorized Sony service facility. [Data error] appears on . • The [MODE (MP3, JPEG)] setting has been set to perform some functions such...does not conform to cancel these functions before playing a disc. • Resume Play has been selected. During stop, press x on the system or the remote and then start playing from the wall outlet (mains), then reconnect after several minutes. 84US A disc cannot be changed. • Multi-...
...may contain an auto pause signal. The angles cannot be ejected and "LOCKED" appears in the front panel display. • Contact your Sony dealer or local authorized Sony service facility. [Data error] appears on . • The [MODE (MP3, JPEG)] setting has been set to perform some functions such...does not conform to cancel these functions before playing a disc. • Resume Play has been selected. During stop, press x on the system or the remote and then start playing from the wall outlet (mains), then reconnect after several minutes. 84US A disc cannot be changed. • Multi-...
Operating Instructions
Page 86
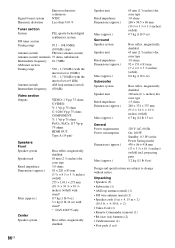
...- 1,710 kHz (with stand* * DAV-DX375 only Bass reflex, magnetically shielded Speaker unit Rated impedance Dimensions (approx.) Mass (approx.) Surround Speaker system Speaker unit Rated impedance Dimensions (approx.) Mass (approx.) Subwoofer Speaker system Speaker unit Rated impedance Dimensions (approx.) ... • Speaker cords (5 m × 4, 15 m × 2) (16.5 ft. × 4, 50 ft. × 2) • Video Cord (1) • Remote Commander (remote) (1) • R6 (size AA) batteries (2) • Calibration mic (1) • Foot pads (1 set at the Power Saving mode) 430 × 86 × 418...
...- 1,710 kHz (with stand* * DAV-DX375 only Bass reflex, magnetically shielded Speaker unit Rated impedance Dimensions (approx.) Mass (approx.) Surround Speaker system Speaker unit Rated impedance Dimensions (approx.) Mass (approx.) Subwoofer Speaker system Speaker unit Rated impedance Dimensions (approx.) ... • Speaker cords (5 m × 4, 15 m × 2) (16.5 ft. × 4, 50 ft. × 2) • Video Cord (1) • Remote Commander (remote) (1) • R6 (size AA) batteries (2) • Calibration mic (1) • Foot pads (1 set at the Power Saving mode) 430 × 86 × 418...
Operating Instructions
Page 92
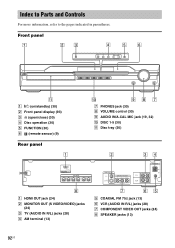
Front panel A "/1 (on/standby) (30) B Front panel display (93) C A (open/close) (30) D Disc operation (30) E FUNCTION (30) F (remote sensor) (9) Rear panel G PHONES jack (30) H VOLUME control (30) I AUDIO IN/A.CAL MIC jack (19, 32) J DISC 1-5 (30) K Disc tray (30) (DVD ONLY) OUT SPEAKER ...
Front panel A "/1 (on/standby) (30) B Front panel display (93) C A (open/close) (30) D Disc operation (30) E FUNCTION (30) F (remote sensor) (9) Rear panel G PHONES jack (30) H VOLUME control (30) I AUDIO IN/A.CAL MIC jack (19, 32) J DISC 1-5 (30) K Disc tray (30) (DVD ONLY) OUT SPEAKER ...

Operating Instructions
Page 98
AMP Menu List You can set the following items with AMP MENU on the remote. AMP menu DIMMER DEMO ATTENUATE DIMMER ON DIMMER OFF DEMO ON DEMO OFF ATT ON ATT OFF 98US
AMP Menu List You can set the following items with AMP MENU on the remote. AMP menu DIMMER DEMO ATTENUATE DIMMER ON DIMMER OFF DEMO ON DEMO OFF ATT ON ATT OFF 98US
Operating Instructions
Page 99
... 40 PROGRESSIVE AUTO 26 Progressive format 26, 89 PROGRESSIVE VIDEO 26 Q Quick Setup 19 R Radio 58 Radio Stations 57 Rear Panel 92 Region Code 8, 89 Remote 9, 60 Repeat Play 42 RESET 72 Resume Play 39 99US A. Index Numerics 16:9 73 4:3 LETTER BOX 73 4:3 OUTPUT 75 4:3 PAN SCAN 73 5.1 Channel Surround 44...
... 40 PROGRESSIVE AUTO 26 Progressive format 26, 89 PROGRESSIVE VIDEO 26 Q Quick Setup 19 R Radio 58 Radio Stations 57 Rear Panel 92 Region Code 8, 89 Remote 9, 60 Repeat Play 42 RESET 72 Resume Play 39 99US A. Index Numerics 16:9 73 4:3 LETTER BOX 73 4:3 OUTPUT 75 4:3 PAN SCAN 73 5.1 Channel Surround 44...
Operating Instructions
Page 104
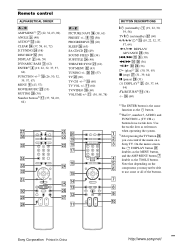
.../VIDEO ql (60) VOLUME +/- qa (30, 58, 78) BUTTON DESCRIPTIONS [/1 (on/standby) 1 (19, 22, 30, 39, 58) TV [/1 (on a Sony TV. Use the tactile dots as references when operating the system. 3)After pressing the TV button w;, you may not be able to use some or all of the buttons. On the... ej (60) C/X/x/c/ 3) qg (19, 22, 32, 37, 57, 64) REPLAY/ ADVANCE wg (30) ./> qd 8 (30) m/M e; wh e; (57) TV w; (60) TV CH +/-2) 0 (60) TV VOL +/- Remote control ALPHABETICAL ORDER A - wh (36) H (play)2) 9 (30, 39, 65) x (stop) wj (31, 39, 64) X (pause) wl (31) DISPLAY3) ea (20, 37, 64, 94) O RETURN3) qf...
.../VIDEO ql (60) VOLUME +/- qa (30, 58, 78) BUTTON DESCRIPTIONS [/1 (on/standby) 1 (19, 22, 30, 39, 58) TV [/1 (on a Sony TV. Use the tactile dots as references when operating the system. 3)After pressing the TV button w;, you may not be able to use some or all of the buttons. On the... ej (60) C/X/x/c/ 3) qg (19, 22, 32, 37, 57, 64) REPLAY/ ADVANCE wg (30) ./> qd 8 (30) m/M e; wh e; (57) TV w; (60) TV CH +/-2) 0 (60) TV VOL +/- Remote control ALPHABETICAL ORDER A - wh (36) H (play)2) 9 (30, 39, 65) x (stop) wj (31, 39, 64) X (pause) wl (31) DISPLAY3) ea (20, 37, 64, 94) O RETURN3) qf...


