Operating Instructions
Page 4
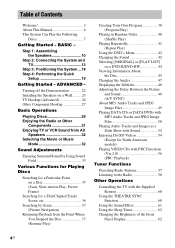
Step 1: Assembling the Speakers 10 Step 2: Connecting the System and TV 13 Step 3: Positioning the System ...18 Step 4: Performing the Quick Setup 19 Getting Started - Table of the Front Panel Display 62 4GB ADVANCED - BASIC - Turning off the Demonstration 22 Installing ... Your Own Program 38 (Program Play) Playing in Random Order 40 (Shuffle Play) Playing Repeatedly 41 (Repeat Play) Using the DVD's Menu 42 Changing the Sound 42 Selecting [ORIGINAL] or [PLAY LIST] on a DVD-R/DVD-RW 44 Viewing Information About the Disc 45 Changing the Angles 47 Displaying the Subtitles 48...
Step 1: Assembling the Speakers 10 Step 2: Connecting the System and TV 13 Step 3: Positioning the System ...18 Step 4: Performing the Quick Setup 19 Getting Started - Table of the Front Panel Display 62 4GB ADVANCED - BASIC - Turning off the Demonstration 22 Installing ... Your Own Program 38 (Program Play) Playing in Random Order 40 (Shuffle Play) Playing Repeatedly 41 (Repeat Play) Using the DVD's Menu 42 Changing the Sound 42 Selecting [ORIGINAL] or [PLAY LIST] on a DVD-R/DVD-RW 44 Viewing Information About the Disc 45 Changing the Angles 47 Displaying the Subtitles 48...
Operating Instructions
Page 5
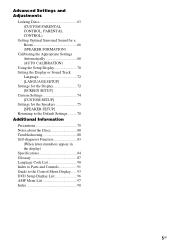
... a Room 66 (SPEAKER FORMATION) Calibrating the Appropriate Settings Automatically 68 (AUTO CALIBRATION) Using the Setup Display 70 Setting the Display or Sound Track Language 72 [LANGUAGE SETUP] Settings for the Display 72 [SCREEN SETUP] Custom Settings 74 [CUSTOM SETUP] Settings for the Speakers 75 [SPEAKER SETUP] Returning ...
... a Room 66 (SPEAKER FORMATION) Calibrating the Appropriate Settings Automatically 68 (AUTO CALIBRATION) Using the Setup Display 70 Setting the Display or Sound Track Language 72 [LANGUAGE SETUP] Settings for the Display 72 [SCREEN SETUP] Custom Settings 74 [CUSTOM SETUP] Settings for the Speakers 75 [SPEAKER SETUP] Returning ...

Operating Instructions
Page 15
...After connecting all the speakers are the same color as shown below. If this , be short-circuited. Stripped cords are reversed, the sound will lack bass and may damage the system. Color tube (+) (-) Note • Do not catch the speaker cord insulation in the SPEAKER jack. Getting Started - B Audio...touch another speaker terminal or the bare wire of the jacks to be distorted. 2 Connecting the TV Required cords A Video cord . If no sound is heard from a speaker while outputting a test tone, or a test tone is touching another speaker cord, such as the label of another speaker...
...After connecting all the speakers are the same color as shown below. If this , be short-circuited. Stripped cords are reversed, the sound will lack bass and may damage the system. Color tube (+) (-) Note • Do not catch the speaker cord insulation in the SPEAKER jack. Getting Started - B Audio...touch another speaker terminal or the bare wire of the jacks to be distorted. 2 Connecting the TV Required cords A Video cord . If no sound is heard from a speaker while outputting a test tone, or a test tone is touching another speaker cord, such as the label of another speaker...
Operating Instructions
Page 16
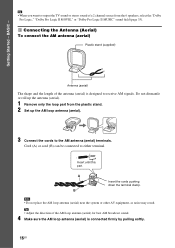
... sure the AM loop antenna (aerial) is designed to receive AM signals. Note • Do not place the AM loop antenna (aerial) near the system or other AV equipment, as noise may result. Cord (A) or cord (B) can be connected to the AM antenna (aerial) terminals. Insert until this ... the direction of the antenna (aerial) is connected firmly by pulling softly. 16GB Getting Started - Tip • When you want to output the TV sound or stereo sound of a 2 channel source from the plastic stand. 2 Set up the AM loop antenna (aerial). 3 Connect the cords to either terminal. A B AM ...
... sure the AM loop antenna (aerial) is designed to receive AM signals. Note • Do not place the AM loop antenna (aerial) near the system or other AV equipment, as noise may result. Cord (A) or cord (B) can be connected to the AM antenna (aerial) terminals. Insert until this ... the direction of the antenna (aerial) is connected firmly by pulling softly. 16GB Getting Started - Tip • When you want to output the TV sound or stereo sound of a 2 channel source from the plastic stand. 2 Set up the AM loop antenna (aerial). 3 Connect the cords to either terminal. A B AM ...
Operating Instructions
Page 18
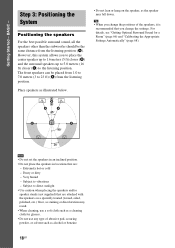
...) closer (B) and the surround speakers up to 5.0 meters (16 ft) closer (C) to 23 ft) (A) from the listening position (A). However, this system allows you change the settings. Place speakers as illustrated below. • Do not lean or hang on a specially treated (waxed, oiled, polished, etc...abrasive pad, scouring powder, or solvent such as staining or discoloration may fall down. Step 3: Positioning the System Positioning the speakers For the best possible surround sound, all the speakers other than the subwoofer should be placed from 1.0 to 7.0 meters (3 to the listening ...
...) closer (B) and the surround speakers up to 5.0 meters (16 ft) closer (C) to 23 ft) (A) from the listening position (A). However, this system allows you change the settings. Place speakers as illustrated below. • Do not lean or hang on a specially treated (waxed, oiled, polished, etc...abrasive pad, scouring powder, or solvent such as staining or discoloration may fall down. Step 3: Positioning the System Positioning the speakers For the best possible surround sound, all the speakers other than the subwoofer should be placed from 1.0 to 7.0 meters (3 to the listening ...
Operating Instructions
Page 19
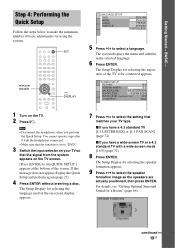
... [Press [ENTER] to select the speaker formation image as the speakers are actually positioned, then press ENTER. For details, see "Getting Optimal Surround Sound for selecting the speaker formation appears. 9 Press C/c to run QUICK SETUP.] appears at the bottom of the TV to select a language. BASIC ... when you have a wide-screen TV or a 4:3 standard TV with the headphones connected. • Make sure that the signal from the system appears on the TV. 2 Press [/1. The Setup Display for selecting the aspect ratio of the screen. The Setup Display for selecting the language...
... [Press [ENTER] to select the speaker formation image as the speakers are actually positioned, then press ENTER. For details, see "Getting Optimal Surround Sound for selecting the speaker formation appears. 9 Press C/c to run QUICK SETUP.] appears at the bottom of the TV to select a language. BASIC ... when you have a wide-screen TV or a 4:3 standard TV with the headphones connected. • Make sure that the signal from the system appears on the TV. 2 Press [/1. The Setup Display for selecting the aspect ratio of the screen. The Setup Display for selecting the language...
Operating Instructions
Page 20
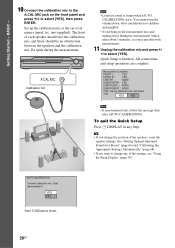
...? Set up the calibration mic at the ear level using a tripod, etc. (not supplied). A.CAL MIC Calibration mic Note • Loud test sound is finished. See "Getting Optimal Surround Sound for a Room" (page 66) and "Calibrating the Appropriate Settings Automatically" (page 68). • If you change any Step. You cannot turn the...
...? Set up the calibration mic at the ear level using a tripod, etc. (not supplied). A.CAL MIC Calibration mic Note • Loud test sound is finished. See "Getting Optimal Surround Sound for a Room" (page 66) and "Calibrating the Appropriate Settings Automatically" (page 68). • If you change any Step. You cannot turn the...
Operating Instructions
Page 27
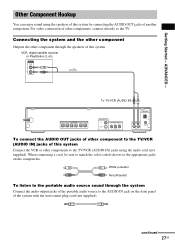
... color-coded sleeves to the portable audio source sound through the speakers of the system with the stereo mini-plug cord (not supplied). White (L/audio) Red (R/audio) To listen to the appropriate jacks on the front panel of this system by connecting the AUDIO OUT jacks of other ...the other components to the TV/VCR (AUDIO IN) jacks using the speakers of this system. For video connection of another component. VCR, digital satellite receiver or PlayStation 2, etc. Other Component Hookup You can enjoy sound using the audio cord (not supplied). AUDIO OUT L R To TV/VCR (AUDIO ...
... color-coded sleeves to the portable audio source sound through the speakers of the system with the stereo mini-plug cord (not supplied). White (L/audio) Red (R/audio) To listen to the appropriate jacks on the front panel of this system by connecting the AUDIO OUT jacks of other ...the other components to the TV/VCR (AUDIO IN) jacks using the speakers of this system. For video connection of another component. VCR, digital satellite receiver or PlayStation 2, etc. Other Component Hookup You can enjoy sound using the audio cord (not supplied). AUDIO OUT L R To TV/VCR (AUDIO ...

Operating Instructions
Page 28
Press SOUND FIELD repeatedly until "A.F.D. STD" appears in the front panel display. To cancel, select other than "A.F.D. Tip • When listening to avoid hum and noise. 28GB Note • Be sure to make connections securely to MP3 format recordings using a portable audio source, you can enhance the sound. STD." Press FUNCTION to select "AUDIO." Connect the portable audio source.
Press SOUND FIELD repeatedly until "A.F.D. STD" appears in the front panel display. To cancel, select other than "A.F.D. Tip • When listening to avoid hum and noise. 28GB Note • Be sure to make connections securely to MP3 format recordings using a portable audio source, you can enhance the sound. STD." Press FUNCTION to select "AUDIO." Connect the portable audio source.
Operating Instructions
Page 30
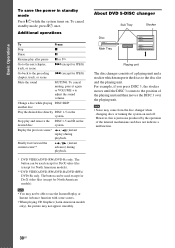
...• When playing CD Graphics (Latin American models only), the picture may come from the disc changer when changing discs or turning the system on the desired disc system. Note • Noise may not appear smoothly. However, this is just noise produced by the operation of a playing unit and a stocker... to the disc slot and the playing unit. For example, if you press DISC 3, the stocker moves until the DISC 3 comes to adjust the sound volume. Additional operations To Press Stop x Pause X Resume play and remove the DISC 1-5 and A on and off. The button can be used ...
...• When playing CD Graphics (Latin American models only), the picture may come from the disc changer when changing discs or turning the system on the desired disc system. Note • Noise may not appear smoothly. However, this is just noise produced by the operation of a playing unit and a stocker... to the disc slot and the playing unit. For example, if you press DISC 3, the stocker moves until the DISC 3 comes to adjust the sound volume. Additional operations To Press Stop x Pause X Resume play and remove the DISC 1-5 and A on and off. The button can be used ...

Operating Instructions
Page 31
... front panel display, then press ENTER or c. 4 Press X/x to the AUDIO IN jack on the front panel. Changing the input level of the sound from the sound of the system changes in the following sequence. The setting is changed. • ATT OFF: normal input level. 5 Press ENTER. To prevent this, you press FUNCTION...
... front panel display, then press ENTER or c. 4 Press X/x to the AUDIO IN jack on the front panel. Changing the input level of the sound from the sound of the system changes in the following sequence. The setting is changed. • ATT OFF: normal input level. 5 Press ENTER. To prevent this, you press FUNCTION...
Operating Instructions
Page 32
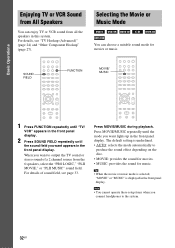
... until "TV/ VCR" appears in this system. Press MOVIE/MUSIC during playback. Basic Operations Enjoying TV or VCR Sound from All Speakers You can choose a suitable sound mode for music. Note • You cannot operate these setup items when you want to output the TV sound or stereo sound of sound field, see "TV Hookup (Advanced...
... until "TV/ VCR" appears in this system. Press MOVIE/MUSIC during playback. Basic Operations Enjoying TV or VCR Sound from All Speakers You can choose a suitable sound mode for music. Note • You cannot operate these setup items when you want to output the TV sound or stereo sound of sound field, see "TV Hookup (Advanced...
Operating Instructions
Page 33
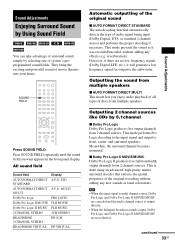
...Dolby Pro Logic produces five output channels from 2 channel sources. SOUND FIELD Automatic outputting of the original sound x AUTO FORMAT DIRECT STANDARD The auto decoding function automatically detects the type of movie theaters into your home. reverberation). STD STANDARD AUTO FORMAT DIRECT A.F.D. Meanwhile, the ... low frequency signal for output to front, center, and surround speakers. Press SOUND FIELD repeatedly until the sound field you enjoy audio playback of all types of system's preprogrammed sound fields. Note • When the input signal is multi channel source, Dolby...
...Dolby Pro Logic produces five output channels from 2 channel sources. SOUND FIELD Automatic outputting of the original sound x AUTO FORMAT DIRECT STANDARD The auto decoding function automatically detects the type of movie theaters into your home. reverberation). STD STANDARD AUTO FORMAT DIRECT A.F.D. Meanwhile, the ... low frequency signal for output to front, center, and surround speakers. Press SOUND FIELD repeatedly until the sound field you enjoy audio playback of all types of system's preprogrammed sound fields. Note • When the input signal is multi channel source, Dolby...
Operating Instructions
Page 34
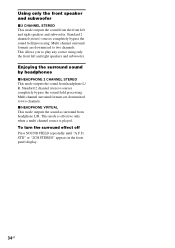
...when a multi channel source is played. To turn the surround effect off Press SOUND FIELD repeatedly until "A.F.D. Enjoying the surround sound by headphones x HEADPHONE 2 CHANNEL STEREO This mode outputs the sound from headphone L/R. STD" or "2CH STEREO" appears in the front panel display.... 34GB x HEADPHONE VIRTUAL This mode outputs the sound as surround from headphone L/ R. Standard 2 channel (stereo) sources completely bypass the sound field processing. Multi channel surround formats are downmixed to two channels. Using only the front ...
...when a multi channel source is played. To turn the surround effect off Press SOUND FIELD repeatedly until "A.F.D. Enjoying the surround sound by headphones x HEADPHONE 2 CHANNEL STEREO This mode outputs the sound from headphone L/R. STD" or "2CH STEREO" appears in the front panel display.... 34GB x HEADPHONE VIRTUAL This mode outputs the sound as surround from headphone L/ R. Standard 2 channel (stereo) sources completely bypass the sound field processing. Multi channel surround formats are downmixed to two channels. Using only the front ...
Operating Instructions
Page 41
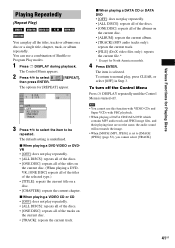
...; When playing a DATA CD/DATA DVD which contains MP3 audio track and JPEG image files, and their playing time are not the same, the audio sound will not match the image. • When [MODE (MP3, JPEG)] is turned off. The default setting is selected. The item is underlined. x When playing a VIDEO...
...; When playing a DATA CD/DATA DVD which contains MP3 audio track and JPEG image files, and their playing time are not the same, the audio sound will not match the image. • When [MODE (MP3, JPEG)] is turned off. The default setting is selected. The item is underlined. x When playing a VIDEO...
Operating Instructions
Page 42
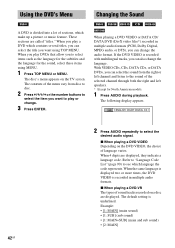
... Refer to "Language Code List" (page 90) to select the desired audio signal. Example: • [1: MAIN] (main sound) • [1: SUB] (sub sound) • [1: MAIN+SUB] (main and sub sound) • [2: MAIN] These sections are displayed. The contents of the menu vary from the right or left speakers. * ... or music feature. When the same language is displayed two or more times, the DVD VIDEO is underlined. Using the DVD's Menu Changing the Sound A DVD is divided into a lot of sections, which language the code represents. x When playing a DVD-VR The types of language varies....
... Refer to "Language Code List" (page 90) to select the desired audio signal. Example: • [1: MAIN] (main sound) • [1: SUB] (sub sound) • [1: MAIN+SUB] (main and sub sound) • [2: MAIN] These sections are displayed. The contents of the menu vary from the right or left speakers. * ... or music feature. When the same language is displayed two or more times, the DVD VIDEO is underlined. Using the DVD's Menu Changing the Sound A DVD is divided into a lot of sections, which language the code represents. x When playing a DVD-VR The types of language varies....

Operating Instructions
Page 43
... DivX video file contained on the disc. The format is underlined. • [STEREO]: the standard stereo sound • [1/L]: the sound of the left channel of the audio track 2 (monaural) • [2:2/R]: the sound of the right channel of the audio track 2 (monaural) Note • While playing a Super VCD on...MAIN], [2: SUB], and [2: MAIN+SUB] do not appear when one audio stream is recorded on which the audio track 2 is not recorded, no sound will come out when you press AUDIO repeatedly during playback, the format of the current audio signal (PCM, Dolby Digital, DTS, etc.) appears as shown...
... DivX video file contained on the disc. The format is underlined. • [STEREO]: the standard stereo sound • [1/L]: the sound of the left channel of the audio track 2 (monaural) • [2:2/R]: the sound of the right channel of the audio track 2 (monaural) Note • While playing a Super VCD on...MAIN], [2: SUB], and [2: MAIN+SUB] do not appear when one audio stream is recorded on which the audio track 2 is not recorded, no sound will come out when you press AUDIO repeatedly during playback, the format of the current audio signal (PCM, Dolby Digital, DTS, etc.) appears as shown...

Operating Instructions
Page 44
.... • LFE (Low Frequency Effect) signal Selecting [ORIGINAL] or [PLAY LIST] on a DVD-R/ DVD-RW Some DVD-Rs/DVD-RWs in a disc contain the sound elements (channels) shown below. About audio signals Audio signals recorded in VR (Video Recording) mode have two types of titles for playback: originally recorded titles... ([ORIGINAL]) and titles that can select the type of title to be played. 1 Press DISPLAY when the system is output from [ORIGINAL] for editing. • [ORIGINAL]: plays the titles originally recorded. 4 Press ENTER. 44GB
.... • LFE (Low Frequency Effect) signal Selecting [ORIGINAL] or [PLAY LIST] on a DVD-R/ DVD-RW Some DVD-Rs/DVD-RWs in a disc contain the sound elements (channels) shown below. About audio signals Audio signals recorded in VR (Video Recording) mode have two types of titles for playback: originally recorded titles... ([ORIGINAL]) and titles that can select the type of title to be played. 1 Press DISPLAY when the system is output from [ORIGINAL] for editing. • [ORIGINAL]: plays the titles originally recorded. 4 Press ENTER. 44GB
Operating Instructions
Page 48
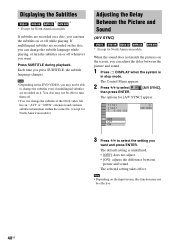
...".AVI" or ".DIVX" extension and contains subtitle information within the same file. (except for North American models) Adjusting the Delay Between the Picture and Sound (A/V SYNC) * * * Except for North American models. The default setting is underlined. • [OFF]: does not adjust. • [ON...]: adjusts the difference between the picture and sound. 1 Press DISPLAY when the system is in stop mode. Displaying the Subtitles * * * Except for North American models. You also may not be able to select...
...".AVI" or ".DIVX" extension and contains subtitle information within the same file. (except for North American models) Adjusting the Delay Between the Picture and Sound (A/V SYNC) * * * Except for North American models. The default setting is underlined. • [OFF]: does not adjust. • [ON...]: adjusts the difference between the picture and sound. 1 Press DISPLAY when the system is in stop mode. Displaying the Subtitles * * * Except for North American models. You also may not be able to select...
Operating Instructions
Page 52
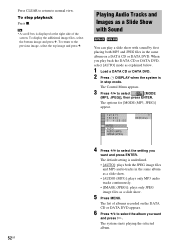
... Images as explained below. 1 Load a DATA CD or DATA DVD. 2 Press DISPLAY when the system is in stop playback Press x. When you play back the DATA CD or DATA DVD, select [AUTO] mode as a Slide Show with Sound You can play a slide show . 5 Press MENU. The default setting is displayed at the... album as a slide show. • [AUDIO (MP3)]: plays only MP3 audio tracks continuously. • [IMAGE (JPEG)]: plays only JPEG image files as a slide show with sound by first placing both the JPEG image files and MP3 audio tracks in the same album on the DATA CD or DATA DVD appears. 6 Press...
... Images as explained below. 1 Load a DATA CD or DATA DVD. 2 Press DISPLAY when the system is in stop playback Press x. When you play back the DATA CD or DATA DVD, select [AUTO] mode as a Slide Show with Sound You can play a slide show . 5 Press MENU. The default setting is displayed at the... album as a slide show. • [AUDIO (MP3)]: plays only MP3 audio tracks continuously. • [IMAGE (JPEG)]: plays only JPEG image files as a slide show with sound by first placing both the JPEG image files and MP3 audio tracks in the same album on the DATA CD or DATA DVD appears. 6 Press...


