
Operating Instructions (Large File - 15.25 MB)
Page 2
...on the apparatus. Do not expose batteries or apparatus with dry cloth. 7) Do not block any heat sources such as lighted candles on the rear of the unit. Excessive sound pressure from the mains, connect the unit to rain or moisture. Owner's Record The model and serial numbers ... or electric shock, do not expose this product. Model No. If the provided plug does not fit into your outlet, consult an electrician for your Sony dealer regarding this apparatus to an easily accessible AC outlet. Record these instructions. 3) Heed all warnings. 4) Follow all instructions. 5) Do not use ...
...on the apparatus. Do not expose batteries or apparatus with dry cloth. 7) Do not block any heat sources such as lighted candles on the rear of the unit. Excessive sound pressure from the mains, connect the unit to rain or moisture. Owner's Record The model and serial numbers ... or electric shock, do not expose this product. Model No. If the provided plug does not fit into your outlet, consult an electrician for your Sony dealer regarding this apparatus to an easily accessible AC outlet. Record these instructions. 3) Heed all warnings. 4) Follow all instructions. 5) Do not use ...
Operating Instructions (Large File - 15.25 MB)
Page 15
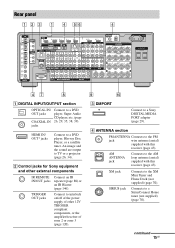
...Super Audio CD player, etc. (page 26, 29, 35, 38, 39). Rear panel A DIGITAL INPUT/OUTPUT section OPTICAL IN/ OUT jacks COAXIAL IN jacks Connect to the AM loop antenna (aerial) supplied with this receiver (page 43). HDMI IN/ OUT* jacks Connect to the FM jack wire ...antenna (aerial) supplied with this receiver (page 43). B Control jacks for Sony equipment and other 12V TRIGGER compliant components, or the amplifier/receiver of zone 2 or zone 3 (page 120). D ANTENNA section FM ANTENNA Connects to a DVD ...
...Super Audio CD player, etc. (page 26, 29, 35, 38, 39). Rear panel A DIGITAL INPUT/OUTPUT section OPTICAL IN/ OUT jacks COAXIAL IN jacks Connect to the AM loop antenna (aerial) supplied with this receiver (page 43). HDMI IN/ OUT* jacks Connect to the FM jack wire ...antenna (aerial) supplied with this receiver (page 43). B Control jacks for Sony equipment and other 12V TRIGGER compliant components, or the amplifier/receiver of zone 2 or zone 3 (page 120). D ANTENNA section FM ANTENNA Connects to a DVD ...

Operating Instructions (Large File - 15.25 MB)
Page 44
...outlet Notes • The AC OUTLET(s) on the rear of the receiver is a switched outlet, which supplies power to the connected component only while the receiver is turned on. • Make sure that metallic wires of the component(s) connected to the receiver's AC OUTLET(s) does not exceed the wattage stated... (mains lead) is left between the SPEAKERS terminals. • Connect the AC power cord (mains lead) firmly. appears on the rear panel. 6: Preparing the receiver and the remote Connecting the AC power cord (mains lead) Connect the supplied AC power cord (mains lead) to the AC IN ...
...outlet Notes • The AC OUTLET(s) on the rear of the receiver is a switched outlet, which supplies power to the connected component only while the receiver is turned on. • Make sure that metallic wires of the component(s) connected to the receiver's AC OUTLET(s) does not exceed the wattage stated... (mains lead) is left between the SPEAKERS terminals. • Connect the AC power cord (mains lead) firmly. appears on the rear panel. 6: Preparing the receiver and the remote Connecting the AC power cord (mains lead) Connect the supplied AC power cord (mains lead) to the AC IN ...

Operating Instructions (Large File - 15.25 MB)
Page 100
...Turn the Control for HDMI function on for both the receiver and your camcorder. 2 Connect your camcorder to the HDMI IN jack on the rear panel. • Depending on while the sound is being... output from the TV speaker. • You can enjoy the TV sound from the speakers connected to the receiver when you ...the HDMI input buttons to display the image of the content may not work correctly if you turn the receiver on the TV, the start automatically. Notes • When "Control for HDMI" is minimized simultaneously. ...
...Turn the Control for HDMI function on for both the receiver and your camcorder. 2 Connect your camcorder to the HDMI IN jack on the rear panel. • Depending on while the sound is being... output from the TV speaker. • You can enjoy the TV sound from the speakers connected to the receiver when you ...the HDMI input buttons to display the image of the content may not work correctly if you turn the receiver on the TV, the start automatically. Notes • When "Control for HDMI" is minimized simultaneously. ...


