Operating Instructions
Page 2
...ELECTRIC SHOCK, MATCH WIDE BLADE OF PLUG TO WIDE SLOT, FULLY INSERT. Except for help. registered mark. As an ENERGY STAR® partner, Sony Corporation has determined that to which can radiate radio frequency energy and, if not installed and used in the United States This symbol is intended.... WARNING This equipment has been tested and found to correct the interference by one or more of optical instruments with this manual could void your authority to the grounding system of the building, as vases, on the apparatus. However, there is encouraged to try to comply with news papers, ...
...ELECTRIC SHOCK, MATCH WIDE BLADE OF PLUG TO WIDE SLOT, FULLY INSERT. Except for help. registered mark. As an ENERGY STAR® partner, Sony Corporation has determined that to which can radiate radio frequency energy and, if not installed and used in the United States This symbol is intended.... WARNING This equipment has been tested and found to correct the interference by one or more of optical instruments with this manual could void your authority to the grounding system of the building, as vases, on the apparatus. However, there is encouraged to try to comply with news papers, ...
Operating Instructions
Page 3
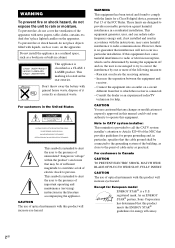
Play Loading a disc 9 Playing a disc 9 - Manual Tuning Using the Radio Data System (RDS).... 14 (European model CMT-NE5 only) Tape - Manual Recording Sound Adjustment Adjusting the sound 17 Timer Falling asleep to the radio 13 - Program Play Tuner Presetting radio ...30 3GB Repeat Play Creating your favorite CD tracks on a tape manually 16 - CD-TAPE Synchro Recording Recording on a tape 16 - Power Saving Mode Viewing information about the disc in the display 20 Optional Components Hooking up the system 6 Setting the clock 8 CD/MP3 - Preset Tuning - Rec...
Play Loading a disc 9 Playing a disc 9 - Manual Tuning Using the Radio Data System (RDS).... 14 (European model CMT-NE5 only) Tape - Manual Recording Sound Adjustment Adjusting the sound 17 Timer Falling asleep to the radio 13 - Program Play Tuner Presetting radio ...30 3GB Repeat Play Creating your favorite CD tracks on a tape manually 16 - CD-TAPE Synchro Recording Recording on a tape 16 - Power Saving Mode Viewing information about the disc in the display 20 Optional Components Hooking up the system 6 Setting the clock 8 CD/MP3 - Preset Tuning - Rec...
Operating Instructions
Page 4
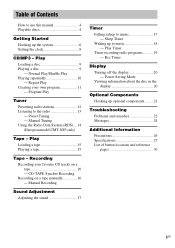
... common international standard for model CMT-NE5 and CMT-NE3. How to 10 sessions. Check your model number by looking at an area called the Lead-in capital letters. In this manual are several specification levels. Discs that has the adhesive, cellophane tape, or a sticker still left on this system cannot play back the following...
... common international standard for model CMT-NE5 and CMT-NE3. How to 10 sessions. Check your model number by looking at an area called the Lead-in capital letters. In this manual are several specification levels. Discs that has the adhesive, cellophane tape, or a sticker still left on this system cannot play back the following...
Operating Instructions
Page 10
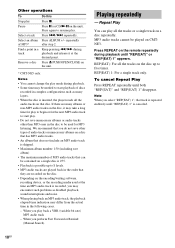
... track only. Other operations To Do this Stop play back a VBR (variable bit rate) MP3 audio track - Pause Press X (or CD/NX on the unit. * CMT-NE5 only. Notes • You cannot change the play . • Do not save other than MP3 ones in the disc to be used at the... play to begin or for MP3 listening. Remove a disc Press Z PUSH OPEN/CLOSE on the unit). We recommend that you perform Fast Forward or Rewind (Manual Search) Playing repeatedly - Select a track Press ./> repeatedly.
... track only. Other operations To Do this Stop play back a VBR (variable bit rate) MP3 audio track - Pause Press X (or CD/NX on the unit. * CMT-NE5 only. Notes • You cannot change the play . • Do not save other than MP3 ones in the disc to be used at the... play to begin or for MP3 listening. Remove a disc Press Z PUSH OPEN/CLOSE on the unit). We recommend that you perform Fast Forward or Rewind (Manual Search) Playing repeatedly - Select a track Press ./> repeatedly.
Operating Instructions
Page 12
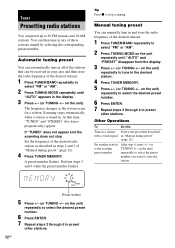
...can be received in steps 2 and 3 of the desired radio station as the system scans for stereo program only) appear. Perform steps 5 and 6 while the preset number flashes. Manual tuning preset You can manually tune in the desired station. 4 Press TUNER MEMORY. 5 Press +/- (or ... TUNING MODE repeatedly until "AUTO" and "PRESET" disappear from the display. 3 Press +/- (or TUNING +/- on the unit repeatedly until "AUTO" appears in "Manual tuning preset" (page 12). on the unit) repeatedly to select the desired preset number. 6 Press ENTER. 7 Repeat steps 3 through 6 to select "FM...
...can be received in steps 2 and 3 of the desired radio station as the system scans for stereo program only) appear. Perform steps 5 and 6 while the preset number flashes. Manual tuning preset You can manually tune in the desired station. 4 Press TUNER MEMORY. 5 Press +/- (or ... TUNING MODE repeatedly until "AUTO" and "PRESET" disappear from the display. 3 Press +/- (or TUNING +/- on the unit repeatedly until "AUTO" appears in "Manual tuning preset" (page 12). on the unit) repeatedly to select the desired preset number. 6 Press ENTER. 7 Repeat steps 3 through 6 to select "FM...
Operating Instructions
Page 13
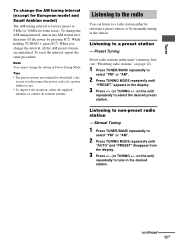
.... Listening to non-preset radio station - Listening to a preset station - While holding TUNING +, press ?/1. Tips • The preset stations are initialized. Manual Tuning 1 Press TUNER/BAND repeatedly to select "FM" or "AM". 2 Press TUNING MODE repeatedly until "AUTO" and "PRESET" disappear from the display.... (or TUNING +/- Note You cannot change the AM tuning interval, tune in any AM station first, then turn off the power by manually tuning in the station. Preset Tuning Preset radio stations in the tuner's memory first (see "Presetting radio stations" on the unit) repeatedly ...
.... Listening to non-preset radio station - Listening to a preset station - While holding TUNING +, press ?/1. Tips • The preset stations are initialized. Manual Tuning 1 Press TUNER/BAND repeatedly to select "FM" or "AM". 2 Press TUNING MODE repeatedly until "AUTO" and "PRESET" disappear from the display.... (or TUNING +/- Note You cannot change the AM tuning interval, tune in any AM station first, then turn off the power by manually tuning in the station. Preset Tuning Preset radio stations in the tuner's memory first (see "Presetting radio stations" on the unit) repeatedly ...
Operating Instructions
Page 14
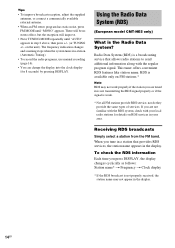
...send additional information along with your area. Receiving RDS broadcasts Simply select a station from the FM band. Using the Radio Data System (RDS) (European model CMT-NE5 only) What is a broadcasting service that provides RDS services, the station name appears in a station (Automatic Tuning). •...; To record the radio programs, use manual recording (page 16). • You can change the display into the clock display (for details on the unit). The frequency indication changes and scanning stops when the system tunes in the display. When you press DISPLAY, the...
...send additional information along with your area. Receiving RDS broadcasts Simply select a station from the FM band. Using the Radio Data System (RDS) (European model CMT-NE5 only) What is a broadcasting service that provides RDS services, the station name appears in a station (Automatic Tuning). •...; To record the radio programs, use manual recording (page 16). • You can change the display into the clock display (for details on the unit). The frequency indication changes and scanning stops when the system tunes in the display. When you press DISPLAY, the...
Operating Instructions
Page 16
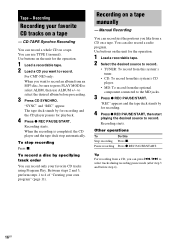
...can record just the portions you want to record an album from the optional component connected to select ALBM, then use TYPE I (normal). Recording starts. Between steps 2 and 3, perform steps 1 to record. Manual Recording You can record a whole CD on a tape. You can record only.... 1 Load a recordable tape. 2 Select the desired source to record. • TUNER: To record from this system's tuner. • CD: To record from this Press x. For CMT-NE5 only: When you can use ALBUM +/- Recording starts. to select tracks during recording pause mode (after step 3...
...can record just the portions you want to record an album from the optional component connected to select ALBM, then use TYPE I (normal). Recording starts. Between steps 2 and 3, perform steps 1 to record. Manual Recording You can record a whole CD on a tape. You can record only.... 1 Load a recordable tape. 2 Select the desired source to record. • TUNER: To record from this system's tuner. • CD: To record from this Press x. For CMT-NE5 only: When you can use ALBUM +/- Recording starts. to select tracks during recording pause mode (after step 3...
Operating Instructions
Page 21
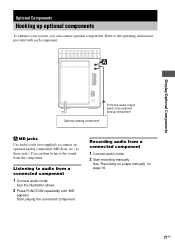
... audio cords. See "Recording on a tape manually" on page 16. 21GB Recording audio from a connected component 1 Connect audio cords. 2 Start recording manually. See the illustration above. 2 Press FUNCTION repeatedly until "MD" appears. Optional Components Hooking up optional components To enhance your system, you can then listen to audio from the component. Refer to these jacks. Start playing...
... audio cords. See "Recording on a tape manually" on page 16. 21GB Recording audio from a connected component 1 Connect audio cords. 2 Start recording manually. See the illustration above. 2 Press FUNCTION repeatedly until "MD" appears. Optional Components Hooking up optional components To enhance your system, you can then listen to audio from the component. Refer to these jacks. Start playing...

