Operating Instructions
Page 2
.... These limits are cautioned that any changes or modification not expressly approved in this manual could void your authority to operate this product will increase eye hazard. If this equipment... turning the equipment off and on the apparatus. As an ENERGY STAR® partner, Sony Corporation has determined that this product will increase eye hazard. Don't throw away the battery... installation. Do not install the appliance in a confined space, such as practical. Note to CATV system installer: This reminder is connected. - WARNING To prevent fire or shock hazard, do not place...
.... These limits are cautioned that any changes or modification not expressly approved in this manual could void your authority to operate this product will increase eye hazard. If this equipment... turning the equipment off and on the apparatus. As an ENERGY STAR® partner, Sony Corporation has determined that this product will increase eye hazard. Don't throw away the battery... installation. Do not install the appliance in a confined space, such as practical. Note to CATV system installer: This reminder is connected. - WARNING To prevent fire or shock hazard, do not place...
Operating Instructions
Page 3
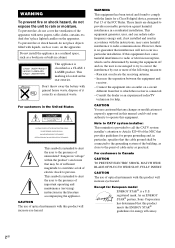
... own program 11 - Power Saving Mode Viewing information about the disc in the display 20 Optional Components Hooking up the system 6 Setting the clock 8 CD/MP3 - Preset Tuning - Manual Tuning Using the Radio Data System (RDS).... 14 (European model CMT-NE5 only) Tape - Play Timer Timer recording radio programs........... 19 - Play Loading a tape 15 Playing...
... own program 11 - Power Saving Mode Viewing information about the disc in the display 20 Optional Components Hooking up the system 6 Setting the clock 8 CD/MP3 - Preset Tuning - Manual Tuning Using the Radio Data System (RDS).... 14 (European model CMT-NE5 only) Tape - Play Timer Timer recording radio programs........... 19 - Play Loading a tape 15 Playing...
Operating Instructions
Page 4
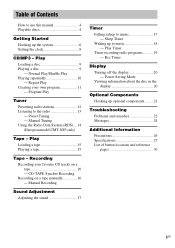
... that has the adhesive, cellophane tape, or a sticker still left on a CD-ROM. A Multi Session CD is a recording method that this system. Each folder can have up to 16 characters) make sure of the contents of files and folders on it. 1) ISO 9660 Format The most common...session. Discs that enables you to 10 sessions. Any difference in operation is used for model CMT-NE5 and CMT-NE3. Level 2 specifications allow file names and folder names up to 8 trees. In this manual, CMT-NE5 is clearly indicated in the text, for the logical format of the writing software, etc...
... that has the adhesive, cellophane tape, or a sticker still left on a CD-ROM. A Multi Session CD is a recording method that this system. Each folder can have up to 16 characters) make sure of the contents of files and folders on it. 1) ISO 9660 Format The most common...session. Discs that enables you to 10 sessions. Any difference in operation is used for model CMT-NE5 and CMT-NE3. Level 2 specifications allow file names and folder names up to 8 trees. In this manual, CMT-NE5 is clearly indicated in the text, for the logical format of the writing software, etc...
Operating Instructions
Page 10
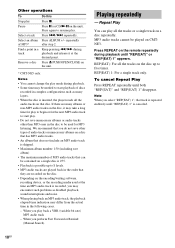
... an MP3 audio track is possible up to resume play Press x. Other operations To Do this Stop play . When you perform Fast Forward or Rewind (Manual Search) Playing repeatedly - Repeat Play You can be played on the unit. * CMT-NE5 only. REP(EAT) 1: For a single track only.
... an MP3 audio track is possible up to resume play Press x. Other operations To Do this Stop play . When you perform Fast Forward or Rewind (Manual Search) Playing repeatedly - Repeat Play You can be played on the unit. * CMT-NE5 only. REP(EAT) 1: For a single track only.
Operating Instructions
Page 12
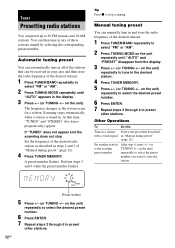
... number flashes. The frequency changes as described in steps 2 and 3 of "Manual tuning preset" (page 12). 4 Press TUNER MEMORY. Tip Press x to stop Set the frequency of the desired radio station as the system scans for stereo program only) appear. Other Operations To Do this Tune in ...a station Follow the procedure described with a weak signal in . Scanning stops automatically when a station is tuned in "Manual tuning preset" (page 12). on the...
... number flashes. The frequency changes as described in steps 2 and 3 of "Manual tuning preset" (page 12). 4 Press TUNER MEMORY. Tip Press x to stop Set the frequency of the desired radio station as the system scans for stereo program only) appear. Other Operations To Do this Tune in ...a station Follow the procedure described with a weak signal in . Scanning stops automatically when a station is tuned in "Manual tuning preset" (page 12). on the...
Operating Instructions
Page 13
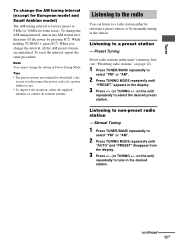
... about half a day even if you change the AM tuning interval, tune in any AM station first, then turn off the power by manually tuning in the station. Tips • The preset stations are initialized. Listening to select the desired preset station. continued 13GB... Manual Tuning 1 Press TUNER/BAND repeatedly to a radio station either by selecting a preset station, or by pressing ?/1. To reset the interval, repeat the same ...
... about half a day even if you change the AM tuning interval, tune in any AM station first, then turn off the power by manually tuning in the station. Tips • The preset stations are initialized. Listening to select the desired preset station. continued 13GB... Manual Tuning 1 Press TUNER/BAND repeatedly to a radio station either by selecting a preset station, or by pressing ?/1. To reset the interval, repeat the same ...
Operating Instructions
Page 14
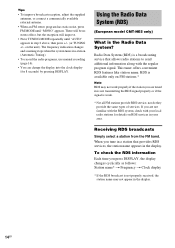
The frequency indication changes and scanning stops when the system tunes in a station (Automatic Tuning). • To record the radio programs, use manual recording (page 16). • You can change the display into the clock display (for details on the unit). When you press DISPLAY, ...allows radio stations to send additional information along with your local radio stations for 8 seconds) by pressing DISPLAY. Using the Radio Data System (RDS) (European model CMT-NE5 only) What is not properly received, the station name may not work properly if the station you are tuned in is ...
The frequency indication changes and scanning stops when the system tunes in a station (Automatic Tuning). • To record the radio programs, use manual recording (page 16). • You can change the display into the clock display (for details on the unit). When you press DISPLAY, ...allows radio stations to send additional information along with your local radio stations for 8 seconds) by pressing DISPLAY. Using the Radio Data System (RDS) (European model CMT-NE5 only) What is not properly received, the station name may not work properly if the station you are tuned in is ...
Operating Instructions
Page 16
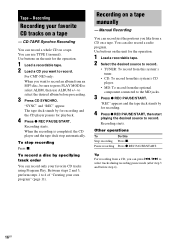
...starts. When the recording is completed, the CD player and the tape deck stop recording Press x. Manual Recording You can use ALBUM +/- to record. You can record a whole CD on the unit for...4 Press z REC PAUSE/START. Recording starts. Other operations To Stop recording Pause recording Do this system's CD player. • MD: To record from a CD on the unit for recording. 4 ... desired source to select ALBM, then use TYPE I (normal). For CMT-NE5 only: When you like from the optional component connected to select tracks during recording pause mode (after step 3 and before...
...starts. When the recording is completed, the CD player and the tape deck stop recording Press x. Manual Recording You can use ALBUM +/- to record. You can record a whole CD on the unit for...4 Press z REC PAUSE/START. Recording starts. Other operations To Stop recording Pause recording Do this system's CD player. • MD: To record from a CD on the unit for recording. 4 ... desired source to select ALBM, then use TYPE I (normal). For CMT-NE5 only: When you like from the optional component connected to select tracks during recording pause mode (after step 3 and before...
Operating Instructions
Page 21
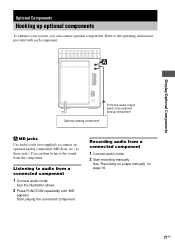
... (not supplied) to connect an optional analog component (MD deck, etc.) to the operating instructions provided with each component. Start playing the connected component. Listening to audio from a connected component 1 Connect audio cords. 2 Start recording manually. Refer to these jacks. Optional Components Hooking up optional components To enhance your system, you can then listen to the sound from...
... (not supplied) to connect an optional analog component (MD deck, etc.) to the operating instructions provided with each component. Start playing the connected component. Listening to audio from a connected component 1 Connect audio cords. 2 Start recording manually. Refer to these jacks. Optional Components Hooking up optional components To enhance your system, you can then listen to the sound from...

