Primary User Manual
Page 3
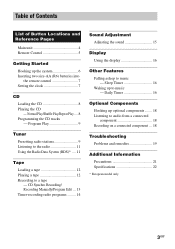
...Normal Play/Shuffle Play/Repeat Play .... 8 Programming the CD tracks -- Daily Timer 16 Optional Components Hooking up to audio from a connected component 18 Recording on a connected component ... 18 Troubleshooting Problems and remedies 19 Additional Information Precautions 21 Specifications 22 * European model only ...a tape -- Table of Contents List of Button Locations and Reference Pages Main unit 4 Remote Control 5 Getting Started Hooking up the system 6 Inserting two size-AA (R6) batteries into the remote control 7 Setting the clock 7 CD Loading the CD 8 Playing the CD --
...Normal Play/Shuffle Play/Repeat Play .... 8 Programming the CD tracks -- Daily Timer 16 Optional Components Hooking up to audio from a connected component 18 Recording on a connected component ... 18 Troubleshooting Problems and remedies 19 Additional Information Precautions 21 Specifications 22 * European model only ...a tape -- Table of Contents List of Button Locations and Reference Pages Main unit 4 Remote Control 5 Getting Started Hooking up the system 6 Inserting two size-AA (R6) batteries into the remote control 7 Setting the clock 7 CD Loading the CD 8 Playing the CD --
Primary User Manual
Page 5
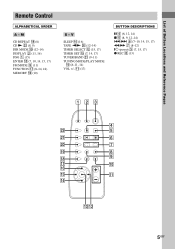
... (15, 17) TIMER SET qg (7, 14, 17) TUNER/BAND wa (9-11) TUNING MODE/PLAY MODE q; (8-11, 14) VOL +/- List of Button Locations and Reference Pages Remote Control ALPHABETICAL ORDER A - qa (17) BUTTON DESCRIPTIONS X 4 (8, 12, 14) x 5 (8, 9, 12-14) ./> 6 (7-10, 14, 15, 17) m/M 7 (8-12) @/1 (power) 3 (7, 15, 17) z REC 8 (13) 123 4 ws 5 wa 6 w; 7 ql 8 9 qk...
... (15, 17) TIMER SET qg (7, 14, 17) TUNER/BAND wa (9-11) TUNING MODE/PLAY MODE q; (8-11, 14) VOL +/- List of Button Locations and Reference Pages Remote Control ALPHABETICAL ORDER A - qa (17) BUTTON DESCRIPTIONS X 4 (8, 12, 14) x 5 (8, 9, 12-14) ./> 6 (7-10, 14, 15, 17) m/M 7 (8-12) @/1 (power) 3 (7, 15, 17) z REC 8 (13) 123 4 ws 5 wa 6 w; 7 ql 8 9 qk...
Primary User Manual
Page 7
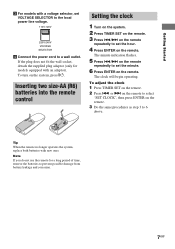
...into the remote control e EE e Setting the clock 1 Turn on the system. 2 Press TIMER SET on the remote. 3 Press ./> on the remote. or > on the remote to select "SET CLOCK", then press ENTER on the remote. 3 Do the same procedures as step 3 to set the minute. 6 Press ENTER on the remote repeatedly ...a long period of time, remove the batteries to prevent possible damage from battery leakage and corrosion. 7GB Tip When the remote no longer operates the system, replace both batteries with a voltage selector, set VOLTAGE SELECTOR to the local power line voltage. 110V-120V 220V-240V VOLTAGE...
...into the remote control e EE e Setting the clock 1 Turn on the system. 2 Press TIMER SET on the remote. 3 Press ./> on the remote. or > on the remote to select "SET CLOCK", then press ENTER on the remote. 3 Do the same procedures as step 3 to set the minute. 6 Press ENTER on the remote repeatedly ...a long period of time, remove the batteries to prevent possible damage from battery leakage and corrosion. 7GB Tip When the remote no longer operates the system, replace both batteries with a voltage selector, set VOLTAGE SELECTOR to the local power line voltage. 110V-120V 220V-240V VOLTAGE...
Primary User Manual
Page 23
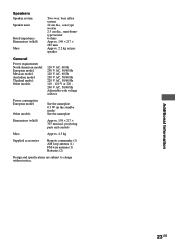
projecting parts and controls Mass Approx. 4.5 kg Supplied accessories Remote commander (1) AM loop antenna (1) FM wire antenna (1) Batteries (2) Design and specifications are subject to change without notice. 23GB Additional Information Speakers Speaker system Speaker units Rated impedance Dimensions (w/h/d) Mass Two-way, bass reflex system 10 cm dia., cone type woofer 2.5 cm dia., semi-dometype tweeter...
projecting parts and controls Mass Approx. 4.5 kg Supplied accessories Remote commander (1) AM loop antenna (1) FM wire antenna (1) Batteries (2) Design and specifications are subject to change without notice. 23GB Additional Information Speakers Speaker system Speaker units Rated impedance Dimensions (w/h/d) Mass Two-way, bass reflex system 10 cm dia., cone type woofer 2.5 cm dia., semi-dometype tweeter...


