Operating Instructions
Page 1
Model No Serial No CMT-HPX10W CMT-HPX9 CMT-HPX7 ©2004 Sony Corporation Refer to them whenever you call upon your Sony dealer regarding this product. Record the serial number in the space provided below. 4-255-291-13(2) Micro Hi-Fi Component System Operating Instructions Owner's Record The model and serial numbers are located on the rear of the unit.
Model No Serial No CMT-HPX10W CMT-HPX9 CMT-HPX7 ©2004 Sony Corporation Refer to them whenever you call upon your Sony dealer regarding this product. Record the serial number in the space provided below. 4-255-291-13(2) Micro Hi-Fi Component System Operating Instructions Owner's Record The model and serial numbers are located on the rear of the unit.
Operating Instructions
Page 2
... limits for help. This symbol is no guarantee that to the point of the building, as vases, on the apparatus. However, there is intended to alert the user to Part 15 of important operating and maintenance (servicing) instructions in accordance with liquids, such as close to which can radiate radio frequency energy and, if not installed and used in...
... limits for help. This symbol is no guarantee that to the point of the building, as vases, on the apparatus. However, there is intended to alert the user to Part 15 of important operating and maintenance (servicing) instructions in accordance with liquids, such as close to which can radiate radio frequency energy and, if not installed and used in...
Operating Instructions
Page 4
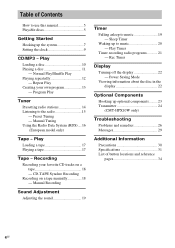
... Transmitter 24 (CMT-HPX10W only) Troubleshooting Problems and remedies 26 Messages 29 Additional Information Precautions 30 Specifications 31 List of Contents How to music 20 - Power Saving Mode Viewing information about the disc in the display 22 Optional Components Hooking up to use this manual 5 Playable discs 5 Getting Started Hooking up the system 7 Setting the clock 9 CD/MP3 - Repeat Play Creating your favorite CD tracks on a tape manually 18 - Preset Tuning - Normal Play/Shuffle Play Playing repeatedly...
... Transmitter 24 (CMT-HPX10W only) Troubleshooting Problems and remedies 26 Messages 29 Additional Information Precautions 30 Specifications 31 List of Contents How to music 20 - Power Saving Mode Viewing information about the disc in the display 22 Optional Components Hooking up to use this manual 5 Playable discs 5 Getting Started Hooking up the system 7 Setting the clock 9 CD/MP3 - Repeat Play Creating your favorite CD tracks on a tape manually 18 - Preset Tuning - Normal Play/Shuffle Play Playing repeatedly...

Operating Instructions
Page 5
... model CMT-HPX10W, CMT-HPX9 and CMTHPX7. music CD format - In Level 1, file names must be no more than 3 characters in the extension ".MP3") and in capital letters. Any difference in operation is a recording method that this system cannot play back the following formats: - How to use this manual • The instructions in this manual are several specification levels. Mixed CD: This format records data on the first track and audio (audio...
... model CMT-HPX10W, CMT-HPX9 and CMTHPX7. music CD format - In Level 1, file names must be no more than 3 characters in the extension ".MP3") and in capital letters. Any difference in operation is a recording method that this system cannot play back the following formats: - How to use this manual • The instructions in this manual are several specification levels. Mixed CD: This format records data on the first track and audio (audio...

Operating Instructions
Page 8
... settings. 4 Connect the power cord to CD. 2 Make sure that "PLEASE WAIT" then "LOCK" is displayed. 4 Unplug the power cord. * Saudi Arabian Model: 120 - 127 V 8GB Refer to avoid possible damage from the system and other components. 3 For models with new ones. Inserting two R6 (size AA) batteries into the remote Note If you do not use the remote for a long period of time, remove the batteries...
... settings. 4 Connect the power cord to CD. 2 Make sure that "PLEASE WAIT" then "LOCK" is displayed. 4 Unplug the power cord. * Saudi Arabian Model: 120 - 127 V 8GB Refer to avoid possible damage from the system and other components. 3 For models with new ones. Inserting two R6 (size AA) batteries into the remote Note If you do not use the remote for a long period of time, remove the batteries...
Operating Instructions
Page 12
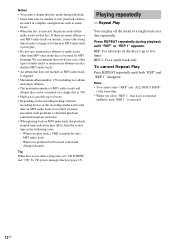
... disc access takes a long time, set "CD POWER" and "ON" by CD power manage function (page 15). Repeat Play You can be needed to start play. • Do not save other than MP3 ones in the following cases. - To cancel Repeat Play Press REPEAT repeatedly until both "REP" and "REP 1" disappear. REP: For all the audio tracks on the encoding/writing software, recording device or the recording media used...
... disc access takes a long time, set "CD POWER" and "ON" by CD power manage function (page 15). Repeat Play You can be needed to start play. • Do not save other than MP3 ones in the following cases. - To cancel Repeat Play Press REPEAT repeatedly until both "REP" and "REP 1" disappear. REP: For all the audio tracks on the encoding/writing software, recording device or the recording media used...

Operating Instructions
Page 13
... desired track number appears. To play them. The track is cleared when you select an MP3 audio track. You can make a program of the disc buttons (DISC 1 - 5 and DISC +1) on the remote for the operation. 1 Press CD (or FUNCTION repeatedly) until "CD" appears. 2 Press PLAY MODE in stop mode repeatedly until "CD" appears, then press N (or CD/NX on the unit). Selected track number 6 Program additional discs or tracks. appears when the total CD program time exceeds...
... desired track number appears. To play them. The track is cleared when you select an MP3 audio track. You can make a program of the disc buttons (DISC 1 - 5 and DISC +1) on the remote for the operation. 1 Press CD (or FUNCTION repeatedly) until "CD" appears. 2 Press PLAY MODE in stop mode repeatedly until "CD" appears, then press N (or CD/NX on the unit). Selected track number 6 Program additional discs or tracks. appears when the total CD program time exceeds...

Operating Instructions
Page 14
... the stations that time, "TUNED" and "STEREO" (for a station. At that can be received in steps 2 and 3 of those stations simply by selecting the corresponding preset number. on the unit). You can then tune in . Set another station to store the station. A preset number flashes. Perform steps 5 and 6 while the preset number flashes. Preset number 5 Press +/- (or TUNING +/- Scanning stops automatically when a station is tuned in any of "Manual tuning preset" (page 14). 4 Press TUNER MEMORY. Tuner Presetting radio stations...
... the stations that time, "TUNED" and "STEREO" (for a station. At that can be received in steps 2 and 3 of those stations simply by selecting the corresponding preset number. on the unit). You can then tune in . Set another station to store the station. A preset number flashes. Perform steps 5 and 6 while the preset number flashes. Preset number 5 Press +/- (or TUNING +/- Scanning stops automatically when a station is tuned in any of "Manual tuning preset" (page 14). 4 Press TUNER MEMORY. Tuner Presetting radio stations...
Operating Instructions
Page 15
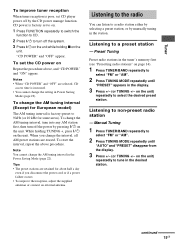
... CD power manage function. To set the CD power on Repeat the procedure above procedure. Listening to non-preset radio station - When you change the interval, all AM preset stations are retained for about half a day even if you disconnect the power cord or if a power failure occurs. • To improve the reception, adjust the supplied antennas or connect an external antenna. Preset Tuning Preset radio stations in the tuner's memory first (see "Presetting radio stations" on...
... CD power manage function. To set the CD power on Repeat the procedure above procedure. Listening to non-preset radio station - When you change the interval, all AM preset stations are retained for about half a day even if you disconnect the power cord or if a power failure occurs. • To improve the reception, adjust the supplied antennas or connect an external antenna. Preset Tuning Preset radio stations in the tuner's memory first (see "Presetting radio stations" on...
Operating Instructions
Page 16
...; Press TUNING MODE repeatedly until "MONO" appears. Tips • To improve broadcast reception, adjust the supplied antennas, or connect a commercially available external antenna. • When an FM stereo program has static noise, press FM MODE until "AUTO" appears in step 2 above, then press +/- (or TUNING +/- The frequency indication changes and scanning stops when the system tunes in a station (Automatic Tuning). • To record the radio programs, use manual recording (page...
...; Press TUNING MODE repeatedly until "MONO" appears. Tips • To improve broadcast reception, adjust the supplied antennas, or connect a commercially available external antenna. • When an FM stereo program has static noise, press FM MODE until "AUTO" appears in step 2 above, then press +/- (or TUNING +/- The frequency indication changes and scanning stops when the system tunes in a station (Automatic Tuning). • To record the radio programs, use manual recording (page...

Operating Instructions
Page 18
... component connected to 4 of "Creating your own program" (page 13). Use buttons on the unit for the operation. 1 Load a recordable tape. 2 Load a CD you can record a whole CD on the unit for playback. 4 Press X TAPE. Tape - Recording on a tape - Use buttons on a tape. Press X TAPE. to select tracks during recording pause mode (after step 3 and before proceeding. 3 Press CD SYNC. When the recording is completed, the CD player and the tape deck stop recording Press x. Recording starts. CD-TAPE Synchro Recording You...
... component connected to 4 of "Creating your own program" (page 13). Use buttons on the unit for the operation. 1 Load a recordable tape. 2 Load a CD you can record a whole CD on the unit for playback. 4 Press X TAPE. Tape - Recording on a tape - Use buttons on a tape. Press X TAPE. to select tracks during recording pause mode (after step 3 and before proceeding. 3 Press CD SYNC. When the recording is completed, the CD player and the tape deck stop recording Press x. Recording starts. CD-TAPE Synchro Recording You...

Operating Instructions
Page 20
...). 2 Adjust the volume. 3 Press CLOCK/TIMER SET. 4 Press ./> repeatedly until "TIMER OFF" appears, then press ENTER. Press ./> repeatedly to set the minute, then press ENTER. 6 Set the time to stop time, and the sound source appear in a radio station (see "Setting the clock" on page 9). The start playing. Notes • If you use the optional component connected to the MD/VIDEO jacks or the transmitter (CMTHPX10W only) as sound sources for the operation...
...). 2 Adjust the volume. 3 Press CLOCK/TIMER SET. 4 Press ./> repeatedly until "TIMER OFF" appears, then press ENTER. Press ./> repeatedly to set the minute, then press ENTER. 6 Set the time to stop time, and the sound source appear in a radio station (see "Setting the clock" on page 9). The start playing. Notes • If you use the optional component connected to the MD/VIDEO jacks or the transmitter (CMTHPX10W only) as sound sources for the operation...

Operating Instructions
Page 22
... playback. switching the CD power on the play back a track with MP3 audio tracks ** When you press the button, the display changes cyclically as follows: TOC display* or total number of Contents; Power Saving Mode The clock display can also check the information recorded on the disc** or total track number of the current album** t Disc name** t Clock display t Bass level t Treble level * TOC = Table of albums on disc, such as the titles. Checking the remaining time...
... playback. switching the CD power on the play back a track with MP3 audio tracks ** When you press the button, the display changes cyclically as follows: TOC display* or total number of Contents; Power Saving Mode The clock display can also check the information recorded on the disc** or total track number of the current album** t Disc name** t Clock display t Bass level t Treble level * TOC = Table of albums on disc, such as the titles. Checking the remaining time...

Operating Instructions
Page 23
You can connect optional components. Start playing the connected component. The function will appear in Power Saving Mode. 23GB From the audio output jacks of an optional analog component Optional analog component Display/Optional Components A MD/VIDEO jacks Use audio cords (not supplied) to connect an optional analog component (MD deck, etc.) to audio from a connected component 1 Connect audio cords. Listening to these jacks. To change from "MD" to "VIDEO", and "VIDEO" will change back to "MD", repeat...
You can connect optional components. Start playing the connected component. The function will appear in Power Saving Mode. 23GB From the audio output jacks of an optional analog component Optional analog component Display/Optional Components A MD/VIDEO jacks Use audio cords (not supplied) to connect an optional analog component (MD deck, etc.) to audio from a connected component 1 Connect audio cords. Listening to these jacks. To change from "MD" to "VIDEO", and "VIDEO" will change back to "MD", repeat...
Operating Instructions
Page 24
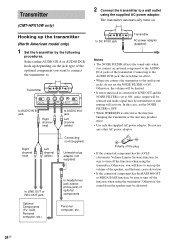
... power adaptor. Transmitter (CMT-HPX10W only) Hooking up the volume of the speaker, and that may cause distortion. • If the connected component has the BASS BOOST or MEGA BASS function, be distorted. 24GB The transmitter automatically turns on the jack type of optional components Personal computer, etc. 2 Connect the transmitter to turn up the transmitter (North American model only) 1 Set the transmitter by the following procedures. Connecting to the AUDIO IN B jack...
... power adaptor. Transmitter (CMT-HPX10W only) Hooking up the volume of the speaker, and that may cause distortion. • If the connected component has the BASS BOOST or MEGA BASS function, be distorted. 24GB The transmitter automatically turns on the jack type of optional components Personal computer, etc. 2 Connect the transmitter to turn up the transmitter (North American model only) 1 Set the transmitter by the following procedures. Connecting to the AUDIO IN B jack...

Operating Instructions
Page 25
... 1 Start playing the connected component. 2 Press FUNCTION repeatedly to switch the function to the operating instructions of time, disconnect the AC power adaptor from green to be received. For details, refer to the operating instructions of the MDR-RF820RK. • Turn down the volume on a desk, is connected to the headphones jack of the source component, set the volume of that component as high as possible without distorting the audio signal...
... 1 Start playing the connected component. 2 Press FUNCTION repeatedly to switch the function to the operating instructions of time, disconnect the AC power adaptor from green to be received. For details, refer to the operating instructions of the MDR-RF820RK. • Turn down the volume on a desk, is connected to the headphones jack of the source component, set the volume of that component as high as possible without distorting the audio signal...
Operating Instructions
Page 26
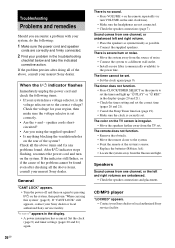
... authorized Sony service facility. 26GB After ?/1 indicator stops flashing, reconnect the power cord and turn VOLUME on the unit clockwise). • Make sure the headphones are unbalanced. • Check the speaker connections and placement. "- -:- -" appears in the troubleshooting checklist below and take the indicated corrective action. Speakers Sound comes from one channel, or unbalanced left and right volumes are not connected. • Check the speaker connections (page 7). Set the clock (page 9) and timer settings (pages...
... authorized Sony service facility. 26GB After ?/1 indicator stops flashing, reconnect the power cord and turn VOLUME on the unit clockwise). • Make sure the headphones are unbalanced. • Check the speaker connections and placement. "- -:- -" appears in the troubleshooting checklist below and take the indicated corrective action. Speakers Sound comes from one channel, or unbalanced left and right volumes are not connected. • Check the speaker connections (page 7). Set the clock (page 9) and timer settings (pages...

Operating Instructions
Page 27
.... A stereo FM program cannot be received in MP3 format. • Discs containing tracks other components. • Consult your nearest Sony dealer if the supplied AM antenna has come off the plastic stand. • Try turning off surrounding electrical equipment. • Set "CD POWER" and "OFF" by the CD power manage function (page 15). Clean them (page 31). • The record/playback heads are dirty. The tape does...
.... A stereo FM program cannot be received in MP3 format. • Discs containing tracks other components. • Consult your nearest Sony dealer if the supplied AM antenna has come off the plastic stand. • Try turning off surrounding electrical equipment. • Set "CD POWER" and "OFF" by the CD power manage function (page 15). Clean them (page 31). • The record/playback heads are dirty. The tape does...

Operating Instructions
Page 28
... record. • No cassette is reset to the end. the cord plugs are placed on the unit for the operation. 1 Disconnect the power cord. 2 Reconnect the power cord. 3 Press ?/1 to turn down the volume of an audio reproducer, make sure the CHG indicator lights up the volume on the connected optional component, if the transmitter is set to OFF. • Make sure that the NOISE FILTER switch is connected to the headphones jack. • Change the radio...
... record. • No cassette is reset to the end. the cord plugs are placed on the unit for the operation. 1 Disconnect the power cord. 2 Reconnect the power cord. 3 Press ?/1 to turn down the volume of an audio reproducer, make sure the CHG indicator lights up the volume on the connected optional component, if the transmitter is set to OFF. • Make sure that the NOISE FILTER switch is connected to the headphones jack. • Change the radio...

Operating Instructions
Page 29
... Play Timer or Rec Timer are set the clock or timer during operation. SET CLOCK You tried to program 26 or more tracks (steps). TIME NG Play Timer or Rec Timer start and end times are not set . Troubleshooting Messages One of the following messages may appear or flash in the display during timer operation. 29GB Tuner COMPLETE The preset operation ended normally. Wireless (CMT-HPX10W only) AUTO SCAN You can adjust the settings so that you hear clear audio sound...
... Play Timer or Rec Timer are set the clock or timer during operation. SET CLOCK You tried to program 26 or more tracks (steps). TIME NG Play Timer or Rec Timer start and end times are not set . Troubleshooting Messages One of the following messages may appear or flash in the display during timer operation. 29GB Tuner COMPLETE The preset operation ended normally. Wireless (CMT-HPX10W only) AUTO SCAN You can adjust the settings so that you hear clear audio sound...


