Operating Instructions
Page 2
... such as a bookcase or built-in this manual could void your Sony dealer regarding this product will not occur in the literature accompanying the ... battery compartment. Owner's Record The model number is located at the rear of the CD radio cassette-corder and the serial number is connected. -Consult the dealer or an experienced radio/.... If this equipment. Warning To prevent fire or shock hazard, do not expose the player to constitute a risk of optical instruments with the limits for help. CAUTION The use of... in a residential installation. CFD-ZW755 Serial No 2 Introduction
... such as a bookcase or built-in this manual could void your Sony dealer regarding this product will not occur in the literature accompanying the ... battery compartment. Owner's Record The model number is located at the rear of the CD radio cassette-corder and the serial number is connected. -Consult the dealer or an experienced radio/.... If this equipment. Warning To prevent fire or shock hazard, do not expose the player to constitute a risk of optical instruments with the limits for help. CAUTION The use of... in a residential installation. CFD-ZW755 Serial No 2 Introduction
Operating Instructions
Page 3
... to the radio 8 Playing a tape 10 Recording on a tape The CD Player 12 Using the display 13 Locating a specific track 14 Playing tracks repeatedly (Repeat Play) 15 Playing tracks in random order (Shuffle Play) 16 Creating your ...
... to the radio 8 Playing a tape 10 Recording on a tape The CD Player 12 Using the display 13 Locating a specific track 14 Playing tracks repeatedly (Repeat Play) 15 Playing tracks in random order (Shuffle Play) 16 Creating your ...
Operating Instructions
Page 4
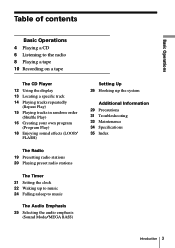
With the label side up 2 Close the lid of the CD compartment. 3 4 Basic Operations Press ^. Display Track number Playing time Basic Operations Playing a CD 1,2 3 For hookup instructions, see pages 26 - 28. 1 Push 6 PUSH OPEN/CLOSE down to open the CD compartment and place the CD on ) and plays all the tracks once. The player turns on (direct power-on the CD compartment.
With the label side up 2 Close the lid of the CD compartment. 3 4 Basic Operations Press ^. Display Track number Playing time Basic Operations Playing a CD 1,2 3 For hookup instructions, see pages 26 - 28. 1 Push 6 PUSH OPEN/CLOSE down to open the CD compartment and place the CD on ) and plays all the tracks once. The player turns on (direct power-on the CD compartment.
Operating Instructions
Page 5
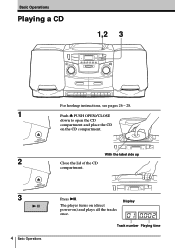
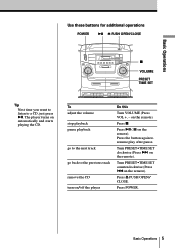
To adjust the volume stop playback pause playback go to the next track go back to the previous track remove the CD turn on the remote). Press ^ ( P on /off the player Do this Turn VOLUME (Press VOL +, - Basic Operations 5 Turn PRESET•TIME SET clockwise (Press + on the ... and starts playing the CD. Press the button again to a CD, just press ^. Basic Operations Use these buttons for additional operations POWER ^ 6 PUSH OPEN/CLOSE p VOLUME PRESET TIME SET Tip Next time you want to listen to resume play after pause. Press POWER. The player turns on the remote)....
To adjust the volume stop playback pause playback go to the next track go back to the previous track remove the CD turn on the remote). Press ^ ( P on /off the player Do this Turn VOLUME (Press VOL +, - Basic Operations 5 Turn PRESET•TIME SET clockwise (Press + on the ... and starts playing the CD. Press the button again to a CD, just press ^. Basic Operations Use these buttons for additional operations POWER ^ 6 PUSH OPEN/CLOSE p VOLUME PRESET TIME SET Tip Next time you want to listen to resume play after pause. Press POWER. The player turns on the remote)....
Operating Instructions
Page 10
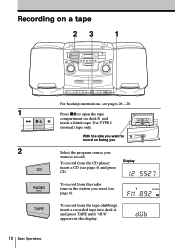
To record from the tape (dubbing): insert a recorded tape into deck A and press TAPE until "dUb" appears in the station you want to record. To record from the CD player: insert a CD (see page 4) and press CD. With the side you want (see pages 26 - 28. Display To record from the radio: tune in the display. Recording on a tape 23 1 1 2 10 Basic Operations For hookup instructions, see page 6). Use TYPE I (normal) tape only. Press p6 to record on facing you Select the program source you want to open the tape compartment on deck B and insert a blank tape.
To record from the tape (dubbing): insert a recorded tape into deck A and press TAPE until "dUb" appears in the station you want to record. To record from the CD player: insert a CD (see page 4) and press CD. With the side you want (see pages 26 - 28. Display To record from the radio: tune in the display. Recording on a tape 23 1 1 2 10 Basic Operations For hookup instructions, see page 6). Use TYPE I (normal) tape only. Press p6 to record on facing you Select the program source you want to open the tape compartment on deck B and insert a blank tape.
Operating Instructions
Page 11
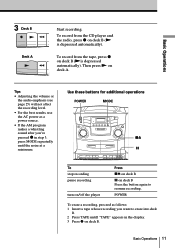
To record from the CD player and the radio, press r on deck B Press the button again to erase into deck B. 2 Press TAPE untill "TAPE" appears in step 3, press MODE repeatedly until ... record from the tape, press r on deck A. Use these buttons for additional operations POWER MODE p6 P To stop recording pause recording turn on/off the player Press p6 on deck B P on deck B (( is depressed automatically). POWER To erase a recording, proceed as a power source. • If the AM program makes a whistling sound...
To record from the CD player and the radio, press r on deck B Press the button again to erase into deck B. 2 Press TAPE untill "TAPE" appears in step 3, press MODE repeatedly until ... record from the tape, press r on deck A. Use these buttons for additional operations POWER MODE p6 P To stop recording pause recording turn on/off the player Press p6 on deck B P on deck B (( is depressed automatically). POWER To erase a recording, proceed as a power source. • If the AM program makes a whistling sound...
Operating Instructions
Page 12
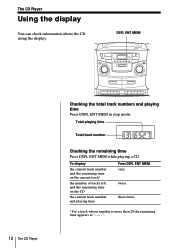
Total playing time Total track number Checking the remaining time Press DSPL ENT MEM while playing a CD. The CD Player Using the display You can check information about the CD using the display. To display the current track number and the remaining time on the current track* the number of tracks left and... the remaining time on the CD the current track number and playing time Press DSPL ENT MEM once twice three times * For a track whose number is more than 20 the remaining time appears as "- -:- -". DSPL ENT MEM 12 The CD Player Checking the total track numbers and playing ...
Total playing time Total track number Checking the remaining time Press DSPL ENT MEM while playing a CD. The CD Player Using the display You can check information about the CD using the display. To display the current track number and the remaining time on the current track* the number of tracks left and... the remaining time on the CD the current track number and playing time Press DSPL ENT MEM once twice three times * For a track whose number is more than 20 the remaining time appears as "- -:- -". DSPL ENT MEM 12 The CD Player Checking the total track numbers and playing ...
Operating Instructions
Page 13
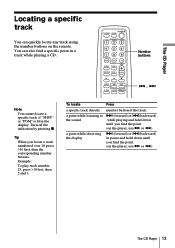
... the remote. Turn off the indication by pressing p. Tip When you find the point. (on the player, use ) or 0.) The CD Player 13 The CD Player Locating a specific track You can also find a specific point in a track while playing a CD. To locate Press a specific track directly number button of the track. You can quickly locate any...
... the remote. Turn off the indication by pressing p. Tip When you find the point. (on the player, use ) or 0.) The CD Player 13 The CD Player Locating a specific track You can also find a specific point in a track while playing a CD. To locate Press a specific track directly number button of the track. You can quickly locate any...
Operating Instructions
Page 14
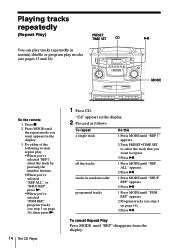
... MODE until "PGM REP" appears. 2 Program tracks (see step 3 on page 16). 3 Press ^. Playing tracks repeatedly (Repeat Play) PRESET TIME SET CD You can play tracks repeatedly in normal, shuffle or program play : •When you've selected "REP1", select the track by pressing the number buttons...ALL", or "SHUF REP", press (. •When you've selected "PGM REP", program tracks (see step 3 on page 16), then press (. 14 The CD Player 1 Press CD. "Cd" appears in the display. 3 Do either of the following to start repeat play modes (see pages 15 and 16). ^ MODE On the remote 1 Press p. ...
... MODE until "PGM REP" appears. 2 Program tracks (see step 3 on page 16). 3 Press ^. Playing tracks repeatedly (Repeat Play) PRESET TIME SET CD You can play tracks repeatedly in normal, shuffle or program play : •When you've selected "REP1", select the track by pressing the number buttons...ALL", or "SHUF REP", press (. •When you've selected "PGM REP", program tracks (see step 3 on page 16), then press (. 14 The CD Player 1 Press CD. "Cd" appears in the display. 3 Do either of the following to start repeat play modes (see pages 15 and 16). ^ MODE On the remote 1 Press p. ...

Operating Instructions
Page 15
The CD Player 15 "Cd" appears in the display. 2 Press MODE until "SHUF" appears in the display. 3 Press (. 1 Press CD. To cancel Shuffle Play Press MODE until "SHUF" disappears from the display. The CD Player Playing tracks in random order (Shuffle Play) CD You can play tracks in random order. ^ MODE On the remote 1 Press p. 2 Press MODE until "SHUF" appears in the display. 3 Press ^ to start shuffle play.
The CD Player 15 "Cd" appears in the display. 2 Press MODE until "SHUF" appears in the display. 3 Press (. 1 Press CD. To cancel Shuffle Play Press MODE until "SHUF" disappears from the display. The CD Player Playing tracks in random order (Shuffle Play) CD You can play tracks in random order. ^ MODE On the remote 1 Press p. 2 Press MODE until "SHUF" appears in the display. 3 Press ^ to start shuffle play.
Operating Instructions
Page 16
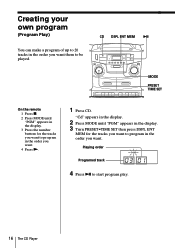
Playing order Programed track 4 Press ^ to start program play. 16 The CD Player "Cd" appears in the display. 2 Press MODE until "PGM" appears in the display. 3 Press the number buttons for the tracks you want to program in the order you want . 4 Press (. 1 Press CD. CD DSPL ENT MEM ^ MODE PRESET TIME SET On the remote...
Playing order Programed track 4 Press ^ to start program play. 16 The CD Player "Cd" appears in the display. 2 Press MODE until "PGM" appears in the display. 3 Press the number buttons for the tracks you want to program in the order you want . 4 Press (. 1 Press CD. CD DSPL ENT MEM ^ MODE PRESET TIME SET On the remote...
Operating Instructions
Page 17
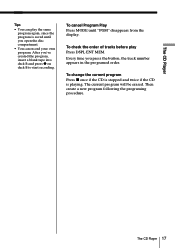
... the programing procedure. To cancel Program Play Press MODE until you open the disc compartment. • You can play Press DSPL ENT MEM. The CD Player 17 The CD Player Tips • You can record your own program. The current program will be erased. To check the order of tracks before play the same...
... the programing procedure. To cancel Program Play Press MODE until you open the disc compartment. • You can play Press DSPL ENT MEM. The CD Player 17 The CD Player Tips • You can record your own program. The current program will be erased. To check the order of tracks before play the same...

Operating Instructions
Page 18
The player returns to start the function. To repeat a selected part of a CD (LOOP) and can "flash" the CD sound (FLASH) during playback. LOOP FLASH 1 Play a CD. 2 Press and hold LOOP on the remote FLASH on the remote To cancel the LOOP or FLASH function Release the button. Enjoying sound effects (LOOP/FLASH) You can repeat part of a CD "flash" the CD sound Press and hold LOOP or FLASH at the point you want to normal play. 18 The CD Player
The player returns to start the function. To repeat a selected part of a CD (LOOP) and can "flash" the CD sound (FLASH) during playback. LOOP FLASH 1 Play a CD. 2 Press and hold LOOP on the remote FLASH on the remote To cancel the LOOP or FLASH function Release the button. Enjoying sound effects (LOOP/FLASH) You can repeat part of a CD "flash" the CD sound Press and hold LOOP or FLASH at the point you want to normal play. 18 The CD Player
Operating Instructions
Page 24
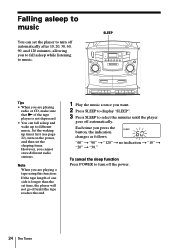
Note When you are playing radio or CD, make sure that ( of one side is not depressed. • You can set the player to turn off automatically after 10, 20, 30, 60, 90, and 120 minutes, allowing you want. 2 Press SLEEP to display "SLEEP". 3 Press SLEEP to select ... first (see page 22), turn off automatically. SLEEP Tips • When you are playing a tape using this function: If the tape length of the tape player is longer than the set the sleeping timer. However, you press the button, the indication changes as follows: "60" n "90" n "120" n no indication n "10" n "20...
Note When you are playing radio or CD, make sure that ( of one side is not depressed. • You can set the player to turn off automatically after 10, 20, 30, 60, 90, and 120 minutes, allowing you want. 2 Press SLEEP to display "SLEEP". 3 Press SLEEP to select ... first (see page 22), turn off automatically. SLEEP Tips • When you are playing a tape using this function: If the tape length of the tape player is longer than the set the sleeping timer. However, you press the button, the indication changes as follows: "60" n "90" n "120" n no indication n "10" n "20...
Operating Instructions
Page 28
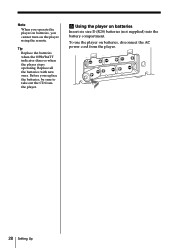
Replace all the batteries with new ones. To use the player on batteries, disconnect the AC power cord from the player. 5 Using the player on the player using the remote. Tip Replace the batteries when the OPR/BATT indicator dims or when the player stops operating. Before you cannot turn on batteries Insert six size D (R20) batteries (not supplied) into the battery compartment. Note When you operate the player on batteries, you replace the batteries, be sure to take out the CD from the player. 28 Setting Up
Replace all the batteries with new ones. To use the player on batteries, disconnect the AC power cord from the player. 5 Using the player on the player using the remote. Tip Replace the batteries when the OPR/BATT indicator dims or when the player stops operating. Before you cannot turn on batteries Insert six size D (R20) batteries (not supplied) into the battery compartment. Note When you operate the player on batteries, you replace the batteries, be sure to take out the CD from the player. 28 Setting Up
Operating Instructions
Page 29
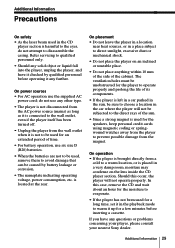
... not place the player on the lens inside the CD player section. Additional Information 29 Refer servicing to qualified personnel only. • Should any solid object or liquid fall into the player, unplug the player, and have any further. In this occur, the player will not be caused by qualified personnel before inserting a cassette. Additional Information Precautions...
... not place the player on the lens inside the CD player section. Additional Information 29 Refer servicing to qualified personnel only. • Should any solid object or liquid fall into the player, unplug the player, and have any further. In this occur, the player will not be caused by qualified personnel before inserting a cassette. Additional Information Precautions...
Operating Instructions
Page 31
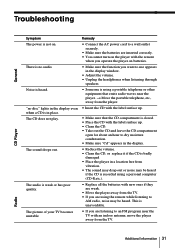
... General CD Player Symptom The power is not on batteries. • Make sure the function you want to use appears in the display window. • Adjust the volume. • Unplug the headphones when listening through speakers. • Someone is using a portable telephone or other equipment that the CD compartment is closed. • Place the CD...
... General CD Player Symptom The power is not on batteries. • Make sure the function you want to use appears in the display window. • Adjust the volume. • Unplug the headphones when listening through speakers. • Someone is using a portable telephone or other equipment that the CD compartment is closed. • Place the CD...
Operating Instructions
Page 34
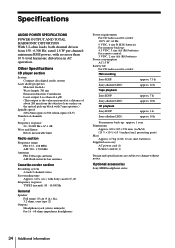
...CD player section System Compact disc digital audio system Laser diode properties Material: GaAlAs Wave length: 780 nm Emission duration: Continuous Laser output: Less than 10 % total harmonic distortion in .) dia., 3.2 ohms, cone type (2) Outputs Headphones jack (stereo minijack) For 16 - 68 ohms impedance headphones Power requirements For CD radio cassette... AC 15 W Battery life For CD radio cassette-corder: FM recording Sony R20P: approx. 7.5 h Sony alkaline LR20: Tape playback approx. 22 h Sony R20P: Sony alkaline LR20: CD playback Sony R20P: Sony alkaline LR20: approx. 7 h approx...
...CD player section System Compact disc digital audio system Laser diode properties Material: GaAlAs Wave length: 780 nm Emission duration: Continuous Laser output: Less than 10 % total harmonic distortion in .) dia., 3.2 ohms, cone type (2) Outputs Headphones jack (stereo minijack) For 16 - 68 ohms impedance headphones Power requirements For CD radio cassette... AC 15 W Battery life For CD radio cassette-corder: FM recording Sony R20P: approx. 7.5 h Sony alkaline LR20: Tape playback approx. 22 h Sony R20P: Sony alkaline LR20: CD playback Sony R20P: Sony alkaline LR20: approx. 7 h approx...
Operating Instructions
Page 35
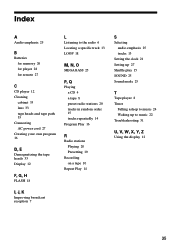
Index A Audio emphasis 25 B Batteries for memory 26 for player 28 for remote 27 C CD player 12 Cleaning cabinet 33 lens 33 tape heads and tape path 33 Connecting AC power cord 27 Creating your own program 16 D, E Demagnetizing the tape ...heads 33 Display 12 F, G, H FLASH 18 L Listening to the radio 6 Locating a specific track 13 LOOP 18 M, N, O MEGA BASS 25 P, Q Playing a CD 4 a tape 8 preset...
Index A Audio emphasis 25 B Batteries for memory 26 for player 28 for remote 27 C CD player 12 Cleaning cabinet 33 lens 33 tape heads and tape path 33 Connecting AC power cord 27 Creating your own program 16 D, E Demagnetizing the tape ...heads 33 Display 12 F, G, H FLASH 18 L Listening to the radio 6 Locating a specific track 13 LOOP 18 M, N, O MEGA BASS 25 P, Q Playing a CD 4 a tape 8 preset...


