Operating Instructions
Page 1
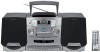
3-046-018-11 (1) CD Radio Cassette-Corder Operating Instructions CFD-ZW755 ©2000 by Sony Corporation
3-046-018-11 (1) CD Radio Cassette-Corder Operating Instructions CFD-ZW755 ©2000 by Sony Corporation
Operating Instructions
Page 2
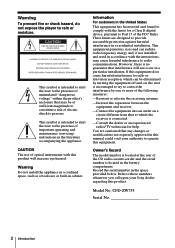
... voltage" within the product's enclosure that any changes or modifications not expressly approved in this manual could void your Sony dealer regarding this equipment. Model No. Warning To prevent fire or shock hazard, do not expose the player to the presence of important operating and maintenance (servicing) instructions in the literature accompanying the appliance. CFD-ZW755 Serial No 2 Introduction Information For customers in...
... voltage" within the product's enclosure that any changes or modifications not expressly approved in this manual could void your Sony dealer regarding this equipment. Model No. Warning To prevent fire or shock hazard, do not expose the player to the presence of important operating and maintenance (servicing) instructions in the literature accompanying the appliance. CFD-ZW755 Serial No 2 Introduction Information For customers in...
Operating Instructions
Page 3
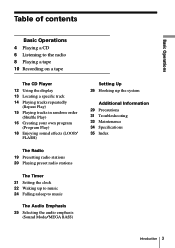
... of contents Basic Operations 4 Playing a CD 6 Listening to the radio 8 Playing a tape 10 Recording on a tape The CD Player 12 Using the display 13 Locating a specific track 14 Playing tracks repeatedly (Repeat Play) 15 Playing tracks in random order (Shuffle Play) 16 Creating your own program (Program Play) 18 Enjoying sound effects (LOOP/ FLASH) The Radio 19 Presetting radio stations 20 Playing preset radio stations The Timer 21 Setting the clock 22 Waking up to music 24 Falling asleep to music The Audio Emphasis 25 Selecting the audio emphasis (Sound Mode/MEGA BASS) Setting Up 26...
... of contents Basic Operations 4 Playing a CD 6 Listening to the radio 8 Playing a tape 10 Recording on a tape The CD Player 12 Using the display 13 Locating a specific track 14 Playing tracks repeatedly (Repeat Play) 15 Playing tracks in random order (Shuffle Play) 16 Creating your own program (Program Play) 18 Enjoying sound effects (LOOP/ FLASH) The Radio 19 Presetting radio stations 20 Playing preset radio stations The Timer 21 Setting the clock 22 Waking up to music 24 Falling asleep to music The Audio Emphasis 25 Selecting the audio emphasis (Sound Mode/MEGA BASS) Setting Up 26...
Operating Instructions
Page 5
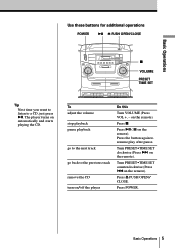
... starts playing the CD. Press the button again to a CD, just press ^. Turn PRESET•TIME SET counterclockwise (Press =on the remote). on the remote). Press POWER. Basic Operations Use these buttons for additional operations POWER ^ 6 PUSH OPEN/CLOSE p VOLUME PRESET TIME SET Tip Next time you want to listen to resume play after pause. Turn PRESET•TIME SET clockwise (Press + on /off the player Do this Turn VOLUME (Press VOL +, - Basic Operations 5 Press 6 PUSH OPEN/ CLOSE. To adjust the volume stop playback pause playback...
... starts playing the CD. Press the button again to a CD, just press ^. Turn PRESET•TIME SET counterclockwise (Press =on the remote). on the remote). Press POWER. Basic Operations Use these buttons for additional operations POWER ^ 6 PUSH OPEN/CLOSE p VOLUME PRESET TIME SET Tip Next time you want to listen to resume play after pause. Turn PRESET•TIME SET clockwise (Press + on /off the player Do this Turn VOLUME (Press VOL +, - Basic Operations 5 Press 6 PUSH OPEN/ CLOSE. To adjust the volume stop playback pause playback...

Operating Instructions
Page 6
... player automatically scans the radio frequencies and stops when it finds a clear station. Each time you cannot tune in to a station, press the button repeatedly to change in the display (direct power-on). If you press the button, the indication changes as follows: "FM1" n "FM2" n "AM". 2 Hold down TUNE + or - Listening to the radio 1 2 For hookup instructions, see pages 26 - 28. 1 Press RADIO BAND until the frequency digits begin to change...
... player automatically scans the radio frequencies and stops when it finds a clear station. Each time you cannot tune in to a station, press the button repeatedly to change in the display (direct power-on). If you press the button, the indication changes as follows: "FM1" n "FM2" n "AM". 2 Hold down TUNE + or - Listening to the radio 1 2 For hookup instructions, see pages 26 - 28. 1 Press RADIO BAND until the frequency digits begin to change...
Operating Instructions
Page 8
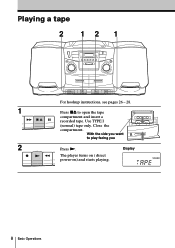
With the side you want to open the tape compartment and insert a recorded tape. Use TYPE I (normal) tape only. Close the compartment. Playing a tape 2 12 1 For hookup instructions, see pages 26 - 28. 1 Press p6 to play facing you 2 Press (. Display The player turns on ( direct power-on) and starts playing. 8 Basic Operations
With the side you want to open the tape compartment and insert a recorded tape. Use TYPE I (normal) tape only. Close the compartment. Playing a tape 2 12 1 For hookup instructions, see pages 26 - 28. 1 Press p6 to play facing you 2 Press (. Display The player turns on ( direct power-on) and starts playing. 8 Basic Operations
Operating Instructions
Page 10
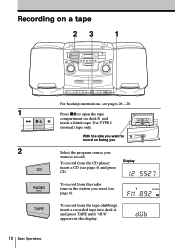
Use TYPE I (normal) tape only. With the side you want to record on facing you Select the program source you want to open the tape compartment on a tape 23 1 1 2 10 Basic Operations For hookup instructions, see page 4) and press CD. To record from the CD player: insert a CD (see pages 26 - 28. Display To record from the radio: tune in the display. Recording on deck B and insert a blank tape. To record from the tape (dubbing): insert a recorded tape into deck A and press TAPE until "dUb" appears in the station you want (see page 6). Press p6 to record.
Use TYPE I (normal) tape only. With the side you want to record on facing you Select the program source you want to open the tape compartment on a tape 23 1 1 2 10 Basic Operations For hookup instructions, see page 4) and press CD. To record from the CD player: insert a CD (see pages 26 - 28. Display To record from the radio: tune in the display. Recording on deck B and insert a blank tape. To record from the tape (dubbing): insert a recorded tape into deck A and press TAPE until "dUb" appears in the station you want (see page 6). Press p6 to record.
Operating Instructions
Page 11
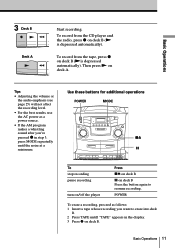
...; Adjusting the volume or the audio emphasis (see page 25) will not affect the recording level. • For the best results, use the AC power as follows: 1 Insert a tape whose recording you 've pressed r in the display. 3 Press r on deck B. POWER To erase a recording, proceed as a power source. • If the AM program makes a whistling sound after you want to resume recording. Basic Operations 11 To record from the tape...
...; Adjusting the volume or the audio emphasis (see page 25) will not affect the recording level. • For the best results, use the AC power as follows: 1 Insert a tape whose recording you 've pressed r in the display. 3 Press r on deck B. POWER To erase a recording, proceed as a power source. • If the AM program makes a whistling sound after you want to resume recording. Basic Operations 11 To record from the tape...
Operating Instructions
Page 13
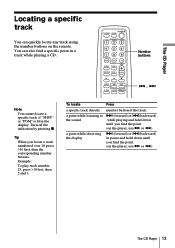
... the sound + (forward) or =(backward) while playing and hold down until you find the point. (on the player, use ) or 0.) The CD Player 13 Tip When you locate a track numbered over 10, press >10 first, then the corresponding number buttons. Turn off the indication by pressing p. Example: To play track number 23, press >10 first, then 2 and 3. To locate Press a specific track directly number button of the track. The CD Player Locating a specific track...
... the sound + (forward) or =(backward) while playing and hold down until you find the point. (on the player, use ) or 0.) The CD Player 13 Tip When you locate a track numbered over 10, press >10 first, then the corresponding number buttons. Turn off the indication by pressing p. Example: To play track number 23, press >10 first, then 2 and 3. To locate Press a specific track directly number button of the track. The CD Player Locating a specific track...
Operating Instructions
Page 14
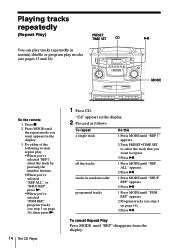
Playing tracks repeatedly (Repeat Play) PRESET TIME SET CD You can play tracks repeatedly in normal, shuffle or program play modes (see pages 15 and 16). ^ MODE On the remote 1 Press p. 2 Press MODE until the repeat mode you want appears in the display. 3 Do either of the following to start repeat play: •When you've selected "REP1", select the track by pressing the number buttons. •When you've selected "REP ALL", or "SHUF REP", press...
Playing tracks repeatedly (Repeat Play) PRESET TIME SET CD You can play tracks repeatedly in normal, shuffle or program play modes (see pages 15 and 16). ^ MODE On the remote 1 Press p. 2 Press MODE until the repeat mode you want appears in the display. 3 Do either of the following to start repeat play: •When you've selected "REP1", select the track by pressing the number buttons. •When you've selected "REP ALL", or "SHUF REP", press...

Operating Instructions
Page 19
The Radio 19 The frequency digits flash in the display and the station is stored into the player's memory. The new station replaces the old one. DSPL ENT MEM TUNE -, + PRESET TIME SET On the remote 1 Press BAND to select the band. 2 Set the frequency to the station you want. 3 Press and hold the number buttons that you want to preset the new station on for 2 seconds. 1 Press RADIO BAND until...
The Radio 19 The frequency digits flash in the display and the station is stored into the player's memory. The new station replaces the old one. DSPL ENT MEM TUNE -, + PRESET TIME SET On the remote 1 Press BAND to select the band. 2 Set the frequency to the station you want. 3 Press and hold the number buttons that you want to preset the new station on for 2 seconds. 1 Press RADIO BAND until...
Operating Instructions
Page 20
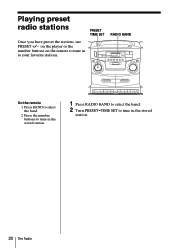
Playing preset radio stations PRESET TIME SET Once you have preset the stations, use PRESET +/- RADIO BAND On the remote 1 Press BAND to select the band. 2 Press the number buttons to tune in the stored station. 20 The Radio on the player or the number buttons on the remote to tune in to tune in the stored station. 1 Press RADIO BAND to select the band. 2 Turn PRESET•TIME SET to your favorite stations.
Playing preset radio stations PRESET TIME SET Once you have preset the stations, use PRESET +/- RADIO BAND On the remote 1 Press BAND to select the band. 2 Press the number buttons to tune in the stored station. 20 The Radio on the player or the number buttons on the remote to tune in to tune in the stored station. 1 Press RADIO BAND to select the band. 2 Turn PRESET•TIME SET to your favorite stations.
Operating Instructions
Page 24
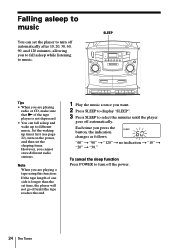
... the set time, the player will not go off until the player goes off automatically. SLEEP Tips • When you press the button, the indication changes as follows: "60" n "90" n "120" n no indication n "10" n "20" n "30." To cancel the sleep function Press POWER to turn off the power. 24 The Timer Set the waking up to different music. Note When you are playing radio or CD, make...
... the set time, the player will not go off until the player goes off automatically. SLEEP Tips • When you press the button, the indication changes as follows: "60" n "90" n "120" n no indication n "10" n "20" n "30." To cancel the sleep function Press POWER to turn off the power. 24 The Timer Set the waking up to different music. Note When you are playing radio or CD, make...
Operating Instructions
Page 27
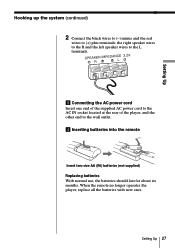
.... the right speaker wires to the R and the left speaker wires to the L terminals. 3 Connecting the AC power cord Insert one end of the supplied AC power cord to the AC IN socket located at the rear of the player, and the other end to (+) plus terminals; Setting Up 27 When the remote no longer operates the player, replace all the batteries with new...
.... the right speaker wires to the R and the left speaker wires to the L terminals. 3 Connecting the AC power cord Insert one end of the supplied AC power cord to the AC IN socket located at the rear of the player, and the other end to (+) plus terminals; Setting Up 27 When the remote no longer operates the player, replace all the batteries with new...
Operating Instructions
Page 28
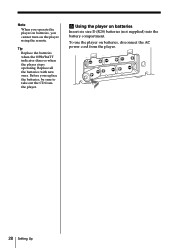
Replace all the batteries with new ones. To use the player on batteries Insert six size D (R20) batteries (not supplied) into the battery compartment. Before you cannot turn on the player using the remote. Tip Replace the batteries when the OPR/BATT indicator dims or when the player stops operating. Note When you operate the player on batteries, you replace the batteries, be sure to take out the CD from the player. 5 Using the player on batteries, disconnect the AC power cord from the player. 28 Setting Up
Replace all the batteries with new ones. To use the player on batteries Insert six size D (R20) batteries (not supplied) into the battery compartment. Before you cannot turn on the player using the remote. Tip Replace the batteries when the OPR/BATT indicator dims or when the player stops operating. Note When you operate the player on batteries, you replace the batteries, be sure to take out the CD from the player. 5 Using the player on batteries, disconnect the AC power cord from the player. 28 Setting Up
Operating Instructions
Page 29
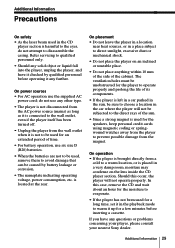
... not use the supplied AC power cord; If you have it checked by battery leakage or corrosion. • The nameplate indicating operating voltage, power consumption, etc. Additional Information 29 On operation • If the player is brought directly from the wall outlet when it is connected to the wall outlet, even if the player itself has been turned off. • Unplug the player from...
... not use the supplied AC power cord; If you have it checked by battery leakage or corrosion. • The nameplate indicating operating voltage, power consumption, etc. Additional Information 29 On operation • If the player is brought directly from the wall outlet when it is connected to the wall outlet, even if the player itself has been turned off. • Unplug the player from...
Operating Instructions
Page 31
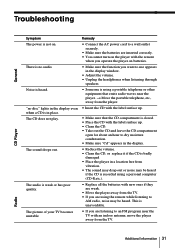
... audio. Troubleshooting General CD Player Symptom The power is not on batteries. • Make sure the function you want to dry moisture condensation. • Make sure "Cd" appears in the display. • Reduce the volume. • Clean the CD, or replace it if the CD is badly damaged • Place the player in the display window. • Adjust the volume. • Unplug the headphones when listening through speakers. • Someone is using a portable...
... audio. Troubleshooting General CD Player Symptom The power is not on batteries. • Make sure the function you want to dry moisture condensation. • Make sure "Cd" appears in the display. • Reduce the volume. • Clean the CD, or replace it if the CD is badly damaged • Place the player in the display window. • Adjust the volume. • Unplug the headphones when listening through speakers. • Someone is using a portable...
Operating Instructions
Page 32
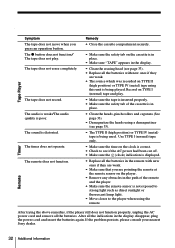
... record. The sound is poor. The timer does not operate. Use TYPE I (normal) tape and play . Timer After trying the above remedies, if the player still does not function properly, unplug the AC power cord and remove all the batteries in the display disappear, plug the power cord and insert the batteries again. If the problem persists, please consult your nearest Sony dealer. Remote 32 Additional Information The remote does not function. Tape Player Symptom The tape...
... record. The sound is poor. The timer does not operate. Use TYPE I (normal) tape and play . Timer After trying the above remedies, if the player still does not function properly, unplug the AC power cord and remove all the batteries in the display disappear, plug the power cord and insert the batteries again. If the problem persists, please consult your nearest Sony dealer. Remote 32 Additional Information The remote does not function. Tape Player Symptom The tape...
Operating Instructions
Page 34
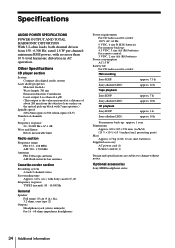
...) batteries Power consumption AC 15 W Battery life For CD radio cassette-corder: FM recording Sony R20P: approx. 7.5 h Sony alkaline LR20: Tape playback approx. 22 h Sony R20P: Sony alkaline LR20: CD playback Sony R20P: Sony alkaline LR20: approx. 7 h approx. 20 h approx. 3 h approx. 10 h For memory back-up: approx. 1 year Dimensions Approx. 650 × 265 × 256 mm (w/h/d) (25 5⁄8 × 10 1⁄2 × 10 1⁄8 inches) (incl. Other Specifications CD player section System Compact disc digital audio system Laser...
...) batteries Power consumption AC 15 W Battery life For CD radio cassette-corder: FM recording Sony R20P: approx. 7.5 h Sony alkaline LR20: Tape playback approx. 22 h Sony R20P: Sony alkaline LR20: CD playback Sony R20P: Sony alkaline LR20: approx. 7 h approx. 20 h approx. 3 h approx. 10 h For memory back-up: approx. 1 year Dimensions Approx. 650 × 265 × 256 mm (w/h/d) (25 5⁄8 × 10 1⁄2 × 10 1⁄8 inches) (incl. Other Specifications CD player section System Compact disc digital audio system Laser...
Operating Instructions
Page 35
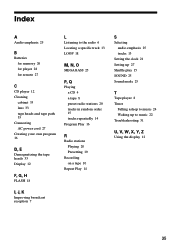
... 18 L Listening to the radio 6 Locating a specific track 13 LOOP 18 M, N, O MEGA BASS 25 P, Q Playing a CD 4 a tape 8 preset radio stations 20 tracks in random order 15 tracks repeatedly 14 Program Play 16 R Radio stations Playing 20 Presetting 19 Recording on a tape 10 Repeat Play 14 I, J, K Improving broadcast reception 7 S Selecting audio emphasis 25 tracks 13 Setting the clock 21 Setting up 27 Shuffle play 15 SOUND 25 Sound mode 25 T Tape player 8 Timer Falling asleep to music 24 Waking up to music 22 Troubleshooting 31 U, V, W, X, Y, Z Using the display 12 Additional Information 35
... 18 L Listening to the radio 6 Locating a specific track 13 LOOP 18 M, N, O MEGA BASS 25 P, Q Playing a CD 4 a tape 8 preset radio stations 20 tracks in random order 15 tracks repeatedly 14 Program Play 16 R Radio stations Playing 20 Presetting 19 Recording on a tape 10 Repeat Play 14 I, J, K Improving broadcast reception 7 S Selecting audio emphasis 25 tracks 13 Setting the clock 21 Setting up 27 Shuffle play 15 SOUND 25 Sound mode 25 T Tape player 8 Timer Falling asleep to music 24 Waking up to music 22 Troubleshooting 31 U, V, W, X, Y, Z Using the display 12 Additional Information 35


