
Limited Warranty (US Only)
Page 1
... questions: To locate the servicer or dealer nearest you . This warranty gives you specific legal rights, and you may not apply to you must pay for a period of one (1) year from your convenience, Sony Electronics Inc. 4-557-172-02 General Stereo/Hifi Components/Tape Decks ® CD Players/Mini Disc Players/Audio Systems Hifi Audio LIMITED WARRANTY Sony Electronics Inc. ("Sony") warrants this Product...
... questions: To locate the servicer or dealer nearest you . This warranty gives you specific legal rights, and you may not apply to you must pay for a period of one (1) year from your convenience, Sony Electronics Inc. 4-557-172-02 General Stereo/Hifi Components/Tape Decks ® CD Players/Mini Disc Players/Audio Systems Hifi Audio LIMITED WARRANTY Sony Electronics Inc. ("Sony") warrants this Product...
Operating Instructions (primary manual)
Page 1
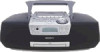
3-864-534-51(1) CD Radio Cassette-Corder Operating Instructions CFD-S47 ©1998 by Sony Corporation
3-864-534-51(1) CD Radio Cassette-Corder Operating Instructions CFD-S47 ©1998 by Sony Corporation
Operating Instructions (primary manual)
Page 2
... the battery compartment. Record the serial number in cabinet. This equipment generates, uses and can be of sufficient magnitude to persons. However, there is located in a particular installation. Owner's Record The model number is located at the bottom and the serial number is no guarantee that to Part 15 of optical instruments with the instructions, may be determined by one or more of plug to radio communications. CFD-S47 Serial...
... the battery compartment. Record the serial number in cabinet. This equipment generates, uses and can be of sufficient magnitude to persons. However, there is located in a particular installation. Owner's Record The model number is located at the bottom and the serial number is no guarantee that to Part 15 of optical instruments with the instructions, may be determined by one or more of plug to radio communications. CFD-S47 Serial...
Operating Instructions (primary manual)
Page 3
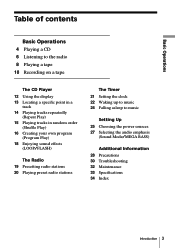
... Operations 4 Playing a CD 6 Listening to the radio 8 Playing a tape 10 Recording on a tape The CD Player 12 Using the display 13 Locating a specific point in a track 14 Playing tracks repeatedly (Repeat Play) 15 Playing tracks in random order (Shuffle Play) 16 Creating your own program (Program Play) 18 Enjoying sound effects (LOOP/FLASH) The Radio 19 Presetting radio stations 20 Playing preset radio stations The Timer 21 Setting the clock 22 Waking up to music 24 Falling asleep to music Setting Up 25 Choosing the power sources 27 Selecting the audio emphasis (Sound Mode/MEGA BASS...
... Operations 4 Playing a CD 6 Listening to the radio 8 Playing a tape 10 Recording on a tape The CD Player 12 Using the display 13 Locating a specific point in a track 14 Playing tracks repeatedly (Repeat Play) 15 Playing tracks in random order (Shuffle Play) 16 Creating your own program (Program Play) 18 Enjoying sound effects (LOOP/FLASH) The Radio 19 Presetting radio stations 20 Playing preset radio stations The Timer 21 Setting the clock 22 Waking up to music 24 Falling asleep to music Setting Up 25 Choosing the power sources 27 Selecting the audio emphasis (Sound Mode/MEGA BASS...
Operating Instructions (primary manual)
Page 4
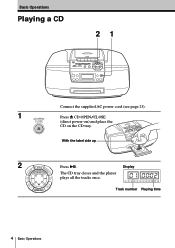
BAND PRE PRES OL + SET + VOL TUNE - - TUNE + V Press ^. The CD tray closes and the player plays all the tracks once. Basic Operations Playing a CD 21 1 CD OPEN/ CLOSE Connect the supplied AC power cord (see page 25). Press 6 CD OPEN/CLOSE (direct power-on) and place the CD on the CD tray. With the label side up 2 ET - Display Track number Playing time 4 Basic Operations
BAND PRE PRES OL + SET + VOL TUNE - - TUNE + V Press ^. The CD tray closes and the player plays all the tracks once. Basic Operations Playing a CD 21 1 CD OPEN/ CLOSE Connect the supplied AC power cord (see page 25). Press 6 CD OPEN/CLOSE (direct power-on) and place the CD on the CD tray. With the label side up 2 ET - Display Track number Playing time 4 Basic Operations
Operating Instructions (primary manual)
Page 5
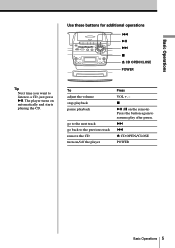
Basic Operations Use these buttons for additional operations = ^ + p 6 CD OPEN/CLOSE POWER Tip Next time you want to listen to resume play after pause. + = 6 CD OPEN/CLOSE POWER Basic Operations 5 p ^ (P on /off the player Press VOL +, - To adjust the volume stop playback pause playback go to the next track go back to the previous track remove the CD turn on the remote) Press the button again to a CD, just press ^. The player turns on automatically and starts playing the CD.
Basic Operations Use these buttons for additional operations = ^ + p 6 CD OPEN/CLOSE POWER Tip Next time you want to listen to resume play after pause. + = 6 CD OPEN/CLOSE POWER Basic Operations 5 p ^ (P on /off the player Press VOL +, - To adjust the volume stop playback pause playback go to the next track go back to the previous track remove the CD turn on the remote) Press the button again to a CD, just press ^. The player turns on automatically and starts playing the CD.
Operating Instructions (primary manual)
Page 6
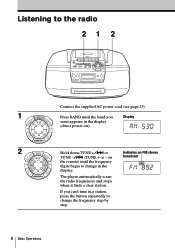
...'t tune in a station, press the button repeatedly to change in the display (direct power-on). If you want appears in the display. TUNE + V Hold down TUNE +/+ or TUNE -/= (TUNE + or - Press BAND until the frequency digits begin to the radio 212 1 ET - Listening to change the frequency step by step. BAND PRE PRES OL + SET + VOL TUNE - - The player automatically scans the radio frequencies and stops when it finds a clear station. TUNE + V Connect the supplied AC power cord...
...'t tune in a station, press the button repeatedly to change in the display (direct power-on). If you want appears in the display. TUNE + V Hold down TUNE +/+ or TUNE -/= (TUNE + or - Press BAND until the frequency digits begin to the radio 212 1 ET - Listening to change the frequency step by step. BAND PRE PRES OL + SET + VOL TUNE - - The player automatically scans the radio frequencies and stops when it finds a clear station. TUNE + V Connect the supplied AC power cord...
Operating Instructions (primary manual)
Page 7
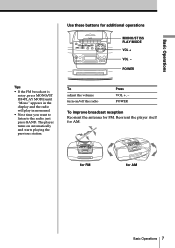
... antenna for additional operations MONO/ST ISS PLAY MODE VOL + VOL - The player turns on /off the radio Press VOL +, - To adjust the volume turn on automatically and starts playing the previous station. Basic Operations Use these buttons for FM. POWER Tips • If the FM broadcast is noisy, press MONO/ST ISS•PLAY MODE until "Mono" appears in the display and the radio will play in monaural. • Next time...
... antenna for additional operations MONO/ST ISS PLAY MODE VOL + VOL - The player turns on /off the radio Press VOL +, - To adjust the volume turn on automatically and starts playing the previous station. Basic Operations Use these buttons for FM. POWER Tips • If the FM broadcast is noisy, press MONO/ST ISS•PLAY MODE until "Mono" appears in the display and the radio will play in monaural. • Next time...
Operating Instructions (primary manual)
Page 8
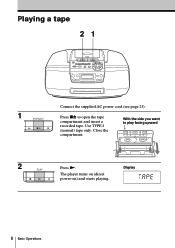
The player turns on (direct power-on) and starts playing. Close the compartment. Use TYPE I (normal) tape only. Display 8 Basic Operations Press p6 to play facing upward 2 PLAY Press (. With the side you want to open the tape compartment and insert a recorded tape. Playing a tape 21 1 STOP/EJECT Connect the supplied AC power cord (see page 25).
The player turns on (direct power-on) and starts playing. Close the compartment. Use TYPE I (normal) tape only. Display 8 Basic Operations Press p6 to play facing upward 2 PLAY Press (. With the side you want to open the tape compartment and insert a recorded tape. Playing a tape 21 1 STOP/EJECT Connect the supplied AC power cord (see page 25).
Operating Instructions (primary manual)
Page 10
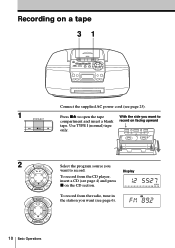
... to record. TUNE + V ET - TUNE + V Select the program source you want to open the tape compartment and insert a blank tape. Display To record from the CD player, insert a CD (see page 4) and press p on the CD section. Use TYPE I (normal) tape only. BAND PRE PRES OL + SET + VOL TUNE - - BAND PRE PRES OL + SET + VOL TUNE - - Recording on a tape 31 1 STOP/EJECT Connect the supplied AC power cord (see page 6). 10 Basic Operations To record from the radio, tune in the station you want...
... to record. TUNE + V ET - TUNE + V Select the program source you want to open the tape compartment and insert a blank tape. Display To record from the CD player, insert a CD (see page 4) and press p on the CD section. Use TYPE I (normal) tape only. BAND PRE PRES OL + SET + VOL TUNE - - BAND PRE PRES OL + SET + VOL TUNE - - Recording on a tape 31 1 STOP/EJECT Connect the supplied AC power cord (see page 6). 10 Basic Operations To record from the radio, tune in the station you want...
Operating Instructions (primary manual)
Page 11
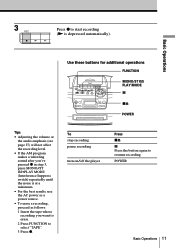
... "TAPE". 3 Press r. Basic Operations Use these buttons for additional operations FUNCTION MONO/ST ISS PLAY MODE P p6 POWER Tips • Adjusting the volume or the audio emphasis (see page 27) will not affect the recording level. • If the AM program makes a whistling sound after you've pressed r in step 3, press MONO/ST ISS•PLAY MODE (Interference Suppress switch) repeatedly until the noise is at a minimum. • For the best...
... "TAPE". 3 Press r. Basic Operations Use these buttons for additional operations FUNCTION MONO/ST ISS PLAY MODE P p6 POWER Tips • Adjusting the volume or the audio emphasis (see page 27) will not affect the recording level. • If the AM program makes a whistling sound after you've pressed r in step 3, press MONO/ST ISS•PLAY MODE (Interference Suppress switch) repeatedly until the noise is at a minimum. • For the best...
Operating Instructions (primary manual)
Page 14
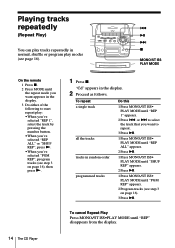
... from the display. "Cd" appears in the display. 2 Proceed as follows. Playing tracks repeatedly (Repeat Play) You can play tracks repeatedly in normal, shuffle or program play modes (see page 16). = ^ + p MONO/ST ISS PLAY MODE On the remote 1 Press p. 2 Press MODE until the repeat mode you want appears in the display. 3 Do either of the following to start repeat play: •When you've selected "REP 1", select the track by pressing the number button. •...
... from the display. "Cd" appears in the display. 2 Proceed as follows. Playing tracks repeatedly (Repeat Play) You can play tracks repeatedly in normal, shuffle or program play modes (see page 16). = ^ + p MONO/ST ISS PLAY MODE On the remote 1 Press p. 2 Press MODE until the repeat mode you want appears in the display. 3 Do either of the following to start repeat play: •When you've selected "REP 1", select the track by pressing the number button. •...
Operating Instructions (primary manual)
Page 19
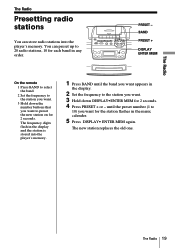
... in the display. 2 Set the frequency to the station you want . 3 Hold down the number buttons that you want to preset the new station on for the station flashes in any order. The new station replaces the old one. The frequency digits flash in the display and the station is stored into the player's memory. You can store radio stations into the player's memory. 1 Press BAND until the preset number (1 to...
... in the display. 2 Set the frequency to the station you want . 3 Hold down the number buttons that you want to preset the new station on for the station flashes in any order. The new station replaces the old one. The frequency digits flash in the display and the station is stored into the player's memory. You can store radio stations into the player's memory. 1 Press BAND until the preset number (1 to...
Operating Instructions (primary manual)
Page 24
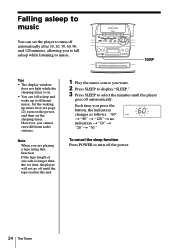
...), turn on the power, and then set the player to turn off automatically. Note When you are playing a tape using this function: If the tape length of one side is on. • You can set the sleeping timer. Each time you to select the minutes until the tape reaches the end. 1 Play the music source you cannot store different radio stations. Set the waking up to turn off until the player...
...), turn on the power, and then set the player to turn off automatically. Note When you are playing a tape using this function: If the tape length of one side is on. • You can set the sleeping timer. Each time you to select the minutes until the tape reaches the end. 1 Play the music source you cannot store different radio stations. Set the waking up to turn off until the player...
Operating Instructions (primary manual)
Page 26
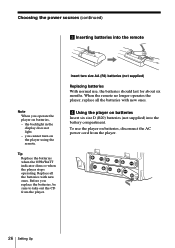
... the player using the remote. To use , the batteries should last for about six months. Replace all the batteries with new ones. Choosing the power sources (continued) 3 Inserting batteries into the battery compartment. Before you operate the player on batteries, disconnect the AC power cord from the player. Insert two size AA (R6) batteries (not supplied) Replacing batteries With normal use the player on batteries, - the backlight in the display does not light. - Tip Replace the batteries...
... the player using the remote. To use , the batteries should last for about six months. Replace all the batteries with new ones. Choosing the power sources (continued) 3 Inserting batteries into the battery compartment. Before you operate the player on batteries, disconnect the AC power cord from the player. Insert two size AA (R6) batteries (not supplied) Replacing batteries With normal use the player on batteries, - the backlight in the display does not light. - Tip Replace the batteries...
Operating Instructions (primary manual)
Page 28
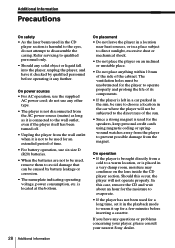
... CD and wait about an hour for the moisture to evaporate. • If the player has not been used for a long time, set it in the playback mode to warm it is not to be subjected to the direct rays of time. • For battery operation, use the supplied AC power cord; If you have it checked by battery leakage or corrosion. • The nameplate indicating operating voltage, power...
... CD and wait about an hour for the moisture to evaporate. • If the player has not been used for a long time, set it in the playback mode to warm it is not to be subjected to the direct rays of time. • For battery operation, use the supplied AC power cord; If you have it checked by battery leakage or corrosion. • The nameplate indicating operating voltage, power...
Operating Instructions (primary manual)
Page 30
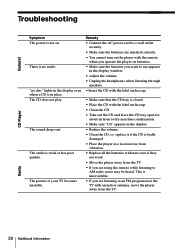
... you operate the player on . Radio 30 Additional Information The sound drops out. This is badly damaged • Place the player in place. Troubleshooting General CD Player Symptom The power is weak or has poor quality. "no audio. The audio is not on batteries. • Make sure the function you want to use appears in the display window. • Adjust the volume. • Unplug the headphones when listening through speakers...
... you operate the player on . Radio 30 Additional Information The sound drops out. This is badly damaged • Place the player in place. Troubleshooting General CD Player Symptom The power is weak or has poor quality. "no audio. The audio is not on batteries. • Make sure the function you want to use appears in the display window. • Adjust the volume. • Unplug the headphones when listening through speakers...
Operating Instructions (primary manual)
Page 31
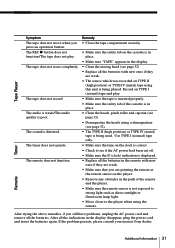
... strong light such as direct sunlight or fluorescent lamp light. • Move closer to see page 32) • Replace all the indications in the display disappear, plug the power cord and insert the batteries again. Record on TYPE I (normal) tape only. • Make sure the time on the clock is correct. • Check to the player when using the remote. The tape does not erase completely. Tape Player Symptom The tape does...
... strong light such as direct sunlight or fluorescent lamp light. • Move closer to see page 32) • Replace all the indications in the display disappear, plug the power cord and insert the batteries again. Record on TYPE I (normal) tape only. • Make sure the time on the clock is correct. • Check to the player when using the remote. The tape does not erase completely. Tape Player Symptom The tape does...
Operating Instructions (primary manual)
Page 33
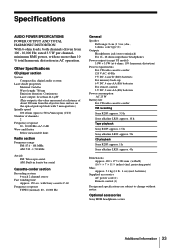
... (R6) batteries For remote control: 3 V DC, 2 size AA (R6) batteries Power consumption AC 25 W Battery life For CD radio cassette-corder: FM recording Sony R20P: approx. 3.5 h Sony alkaline LR20: approx. 10 h Tape playback Sony R20P: approx. 1.5 h Sony alkaline LR20: approx. 5 h CD playback Sony R20P: approx. 1 h Sony alkaline LR20: approx. 4 h Dimensions Approx. 420 × 177 × 281 mm (w/h/d) (16 5⁄8 × 7 × 11 1⁄8 inches) (incl. Other Specifications CD player section System Compact disc digital audio system Laser diode properties...
... (R6) batteries For remote control: 3 V DC, 2 size AA (R6) batteries Power consumption AC 25 W Battery life For CD radio cassette-corder: FM recording Sony R20P: approx. 3.5 h Sony alkaline LR20: approx. 10 h Tape playback Sony R20P: approx. 1.5 h Sony alkaline LR20: approx. 5 h CD playback Sony R20P: approx. 1 h Sony alkaline LR20: approx. 4 h Dimensions Approx. 420 × 177 × 281 mm (w/h/d) (16 5⁄8 × 7 × 11 1⁄8 inches) (incl. Other Specifications CD player section System Compact disc digital audio system Laser diode properties...
Operating Instructions (primary manual)
Page 34
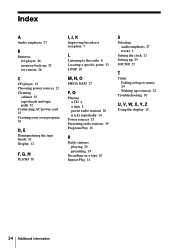
...Demagnetizing the tape heads 32 Display 12 F, G, H FLASH 18 I, J, K Improving broadcast reception 7 L Listening to the radio 6 Locating a specific point 13 LOOP 18 M, N, O MEGA BASS 27 P, Q Playing a CD 4 a tape 8 preset radio stations 20 tracks repeatedly 14 Power sources 25 Presetting radio stations 19 Program Play 16 R Radio stations playing 20 presetting 19 Recording on a tape 10 Repeat Play 14 S Selecting audio emphasis 27 tracks 5 Setting the clock 21 Setting up 25 SOUND 27 T Timer Falling asleep to music 24 Waking up to music 22 Troubleshooting 30 U, V, W, X, Y, Z Using the display 12...
...Demagnetizing the tape heads 32 Display 12 F, G, H FLASH 18 I, J, K Improving broadcast reception 7 L Listening to the radio 6 Locating a specific point 13 LOOP 18 M, N, O MEGA BASS 27 P, Q Playing a CD 4 a tape 8 preset radio stations 20 tracks repeatedly 14 Power sources 25 Presetting radio stations 19 Program Play 16 R Radio stations playing 20 presetting 19 Recording on a tape 10 Repeat Play 14 S Selecting audio emphasis 27 tracks 5 Setting the clock 21 Setting up 25 SOUND 27 T Timer Falling asleep to music 24 Waking up to music 22 Troubleshooting 30 U, V, W, X, Y, Z Using the display 12...


