Warranty Card
Page 1
... into a service contract with the Sony Partnership within the Warranty period must be defective, Sony will supply, at your expense. In addition, if you must take the Product, or deliver the Product freight prepaid, in exchange for defective parts for all labor charges. 2. 4-557-147-22 Tape Cassette Player/Recorder/CD Player/Mini Disc ® DAT/Radio/Head Phone/Speaker/MIC/Personals Portable Audio LIMITED WARRANTY Sony Electronics Inc. ("Sony") warrants...
... into a service contract with the Sony Partnership within the Warranty period must be defective, Sony will supply, at your expense. In addition, if you must take the Product, or deliver the Product freight prepaid, in exchange for defective parts for all labor charges. 2. 4-557-147-22 Tape Cassette Player/Recorder/CD Player/Mini Disc ® DAT/Radio/Head Phone/Speaker/MIC/Personals Portable Audio LIMITED WARRANTY Sony Electronics Inc. ("Sony") warrants...
Operating Instructions (primary manual)
Page 1
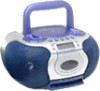
3-867-446-12 (1) CD Radio Cassette-Corder Operating Instructions CFD-E55 ©1999 by Sony Corporation
3-867-446-12 (1) CD Radio Cassette-Corder Operating Instructions CFD-E55 ©1999 by Sony Corporation
Operating Instructions (primary manual)
Page 2
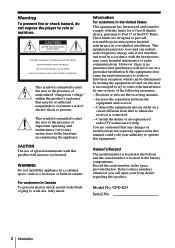
... in this manual could void your authority to these numbers whenever you call upon your Sony dealer regarding this equipment. Refer to operate this product. WARNING Do not install the appliance in a confined space, such as a bookcase or built-in the battery compartment. These limits are cautioned that to Part 15 of important operating and maintenance (servicing) instructions in the...
... in this manual could void your authority to these numbers whenever you call upon your Sony dealer regarding this equipment. Refer to operate this product. WARNING Do not install the appliance in a confined space, such as a bookcase or built-in the battery compartment. These limits are cautioned that to Part 15 of important operating and maintenance (servicing) instructions in the...

Operating Instructions (primary manual)
Page 3
... radio 8 Playing a tape 10 Recording on a tape The CD Player 12 Using the display 13 Locating a specific point in a track 14 Playing tracks repeatedly (Repeat Play) 15 Playing tracks in random order (Shuffle Play) 16 Creating your own program (Program Play) The Radio 18 Presetting radio stations 19 Playing preset radio stations The Timer 20 Setting the clock 21 Waking up to music 23 Falling asleep to music 24 Using the countdown timer Setting Up 26 Choosing the power sources 28 Selecting the audio emphasis (SOUND/MEGA BASS) Additional Information 29 Precautions 31 Troubleshooting...
... radio 8 Playing a tape 10 Recording on a tape The CD Player 12 Using the display 13 Locating a specific point in a track 14 Playing tracks repeatedly (Repeat Play) 15 Playing tracks in random order (Shuffle Play) 16 Creating your own program (Program Play) The Radio 18 Presetting radio stations 19 Playing preset radio stations The Timer 20 Setting the clock 21 Waking up to music 23 Falling asleep to music 24 Using the countdown timer Setting Up 26 Choosing the power sources 28 Selecting the audio emphasis (SOUND/MEGA BASS) Additional Information 29 Precautions 31 Troubleshooting...
Operating Instructions (primary manual)
Page 4
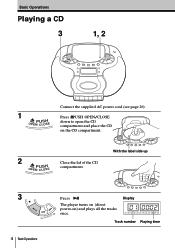
With the label side up 3 Press u. Press ZPUSH OPEN/CLOSE down to open the CD compartment and place the CD on ) and plays all the tracks once. Basic Operations Playing a CD 3 1, 2 1 Z OPENP/ UCLSOHSE Connect the supplied AC power cord (see page 26). Track number Playing time 4 BasicOperations Display TUNE TIME SET The player turns on (direct power-on the CD compartment. 2 Z OPENP/ UCLSOHSE Close the lid of the CD compartment.
With the label side up 3 Press u. Press ZPUSH OPEN/CLOSE down to open the CD compartment and place the CD on ) and plays all the tracks once. Basic Operations Playing a CD 3 1, 2 1 Z OPENP/ UCLSOHSE Connect the supplied AC power cord (see page 26). Track number Playing time 4 BasicOperations Display TUNE TIME SET The player turns on (direct power-on the CD compartment. 2 Z OPENP/ UCLSOHSE Close the lid of the CD compartment.
Operating Instructions (primary manual)
Page 6
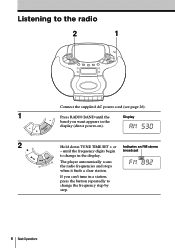
until the band you can't tune in the display. Press RADIO BAND until the frequency digits begin to change in a station, press the button repeatedly to the radio 2 1 1 VOL 2 RABDANI D O TUNE TIME SET Connect the supplied AC power cord (see page 26). If you want appears in the display (direct power-on). Indicates an FM stereo broadcast 6 BasicOperations Listening to change the frequency step by step. Display Hold down TUNE TIME SET + or - The player automatically scans the radio frequencies and stops when it finds a clear station.
until the band you can't tune in the display. Press RADIO BAND until the frequency digits begin to change in a station, press the button repeatedly to the radio 2 1 1 VOL 2 RABDANI D O TUNE TIME SET Connect the supplied AC power cord (see page 26). If you want appears in the display (direct power-on). Indicates an FM stereo broadcast 6 BasicOperations Listening to change the frequency step by step. Display Hold down TUNE TIME SET + or - The player automatically scans the radio frequencies and stops when it finds a clear station.
Operating Instructions (primary manual)
Page 7
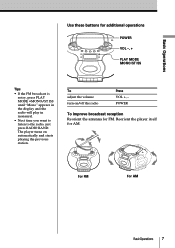
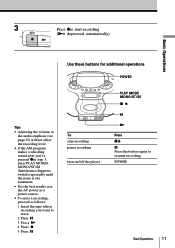
... Operations Use these buttons for FM. The player turns on /off the radio Press VOL +, - To adjust the volume turn on automatically and starts playing the previous station. POWER To improve broadcast reception Reorient the antenna for additional operations POWER VOL -, + PLAY MODE MONO/ST ISS Tips • If the FM broadcast is noisy, press PLAY MODE •MONO/ST ISS until "Mono" appears in the display and the radio will play...
... Operations Use these buttons for FM. The player turns on /off the radio Press VOL +, - To adjust the volume turn on automatically and starts playing the previous station. POWER To improve broadcast reception Reorient the antenna for additional operations POWER VOL -, + PLAY MODE MONO/ST ISS Tips • If the FM broadcast is noisy, press PLAY MODE •MONO/ST ISS until "Mono" appears in the display and the radio will play...

Operating Instructions (primary manual)
Page 8
Press xZto open the tape compartment and insert a recorded tape. The player turns on (direct power-on) and starts playing. Close the compartment. 2 PLAY With the side you want to play facing you Press N. Display 8 BasicOperations Playing a tape 21 1 STOP/EJECT Connect the supplied AC power cord (see page 26). Use TYPE I (normal) tape only.
Press xZto open the tape compartment and insert a recorded tape. The player turns on (direct power-on) and starts playing. Close the compartment. 2 PLAY With the side you want to play facing you Press N. Display 8 BasicOperations Playing a tape 21 1 STOP/EJECT Connect the supplied AC power cord (see page 26). Use TYPE I (normal) tape only.
Operating Instructions (primary manual)
Page 10
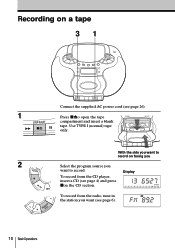
Press xZto open the tape compartment and insert a blank tape. To record from the radio, tune in the station you want (see page 6). 10 BasicOperations Use TYPE I (normal) tape only. 2 POOWPRE/BRATT O RABDANI D VOL With the side you want to record. Display To record from the CD player, insert a CD (see page 4) and press xon the CD section. Recording on facing you Select the program source you want to record on a tape 31 1 STOP/EJECT Connect the supplied AC power cord (see page 26).
Press xZto open the tape compartment and insert a blank tape. To record from the radio, tune in the station you want (see page 6). 10 BasicOperations Use TYPE I (normal) tape only. 2 POOWPRE/BRATT O RABDANI D VOL With the side you want to record. Display To record from the CD player, insert a CD (see page 4) and press xon the CD section. Recording on facing you Select the program source you want to record on a tape 31 1 STOP/EJECT Connect the supplied AC power cord (see page 26).
Operating Instructions (primary manual)
Page 11
...). Basic Operations Use these buttons for additional operations POWER Tips • Adjusting the volume or the audio emphasis (see page 27) will not affect the recording level. • If the AM program makes a whistling sound after you've pressed zin step 3, press PLAY MODE• MONO/ST ISS (Interference Suppress switch) repeatedly until the noise is at a minimum. • For the best results, use the AC power as a power source...
...). Basic Operations Use these buttons for additional operations POWER Tips • Adjusting the volume or the audio emphasis (see page 27) will not affect the recording level. • If the AM program makes a whistling sound after you've pressed zin step 3, press PLAY MODE• MONO/ST ISS (Interference Suppress switch) repeatedly until the noise is at a minimum. • For the best results, use the AC power as a power source...

Operating Instructions (primary manual)
Page 14
...). Playing tracks repeatedly (Repeat Play) You can play tracks repeatedly in the display. 2 Proceed as follows. or > to select the track that you want to repeat. 3 Press u. 1 Press PLAY MODE• MONO/ST ISS until "REP ALL" appears. 2 Press u. 1 Press PLAY MODE• MONO/ST ISS until "SHUF REP" appears. 2 Press u. 1 Press PLAY MODE• MONO/ST ISS until "REP 1" appears. 2 Press . "Cd" appears in normal, shuffle or program play modes...
...). Playing tracks repeatedly (Repeat Play) You can play tracks repeatedly in the display. 2 Proceed as follows. or > to select the track that you want to repeat. 3 Press u. 1 Press PLAY MODE• MONO/ST ISS until "REP ALL" appears. 2 Press u. 1 Press PLAY MODE• MONO/ST ISS until "SHUF REP" appears. 2 Press u. 1 Press PLAY MODE• MONO/ST ISS until "REP 1" appears. 2 Press . "Cd" appears in normal, shuffle or program play modes...
Operating Instructions (primary manual)
Page 22
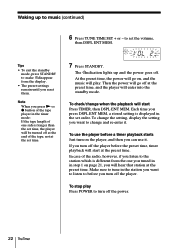
... up and the power goes off the player before the preset time, timer playback will start at the preset time. to music (continued) 6 Press TUNE TIME SET + or - At the preset time, the power will go off the power. 22 TheTimer Make sure to tune in the timer mode: If the tape length of the radio, however, if you turn off . Note When you press N or z button of the tape player in the station you want to...
... up and the power goes off the player before the preset time, timer playback will start at the preset time. to music (continued) 6 Press TUNE TIME SET + or - At the preset time, the power will go off the power. 22 TheTimer Make sure to tune in the timer mode: If the tape length of the radio, however, if you turn off . Note When you press N or z button of the tape player in the station you want to...
Operating Instructions (primary manual)
Page 23
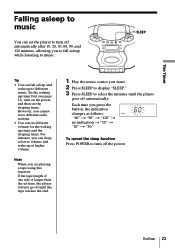
... time you press the button, the indication changes as follows: "60" t "90" t "120" t no indication t "10" t "20" t "30." However, you cannot store different radio stations. • You can set different volume for the waking up timer first (see page 21), turn off the power. Note When you are playing a tape using this function: If the tape length of one side is longer than the set time, the player...
... time you press the button, the indication changes as follows: "60" t "90" t "120" t no indication t "10" t "20" t "30." However, you cannot store different radio stations. • You can set different volume for the waking up timer first (see page 21), turn off the power. Note When you are playing a tape using this function: If the tape length of one side is longer than the set time, the player...
Operating Instructions (primary manual)
Page 26
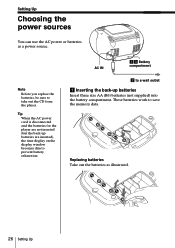
...-up batteries Insert three size AA (R6) batteries (not supplied) into the battery compartment. AC IN 13 Battery compartment 2 to prevent battery exhaustion. Note Before you replace the batteries, be sure to save the memory data. Setting Up Choosing the power sources You can use the AC power or batteries as illustrated. 26 Setting Up These batteries work to take out the CD from the player. Replacing batteries Take out the batteries as a power...
...-up batteries Insert three size AA (R6) batteries (not supplied) into the battery compartment. AC IN 13 Battery compartment 2 to prevent battery exhaustion. Note Before you replace the batteries, be sure to save the memory data. Setting Up Choosing the power sources You can use the AC power or batteries as illustrated. 26 Setting Up These batteries work to take out the CD from the player. Replacing batteries Take out the batteries as a power...

Operating Instructions (primary manual)
Page 27
... memory data, replace the batteries with new ones. To use , the back-up batteries when the time display dims or when you cannot operate the timer. Replacing batteries Replace the batteries when the OPR/BATT indicator dims or when the player stops operating. Replace all the batteries with new ones. With normal use the player on batteries, disconnect the AC power cord from the player. 2 Connecting the AC power cord Insert one end of the supplied...
... memory data, replace the batteries with new ones. To use , the back-up batteries when the time display dims or when you cannot operate the timer. Replacing batteries Replace the batteries when the OPR/BATT indicator dims or when the player stops operating. Replace all the batteries with new ones. With normal use the player on batteries, disconnect the AC power cord from the player. 2 Connecting the AC power cord Insert one end of the supplied...
Operating Instructions (primary manual)
Page 29
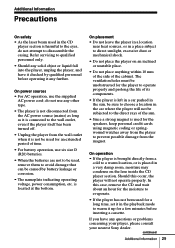
... time. • For battery operation, use the supplied AC power cord; Additional Information Precautions On safety • As the laser beam used , remove them to avoid damage that can be caused by qualified personnel before inserting a cassette. Should this case, remove the CD and wait about an hour for the moisture to evaporate. • If the player has not been used for the speakers...
... time. • For battery operation, use the supplied AC power cord; Additional Information Precautions On safety • As the laser beam used , remove them to avoid damage that can be caused by qualified personnel before inserting a cassette. Should this case, remove the CD and wait about an hour for the moisture to evaporate. • If the player has not been used for the speakers...
Operating Instructions (primary manual)
Page 31
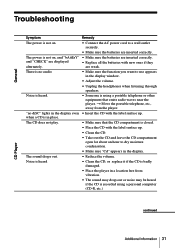
... the CD, or replace it if the CD is badly damaged. • Place the player in the display window. • Adjust the volume. • Unplug the headphones when listening through speakers. The CD does not play. • Make sure that emits radio waves near the player. The power is not on . • Connect the AC power cord to use appears in a location free from the player. "no audio. • Make sure the function...
... the CD, or replace it if the CD is badly damaged. • Place the player in the display window. • Adjust the volume. • Unplug the headphones when listening through speakers. The CD does not play. • Make sure that emits radio waves near the player. The power is not on . • Connect the AC power cord to use appears in a location free from the player. "no audio. • Make sure the function...
Operating Instructions (primary manual)
Page 32
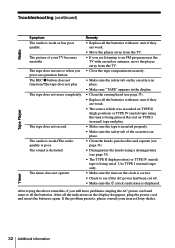
... Information The tape does not erase completely. The sound is weak or has poor quality. Timer After trying the above remedies, if you press an operation button. After all the indications in the display. • Clean the erasing head (see page 33). • Replace all the batteries. Troubleshooting (continued) Radio Tape Player Symptom The audio is distorted. Use TYPE I (normal) tape and play . If the problem persists, please...
... Information The tape does not erase completely. The sound is weak or has poor quality. Timer After trying the above remedies, if you press an operation button. After all the indications in the display. • Clean the erasing head (see page 33). • Replace all the batteries. Troubleshooting (continued) Radio Tape Player Symptom The audio is distorted. Use TYPE I (normal) tape and play . If the problem persists, please...
Operating Instructions (primary manual)
Page 34
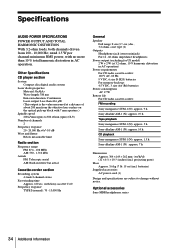
...) (incl. Other Specifications CD player section System Compact disc digital audio system Laser diode properties Material: GaAlAs Wave length: 780 nm Emission duration: Continuous Laser output: Less than 10 % total harmonic distortion in AC operation) Power requirements For CD radio cassette-corder: 120 V AC, 60 Hz 9 V DC, 6 size D (R20) batteries For memory back-up block with Sony cassette C-60 Frequency response TYPE I (normal): 70 - 13,000 Hz General Speaker Full range: 8 cm...
...) (incl. Other Specifications CD player section System Compact disc digital audio system Laser diode properties Material: GaAlAs Wave length: 780 nm Emission duration: Continuous Laser output: Less than 10 % total harmonic distortion in AC operation) Power requirements For CD radio cassette-corder: 120 V AC, 60 Hz 9 V DC, 6 size D (R20) batteries For memory back-up block with Sony cassette C-60 Frequency response TYPE I (normal): 70 - 13,000 Hz General Speaker Full range: 8 cm...
Operating Instructions (primary manual)
Page 35
... tape heads 33 Display 12 I, J, K Improving broadcast reception 7 L Listening to the radio 6 Locating a specific point 13 M, N, O MEGA BASS 28 P, Q Playing a CD 4 a tape 8 preset radio stations 19 tracks repeatedly 14 Power sources 26 Presetting radio stations 18 Program Play 16 R Radio stations playing 19 presetting 18 Recording on a tape 10 Repeat Play 14 S Selecting audio emphasis 28 tracks 5 Setting the clock 20 Setting up 25 Shufle Play 15 SOUND 28 T Timer Falling asleep to music 23 Waking up to music 21 Using the count down timer 24 Troubleshooting 31 U, V, W, X, Y, Z Using the display...
... tape heads 33 Display 12 I, J, K Improving broadcast reception 7 L Listening to the radio 6 Locating a specific point 13 M, N, O MEGA BASS 28 P, Q Playing a CD 4 a tape 8 preset radio stations 19 tracks repeatedly 14 Power sources 26 Presetting radio stations 18 Program Play 16 R Radio stations playing 19 presetting 18 Recording on a tape 10 Repeat Play 14 S Selecting audio emphasis 28 tracks 5 Setting the clock 20 Setting up 25 Shufle Play 15 SOUND 28 T Timer Falling asleep to music 23 Waking up to music 21 Using the count down timer 24 Troubleshooting 31 U, V, W, X, Y, Z Using the display...


