
Operating Instructions
Page 1
For installation and connections, see the supplied installation/connections manual. CDX-M9900 © 2004 Sony Corporation En ce qui concerne l'installation et les connexions, consulter le manuel d'installation/ raccordement fourni. Model No. 3-265-745-11 (1) FM/AM Compact Disc Player Operating Instructions US Mode d'emploi FR Owner's Record The model and serial numbers are located on the bottom of the unit. Record these numbers whenever you call upon your Sony dealer regarding this product. Refer to these numbers in the space provided below. CDX-M9900 Serial No.
For installation and connections, see the supplied installation/connections manual. CDX-M9900 © 2004 Sony Corporation En ce qui concerne l'installation et les connexions, consulter le manuel d'installation/ raccordement fourni. Model No. 3-265-745-11 (1) FM/AM Compact Disc Player Operating Instructions US Mode d'emploi FR Owner's Record The model and serial numbers are located on the bottom of the unit. Record these numbers whenever you call upon your Sony dealer regarding this product. Refer to these numbers in the space provided below. CDX-M9900 Serial No.

Operating Instructions
Page 2
... the disc. These limits are cautioned that to radio communications. Reorient or relocate the receiving antenna. - CAUTION The use the functions by generating even-order harmonics from that any changes or modifications not expressly approved in a particular installation. BBE MP works by mainly using the card remote commander. • Illustrations in a residential installation. FEATURING: • Video input terminal provided for viewing video images. • Store video images...
... the disc. These limits are cautioned that to radio communications. Reorient or relocate the receiving antenna. - CAUTION The use the functions by generating even-order harmonics from that any changes or modifications not expressly approved in a particular installation. BBE MP works by mainly using the card remote commander. • Illustrations in a residential installation. FEATURING: • Video input terminal provided for viewing video images. • Store video images...

Operating Instructions
Page 3
... - Clock 13 CD Player CD/MD Unit (optional) Playing a disc 14 Display items 15 Playing tracks repeatedly - Disc Memo 17 Locating a disc by name - BTM (Best Tuning Memory 19 Display items 19 Receiving the stored stations 20 Storing only desired stations 20 Storing station names - Station Memo 21 Tuning in random order - Skin 22 Setting the character color - Effect 24 Selecting a wallpaper - Auto Clear 27 Storing the images - Bass/Treble 31 Adjusting the front and rear volume - Disc List 18 * Functions available...
... - Clock 13 CD Player CD/MD Unit (optional) Playing a disc 14 Display items 15 Playing tracks repeatedly - Disc Memo 17 Locating a disc by name - BTM (Best Tuning Memory 19 Display items 19 Receiving the stored stations 20 Storing only desired stations 20 Storing station names - Station Memo 21 Tuning in random order - Skin 22 Setting the character color - Effect 24 Selecting a wallpaper - Auto Clear 27 Storing the images - Bass/Treble 31 Adjusting the front and rear volume - Disc List 18 * Functions available...

Operating Instructions
Page 4
Location of controls Card remote commander RM-X145A OPEN/CLOSE CAT REP SHUF 1 2 3 BBE MP PAUSE 4 5 6 SCREEN CAPTURE IMAGE MENU DISC + MODE SEEK- BACK SOURCE DISC - When selecting the item in the menus (DISC) (M) : to select upwards (SEEK) ( SEEK+ ENTER OFF + ATT VOL -
Location of controls Card remote commander RM-X145A OPEN/CLOSE CAT REP SHUF 1 2 3 BBE MP PAUSE 4 5 6 SCREEN CAPTURE IMAGE MENU DISC + MODE SEEK- BACK SOURCE DISC - When selecting the item in the menus (DISC) (M) : to select upwards (SEEK) ( SEEK+ ENTER OFF + ATT VOL -

Operating Instructions
Page 5
... the ignition switch After turning off and this causes battery drain. 5 i Reset button To reset the unit. When you connect a Sony portable device and CD/ MD unit(s) at the same time, use . *1 Available only when an optional Sony portable device is connected. f L (Left) dial To adjust the volume. Menu: To select an item. a SOURCE (Power on the card remote commander. Otherwise, the display does not turn off the unit/stop playback or radio reception. h Receptor To receive signals from...
... the ignition switch After turning off and this causes battery drain. 5 i Reset button To reset the unit. When you connect a Sony portable device and CD/ MD unit(s) at the same time, use . *1 Available only when an optional Sony portable device is connected. f L (Left) dial To adjust the volume. Menu: To select an item. a SOURCE (Power on the card remote commander. Otherwise, the display does not turn off the unit/stop playback or radio reception. h Receptor To receive signals from...

Operating Instructions
Page 6
... the car starts moving, the images coming from VIDEO IN turns off automatically when the parking brake is operating. • Do not use the Disc Memo feature while driving, or perform any questions or problems concerning your unit that are turned off before operating it. • Power antennas will not operate properly. Do not operate the unit or watch the display window while driving. To maintain high sound quality...
... the car starts moving, the images coming from VIDEO IN turns off automatically when the parking brake is operating. • Do not use the Disc Memo feature while driving, or perform any questions or problems concerning your unit that are turned off before operating it. • Power antennas will not operate properly. Do not operate the unit or watch the display window while driving. To maintain high sound quality...

Operating Instructions
Page 10
... 3, then press (MENU) to return to the CUSTOM button. Operation by the card remote commander: OPEN/CLOSE CAT MENU BACK REP SHUF 1 2 3 BBE MP PAUSE 4 5 6 SCREEN CAPTURE IMAGE MENU DISC + MODE SEEK- The main menu appears. 2 Rotate the R dial to the normal display. BACK SOURCE DISC - The display returns to select the desired menu item, then press (ENTER). Display - Settings for the system of the unit. Settings for display images. As...
... 3, then press (MENU) to return to the CUSTOM button. Operation by the card remote commander: OPEN/CLOSE CAT MENU BACK REP SHUF 1 2 3 BBE MP PAUSE 4 5 6 SCREEN CAPTURE IMAGE MENU DISC + MODE SEEK- The main menu appears. 2 Rotate the R dial to the normal display. BACK SOURCE DISC - The display returns to select the desired menu item, then press (ENTER). Display - Settings for the system of the unit. Settings for display images. As...
Operating Instructions
Page 12
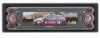
... signals are selectable depending on the display mode, and setting items in the menu differ depending on screen with color, size and movement of this unit is set to "PAL" or "NTSC" according to the video unit connected. Standard mode*1 Displays images and/or pre-stored visual effects with various information. Video images from -5 to the PAL and NTSC color system. Tip When AUX is selected as follows...
... signals are selectable depending on the display mode, and setting items in the menu differ depending on screen with color, size and movement of this unit is set to "PAL" or "NTSC" according to the video unit connected. Standard mode*1 Displays images and/or pre-stored visual effects with various information. Video images from -5 to the PAL and NTSC color system. Tip When AUX is selected as follows...
Operating Instructions
Page 20
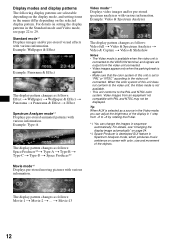
Preset search Press (1) to select the desired band. Radio reception of the desired band starts. Receive stored stations - Operation by the card remote commander: To Stop radio reception Press (OFF). Press M/m [until the desired station]. Search stations Press Receiving the stored stations 1 Press (SOURCE) repeatedly to select the radio. 2 Press (MODE) repeatedly to (6).
Preset search Press (1) to select the desired band. Radio reception of the desired band starts. Receive stored stations - Operation by the card remote commander: To Stop radio reception Press (OFF). Press M/m [until the desired station]. Search stations Press Receiving the stored stations 1 Press (SOURCE) repeatedly to select the radio. 2 Press (MODE) repeatedly to (6).

Operating Instructions
Page 23
... color changes as follows: White y Green y Pink y Yellow y Purple y Black y Custom y Blue y White 5 Press (MENU). Char Color You can select a character color to the normal display. 23 The display returns to select "YES," then press (ENTER). The confirmation display appears after adjusting "B," then press (ENTER). 6 Press < or , repeatedly to the normal display. Setting the character color - The RGB edit display appears. 5 Adjust the color levels. 1 Press M or m repeatedly to select...
... color changes as follows: White y Green y Pink y Yellow y Purple y Black y Custom y Blue y White 5 Press (MENU). Char Color You can select a character color to the normal display. 23 The display returns to select "YES," then press (ENTER). The confirmation display appears after adjusting "B," then press (ENTER). 6 Press < or , repeatedly to the normal display. Setting the character color - The RGB edit display appears. 5 Adjust the color levels. 1 Press M or m repeatedly to select...

Operating Instructions
Page 29
... and provides clear CD quality sound even from heavily compressed MP3 material. To cancel the BBE MP, select "BBE MP OFF." ATT Press (ATT) to the previous display. 5 Press (MENU). To restore the previous volume level, select "ATT OFF." Tip When the interface cable of a car telephone is available only when playing back on this unit (when playing back on this unit, press (MENU), then set as a start-up...
... and provides clear CD quality sound even from heavily compressed MP3 material. To cancel the BBE MP, select "BBE MP OFF." ATT Press (ATT) to the previous display. 5 Press (MENU). To restore the previous volume level, select "ATT OFF." Tip When the interface cable of a car telephone is available only when playing back on this unit (when playing back on this unit, press (MENU), then set as a start-up...
Operating Instructions
Page 32
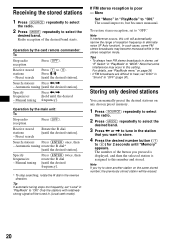
... the installed speaker system, you press < or ,, the frequency changes as follows: OFF y 78Hz y 125Hz 6 Press (MENU). Adjusting the front and rear volume - To adjust the balance between right and left speakers (Balance), and front and rear speakers (Fader). 1 Press (SOURCE) to select a source (radio, CD, MD or AUX). 2 Press (MENU). 3 Press < or , repeatedly to select "Sound," then press (ENTER). 4 Press < or , repeatedly to adjust the balance, then press (ENTER). 6 Press (MENU). Each time you can adjust the volume balance...
... the installed speaker system, you press < or ,, the frequency changes as follows: OFF y 78Hz y 125Hz 6 Press (MENU). Adjusting the front and rear volume - To adjust the balance between right and left speakers (Balance), and front and rear speakers (Fader). 1 Press (SOURCE) to select a source (radio, CD, MD or AUX). 2 Press (MENU). 3 Press < or , repeatedly to select "Sound," then press (ENTER). 4 Press < or , repeatedly to adjust the balance, then press (ENTER). 6 Press (MENU). Each time you can adjust the volume balance...

Operating Instructions
Page 33
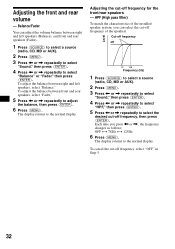
... connected subwoofer(s), you press < or ,, the frequency changes as follows: OFF y 125Hz y 78Hz 6 Press (MENU). Each time you can cut -off frequency, select "OFF" in 1 dB steps from -∞, -10 dB to adjust the volume level, then press (ENTER). The display returns to the normal display. Level Adjusting the cut out the unwanted high and middle frequency signals entering the subwoofer(s). Sub Woofer 1 Press (SOURCE) to select a source (radio, CD, MD or AUX). 2 Press (MENU...
... connected subwoofer(s), you press < or ,, the frequency changes as follows: OFF y 125Hz y 78Hz 6 Press (MENU). Each time you can cut -off frequency, select "OFF" in 1 dB steps from -∞, -10 dB to adjust the volume level, then press (ENTER). The display returns to the normal display. Level Adjusting the cut out the unwanted high and middle frequency signals entering the subwoofer(s). Sub Woofer 1 Press (SOURCE) to select a source (radio, CD, MD or AUX). 2 Press (MENU...
Operating Instructions
Page 34
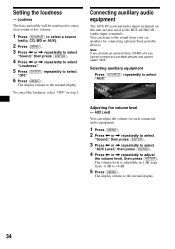
... display returns to +6 dB. 5 Press (MENU). To cancel the loudness, select "OFF" in 1 dB steps from your car speakers by connecting optional Sony portable devices. Adjusting the volume level - Note If you connect an optional Sony CD/MD unit, you cannot connect any portable devices and cannot select "AUX." Loudness The bass and treble will be reinforced to enjoy clear sound at low volume. 1 Press (SOURCE) to select a source (radio, CD, MD or AUX). 2 Press (MENU). 3 Press < or , repeatedly to select "Sound...
... display returns to +6 dB. 5 Press (MENU). To cancel the loudness, select "OFF" in 1 dB steps from your car speakers by connecting optional Sony portable devices. Adjusting the volume level - Note If you connect an optional Sony CD/MD unit, you cannot connect any portable devices and cannot select "AUX." Loudness The bass and treble will be reinforced to enjoy clear sound at low volume. 1 Press (SOURCE) to select a source (radio, CD, MD or AUX). 2 Press (MENU). 3 Press < or , repeatedly to select "Sound...

Operating Instructions
Page 35
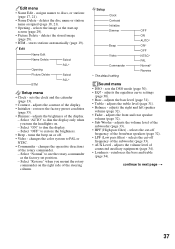
... turn off the unit while initializing. • Initialization takes time depending on the volume of the Video mode 1 Press (MENU). 2 Press < or , repeatedly to select "Setup," then press (ENTER). 3 Press < or , repeatedly to perform the function easily. Each time you press < or ,, the function changes as to select "Initialize," then press (ENTER). Setup (Contrast, Dimmer, Video, Commander), Edit (Name Edit, Name Delete, Picture Delete, Opening), Display (Skin, Char Color, Auto...
... turn off the unit while initializing. • Initialization takes time depending on the volume of the Video mode 1 Press (MENU). 2 Press < or , repeatedly to select "Setup," then press (ENTER). 3 Press < or , repeatedly to perform the function easily. Each time you press < or ,, the function changes as to select "Initialize," then press (ENTER). Setup (Contrast, Dimmer, Video, Commander), Edit (Name Edit, Name Delete, Picture Delete, Opening), Display (Skin, Char Color, Auto...
Operating Instructions
Page 37
... - adjusts the treble level (page 31). • Balance - adjusts the volume level of the rotary commander. - Select "AUTO" to use the rotary commander as the start-up screen (page 29). • Picture Delete - Select "ON" to next page t 37 changes the operative directions of connected auxiliary equipment (page 34). • Loudness - continue to dim the display. - sets the DSO mode (page 30). • EQ7 - adjusts the equalizer curve settings (page 30). • Bass - adjusts the...
... - adjusts the treble level (page 31). • Balance - adjusts the volume level of the rotary commander. - Select "AUTO" to use the rotary commander as the start-up screen (page 29). • Picture Delete - Select "ON" to next page t 37 changes the operative directions of connected auxiliary equipment (page 34). • Loudness - continue to dim the display. - sets the DSO mode (page 30). • EQ7 - adjusts the equalizer curve settings (page 30). • Bass - adjusts the...

Operating Instructions
Page 39
... the control to : - Find a station manually. By rotating the control SEEK/AMS control SEL MODE DSPL DSPL MODE SEL By pressing buttons (ATT) (MODE) (SOURCE) OFF (DSPL) Rotate the VOL control to adjust the volume. (OFF) Press To (SOURCE) Change the source (Radio/CD/MD*1)/Power on the ignition key switch, after turning off . (SEL)/(SOUND) (Not available) (DSPL) Select the display mode (This button works as the SCREEN button). By pushing in and rotating the control PRESET/DISC control Push in stations automatically. Receive preset stations. - Rotate...
... the control to : - Find a station manually. By rotating the control SEEK/AMS control SEL MODE DSPL DSPL MODE SEL By pressing buttons (ATT) (MODE) (SOURCE) OFF (DSPL) Rotate the VOL control to adjust the volume. (OFF) Press To (SOURCE) Change the source (Radio/CD/MD*1)/Power on the ignition key switch, after turning off . (SEL)/(SOUND) (Not available) (DSPL) Select the display mode (This button works as the SCREEN button). By pushing in and rotating the control PRESET/DISC control Push in stations automatically. Receive preset stations. - Rotate...

Operating Instructions
Page 42
... channel minimum continuous average power into 4 ohms, 4 channels driven from 20 Hz to 20 kHz with an RCA pin cord) RC-61 (1 m), RC-62 (2 m) CD changer (10 discs) CDX-757MX CD changer (6 discs) CDX-T69 MD changer (6 discs) MDX-66XLP XM satellite radio receiver XT-XM1 Mobile DVD Player DVX-11A Source selector XA-C30 AUX-IN selector XA-300 Note This unit cannot be connected to a digital preamplifier or an equalizer which is Sony BUS system compatible...
... channel minimum continuous average power into 4 ohms, 4 channels driven from 20 Hz to 20 kHz with an RCA pin cord) RC-61 (1 m), RC-62 (2 m) CD changer (10 discs) CDX-757MX CD changer (6 discs) CDX-T69 MD changer (6 discs) MDX-66XLP XM satellite radio receiver XT-XM1 Mobile DVD Player DVX-11A Source selector XA-C30 AUX-IN selector XA-300 Note This unit cannot be connected to a digital preamplifier or an equalizer which is Sony BUS system compatible...

Operating Instructions
Page 43
... to turn on the unit until the display appears. The sound skips from /does not appear in the ON, ACC, or OFF position. The following checklist will not display correctly. a disc recorded in the menu. No power is in the display window. The car does not have a relay box. General The operation buttons do not function. t Store again into the memory. • The power cord or battery...
... to turn on the unit until the display appears. The sound skips from /does not appear in the ON, ACC, or OFF position. The following checklist will not display correctly. a disc recorded in the menu. No power is in the display window. The car does not have a relay box. General The operation buttons do not function. t Store again into the memory. • The power cord or battery...

Operating Instructions
Page 44
... mode (page 20). Buttons and dials do not work while storing images. t Wait a moment until storing images is not applied. 44 The sound is in the menu. The number of images stored in the rear/side glass.) • Check the connection of the car antenna. • The auto antenna will not go up. t Set the color system to PAL or NTSC according to the connected video unit...
... mode (page 20). Buttons and dials do not work while storing images. t Wait a moment until storing images is not applied. 44 The sound is in the menu. The number of images stored in the rear/side glass.) • Check the connection of the car antenna. • The auto antenna will not go up. t Set the color system to PAL or NTSC according to the connected video unit...


